Table of Contents
Advertisement
Quick Links
MIL-4711H
Manageable Hub
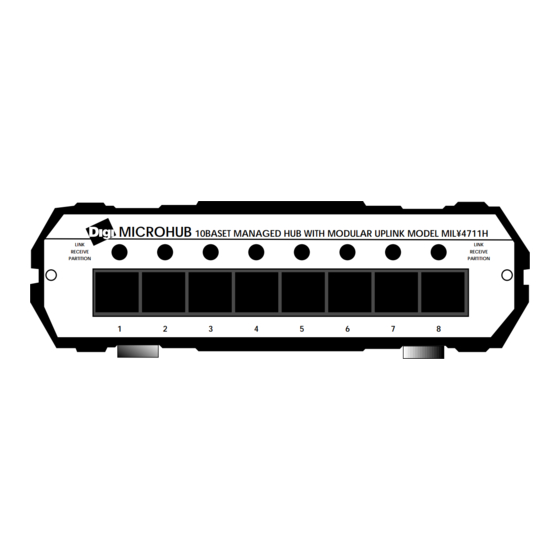
MICROHUB
10BASET MANAGED HUB WITH MODULAR UPLINK MODEL MIL¥4711H
LINK
LINK
RECEIVE
RECEIVE
PARTITION
PARTITION
1
2
3
4
5
6
7
8
User's Guide
This guide includes the following information:
"Description of Hardware" on page 2
"Description of the LEDs" on page 3
"Description of Dip Switches" on page 3
"The DB-9 Serial Port" on page 4
"Installation Procedure" on page 4
"Assigning an IP Address" on page 5
"Setting the IP Address with Telnet" on page 5
"Setting the IP Address with RARP" on page 6
"Setting the IP Address with BOOTP" on page 7
"Verifying the IP Address is Set Properly" on page 8
"Legal" on page 9
Doc. Number: 75425 Rev. A
Advertisement
Table of Contents

Related Manuals for Digi MIL-4711H


Summary of Contents for Digi MIL-4711H
-
Page 1: Table Of Contents
MIL-4711H Manageable Hub MICROHUB 10BASET MANAGED HUB WITH MODULAR UPLINK MODEL MIL¥4711H LINK LINK RECEIVE RECEIVE PARTITION PARTITION User’s Guide This guide includes the following information: “Description of Hardware” on page 2 “Description of the LEDs” on page 3 “Description of Dip Switches” on page 3 “The DB-9 Serial Port”... -
Page 2: Description Of Hardware
10BASE-T, 10BASE2, 10BASE-FL or AUI connectivity, and an RS-232 port for out-of-band management. The MIL-4711H supports standard MIB-II, Digi's private MIBs, and hub MIBs using the SNMP protocol with both in-band management (over TCP/IP and IPX protocols) and out-of-band management through an RS-232 port. -
Page 3: Description Of The Leds
Install Guide MIL-4300M MIL-4310M 16VAC Figure 3.MIL-4711 (Rear View w/ the MIL-4310 Module) D e s c ri ptio n of t he LE Ds On the front panel of the MIL-4711H, there is one LED above each of the eight, 10BASE-T ports. -
Page 4: The Db-9 Serial Port
Install Guide Th e D B -9 S e ria l Por t DB-9 Figure 4.RS-232C Serial Port Pin Assignments DB-Male Pin # Function Note: N/C=No Connect In s ta ll a tio n P roc e dur e Follow these steps to connect the MIL-4711H to your network: 1. -
Page 5: Assigning An Ip Address
Install Guide A s s ig ni n g an IP Addre s s Every device on a TCP/IP network is identified by two addresses: • The address is a 6-byte address assigned to the 4711H by the manufacturer. • The IP address is a 4-byte address assigned by the system admin. Set this. The MIL-4711H stores its IP address in its NVRAM (default: 0.0.0.0). -
Page 6: Setting The Ip Address With Rarp
Install Guide 7. If prompted with a message like Warning: Entering monitor will lock out other Ethernet access and force reset , type [Y] to get the command prompt. 8. Type [N] to enter the network protocols menu. 9. Type [T] to enter the TCP/IP menu. 10. -
Page 7: Setting The Ip Address With Bootp
Install Guide 6. Verify that the RARP daemon is running: ps-ax | grep RARP (for BSD UNIX) or ps-ef | grep RARP (for System V UNIX) Otherwise, start the RARP daemon by typing: /usr/etc/rarpd-a or /etc/rarpd-a If successful, the SYS LED flashes five times per second until the 4711H resolves its IP address. -
Page 8: Verifying The Ip Address Is Set Properly
Install Guide 2. Use a text editor to open the /etc/hosts file and add the following line: 192.185.2.3 alpha 3. Use the following menu sequence in sam: Networking--> Communications--> Device Connectivity--> Boot Protocol--> Actions--> Add 4. In response to the program prompts, add the following information: BOOTP Device Name: <specify the hostname of the MIL-4711H>... -
Page 9: Legal
fitness for a particular purpose, except as expressly set forth in this warranty. In no event shall Digi be liable for incidental or consequential damages, costs, or expenses arising out of or in connection with the performance of the product delivered hereunder.
Need help?
Do you have a question about the MIL-4711H and is the answer not in the manual?
Questions and answers