Advertisement
IMPORTANT NOTE! This gauge has an odometer preset option that is only available one time in the first 100 miles
(160km) of operation. See "Odometer preset" for instructions.
GAUGE SETUP AND CALIBRATION
The setup menus are entered by holding the switch in while turning the key
on. The menus are as follows:
Menu
dIag (EngInE, seCURE, ABS, DONE)
ADJvST (FASTER, SLOWER) (75 - 125)
vnIt (MPH, km/h )
S SET (OFF, 500 - 7500)
PERF (ON, OFF)
NIGHT (ON, OFF)
RPM
WXARN
(shown on bar graph)
V
WXARN
(9.0- 12.1)
HI F-C (200F - 420F or 93C - 215C)
GEAR (DONE, PRESET, LEARN)
FUEL (OFF, SPO, CST, dyn, d09)
(SET LO, range, DONE)
CL CAL
INFO
odoMK-
POWER & GROUND
The gauge is a direct plug in. Constant battery power and key switched power are supplied by the stock harness
along with ground.
STATUS AND WARNING INDICATORS
Several indicators are supplied on the stock wiring harness. Some of these may not be active on your motorcycle.
These include the security, engine, ABS, and low fuel.
LOW VOLTAGE WARNING
When the voltage drops below the warning limit with the engine running, LO and your current voltage will be
displayed. (default warning limit is 11.0V)
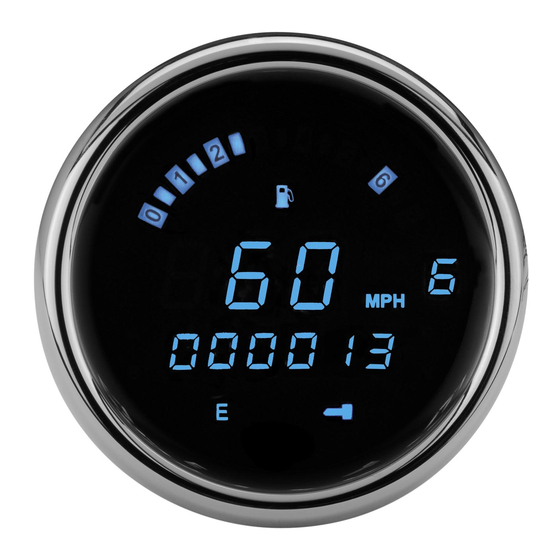
SPEEDOMETER & TACHOMETER
The speedometer and tachometer signals are read from the engine control module (ECM) over a data bus.
The speed can be calibrated to allow for differences in tires or gearing; calibration is discussed later.
The tach bar displays RPM x1000 with a range of 7000 RPM. The RPM can also optionally be shown on the message
display.
CLOCK
The clock uses a 12 hour format and can be set by pressing and holding the switch while the clock is displayed.
After the switch is held for a few seconds the hours will begin flashing. Momentarily pressing the switch will change the
hours, holding the switch will move to the minute set, and the minutes will begin flashing. Momentarily pressing the switch
will now change the minutes. Holding the switch will exit the clock set mode.
MODEL MCL-3204
3-3/8" SPEEDOMETER/TACHOMETER for 2004 – up
Description
read diagnostic codes
adjust calibrate speed
select speed & temp unit
miles to service setting
turn on/off performance displays
turn on/off automatic night dimming
set RPM shift warning point
set low volt warning point
set temperature warning point
transmission gear display selection
select fuel sender type
low fuel light and range setup
adjust clock calibration
display gauge revision code on speedometer
one-time odometer preset
km/h
MPH
A
RPM
B
V
E
MAN# 650284:F
Advertisement
Table of Contents

Related Manuals for Dakota Digital MCL-3204


Summary of Contents for Dakota Digital MCL-3204
- Page 1 MODEL MCL-3204 3-3/8” SPEEDOMETER/TACHOMETER for 2004 – up IMPORTANT NOTE! This gauge has an odometer preset option that is only available one time in the first 100 miles (160km) of operation. See “Odometer preset” for instructions. GAUGE SETUP AND CALIBRATION The setup menus are entered by holding the switch in while turning the key on.
-
Page 2: Speed Calibration
Install the Dakota Digital gauge in reverse order installing grommets and then plugging into the factory plug and securing with the two screws. - Page 3 nIgHt nIgHt nIgHt nIgHt Night Dimming Your display system has a dimming feature that dims the display intensity automatically at night. Normally the system is at full brightness for daytime viewing. To have the system at full brightness all of the time, go into the setup menu as described above and select “ngt”...
- Page 4 PERF PERF PERF PERF Performance menu setup The performance readings can be turned on or off. When they are turned off the odometer display will only toggle through the mileage readings. Press and release the switch until “PErF” is displayed, then press and hold the switch until “ - ” is displayed. Release the switch.
-
Page 5: Function Switch
FUNCTION SWITCH The function switch on the side of the dash panel allows access to all of the mileage, RPM, and performance information. Pressing and releasing the function switch toggles through the different displays. Press and holding the switch will reset the current display. The display sequence is as follows: 000000 ODOMTR >... -
Page 6: Service And Repair
Any action for breach of any warranty hereunder, including any implied warranty of merchantability, must be brought within a period of 24 months from date of original purchase. No person or representative is authorized to assume, for Dakota Digital, any liability other than expressed herein in connection with the sale of this product.
Need help?
Do you have a question about the MCL-3204 and is the answer not in the manual?
Questions and answers