Maytag Performa Refrigerator User Manual
Top mount refrigerator
Hide thumbs
Also See for Performa Refrigerator:
- Use and care manual (84 pages) ,
- User manual (52 pages)
Table of Contents
Advertisement
Congratulations on your purchase
of a Maytag Performa
™
refrigerator! Your
satisfaction is very important to us, so please
read this guide carefully. You will find instructions
on the proper operation and maintenance of your
new appliance.
The "Before You Call" section is designed to help you
solve basic problems before consulting a servicer.
This can save you time and money.
If you have questions, write us (include your model
number and phone number) or call:
Maytag Appliances Sales Company
Attn: CAIR
®
Center
P.O. Box 2370
Cleveland, TN 37320-2370
1-800-688-9900 USA
1-800-688-2002 CANADA
1-800-688-2080 USA TTY (for deaf, hearing
impaired or speech impaired)
(Mon.-Fri., 8am-8pm Eastern Time)
Internet: http://www.maytag.com
Part No. 111244-1
Form No. A/10/00
U
SER'S
MCS Part No. 61005299
Top Mount Refrigerator
G
Table of Contents
Safety Instructions. . . . . . . . . . . . . . . . . 1
Installation . . . . . . . . . . . . . . . . . . . . . . . 2
Setting and Adjusting
Temperature Controls. . . . . . . . . . . . . 3-4
Ice Service . . . . . . . . . . . . . . . . . . . . . . . 9
Food Storage Tips . . . . . . . . . . . . . . . . 10
Food Storage Chart . . . . . . . . . . . . . . . 11
Storing the Refrigerator. . . . . . . . . . . . 12
Care & Cleaning . . . . . . . . . . . . . . . . . . 12
Cleaning Chart . . . . . . . . . . . . . . . . . . . 13
Before You Call. . . . . . . . . . . . . . . . . . . 14
Warranty. . . . . . . . . . . . . . . . . . . . . . . . 15
Guide de L'Utilisateur . . . . . . . . . . . . . 16
Guía del Usuario . . . . . . . . . . . . . . . . . 32
UIDE
Litho U.S.A.
Advertisement
Table of Contents

Related Manuals for Maytag Performa Refrigerator


Summary of Contents for Maytag Performa Refrigerator
-
Page 1: Table Of Contents
Top Mount Refrigerator SER’S UIDE Congratulations on your purchase of a Maytag Performa ™ refrigerator! Your satisfaction is very important to us, so please read this guide carefully. You will find instructions Table of Contents on the proper operation and maintenance of your new appliance. -
Page 2: Safety Instructions
For Future Assistance Have complete model and serial number identification of Keep your sales slip, proof of original purchase date is your refrigerator. This is located on a data plate inside the needed for warranty service. refrigerator compartment, on the upper left side. Record these numbers below for easy acccess. -
Page 3: Installation
Installation Your new refrigerator was packed carefully for shipment. Remove and discard shelf packing clips (if used) located just above each shelf where they hook onto the frame. To remove plastic clips wiggle the clips sideways and pull straight out. Location Leveling •... -
Page 4: Temperature Controls
Temperature Controls Depending on the model, the style and location of the controls will vary. Some models have two dial or two slide controls at the top of the fresh food compartment. Other models have separate controls, one at the top of the fresh food compartment and another single control at the back of the freezer compartment. -
Page 5: Temperature Controls
Temperature Controls Adjusting the Temperature Controls • 24 hours after adding food, you may decide that one or both compartments should be colder or warmer. If so, adjust the control(s) as indicated in the table below. • Except when starting the refrigerator, do not change either control more than one number at a time. •... -
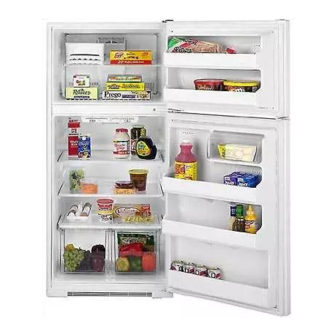
Page 6: Looking Inside The Fresh Food Compartment
Looking Inside Fresh Food Compartment Shelves Full Width Shelves: Some models have full width shelves that rest on linear support rails. To remove: pull the shelf forward until it stops, lift the front and pull the shelf straight out. To reinstall, reverse this procedure. Adjustable Shelves: Cantilever shelves may be available with your refrigerator. -
Page 7: Looking Inside The Freezer Compartment
Looking Inside Fresh Food Compartment The Pick-Off Door Bins (select models) are designed to accommodate gallon-plus sized containers. They are adjustable and easily removed. To remove: Lift the bin up until it clears the retainers on the door liner, then pull the bin straight out. -
Page 8: Fresh Food Compartment
Looking Inside Fresh Food Compartment To use the Dairy Compartment, simply raise the cover. The Egg Cradle (select models) holds a “dozen-plus” eggs. It can be removed to be washed or carried to a work area. style may vary The Multi-Use Rack (select models) provides a place for horizontally storing wine. - Page 9 Looking Inside Freezer Compartment Some refrigerators are equipped with an adjustable Freezer Shelf. The shelf can be adjusted to accommodate a variety of frozen food loads. To remove the shelf: • lift the left end up about 3 inches • pull the right end bars out of the cups in the sidewall.
-
Page 10: Ice Service
Ice Service Ice Cube Trays probably contain undersized and irregular cubes because of air in the supply line. Some models are equipped with ice cube trays and an • The initial batch may also contain impurities from the ice storage bin. The bin stacks neatly on top of the ice new water supply piping. -
Page 11: Food Storage Tips
Food Storage Tips Fresh Food Storage Frozen Food Storage • The fresh food compartment of a refrigerator should • The freezer compartment of a refrigerator should be be kept between 34°F and 40°F with an optimum kept at approximately 0°F. To check the temperature, temperature of 37°F. -
Page 12: Food Storage Chart
Food Storage Chart (Storage times are approximate and may vary depending on type of packaging, storage temperature, and the quality of the food when purchased.) Foods Refrigerator Freezer Storage Tips DAIRY PRODUCTS Butter 1 month 6-9 months Wrap tightly or cover. Milk &... -
Page 13: Storing The Refrigerator
Storing the Refrigerator Vacations Moving If you will be gone for a month or less, leave the When moving, follow steps a–d under Vacations. In controls at the usual settings. addition, remove and carefully pack any items that are easily removable. Ship the refrigerator in an upright During longer absences: position with the doors taped shut. -
Page 14: Cleaning Chart
Care and Cleaning CAUTION: Disconnect the power cord before cleaning. Do not touch refrigerated surfaces with wet or damp hands. Damp objects stick to cold metal surfaces. Before cleaning the freezer, allow it to warm up. Allow glass shelves to warm up before immersing in warm water. Refrigerator Cleaning Chart Refrigerator Exterior Part... -
Page 15: Before You Call
Before You Call Check these points if your refrigerator... • temperature control turned to “Off” or 0 • power cord not plugged in Won’t Run • no power at the electrical outlet • circuit breaker tripped or the house fuse blown •... -
Page 16: Warranty
Second thru Fifth Year: After the first year from the date of original retail purchase, through the end of the fifth year, Maytag Appliances will repair or replace, at its option, free of charge for parts and labor, any part of the sealed refrigeration system (consisting of the compressor, evaporator, condenser, drier and connecting tubing) and the cabinet liner (exclusive of the door liner) which fail in normal home use.
Need help?
Do you have a question about the Performa Refrigerator and is the answer not in the manual?
Questions and answers
Where is the defrost drain on my Maytag Performa model# PTB1953GR