Advertisement
Quick Links
4-449-804-03(1)
(1)
/
Interchangeable Lens/
Objectif interchangeable/
/
Operating Instructions/Mode d'emploi/
(3)
Manual de instrucciones/
70-400mm F4-5.6 G SSM II
SAL70400G2
A-mount
(1)
©2013 Sony Corporation
Printed in Japan
–1
(1)
(2)
–2
(2)
(4)
A
E
ˎ
ˎ
(2)
E
ˎ
ˎ
ˎ
ˎ
2
1
2
3
4
5
6
7
8
9
10
/
11
12
13
14
15
16
–
1
1
2
2
ˎ
ˎ
2
2
ˎ
ˎ
ˎ
ˎ
–
1
90
ˎ
ˎ
2
ˎ
ˎ
1
ˎ
ˎ
2
1
3
SET/RELEASE
3
4
4
35mm
mm
1*
2
1
2*
2
2
*
m
ˎ
ˎ
3
mm
ˎ
ˎ
mm
g
ˎ
ˎ
*
1
35mm
*
2
1 35mm
*
3
ˎ
AF
MF
AF
ˎ
AF
MF
AF
1
AF
1
AF
AF
AF
MF
MF
-
/
AF
MF
AF
AF
You will find information on using each lens in this
manual. Precautions common to lenses, such as notes
AF
/
on use will be found in "Precautions before using" on a
ˎ
ˎ
separate sheet. Be sure to read both documents before
using the lens.
FULL :
AF
ˋ
This lens is designed for A-mount, which can be used on Sony
-3m :
3.0m
AF
ˋ
α cameras.
MF
ˎ
ˎ
-
Notes on use
AF/MF
When using this lens with an E-mount camera, attach a
ˎ
ˎ
separately sold Mount Adaptor. Do not attach the lens directly to
AF
MF
the E-mount camera or you may damage both.
ˎ
ˎ
AF
AF/MF
When you carry the camera with the lens attached, make sure to
ˎ
ˎ
MF
AF
MF
hold both the camera and the lens steadily.
ˎ
ˎ
AF
AF/MF
Do not hold by any part of the lens that protrudes when
ˎ
ˎ
zooming.
DMF
Precaution for flash use
When using a built-in camera flash, make sure to remove the
AF
AF-A
AF
lens hood. With certain of lens/flash combinations, the lens
AF-S
may partially block the light of the flash, resulting in a shadow
DMF
at the bottom of the picture.
DMF
ˎ
ˎ
Vignetting
ˋ
AF AF-C
When you use lens, the corners of the screen become darker
ˋ
than the center. To reduce this phenomena (called vignetting),
ˋ
AF-A
2
close the aperture by 1 to 2 stops.
MF
Darkening at the top of the viewfinder image
The top of the viewfinder image may appear darker. This is a
normal phenomenon caused by the size of the reflex mirror in
the camera, and does not affect the recorded image.
MF
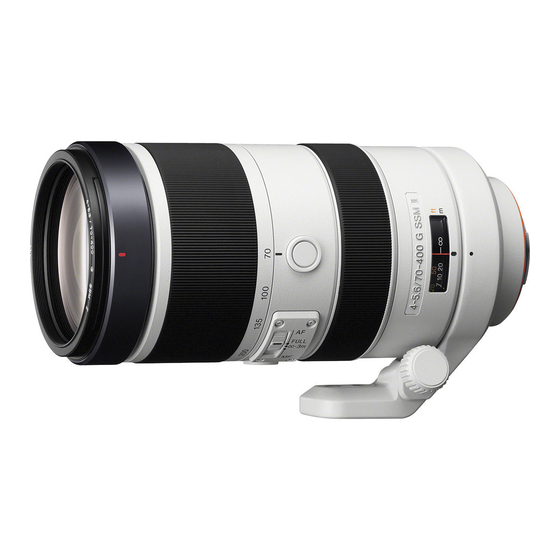
Names of parts
1···Zooming ring 2···Focusing ring 3···Distance index
4···Lens contacts 5···Lens hood index 6···Focal-length scale
7···Focal-length index 8···Distance scale 9···Focus hold button
10···Focus-mode/range switch 11···Mounting index
12···Lens index (black) 13···Collar mounting index (red)
14···Collar index (black) 15···Collar 16···Collar-locking knob
3
Attaching/detaching the lens
ˎ
ˎ
To attach the lens (See illustration –.)
1
Remove the rear and front lens caps and the camera
body cap.
1.4X SAL14TC
2X SAL20TC
You can attach/detach the lens front cap in two ways, (1)
ˎ
ˎ
MF
and (2). When you attach/detach the lens cap with the lens
hood attached, use method (2).
2
Align the orange index on the lens barrel with the
ˎ
ˎ
orange index on the camera (mounting index), then
insert the lens into the camera mount and rotate it
clockwise until it locks.
Do not press the lens release button on the camera when
ˎ
ˎ
mounting the lens.
Do not mount the lens at an angle.
ˎ
ˎ
To remove the lens (See illustration –.)
While pressing and holding the lens release button on the
camera, rotate the lens counterclockwise until it stops, then
detach the lens.
Using the tripod
When using a tripod, attach it to the-mounting collar of the
lens, not to the tripod receptacle of the camera.
To change vertical/horizontal position
Loosen the collar-locking knob on the tripod-mounting collar
(1) and rotate the camera either direction. The camera can be
70-400mm F4-5.6 G SSM II
quickly switched between vertical and horizontal positions while
(SAL70400G2)
maintaining stability when using a tripod.
*
1
105-600
Black indexes (collar indexes) are located at 90° intervals on the
ˎ
ˎ
tripod-mounting collar. Align a black index on the tripod-
12-18
mounting collar with the black index (collar index) on the lens to
34 -6 10'
adjust the camera position precisely (2).
23 -4 10'
Tighten the collar-locking knob firmly after the camera position
ˎ
ˎ
1.5
is set.
0.27
To detach the tripod-mounting collar from the
F22-F32
lens
77
94.5 196
The tripod-mounting collar can be detached from the lens
when not using a tripod.
1
1,500
Remove the lens from the camera.
See "
Attaching/detaching the lens" for details.
ˎ
ˎ
APS-C
2
Loosen the collar-locking knob (1).
3
Rotate the tripod-mounting collar to align the red index
2 APS-C
on the tripod-mounting collar (collar mounting index
next to SET/RELEASE) with the orange index on the lens
(mounting index) (3).
4
Move the tripod-mounting collar towards the lens
ADI
ADI
mount and detach the tripod-mounting collar from
the lens (4).
Attaching lens hood
It is recommended that you use a lens hood to reduce flare and
ensure maximum image quality.
1
Align the red line on the lens hood with the red dot on
1
1
the lens (Lens hood index). Turn the hood clockwise
until the red dot on the hood meets the red dot on the
lens and it clicks into place (1).
The polarizing-filter window can be opened (2) to allow the
ˎ
ˎ
rotation of the polarizing filter (sold separately) without having
to remove the lens hood. Close the window when shooting.
Attach the lens hood properly. Otherwise, the lens hood may
ˎ
ˎ
interfere with the desired effect or may appear in pictures.
When storing, turn over the lens hood and place it onto the lens
ˎ
ˎ
backwards.
Zooming
Rotate the zooming ring to the desired focal length.
Focusing
To set AF/MF (auto focus/manual focus) and
Focus range (AF range)
The focus mode can be switched between AF and MF on the
lens. You can also select the focus range (AF range) in AF
mode.
To shoot in AF mode, set the focus mode to AF both on the
camera and lens, and select the focus range (AF range) on the
lens. You can shoot in MF mode when either the camera or
the lens or both are set to MF.
To set the focus mode on the lens
(See illustration -.)
Slide the focus-mode/range switch to the appropriate mode,
AF or MF, and to the appropriate focus range (AF range) when
AF is selected.
In AF, select a focus range from the following, depending on
ˎ
ˎ
the distance to your subject with the focus-mode/range switch.
Setting the focus range allows for quicker focusing. This is useful
when the shooting range is limited.
FULL : No distance limit. AF works in the entire range.
ˋ
ˎ
-3m : AF works from 3.0m to infinity.
ˋ
ˎ
In MF, turn the focusing ring to adjust the focus while looking
ˎ
ˎ
through the viewfinder, etc. (See illustration -).
To use a camera equipped with an AF/MF control
button
Press the AF/MF control button to switch AF to MF when both
ˎ
ˎ
the camera and lens are set to AF.
Press the AF/MF control button to switch MF to AF when the
ˎ
ˎ
camera is set to MF and the lens is set to AF.
Direct manual focus (DMF)
Rotate the focusing ring to set correct DMF when the focus is
locked in AF-A (automatic auto focus) or AF-S (single-shot
auto focus).
DMF is not available in the following cases:
ˎ
ˎ
When the image is out of focus
ˋ
ˎ
When AF-C (continuous auto focus) is selected
ˋ
ˎ
When the focus is confirmed for the second photo during
ˋ
ˎ
continuous recording in AF-A
Shooting at infinity in MF
The focusing mechanism turns slightly past infinity to provide
accurate focusing under various operating temperatures. Always
confirm the image sharpness through the viewfinder, etc.,
especially when the lens is focused near infinity.
Focus-hold button (See illustration –.)
While the focus-hold button is pressed, auto focus function is
suspended and the focus is fixed for shooting. (This lens has 3
focus-hold buttons.)
The function of the focus-hold button can be changed on
ˎ
ˎ
cameras with custom function capability. Refer to the camera
manuals for details.
On teleconverters
You can use the 1.4X Teleconverter (SAL14TC) and 2X
Teleconverter (SAL20TC) in MF mode. In this case, focus
manually while monitoring the image in the viewfinder, etc., as
the focusing function on the camera does not work.
Shading may appear in the viewfinder image depending on the
ˎ
ˎ
camera. This is not abnormal. This shading does not affect the
recorded image.
Specifications
70-400mm F4-5.6 G SSM II
Name (Model name)
(SAL70400G2)
Equivalent 35mm-format focal
105-600
length*
(mm)
1
Lens groups-elements
12-18
Angle of view 1*
34°-6°10'
2
Angle of view 2*
23°-4°10'
2
Minimum focus*
(m (feet))
1.5 (5)
3
Maximum magnification (×)
0.27
Minimum f-stop
f/22-f/32
Filter diameter (mm)
77
Dimensions (maximum
94.5 × 196
diameter × height)
(3 3/4 × 7 3/4)
(Approx., mm (in.))
Mass (Approx., g (oz))
1,500 (53) (except the collar)
*
1
The equivalent 35mm-format focal length shown above is for
Interchangeable Lens Digital Cameras equipped with an APS-C
sized image sensor.
*
The angle of view 1 is for 35mm-format cameras, and the angle
2
of view 2 is for Interchangeable Lens Digital Cameras equipped
with an APS-C size image sensor.
*
3
Minimum focus is the shortest distance from the image sensor
to the subject.
This lens is equipped with a distance encoder. The distance
ˎ
ˎ
encoder allows more accurate measurement (ADI) by using an
ADI-compatible flash.
Depending on the lens mechanism, the focal length may change
ˎ
ˎ
with any change of the shooting distance. The focal length
assumes the lens is focused at infinity.
Included items
Lens (1), Front lens cap (1), Rear lens cap (1), Lens hood (1),
Lens case (1), Set of printed documentation
Design and specifications are subject to change without notice.
and
is a trademark of Sony Corporation.
Company names and company product names are trademarks
or registered trademarks of those companies.
Des informations relatives à l'utilisation de chaque objectif
sont disponibles dans ce manuel. La section « Précautions
avant toute utilisation », qui fait l'objet d'un document
séparé, contient des précautions relatives aux objectifs,
telles que des remarques sur leur utilisation. Veuillez
lire attentivement ces deux documents avant d'utiliser
l'objectif.
Cet objectif est conçu pour les montures A, à utiliser sur les
appareils photo α Sony.
Remarques sur l'utilisation
Lorsque cet objectif est utilisé avec un appareil photo à monture
ˎ
ˎ
E, rattachez un adaptateur pour monture d'objectif vendu
séparément. Ne rattachez pas directement l'objectif à l'appareil
photo à monture E sinon l'objectif et l'appareil pourraient être
endommagés.
Tenez fermement à la fois l'appareil photo et l'objectif lorsque
ˎ
ˎ
vous transportez l'appareil photo avec l'objectif fixé.
Ne tenez pas l'appareil par une partie saillante de l'objectif lors
ˎ
ˎ
d'une opération de zoom.
Précaution concernant l'utilisation du flash
Lorsque vous utilisez le flash intégré à l'appareil photo,
n'oubliez pas de retirer le pare-soleil. Dans le cas de certaines
combinaisons objectif/flash, l'objectif peut partiellement
bloquer la lumière du flash, ce qui génère une ombre en bas
de l'image.
Vignetage
Lorsque vous utilisez l'objectif, les coins de l'écran peuvent
s'assombrir par rapport au centre. Pour réduire ce phénomène
(appelé vignetage), l'ouverture doit être réglée à une valeur
comprise entre 1 et 2 par rapport à la position de fermeture
complète.
Assombrissement de la partie supérieure de
l'image du viseur
La partie supérieure de l'image du viseur peut apparaître plus
sombre. Il s'agit d'un phénomène normal dû à la taille du
miroir reflex de l'appareil photo. Cela n'affecte pas l'image
enregistrée.
Noms des pièces
1···Bague du zoom 2···Bague de mise au point
3···Index de distance 4···Contacts de l'objectif
5···Repère du pare-soleil 6···Echelle de la longueur focale
7···Repère de la longueur focale
8···Echelle de mise au point
9···Bouton de désactivation de la mise au point
10···Commutateur de mise au point/plage
11···Repère de montage 12···Repère de l'objectif (noir)
13···Repère de montage du cadre (rouge)
14···Repère du cadre (noir) 15···Cadre
16···Bouton de verrouillage du cadre
Fixation/retrait de l'objectif
Fixation de l'objectif (Voir l'illustration –.)
1
Retirez les capuchons d'objectif situés à l'avant et
l'arrière, ainsi que le capuchon de l'appareil photo.
Vous pouvez fixer/détacher le capuchon avant de l'objectif
ˎ
ˎ
de deux façons, (1) et (2). Lorsque vous fixez/détachez le
capuchon d'objectif alors que le pare-soleil est en place,
utilisez la méthode (2).
2
Alignez le repère orange situé sur la monture de
l'objectif sur le repère orange de l'appareil (repère
de montage), puis insérez l'objectif dans la monture
de l'appareil et tournez-le dans le sens horaire
jusqu'à ce qu'il se bloque.
N'appuyez pas sur le bouton de déblocage de l'objectif de
ˎ
ˎ
l'appareil lorsque vous fixez l'objectif.
Ne fixez pas l'objectif de travers.
ˎ
ˎ
(Suite à la page arrière)
Advertisement

Related Manuals for Sony SAL70400G2


Summary of Contents for Sony SAL70400G2
- Page 1 α Sony. using the lens. Focusing FULL : Remarques sur l’utilisation ˋ This lens is designed for A-mount, which can be used on Sony To set AF/MF (auto focus/manual focus) and -3m : 3.0m ˋ α cameras.
- Page 2 Este objetivo está equipado con un codificador de distancia. El ˎ ˎ pueden utilizar en las cámaras Sony α. codificador de distante permite una medición más exacta (ADI) del objetivo y encaje correctamente (1). de mise au point/plage sur le mode approprié, AF ou MF, al utilizar un flash compatible con ADI.
Need help?
Do you have a question about the SAL70400G2 and is the answer not in the manual?
Questions and answers