Lexicon Alpha Owner's Manual
Hide thumbs
Also See for Alpha:
- Owner's manual (28 pages) ,
- Software installation manual (6 pages) ,
- Setup manual (2 pages)
Table of Contents
Advertisement
Advertisement
Table of Contents

Related Manuals for Lexicon Alpha


Summary of Contents for Lexicon Alpha
- Page 1 Owner’s Manual Complete reCording solution...
-
Page 2: Important Safety Instructions
IMPORTANT SAFETY INSTRUCTIONS SAFETY INSTRUCTIONS NOTICe FOR CUSTOMeRS IF YOUR UNIT IS eqUIPPeD WITh A POWeR CORD. WARNING: ThIS APPLIANCe ShALL Be CONNeCTeD TO A MAINS SOCKeT OUTLeT WITh A PROTeCTIVe eARThING CONNeCTION. The cores in the mains lead are coloured in accordance with the following code: The symbols shown above are internationally accepted symbols that GREEN and YELLOW - Earth BLUE - Neutral... -
Page 3: Declaration Of Conformity
Date: January 26, 2011 not operate normally, or has been dropped. POWeR ON/OFF SWITCh: The Power switch used in this piece of european Contact: Your local Lexicon Sales and Service equipment DOeS NOT break the connection from the mains. Office or MAINS DISCONNeCT: The plug shall remain readily operable. -
Page 4: Service Info
5. The foregoing is in lieu of all other warranties, expressed or implied, and Lexicon Professional neither assumes nor authorizes any person to assume on its behalf any obligation or liability in connection with the sale of this product. -
Page 5: Table Of Contents
Table of Contents TAblE OF CONTENTS INTROdUCTION ......... 8 Features ..................8 unpacking the alpha studio ..........9 coMputer MiniMuM requireMents ........9 ® Windows ......................9 ® ......................9 Macintosh the Front panel ..............10 ¼" Instrument Input Jack ..................10 Line 1/Inst ......................10 Peak LEDs ...................... - Page 6 Table of Contents ® Macintosh soFtware setup ..........17 Mac OS ........................17 USINg ThE lExICON AlPhA STUdIO™ ..18 ® Section I – Recording Audio With the Alpha Studio™ ........18 A. Recording Using the Microphone/Line Input........... 18 B. Recording a Guitar using the Instrument Input ........25 Section II –...
-
Page 8: Introduction
Alpha Studio package, providing the lush Lexicon reverbs that have been used on professional recordings for over thirty years. Alternatively, the Lexicon Alpha Studio may be used as an interface with almost any other major audio recording software you may have, such as Steinberg Nuendo ®... -
Page 9: Unpacking The Alpha Studio Tm
Lexicon Alpha Desktop Recording Studio. As with all such systems, adding more RAM than the minimum will allow you to do more processing and improve per- formance, and more disk space will allow you to record more tracks for a longer time. -
Page 10: The Front Panel
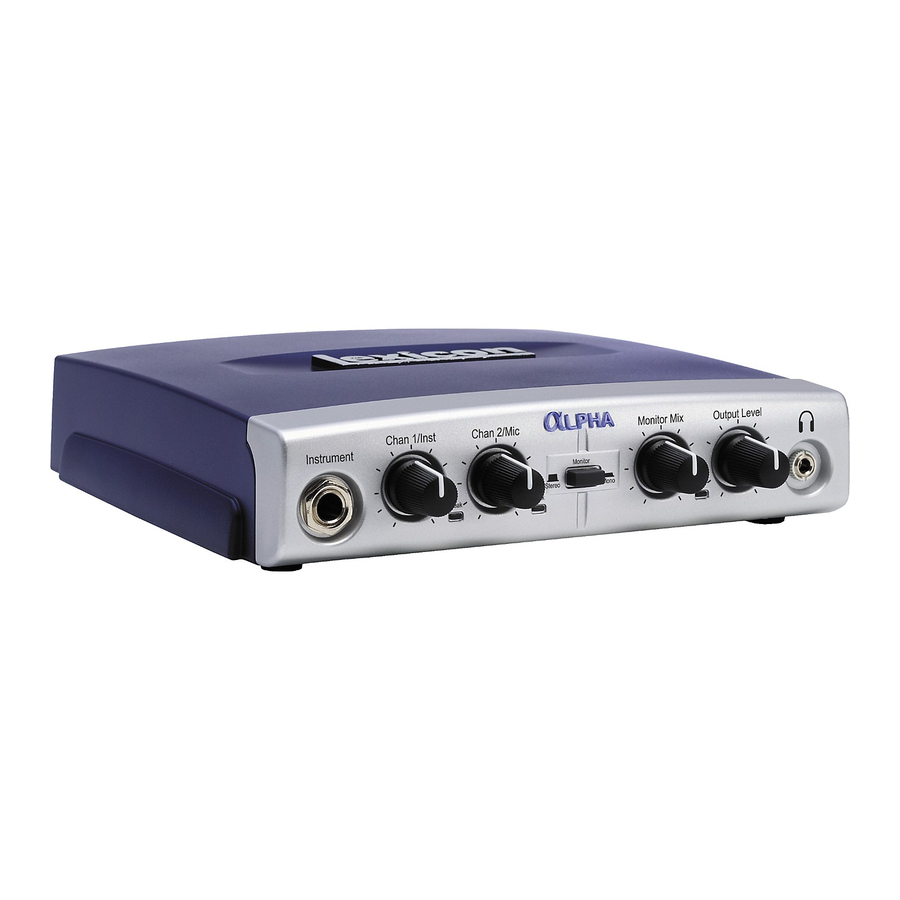
The Front Panel Line 1 / Instrument Line 2 / Microphone Monitor Mix Control Output Level Monitor Mix Output Level Line 2/Mic Line 1/Inst Instrument Monitor Stereo Mono Peak Peak Direct Playback 1/4˝ Instrument Input Jack Peak LEDs Monitor Assign 1/8˝... -
Page 11: Usb Led
The Front Panel the faders on the Mixer screen of the software. To hear only the live source input sig- , turn the Monitor Mix knob fully left to Direct. nals plugged into the Alpha Studio To hear only the mix from the computer, turn the Monitor Mix knob fully right to Playback. -
Page 12: The Rear Panel
RCA Left/Right Line Outputs Line In Line Out Line Out Alpha Studio is a trademark of Lexicon Pro, Inc. Line In 1-2 1/4” Left/Right Line Outputs ThE REAR PANEl The Alpha Studio™ rear panel offers the following features: usb port The USB Port is used to connect the Alpha Studio to your computer and provides the Alpha Studio hardware with power. -
Page 13: Connecting To The Alpha Studio
Connecting to the Alpha Studio CONNECTINg TO ThE AlPhA STUdIO The Alpha Studio is both a 2 x 2 x 2 mixer and a USB audio interface that can be used in a variety of audio setups. This section describes how to make basic connections for the following applications: •... -
Page 14: About Recording Connections
About Recording Connections AbOUT RECORdINg CONNECTIONS Analog audio signals are created by microphones, synthesizers, mixers, and instru- ments with magnetic pickups. Of these sources, microphones and magnetic instrument pickups have the lowest output level, and generally require the most amplification. Keyboards, preamps, and mixers output “line level”... -
Page 15: Mixdown Connections
Mixdown Connections MIxdOWN CONNECTIONS For the cleanest After you record and mix your sessions in either Cubase LE 4 or other recording ® recording, adjust software, you may want to mix them down to a DAT, audio cassette, or other stereo the Gain so the 2-track recording device. -
Page 16: Windows ® Software Setup
® You must consult the Software Installation Guide to ensure the successful installation of the recording software and USB drivers. If you haven’t already installed the Cubase LE 4 and Lexicon ® Pantheon™ plug-in software, please do so before continuing on to the next section. Follow the on-screen instructions to install the USB drivers. -
Page 17: Macintosh ® Software Setup
You must consult the included Software Installation Guide to ensure the successful installation of the recording software and USB setup. If you haven’t already installed the Cubase LE 4 and Lexicon Pantheon™ plug-in ® software, please do so before continuing on to the next section. -
Page 18: Using The Lexicon Alpha Studio
Using the Lexicon Alpha Studio™ ® USINg ThE lExICON AlPhA STUdIO ® ™ section i – recording audio with the alpha studio The diagram below shows how the Alpha Studio™ is connected for this particular setup. a. recording using the Microphone/line input... - Page 19 Recording Using the Microphone/Line Input 3. Select Default and click OK. 4. Select a location to store the project (or use the default location) and click OK.
- Page 20 Recording Using the Microphone/Line Input To set the input of the track to record: 1. Click the Project menu and select Add Track | Audio. When the Add Audio Track dialog appears, click OK. 2. Make sure the Show Inspector button , located in the upper left corner of the screen is lit.
- Page 21 Recording Using the Microphone/Line Input 3. In the Inspector, click the Left - Stereo In: box and select Stereo In - Left for the track input source. (Stereo In - Left relates to Line 1/Inst, Stereo In - Right relates to Line 2/Mic inputs.) 4.
- Page 22 Recording Using the Microphone/Line Input 5. In the Track 1 window, click the Input Monitoring button so that it is not lit.
- Page 23 Recording Using the Microphone/Line Input To check the input level from the microphone or Line Input: 1. If you are using a mic and have connected the Alpha Studio™ to studio monitors, turn them down or off to avoid feedback. 2.
- Page 24 Recording Using the Microphone/Line Input 5. Turn the Alpha Studio™ Output Level knob to adjust the listening volume, and make sure the Monitor Mix knob is somewhere in the middle between Direct and Playback. To overdub a second track: 1. Click anywhere in the gray area (not on the buttons) of the Track 2 window (labeled as Audio 02).
-
Page 25: Recording A Guitar Using The Instrument Input
Recording a Guitar Using the Instrument Input b. recording a guitar using the instruMent input This section explains how to record using the ¼" Instrument input jack on the front panel. 1. Plug your electric, acoustic, or bass guitar into the Instrument input jack on the front of the Alpha Studio™... - Page 26 Recording a Guitar Using the Instrument Input 4. In the Track 1 window, click the Input Monitoring button so that it is not lit. 5. Next, adjust the input gain of the Instrument input To set the input level, strum the guitar while gradually turning up the Line 1 knob until the Peak LED lights only occasionally with the loudest signals.
-
Page 27: Section Ii - Using Software Input Monitoring
Using Software Input Monitoring section ii - using soFtware input Monitoring The previous examples have turned off Cubase ® LE 4’s Input Monitoring software switches while recording tracks, and used the Monitor Mix knob on the front of the Alpha Studio™ hardware to directly monitor an input without latency. Software moni- toring lets you listen to software-based effects in real time and adjust the monitor mix independently of the recording levels, but also introduces some latency (delay) into the input signal. - Page 28 Using Software Input Monitoring 4. Left click on an Insert space and select Earlier VST Plug-ins, Lexicon ®, Pantheon™. 5. Choose Large Hall from the drop down menu at the top of the Pantheon™ Edit Window.
- Page 29 Using Software Input Monitoring 6. Because this is an insert effect, move the Mix slider to 50% (see the Pantheon manual for more details). 7. Change the level to about -52dB. Now you will record with the Lexicon Pantheon ®...
-
Page 30: Section Iii - Adjusting The Buffer Settings
Adjusting the Buffer Settings section iii - adJusting the buFFer settings Audio latency is the minimum time required for a computer to store recorded audio from an audio interface into the recording application memory and playback that same recorded audio back out audio interface output. After the audio has been converted to the digital domain, it is passed to a buffer before it is processed by the driver and then passed to the audio application. -
Page 31: Adjusting The Buffers In Mac Osx
Adjusting the Buffer Settings b. adJusting the buFFers in Mac ® 1. Open Cubase LE 4 and go to Devices>Device Setup. 2. Click on VST Multitrack. 3. Click on Audio Buffer Size and select the Number of Samples. 4. When you are finished click OK. -
Page 32: Specifications
97 dB typical, A-weighted, 20 Hz - 20 kHz Power Requirements: USB powered Dimensions: 6.7 x 6.5 x 1.5 Weight: 1.13 lbs. Lexicon engineers are constantly working to improve the quality of our products.Specifications are therefore subject to change without notice. -
Page 33: Signal Routing Diagram
Lexicon Alpha Studio™ Signal Routing Diagram ®... - Page 36 Questions or comments? 8760 South Sandy Parkway | Sandy, Utah 84070 U.S.A. Email us at: customer@lexiconpro.com Phone: 801-566-8800 | Fax: 801-566-7005 or visit our World Wide Web home page at: www.lexiconpro.com Part Number: 18-0346V-D Copyright 2011 Lexicon Professional ® Printed in China...
Need help?
Do you have a question about the Alpha and is the answer not in the manual?
Questions and answers