Lexicon ALPHA Owner's Manual
Desktop recording studio
Hide thumbs
Also See for ALPHA:
- Owner's manual (36 pages) ,
- Software installation manual (6 pages) ,
- Setup manual (2 pages)
Table of Contents

Related Manuals for Lexicon ALPHA


Summary of Contents for Lexicon ALPHA
- Page 1 Owner’s Manual COMPLETE RECORDING SOLUTION...
- Page 2 Professional neither assumes nor authorizes any person to assume on its behalf any obligation or liability in connection with the sale of this product. In no event shall Lexicon Professional or its dealers be liable for special or consequential damages or from any delay in the performance of this warranty due to causes beyond their control.
-
Page 3: Table Of Contents
Table of Contents TABLE OF CONTENTS INTRODUCTION ........1 USING THE ALPHA STUDIO ....11 Recording With The Alpha Studio ....11 FEATURES ..........1 A. Recording Using The Mic or Line Inputs ....11 B. Recording A Guitar Using The Instrument Input .12 C. Recording With Cubase LE........13 UNPACKING THE ALPHA STUDIO ..2... -
Page 4: Introduction
Alpha Studio hardware provides the professional-quality inputs and outputs, metering, and level controls that computer sound cards or built-in audio connections lack. So you can make full use of the Alpha Studio right away, we’ve included the popular Steinberg ®... -
Page 5: Unpacking The Alpha Studio
Introduction UNPACKING THE ALPHA STUDIO Thoroughly inspect the Alpha Studio and packing materials for signs of damage. Report any shipping damage to the carrier that delivered the product or dealer from whom you purchased the product at once. COMPUTER MINIMUM REQUIREMENTS The Lexicon Alpha doesn't require an extremely powerful computer to use. -
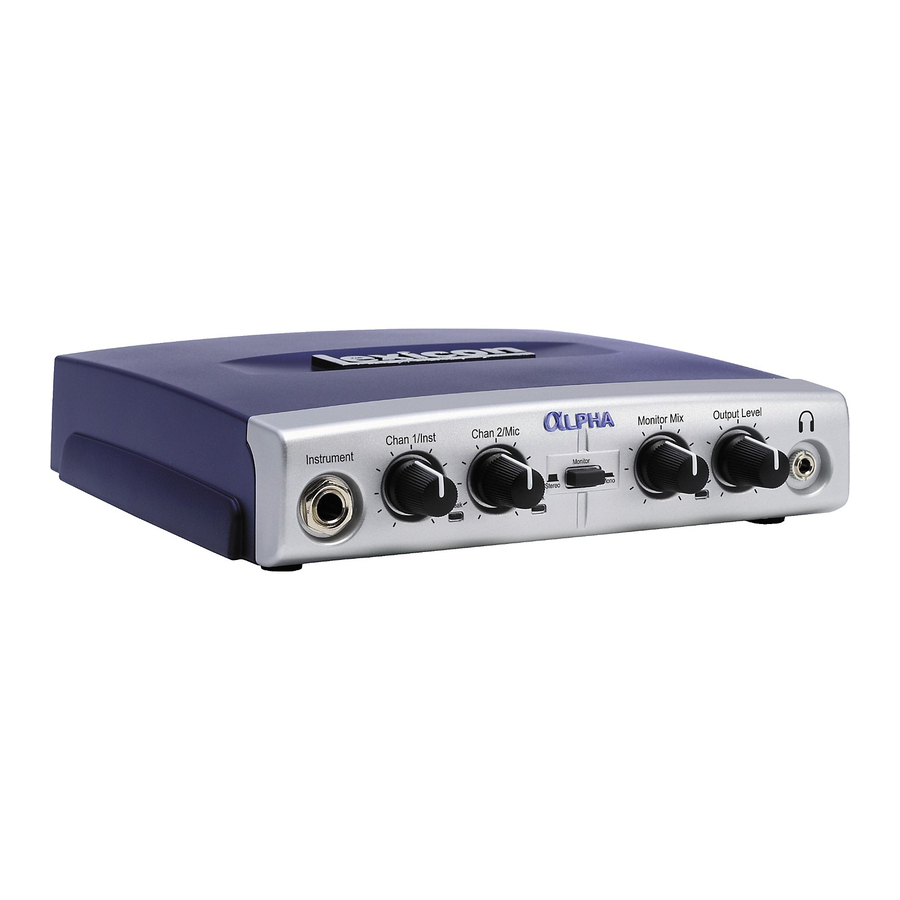
Page 6: The Front Panel
GET THE RIGHT MIX IN YOUR MONITOR MIX HEADPHONES OR The Alpha Studio gives you the ability to hear your analog input signals directly and MONITORS WHILE immediately while recording, without having to adjust levels in software, and before RECORDING. USE the delay caused by digital converters and computer recording latency. -
Page 7: Usb Led
LED is on, it indicates the Alpha Studio is being powered by your computer and audio signals can pass in and out of the system. OUTPUT LEVEL This knob controls the overall output level of the Alpha Studio’s Line and Headphone outputs. ⁄... -
Page 8: The Rear Panel
1/4” Left/Right Line Outputs USB PORT The USB Port is used to connect the Alpha Studio to your computer and provides the Alpha Studio hardware with power. A standard USB cable is included. The Alpha Studio supports USB 2.0 full speed. -
Page 9: Connecting To The Alpha Studio
Connecting to the Alpha Studio – Monitoring Connections CONNECTING TO THE ALPHA STUDIO The Alpha Studio is both a 2 x 2 x 2 mixer and a USB audio interface that can be used in a variety of audio applications. This section describes how to make basic connections for the following functionality: •... -
Page 10: Recording Connections
CONNECTING AN INSTRUMENT Plug a standard ¼" TS (instrument) cable directly from the instrument into the Instrument input jack on the front panel of Alpha Studio. Note that this will disable Line In 1 jack on the back panel. -
Page 11: Mixdown Connections
Output Level knob on the Alpha Studio until the meters on your recording deck read consistently between 0 dB to +4 dB, raising the input level control on the recorder if necessary. If you are connecting to a digital recorder, such as a DAT or CD recorder, set the input... -
Page 12: Connection Diagram
Connecting to the Alpha Studio – Connection Diagram CONNECTION DIAGRAM Mixdown Deck ¼" Chan 1/Inst Chan 2/Mic Monitor Mix Output Level Instrument Monitor Stereo Mono Peak Peak... -
Page 13: Software Setup
NOTE: A USB device must initialize itself with the host computer to operate correctly. The simplest way to avoid problems is to connect the Alpha Studio to the USB port after the computer is booted. -
Page 14: Using The Alpha Studio
To set the input level for the Mic or Line input: 1. If you're recording a mic and the Alpha Studio is connected to studio monitors in the same room, turn them off to avoid bleed and feedback and use headphones. -
Page 15: Recording A Guitar Using The Instrument Input
Instrument Monitor Stereo Mono Peak Peak Turn down all of the Alpha Studio's input and output level controls. Plug your electric, acoustic, or bass guitar into the Instrument input jack on the front of the Alpha Studio hardware. Instrument input uses the same recording channel as the Line 1 input;... -
Page 16: Recording With Cubase Le
Using the Alpha Studio – Recording with the Alpha Studio C. RECORDING WITH CUBASE LE To create a new session and prepare Cubase LE to record: 1. Open Cubase LE. Prompt for project 2. To create a new empty recording session, select the location option. - Page 17 Using the Alpha Studio – Recording with the Alpha Studio Devices Device Setup 4. Go to the menu and select the option. VST Audio System Alpha ASIO 5. Click on and, if not already selected, select (for Windows) or Lexicon Alpha In/Out (for Mac).
- Page 18 Using the Alpha Studio – Recording with the Alpha Studio To create an audio track and assign an audio input: Project Add Track>Audio 1. Click the menu and select Add Audio Track Mono 2. When the dialog appears, select the...
- Page 19 Using the Alpha Studio – Recording with the Alpha Studio Inspector 4. In the window, select the input you would like to record by clicking Input Routing Stereo field then selecting the track input source. Select " In - Left "...
- Page 20 Using the Alpha Studio – Recording with the Alpha Studio Track Input Monitor 6. In the window, make sure the button is not lit. To start recording: Record 1. Click the button on Cubase ® LE’s Transport control. Record Button 2.
-
Page 21: Setting Monitor Levels
Using the Alpha Studio – Recording with the Alpha Studio 5. To overdub a track, create a new track as previously described then make sure the record button on the new track is enabled and any previously recorded tracks are not record enabled. This will allow you to record to the new track without affecting the previously recorded tracks. -
Page 22: Using Software Input Monitoring
ASIO control panel. See "Adjusting The Buffer Settings" on page 21 for more information on adjusting buffer settings. To use software input monitoring: 1. When using Cubase LE’s input monitoring with the Alpha Studio, you will usually want to set the Monitor Mix... - Page 23 Using the Alpha Studio – Recording with the Alpha Studio Edit Channel Settings 3. To assign an effect to the input, click the button. Insert 4. Left click on an slot and select a plug-in from the list. If using a plug-in...
-
Page 24: Adjusting The Buffer Settings
Using the Alpha Studio – Adjusting the Buffer Settings ADJUSTING THE BUFFER SETTINGS Audio latency is the minimum time required for a computer to store recorded audio from an audio interface into the recording application memory and playback that same recorded audio back out of the audio interface output. -
Page 25: Adjusting The Buffers In Mac Os X
Using the Alpha Studio – Adjusting the Buffer Settings ADJUSTING THE BUFFERS IN MAC OS X Devices>Device Setup 1. Open Cubase LE and go to Lexicon Alpha In/Out 2. Click on 3. Click on the Control Panel button. You can now select the buffer size. Selecting lower settings will decrease any monitoring latency. -
Page 26: Specifications
97 dB typical, A-weighted, 20 Hz - 20 kHz Power Requirements: USB powered Dimensions: 6.7 x 6.5 x 1.5 Weight: 1.13 lbs. Lexicon engineers are constantly working to improve the quality of our products. Specifications are therefore subject to change without notice. -
Page 27: Signal Routing Diagram
Signal Routing Diagram... - Page 28 (801) 566-8800 PHONE: lexiconpro.com WEB: lexiconpro.com/en-US/support SUPPORT: Alpha Owner's Manual PN: 5058238-A © 2016 Harman. All rights reserved. Lexicon is a registered trademark of Harman.
Need help?
Do you have a question about the ALPHA and is the answer not in the manual?
Questions and answers