Advertisement
Transmitter Programming Guide
These transmitters makes use of icons (symbols) to identify the reac-
tion your security system/keyless entry/and or remote start system,
where applicable, will have when any icon (button) is pressed.
These icons are programmed at time of installation to meet the needs of
the individual and to complement the vehicle that the system is installed
in. To replace a transmitter or add transmitters, please follow the
programming instructions listed on the pages of this manual.
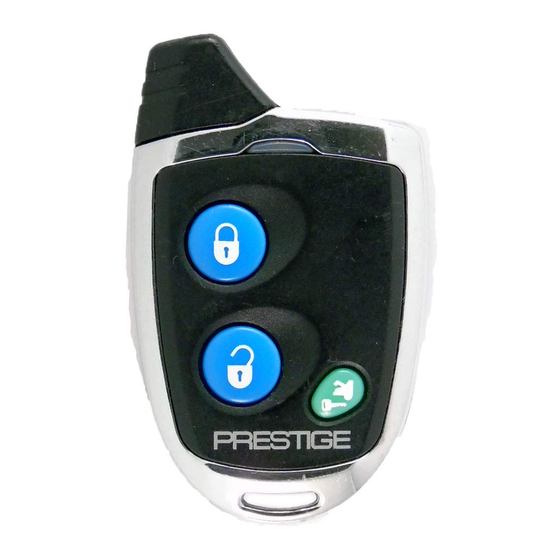
RECEIVER
BUTTON
CHANNEL
1
2
1
3
3
4
5
* Where So Equipped
Model SS91
SYSTEM FUNCTION
Lock And Arm Alarm, also initiate and
terminates *Panic
Unlock And Disarm, also initiates and
terminates *Panic. Programmable to
unlock drivers door and or all doors.
Lock and arm/unlock and disarm. May
be programmed to unlock driver's door
or all doors. Also will initiate and
terminate *Panic.
Pulsed or switched output to control
Remote Trunk Release or optional
device connected to channel 3.
When pressed and release two times,
will provide pulsed output or activate the
Remote Start option when installed.
When so equipped, this button can be
used to operate an optional device
connected to channel 4.
When so equipped, this button can be
used to operate an optional device
connected to channel 5.
1
128-8840
1 of 8
Advertisement
Table of Contents

Related Manuals for Audiovox Auto Security SS91


Summary of Contents for Audiovox Auto Security SS91
- Page 1 Model SS91 Transmitter Programming Guide These transmitters makes use of icons (symbols) to identify the reac- tion your security system/keyless entry/and or remote start system, where applicable, will have when any icon (button) is pressed. These icons are programmed at time of installation to meet the needs of the individual and to complement the vehicle that the system is installed in.
- Page 2 Although the most common use of the transmitter buttons are shown on the front page of this guide, any button or button combination can be programmed into any receiver channel. Additionally, if all 4 buttons are used and you require access to a 5th channel, you would program a combination of buttons to control the 5th function.
- Page 3 Flash 2 times, indicating that the unit is ready to accept programming for channel # 2 which is only used for separate lock and unlock button transmitters, and is the disarm/unlock/unlock 2 and panic. 6) Press and hold the unlock symbol button of the transmitter you wish to program for 4 seconds or until a long chirp is heard from the siren.
- Page 4 16) Within 10 Seconds, Press and hold the unlock button (or any unused button(s)) of the first transmitter you wish to control Channel 7 output, (Driver Priority 2) until a long chirp is heard from the siren. (Repeat this for each transmitter you wish to operate the Channel 7 output, Driver Priority 2) NOTE: Channels 6 and 7 can be used as a separate output to control a function other than driver priority.
- Page 5 can add any desired unused transmitter button. This action erases only the button stored of the transmitter you are programming. All other codes will remain stored. 2. Enter the transmitter program mode. Using any transmitter button press and hold until a long chirp is heard. If a single chirp or multiple chirps, (up to 7 chirps), are heard, the unit is indicating that the transmitter has already been programmed elsewhere in the re- ceiver.
- Page 6 Remove three #0 philips head screws where indicated to gain access to the CR 2032 battery. Carefully remove transmitter back cover. Carefully remove the discharged battery by sliding it out from under the clip in the direction indicated by the arrow in the diagram below.
- Page 7 Credit card purchasers can order additional or replacement transmitters by phone. Simply dial 1 - 800 - 645 - 4994, and follow the instructions from the operator interface. Audiovox Electronics Corp., 150 Marcus Blvd., Hauppauge, N.Y., 11788 Attn.: TRANSMITTER DEPARTMENT 128-8840...
- Page 8 © 2010 Audiovox Electronics Corp., 150 Marcus Blvd., Hauppauge, NY, 11788 128-8840 128-8840 8 of 8...
Need help?
Do you have a question about the Auto Security SS91 and is the answer not in the manual?
Questions and answers