Table of Contents
Advertisement
Available languages
Available languages
Quick Links
4-451-778-01 (1)
IR
Battery Video IR Light
Lampe vidéo IR à batterie
/ Operating Instructions / Mode d'emploi/
HVL-LEIR1
© 2013 Sony Corporation Printed in China
2
1
3
4
5
6
7
8
9
10
1
2
3
ˎ
ˎ
ˎ
POWER
OFF
ON
ˎ
ˎ
ˎ
ˎ
ˎ
ˎ
ˎ
JBRC
http://www.jbrc.net/hp/contents/index.html
ˎ
HD
IR
LED
IR
ˎ
3
2
ˎ
LED
1,500 lx 50 cm
ˎ
IR
m
ˎ
LED
IR
100%
10%
ˎ
LED
5,500 K 3,200 K
2
ˎ
IR
ˎ
ˎ
ˎ
ˎ
0
40
ˎ
ˎ
LED
ˎ
ˎ
ˎ
ˎ
ˋ
ˋ
ˋ
ˋ
ˋ
ˋ
ˎ
10
ˋ
ˋ
10
30
ˋ
ˋ
POWER
OFF
ˎ
ˎ
LED
ˎ
OFF
ˎ
ˎ
1
6
2
7 IR
3
8 POWER
4 BRIGHT
9
5
10
1
2
3
ˎ
ˎ
ˋ
ˋ
ˋ
ˋ
ˎ
ˎ
1
POWER
OFF
2
3
ˎ
ˎ
POWER
OFF
ˎ
3
2
3
2
ˎ
ˎ
ˎ
ˎ
ˎ
ˎ
ˎ
-1
POWER
LIGHT
IR
-1
IR
1
POWER
IR ON
LED
2
NIGHTSHOT(PLUS)
3
BRIGHT
ˎ
NS
IR
ˎ
IR
2
IR
3
SUPER NS PLUS
ˎ
IR
ˎ
IR
ˎ
IR
OFF
-2
BRIGHT
100% MAX)
10
1
-3
3,200 K
BRIGHT
MAX
ˎ
ˎ
BRIGHT
LED
ˎ
ˎ
ˎ
DC3.0V
3
2
ˎ
DC2.4V
3
2
2.5 W
LED
1,500 lx 0.5 m ISO3200
30
70
5,500 K
3,200 K
BRIGHT
MAX
25
IR
7 m
20 m
3
NH-AA
1.5
BRIGHT
MAX
25
3
LS6SG
1.5
BRIGHT
MAX
25
1m
375 lx
3m
41 lx
5m
15 lx
8m
5.8 lx
10m
3.7 lx
0
40
-20
+60
72.3 mm 80.1 mm 50.4 mm( /
/
)
90 g
IR
ˎ
ˎ
1
ˎ
1
ˎ
HVL-LEIR
ˎ
ˎ
7
Before operating the unit, please read these instructions thoroughly, and retain them
for future reference.
Owner's Record
The model number is located on the bottom, and the serial number is located on the
battery box. Record the serial number in the space provided below. Refer to these
numbers whenever you call upon your Sony dealer regarding this product.
Model No. HVL-LEIR1 Serial No.
WARNING
To reduce the risk of fire or electric shock,
1) do not expose the unit to rain or moisture.
2) do not place objects filled with liquids, such as vases, on the apparatus.
For Customers in the U.S.A. and Canada
This device complies with Part 15 of the FCC Rules. Operation is subject to the
following two conditions:
(1) This device may not cause harmful interference, and (2) this device must accept
any interference received, including interference that may cause undesired operation.
This Class B digital apparatus complies with Canadian ICES-003.
For the Customers in the U.S.A.
CAUTION
You are cautioned that any changes or modifications not expressly approved in this
manual could void your authority to operate this equipment.
NOTE
This equipment has been tested and found to comply with the limits for a Class B
digital device, pursuant to Part 15 of the FCC Rules. These limits are designed to
provide reasonable protection against harmful interference in a residential installation.
This equipment generates, uses, and can radiate radio frequency energy and, if not
installed and used in accordance with the instructions, may cause harmful interference
to radio communications. However, there is no guarantee that interference will not
occur in a particular installation. If this equipment does cause harmful interference to
radio or television reception, which can be determined by turning the equipment off
and on, the user is encouraged to try to correct the interference by one or more of the
following measures:
– Reorient or relocate the receiving antenna.
– Increase the separation between the equipment and receiver.
– Connect the equipment into an outlet on a circuit different from that to which the
receiver is connected.
– Consult the dealer or an experienced radio/TV technician for help.
CAUTION
Replace the battery with the specified type only. Otherwise, fire or injury may result.
Do not expose the batteries to excessive heat such as sunshine, fire or the like.
< Notice for the customers in the countries applying EU Directives >
This product has been manufactured by or on behalf of Sony Corporation, 1-7-1
Konan Minato-ku Tokyo, 108-0075 Japan. Inquiries related to product compliance
based on European Union legislation shall be addressed to the authorized
representative, Sony Deutschland GmbH, Hedelfinger Strasse 61, 70327 Stuttgart,
Germany. For any service or guarantee matters, please refer to the addresses provided
in the separate service or guarantee documents.
Disposal of Old Electrical & Electronic Equipment (Applicable
in the European Union and other European countries with
separate collection systems)
This symbol on the product or on its packaging indicates that this
product shall not be treated as household waste. Instead it shall
be handed over to the applicable collection point for the recycling
of electrical and electronic equipment. By ensuring this product
is disposed of correctly, you will help prevent potential negative
consequences for the environment and human health, which could
otherwise be caused by inappropriate waste handling of this product.
The recycling of materials will help to conserve natural resources.
For more detailed information about recycling of this product,
please contact your local Civic Office, your household waste disposal
service or the shop where you purchased the product.
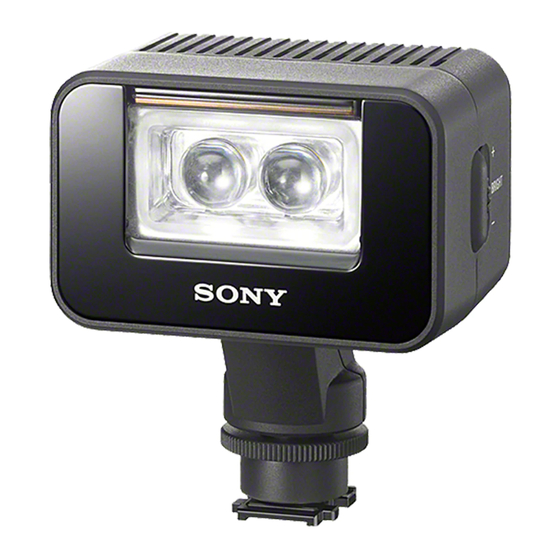
Features
ˎ
The HVL-LEIR1 is a Battery Video IR Light (referred to below as "this unit")
that can be used with a Sony Interchangeable Lens Digital Camera, a Sony
Interchangeable Lens Digital HD Video Camera Recorder or a Sony Digital Still
Camera with a Multi Interface Shoe. This unit has both a high-brightness white LED
and an IR light use with the NightShot (Plus) function.
ˎ
This unit can be used with two AA batteries. To use this unit, attach it to a video
camera etc.
ˎ
The white LED light provides a center illuminance of approximately 1,500 lx (50
cm).
ˎ
The IR light enables recording at a distance of approximately 7 m when using the
NightShot (Plus) function.
ˎ
The illuminance of white LED light and IR light can be adjusted continuously
between 100% and 10% with the dimmer circuit installed.
ˎ
With the built-in color conversion filter, you can set this unit to two color
temperatures, 5,500 K or 3,200 K, when using the white LED light.
ˎ
The IR light is compatible with a video camera with the NightShot (Plus) function.
Precautions
ˎ
This unit does not have dust-proof, splash-proof or water-proof specifications.
ˎ
This unit is a precision instrument. Do not drop, strike or apply a strong impact.
ˎ
Do not attach this unit to a camera with an intelligent accessory shoe. The shoe
adaptor of this unit or the intelligent accessory shoe may be damaged.
ˎ
The operating temperature of this unit is from 0 °C (35 °F) to 40 °C (104 °F).
ˎ
Do not block the ventilation holes. Doing so will cause the internal temperature to
rise which can cause a fire or an accident and cause this unit to malfunction.
ˎ
Do not look at the white LED directly at close range while it is on. It may damage
your eyes.
ˎ
To prevent the camera from dropping, do not hold this unit attached to the camera
to carry it.
ˎ
Do not place this unit near combustible or volatile solvents, such as alcohol or
benzine. Doing so may cause a fire or smoke.
ˎ
Do not allow any liquid into this unit or drop the combustible or metal objects on
the camera. Keeping using the camera after it, doing so may cause a fire or cause this
unit to malfunction.
ˎ
Do not use or store the camera in the following locations. Doing so may cause the
camera to malfunction or deform:
ˋ
a high temperature place such as inside a closed car in summer or in strong
sunshine
ˋ
in direct sunlight or near a heater
locations subject to intense vibrations
ˋ
ˎ
When using this unit in low or high temperature, the battery life will be shorter, so
the lighting time is also reduced. It should be notes the battery capacity decreases as
temperatures changing. When using this unit at the temperature of 10 °C (50 °F) or
less, we recommend operating following steps for longer battery life.
ˋ
Put the battery in your pocket to warm it and attach the battery to this unit just
before use.
When putting a pocket heat pad in your pocket with the battery, be careful not to
touch the pocket heat pad to the battery directly.
ˋ
Charge the battery at room temperature (from 10 °C (50 °F) to 30 °C (85 °F))
ˎ
When you have finished using this unit, be sure that the POWER switch of this unit
is set to "OFF. "
ˎ
When not using this unit or you have finished using it, be sure to remove the battery
from this unit.
ˎ
After use, do not store this unit into the case etc. immediately. The white LED may
be damaged by the generated heat. When storing this unit into the case, be sure that
the power of this unit is set to "OFF, " and it has cooled sufficiently.
ˎ
Recording with this unit with attached to the camera may slightly affect the recorded
sound.
ˎ
Do not apply the strong force or impact to this unit attached to the camera or other
device.
Identifying the parts
1
Filter storing slot
6
Foot
2
Ventilation holes
7
IR indicator
3
Color conversion filter
8
POWER switch
4
BRIGHT dial
9
Battery lid
5
Lock dial
10
Pre-end lamp
Pre-end lamp (remaining battery
notice function)
When the remaining battery power is low, the pre-end lamp turns orange. In this case,
replace it promptly with a new battery or fully charged battery.
(This lamp should be used as only a rough guide of remaining battery power. The
available time of the battery varies depending on the frequency of use and operating
environment.)
Preparation
Attaching to the camera (illustration )
Attach this unit to the Multi Interface Shoe or Accessory Shoe of the camera as follows.
1 Rotate the lock dial of this unit to the right and press it to upwards.
2 Insert the foot of this unit into the shoe of the camera and press it
firmly into place.
3 Rotate the lock dial fully to the left to lock this unit to the camera.
Notes
ˎ
When attaching to a camera that has an accessory shoe, read the instruction manual
of the camera too.
ˎ
If using a camera equipped with a pop-up built-in flash, be careful of the following:
ˋ
Always close the built-in flash of the camera. If your camera has a built-in auto
flash function, turn that function off.
ˋ
Before using the flash, remove this unit from the camera.
ˎ
Make sure this unit is firmly fixed to the camera before use to prevent this unit from
falling during shooting.
To remove from the camera (illustration )
Note
ˎ
When removing, be careful not to drop this unit or the camera. It is recommended
that you attach the camera to a tripod before removing this unit.
1 Turn the POWER switch of this unit to OFF.
2 Rotate the lock dial of the shoe to the right to release the lock.
3 Check that the lock is released before sliding the shoe toward you.
Notes
ˎ
Depending on the frequency of use of this unit, the shoe part may be scratched or
cracked. This can cause this unit to be damaged or fall off.
ˎ
Do not attach this unit to the intelligent accessory shoe. Doing so may damage the
shoe part.
Attaching the battery (illustration )
Before attaching, check that this unit's POWER switch is set to "OFF. "
The following batteries (not supplied) can be used with this unit.
ˎ
Two Sony LR6 (size AA) alkaline batteries
ˎ
Two Sony AA Nickel-Metal Hydride batteries
Notes
ˎ
The batteries may be hot after continuous use. Remove them carefully.
ˎ
You cannot use manganese batteries.
ˎ
When using alkaline batteries, light time may be much shorter.
ˎ
Do not use the batteries in these combinations:
ˋ
new or fully charged with not fully charged.
ˋ
different types or brands.
ˎ
Check the polarities of the batteries when inserting them into this unit. If you insert
the batteries in the wrong direction, this unit does not work.
Turn this unit off before removing the batteries.
ˎ
Using this unit
Using the white LED (illustration -1)
Slide the POWER switch downwards to "LIGHT" while pressing the green
button on the POWER switch.
Using the IR light (illustration -1)
The IR light can be used on a video camera with the NightShot (Plus) function. For
details of NightShot (Plus) operation, refer to the operating instructions supplied with
the video camera.
1 Slide the POWER switch upwards to "IR ON" while pressing the green
button on the POWER switch.
The LED lamp on the side of this unit lights on green.
2 Slide the NIGHTSHOT (PLUS) switch on the video camera to "ON".
3 View the picture in the viewfinder or LCD screen, and adjust the
brightness by rotating the BRIGHT dial.
Tips
ˎ
When you set "NS LIGHT" to "ON" in the menu system of the video camera, the
built-in IR light of the video camera also lights up.
ˎ
In the dark, the distance between the IR light and the subject should be about 2 m
(6 1/2 ft) or more. If the subject is too close, the IR light cannot light up the subject
completely. Since the recording distance will differ depending on the environment,
always check the brightness of the picture in step 3 before you start recording.
ˎ
When "SUPER NS (PLUS)" is set to "ON, " the recording distance lengthens.
Notes on IR light
ˎ
Pictures recorded with the IR light are nearly monochrome.
ˎ
The IR light is invisible because it is infrared. The emitter may look red.
After use
Set the POWER switch to "OFF".
Adjusting the illuminance of this unit (illustration -2)
The illuminance of this unit can be adjusted between 100% (MAX) and 10% (1) using
the BRIGHT dial on this unit.
(Continued on the reverse side.)
Advertisement
Table of Contents

Related Manuals for Sony HVL-LEIR1


Summary of Contents for Sony HVL-LEIR1
- Page 1 ˎ The HVL-LEIR1 is a Battery Video IR Light (referred to below as “this unit”) that can be used with a Sony Interchangeable Lens Digital Camera, a Sony ˎ Interchangeable Lens Digital HD Video Camera Recorder or a Sony Digital Still Camera with a Multi Interface Shoe.
- Page 2 < Avis aux consommateurs des pays appliquant les Directives UE > d’ e mploi du caméscope. Ce produit a été fabriqué par ou pour le compte de Sony Corporation, 1-7-1 Konan 1 Faites glisser l’interrupteur POWER vers le haut pour le mettre sur « IR ...
Need help?
Do you have a question about the HVL-LEIR1 and is the answer not in the manual?
Questions and answers