Table of Contents
Advertisement
Advertisement
Table of Contents

Subscribe to Our Youtube Channel
Related Manuals for Asus P5KPL IPC SI


Summary of Contents for Asus P5KPL IPC SI
- Page 1 P5KPL IPC/SI...
- Page 2 Product warranty or service will not be extended if: (1) the product is repaired, modified or altered, unless such repair, modification of alteration is authorized in writing by ASUS; or (2) the serial number of the product is defaced or missing.
-
Page 3: Table Of Contents
BIOS information Managing and updating your BIOS ..........2-1 2.1.1 ASUS Update utility ............2-1 2.1.2 ASUS EZ Flash 2 utility ........... 2-2 2.1.3 ASUS CrashFree BIOS 3 utility ........2-3 BIOS setup program ..............2-4 Main menu ..................2-4 2.3.1... - Page 4 Boot menu .................. 2-12 2.6.1 Boot Device Priority ............2-12 2.6.2 Boot Settings Configuration .......... 2-12 2.6.3 Security ................. 2-13 Tools menu ................. 2-14 2.7.1 ASUS EZ Flash 2 ............2-14 2.7.2 AI NET 2................ 2-14 Exit menu ..................2-14...
-
Page 5: Notices
Complying with the REACH (Registration, Evaluation, Authorisation, and Restriction of Chemicals) regulatory framework, we published the chemical substances in our products at ASUS REACH website at http://green.asus.com/english/REACH.htm. DO NOT throw the motherboard in municipal waste. This product has been designed to enable proper reuse of parts and recycling. -
Page 6: Safety Information
Safety information Electrical safety • To prevent electrical shock hazard, disconnect the power cable from the electrical outlet before relocating the system. • When adding or removing devices to or from the system, ensure that the power cables for the devices are unplugged before the signal cables are connected. If possible, disconnect all power cables from the existing system before you add a device. -
Page 7: Conventions Used In This Guide
Refer to the following sources for additional information and for product and software updates. ASUS websites The ASUS website provides updated information on ASUS hardware and software products. Refer to the ASUS contact information. Optional documentation Your product package may include optional documentation, such as warranty flyers, that may have been added by your dealer. -
Page 8: P5Kpl Ipc/Si Specifications Summary
- 4 x 240-pin DIMM sockets support unbuffered non-ECC 800/667 MHz DDR2 memory modules - Supports up to 4GB system memory Refer to www.asus.com or this user manual for the Memory QVL (Qualified Vendors Lists). ** When you install a total memory of 4GB capacity... - Page 9 BIOS features 8Mb Flash ROM, AMI BIOS, PnP, DMI v2.0, WfM 2.0, ACPI v2.0a, SM BIOS v2.5 Support CD Contents Drivers ASUS PC Probe II ASUS LiveUpdate Utility Anti-virus software (OEM version) Accessories 1 x Serial ATA cable 1 x UltraDMA 100/66 cable...
-
Page 10: Chapter 1: Product Introduction
Chapter 1 Product introduction Thank you for buying an ASUS P5KPL IPC/SI motherboard! ® Before you start installing the motherboard, and hardware devices on it, check the items in your motherboard package. Refer to page ix for the list of accessories. -
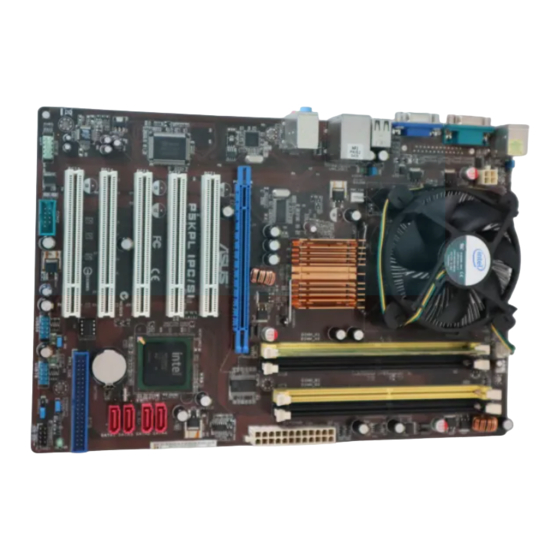
Page 11: Motherboard Overview
Motherboard overview 1.2.1 Motherboard layout Ensure that you install the motherboard into the chassis in the correct orientation. The edge with external ports goes to the rear part of the chassis. Place this side towards the rear of the chassis. Place six screws into the holes indicated by circles to secure the motherboard to the chassis. -
Page 12: Layout Contents
Contact your retailer immediately if the PnP cap is missing, or if you see any damage to the PnP cap/socket contacts/motherboard components. ASUS will shoulder the cost of repair only if the damage is shipment/transit-related. • Keep the cap after installing the motherboard. ASUS will process Return Merchandise Authorization (RMA) requests only if the motherboard comes with the cap on the LGA775 socket. -
Page 13: System Memory
System memory 1.4.1 Overview The motherboard comes with four Double Data Rate 2 (DDR2) Dual Inline Memory Modules (DIMM) sockets. The figure illustrates the location of the DDR2 DIMM sockets: Channel Sockets Channel A DIMM_A1 and DIMM_A2 Channel B DIMM_B1 and DIMM_B2 1.4.2 Memory configurations You may install 512MB, 1GB, 2GB, and 4GB unbuffered non-ECC DDR2 DIMMs into the... - Page 14 · · 1024MB TAKEMS TMS1GB264C081-665QI DS MS18T 51280-3 takeMS · · 1024MB TEAM TVDD1.02M667C4 T2D648PT-6 TEAM · · 1024MB UMAX D46701GP3-63BJU U2S12D30YP-6E UMAX · · 2048MB UMAX D46702GP0-73BCU U2S24D30TP-6E UMAX · · (continued on the next page) ASUS P5KPL IPC/SI...
- Page 15 DDR2-800 MHz capability DIMM socket Chip support (Optional) Size Vendor Part No. SS/DS CL Chip NO. Brand 512MB A-Data M2GVD6G3H3160Q1E52 VD29608A8A-25EG20813 VDATA · · · 2048MB(Kit of 2) A-Data AD2800E001GOU 4-4-4-12 Heat-Sink Package · · · 1024MB A-Data M2GVD6G314170Q1E58 VD29608A8A-25EG80813 VDATA ·...
- Page 16 • B*: Supports one pair of modules inserted into either the yellow or black slots as one pair of Dual-channel memory configuration. • C*: Supports four modules inserted into both the yellow and black slots as two pairs of Dual-channel memory configuration. Visit the ASUS website at www.asus.com for the latest QVL. ASUS P5KPL IPC/SI...
-
Page 17: Expansion Slots
Expansion slots In the future, you may need to install expansion cards. The following sub-sections describe the slots and the expansion cards that they support. Unplug the power cord before adding or removing expansion cards. Failure to do so may cause you physical injury and damage motherboard components. -
Page 18: Jumpers
Removing the cap will cause system boot failure! If the steps above do not help, remove the onboard battery and move the jumper again to clear the CMOS RTC RAM data. After clearing the CMOS, reinstall the battery. ASUS P5KPL IPC/SI... - Page 19 Keyboard power (3-pin KBPWR) This jumper allows you to enable or disable the keyboard wake-up feature. When you set this jumper to pins 2–3 (+5VSB), you can wake up the computer by pressing a key on the keyboard (the default is the Space Bar). This feature requires an ATX power supply that can supply at least 1A on the +5VSB lead, and a corresponding setting in the BIOS.
-
Page 20: Connectors
Video Graphics Adapter (VGA) port. This 15-pin port is for a VGA monitor or other VGA-compatible devices. COM port. This port is for pointing devices or other serial devices. PS/2 keyboard port (purple). This port is for a PS/2 keyboard. ASUS P5KPL IPC/SI 1-11... -
Page 21: Internal Connectors
These are not jumpers! DO NOT place jumper caps on the fan connectors. Only the CPU fan and chassis fan support the ASUS Q-Fan 2 feature. USB connectors (10-1 pin USB56, USB78) These connectors are for USB 2.0 ports. Connect the USB module cable to any of these connectors, then install the module to a slot opening at the back of the system chassis. - Page 22 The connector is for a serial (COM) port. Connect the serial port module cable to the connector, then install the module to a slot opening at the back of the system chassis. The serial port bracket (COM2) is purchased separately. ASUS P5KPL IPC/SI 1-13...
- Page 23 ATX power connectors (24-pin EATXPWR, 4-pin ATX12V) These connectors are for ATX power supply plugs. The power supply plugs are designed to fit these connectors in only one orientation. Find the proper orientation and push down firmly until the connectors completely fit. •...
- Page 24 ATA (133 Mb/s). The numbers (1, 3, 2, 4) on the SATA ports only indicate the order that the SATA devices are detected and will not affect the use of the SATA devices. ASUS P5KPL IPC/SI 1-15...
- Page 25 System panel connector (10-1 pin F_PANEL) This connector supports several chassis-mounted functions. • System power LED (2-pin PLED) This 2-pin connector is for the system power LED. Connect the chassis power LED cable to this connector. The system power LED lights up when you turn on the system power, and blinks when the system is in sleep mode.
-
Page 26: Software Support
The contents of the Support CD are subject to change at any time without notice. Visit the ASUS website at www.asus.com for updates. To run the Support CD Place the Support CD to the optical drive. -
Page 27: Chapter 2: Bios Information
BIOS in the future. Copy the original motherboard BIOS using the ASUS Update utility. 2.1.1 ASUS Update utility The ASUS Update is a utility that allows you to manage, save, and update the motherboard BIOS in Windows environment. ®... -
Page 28: Asus Ez Flash 2 Utility
Follow the onscreen instructions to complete the updating process. 2.1.2 ASUS EZ Flash 2 utility The ASUS EZ Flash 2 feature allows you to update the BIOS without using an OS-based utility. Before you start using this utility, download the latest BIOS file from the ASUS website at www.asus.com. -
Page 29: Asus Crashfree Bios 3 Utility
• Only a USB flash disk wit h FAT 32/16 format and single partition can support the ASUS EZ Flash 2 utility. • Do not shut down or reset the system while updating the BIOS to prevent system boot failure! 2.1.3... -
Page 30: Bios Setup Program
• The BIOS setup screens shown in this section are for reference purposes only, and may not exactly match what you see on your screen. • Visit the ASUS website at www.asus.com to download the latest BIOS file for this motherboard. -
Page 31: System Time
Selects the DMA mode. Configuration options: [Auto] SMART Monitoring [Auto] Sets the Smart Monitoring, Analysis, and Reporting Technology. Configuration options: [Auto] [Disabled] [Enabled] 32Bit Data Transfer [Enabled] Enables or disables 32-bit data transfer. Configuration options: [Disabled] [Enabled] ASUS P5KPL IPC/SI... -
Page 32: Storage Configuration
2.3.4 Storage Configuration The items in this menu allow you to set or change the configurations for the SATA devices installed in the system. Select an item then press <Enter> if you want to configure the item. ATA/IDE Configuration [Enhanced] Allows you to set the ATA/IDE configuration. -
Page 33: Cpu Configuration
Allows you to enable or disable C1E Support. Configuration options: [Disabled] [Enabled] Max CPUID Value Limit [Disabled] Setting this item to [Enabled] allows legacy operating systems to boot even without support for CPUs with extended CPUID functions. Configuration options: [Disabled] [Enabled] ASUS P5KPL IPC/SI... -
Page 34: Chipset
Vanderpool Technology [Enabled] Enables or disables this item when the processor supports Vanderpool technology. Users need to reset the computer to change the configuration of this item. Configuration options: [Enabled] [Disabled] CPU TM function [Enabled] Enables or disables Intel CPU Thermal Monitor (TM) function, a CPU overheating protection ®... -
Page 35: Onboard Devices Configuration
The menu includes setting IRQ and DMA channel resources for either PCI/PnP or legacy ISA devices, and setting the memory size block for legacy ISA devices. Take caution when changing the settings of the PCI PnP menu items. Incorrect field values can cause the system to malfunction. ASUS P5KPL IPC/SI... -
Page 36: Power Menu
Plug and Play O/S [No] When set to [No], BIOS configures all the devices in the system. When set to [Yes] and if you install a Plug and Play operating system, the operating system configures the Plug and Play devices not required for boot. Configuration options: [No] [Yes] PCI Latency Timer [64] Allows you to select the value in units of PCI clocks for the PCI device latency timer register. -
Page 37: Apm Configuration
(RPM). If the fan is not connected to the motherboard, the field shows N/A. Select Ignored if you do not wish to display the detected speed. CPU/Chassis Q-Fan Control [Disabled] Allows you to enable or disable the CPU/chassis Q-Fan control. Configuration options: [Disabled] [Enabled] ASUS P5KPL IPC/SI 2-11... -
Page 38: Boot Menu
POST items. Configuration options: [Disabled] [Enabled] Full Screen Logo [Enabled] This allows you to enable or disable the full screen logo display feature. Configuration options: [Disabled] [Enabled] Set this item to [Enabled] to use the ASUS MyLogo2 feature. ™ AddOn ROM Display Mode [Force BIOS] Sets the display mode for option ROM. -
Page 39: Security
On the password box, key in a password containing up to six letters or numbers, or both. Confirm the password when prompted. The message Password Installed appears after you set your password successfully. To change the user password, follow the same steps in setting a user password. ASUS P5KPL IPC/SI 2-13... -
Page 40: Tools Menu
2.7.1 ASUS EZ Flash 2 Allows you to run ASUS EZ Flash 2. When you press <Enter>, a confirmation message appears. Use the left/right arrow key to select between [Yes] or [No], then press <Enter> to confirm your choice. Please see section 2.1.2 ASUS EZ Flash 2 utility for details.
Need help?
Do you have a question about the P5KPL IPC SI and is the answer not in the manual?
Questions and answers