Table of Contents
Advertisement
Owner's Manual
Bedienungsanleitung
Manual del usuario
Thank you, and congratulations on your choice of the UM-1EX USB MIDI Interface.
201a
Before using this unit, carefully read the sections entitled: "USING THE UNIT
SAFELY" and "IMPORTANT NOTES" (p. 2; p. 4). These sections provide
important information concerning the proper operation of the unit. Additionally,
in order to feel assured that you have gained a good grasp of every feature
provided by your new unit, Owner's manual should be read in its entirety. The
manual should be saved and kept on hand as a convenient reference.
202
Copyright © 2005 ROLAND CORPORATION
All rights reserved. No part of this publication may be reproduced in any form
without the written permission of ROLAND CORPORATION.
Mode d'emploi
Manuale d'uso
Advertisement
Table of Contents

Related Manuals for Edirol UM-1EX

Summary of Contents for Edirol UM-1EX
-
Page 1: Manual Del Usuario
Mode d’emploi Manuale d’uso Manual del usuario Thank you, and congratulations on your choice of the UM-1EX USB MIDI Interface. 201a Before using this unit, carefully read the sections entitled: “USING THE UNIT SAFELY” and “IMPORTANT NOTES” (p. 2; p. 4). These sections provide important information concerning the proper operation of the unit. - Page 2 USING THE UNIT SAFELY Used for instructions intended to alert the user to the risk of death or severe injury should improperly. Used for instructions intended to alert the user to the risk of injury or material damage should the unit be used improperly.
- Page 3 • Make sure you always have the unit placed so it is level and sure to remain stable. Never place it on stands that could wobble, or on inclined surfaces. • Do not allow any objects (e.g., flammable material, coins, pins); or liquids of any kind (water, soft drinks, etc.) to penetrate the unit.
-
Page 4: Important Notes
IMPORTANT NOTES 291a In addition to the items listed under “USING THE UNIT SAFELY” on pages 2 and 3, please read and observe the following: Placement 352a • This device may interfere with radio and television reception. Do not use this device in the vicinity of such receivers. - Page 5 Handling CD-ROMs • Avoid touching or scratching the shiny underside (encoded surface) of the disc. Damaged or dirty CD-ROM discs may not be read properly. Keep your discs clean using a commercially available CD cleaner. * Microsoft and Windows are registered trademarks of Microsoft Corporation. 206e * The screen shots in this document are used in compliance with the guidelines of the Microsoft Corporation.
-
Page 6: Contents Of The Package
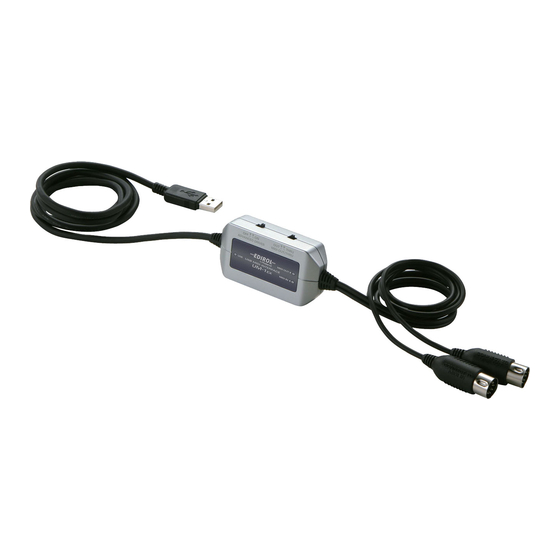
Contents of the Package The UM-1EX includes the following items. When you open the package, first make sure that all items are included. If any are missing, contact the dealer where you purchased the UM- 1EX. USB MIDI Interface UM-1EX CD-ROM This contains drivers for use with the UM-1EX. -
Page 7: Table Of Contents
Contents Names of Things and What They Do... 9 Getting Connected and Installing Drivers (Windows) ... 11 About the Driver Modes ... 11 Installing the Driver... 12 Windows XP/2000 users ... 12 Windows Me/98 users ... 17 Setting the Driver ... 18 Windows XP users ... - Page 8 Deutsch Herstellung der Verbindung und Installation der Treiber (Windows) ... 48 Installation des Treibers... 48 Windows XP/2000-Anwender ... 48 Herstellung der Verbindung und Installation der Treiber (Macintosh) ... 51 Treiberinstallation und Einstellungen ... 51 Mac OS X-Anwender ... 51 Français Connexion et installation des pilotes (Windows) ...
-
Page 9: Names Of Things And What They Do
This will light when you’ve connected the UM-1EX to your computer and your computer has detected the UM-1EX. In order for your computer to detect the UM-1EX, you must install the driver and make settings. (→“Getting Connected and Installing Drivers” Windows (p. 11) / Macintosh (p. 21)) ADVANCED (mode select) Switch This switches the operating mode. - Page 10 THRU Switch Selects the destination to which the MIDI messages that flow in through the UM-1EX’s MIDI IN cable are to output. ■THRU switch ON/OFF setting You can use the THRU switch to switch the destination device for MIDI messages from the MIDI keyboard or digital piano connected to the MIDI IN cable.
-
Page 11: Getting Connected And Installing Drivers (Windows)
A “driver” is software that transfers data between the UM-1EX and application software running on your computer, when your computer and the UM-1EX are connected. The driver sends data from your application to the UM-1EX, and from the UM-1EX to your application. -
Page 12: Installing The Driver
Windows XP/2000 users 1. With the UM-1EX left unconnected, start up Windows. Do not connect the UM-1EX to the computer until you reach Step 13 (p. 14). * Disconnect all USB cables except for a USB keyboard and USB mouse (if used). - Page 13 * The driver cannot be installed by means of the following procedure if the switch is set to OFF. If you are using Windows 98/Me/2000/XP or XP SP1, you must turn the ADVANCED (mode select) Switch ON before you connect the UM-1EX to your computer.
- Page 14 If the message “Connect to Windows Update to search for software?” appears, choose “No” and then click [Next]. 2. Make sure that “EDIROL UM-1” is indicated. Then, choose “Install the software automatically (Recommended) ” and click [Next]. If “Driver Signing Options” in step 4 is set to anything other than “Ignore,” a dialog box with an “!”...
- Page 15 ■ Giving priority to Background Services To ensure that MIDI data is handled smoothly, proceed as follows to make this setting. Windows XP: 1. Open the System Properties dialog box. 1. From the Windows start menu, choose Control Panel. 2. In “Pick a category,” click “Performance and Maintenance.” 3.
- Page 16 Windows 2000: 1. Click the Windows Start button, and from the menu that appears, select Settings | Control Panel. 2. In Control Panel, double-click the System icon. 3. Click the Advanced tab. 4. At the right of the Performance field, click [Performance Options]. The Performance Options dialog box will appear.
-
Page 17: Windows Me/98 Users
Windows Me/98 users 1. With the UM-1EX left unconnected, start up Windows. Do not connect the UM-1EX to the computer until you reach Step 9. 2. Exit all currently running software. Also close any open windows. If you are using virus checking or similar software, be sure to exit it as well. -
Page 18: Setting The Driver
Setting the Driver The following describes the settings needed to use the UM-1EX with Media Player or other sequencer software using Windows standard device settings. If you are using sequencer software that does not utilize Windows standard device settings, make the device settings within the sequencer software. -
Page 19: Windows 2000/Me Users
3. Click ▼ in the MIDI Music Playback [Preferred device] menu and select the MIDI device from the list that appears. Selecting “EDIROL UM-1 MIDI” enables sounds to be played from the sound module connected to the UM- 1EX’s MIDI OUT cable with Media Player or other sequencer software utilizing Windows standard device settings. -
Page 20: Windows 98 Users
3. Select [Single instrument], and select the MIDI device from the list that appears. If you want to use Media Player to play a sound module connected to the UM-1EX’s MIDI OUT cable, select “EDIROL UM-1 MIDI.” 4. Close the Multimedia Properties dialog box. -
Page 21: Getting Connected And Installing Drivers (Macintosh)
A “driver” is software that transfers data between the UM-1EX and application software running on your computer, when your computer and the UM-1EX are connected. The driver sends data from your application to the UM-1EX, and from the UM-1EX to your application. -
Page 22: Mac Os X Users
* A message such as “This Installer package needs to...” may appear. Click “Continue.” 5. The display will indicate “Welcome to the EDIROL UM-1Driver Installer.” Click [Continue]. 6. The display will indicate “Select a Destination.” Click the drive in which the operating system is installed to select it, and then click [Continue]. - Page 23 5. Confirm that UM-1 appears in the Audio MIDI Setup dialog box. * If UM-1 does not appear or if it is grayed out, it means that the UM-1EX is not being recognized properly. Click Rescan MIDI. Also try disconnecting and reconnecting the UM-1EX.
- Page 24 7. Set the device name. 1. With the new external device selected, click Show Info. 2. Enter the name in the Device Name field. 8. Connect the ▼ and ▲ symbols (which signify the outputs and inputs) of the UM-1 icon to those of the new external device icon by using the mouse to drag between them.
- Page 25 Quit your sequencer software before you disconnect the UM-1EX from your Macintosh. • Turn off the Sleep function of your Macintosh. • The UM-1EX will not operate in the Mac OS X Classic environment. Use the UM-1EX when the Classic environment is not running.
-
Page 26: Mac Os 9 Users
* If you install OMS after installing the UM-1 driver, you must install the UM-1 driver once again. If a UM-1EX is already connected to your Macintosh when you install the driver, a message like the following will appear when the Macintosh is started up. Perform the steps described below as appropriate for the message that is displayed. - Page 27 5. Verify the Install Location, and click [Install]. The installation location will be shown differently depending on your system. Make sure that you have selected the startup disk for the system you are currently using. fig.05-20 6. If a message like the following is displayed, click [Continue].
-
Page 28: Oms Settings
■ OMS settings If you are using FreeMIDI, proceed to “FreeMIDI settings” (p. 31). Set the UM-1EX’s ADVANCED (mode select) Switch to the ON position. Operation of the UM-1EX Connect the UM-1EX to your Macintosh. Operation of the UM-1EX * Connect the cable to the USB connector of the Macintosh itself, not to the USB connector of the keyboard. - Page 29 fig.3-6_35 6. The Create a New Studio Setup dialog box will appear. Click [Cancel]. If you accidentally clicked [OK], click [Cancel] in the next screen. fig.3-8_35 7. Choose “Open” from the File menu. From the OMS Setting folder that you copied in step 3, select the UM-1 file, and click [Open].
- Page 30 MIDI connector icon, the cursor will change to a shape. Click the MIDI connector icon shown in the illustration. If the UM-1EX’s MIDI OUT indicator starts blinking, the settings are correct. 12. Exit OMS Setup. From the File menu, choose [Exit]. If the AppleTalk confirmation dialog box appears, click [OK] to close the dialog box.
-
Page 31: Freemidi Settings
■ FreeMIDI settings Set the UM-1EX’s ADVANCED (mode select) Switch to the ON position. Operation of the UM-1EX Connect the UM-1EX to your Macintosh. Operation of the UM-1EX * Connect the cable to the USB connector of the Macintosh itself, not to the USB connector of the keyboard. - Page 32 9. The mouse cursor will change to the shape of a keyboard. Click the icon shown in the illustration. If the UM-1EX’s MIDI OUT indicator starts blinking, the settings are correct. 10. Once again choose the MIDI menu command Check Connections to end the test.
-
Page 33: Basic Use
* Don't change the setting of the THRU switch while you're using the UM-1EX. Doing so will cause MIDI errors. If you are experiencing duplicate notes (i.e., if your sound generating device plays two notes for each note it should play), turn Local Control OFF on your sound generating device, or turn the Thru function OFF in your sequencer software. -
Page 34: Transmitting Midi Messages From The Sequencer Software To A Midi Sound Module Or Digital Piano
MIDI messages from the computer are transmitted to the MIDI device (e.g., MIDI sound module, digital piano) connected to the UM-1EX’s MIDI OUT cable. * Don't change the setting of the THRU switch while you're using the UM-1EX. Doing so will cause MIDI errors. -
Page 35: Transmitting Midi Messages From A Midi Keyboard Or Other Device To A Midi Sound Module
MIDI sound module connected to the UM-1EX’s MIDI OUT cable. Even if the UM-1EX is connected to a computer, no MIDI messages will be sent to the computer. * Don't change the setting of the THRU switch while you're using the UM-1EX. Doing so will cause MIDI errors... - Page 36 MIDI messages are transmitted to the MIDI device (e.g., MIDI sound mod- ule) connected to the MIDI OUT cable. fig.connect-change_e * Don't change the setting of the THRU switch while you're using the UM-1EX. Doing so will cause MIDI errors. MIDI Message Flow (THRU OFF)
-
Page 37: Appendices
* Standard driver mode supports only Windows XP SP2 or later, and Mac OS X. If you are using Windows 98/Me/2000/XP or XP SP1, or if you are using Mac OS 9, you must turn the ADVANCED (mode select) Switch ON before you connect the UM-1EX to your computer. -
Page 38: Troubleshooting
Be sure to close all other programs before installation. Is the CD-ROM correctly inserted into your CD-ROM drive? Installation is not possible unless the CD-ROM included with the UM-1EX is inserted in your CD- ROM drive. Make sure that the CD-ROM is correctly inserted into your CD-ROM drive. - Page 39 USB. Check the settings of your computer. • In some cases, the UM-1EX cannot be used with a bus-powered hub (a hub that does not contain a power supply). Please use a self-powered hub (a hub that contains a power supply).
- Page 40 You are asked to install the driver file even though you installed the driver (Windows) Did you connect the UM-1EX to a different USB connector than the one you used when installing the driver? If your computer or USB hub has two or more USB connectors, and you connect the UA-1EX to a different USB connector, you may be asked for the driver file even though the driver has already been installed in your computer.
- Page 41 Check the settings of your computer. • In some cases, the UM-1EX cannot be used with a bus-powered hub (a hub that does not contain a power supply). Please use a self-powered hub (a hub that contains a power supply).
- Page 42 Macintosh, and then restart it. • In some cases, the UM-1EX will not be detected if you have connected it to the USB connector located on the keyboard of the Macintosh. Please connect it to a USB connector on the...
-
Page 43: Deleting The Driver
Deleting the Driver If you were unable to install the driver according to the procedure given, the UM-1EX may not be recognized correctly by the computer. In this case, use the following procedure to delete the driver, and then follow the procedure to install the driver once again. - Page 44 Insert the CD-ROM into the CD-ROM drive of your Macintosh. 3. In the Driver (Mac OS X) folder of the CD-ROM, double-click “UM1_Uninstaller.” 4. The display will indicate “This uninstalls EDIROL UM-1 driver from this Macintosh.”; click [Uninstall]. If any other message appears, proceed as directed by that message.
- Page 45 Was a heavy processing load experienced while using the UM-1EX, such as accessing the CD-ROM drive or a network? If an operation involving a heavy processing load is performed while the UM-1EX is in use, it may not operate correctly. If this occurs, stop playback/recording, and then try resuming playback/ recording.
-
Page 46: Operating System Becomes Unstable
Operation becomes unstable when the computer is started up with the UM-1EX already connected Please start up your computer with the UM-1EX disconnected, and then connect the UM-1EX. On a computer that uses a USB keyboard, starting up the computer with the UM-1EX already connected may cause operation to become unstable. -
Page 47: Main Specifications
Main Specifications ■ UM-1EX: USB MIDI Interface Controllers ADVANCED switch THRU switch Connectors MIDI IN Cable x 1 (16 MIDI Channels) MIDI OUT Cable x 1 (16 MIDI Channels) USB Cable Power Supply Supplied from the computer Current Draw 70 mA... -
Page 48: Herstellung Der Verbindung Und Installation Der Treiber (Windows)
Windows XP/2000-Anwender 1. Starten Sie Windows bei nicht angeschlossenem UM-1EX. Schließen Sie den UM-1EX nicht an den Computer, solange Sie nicht Schritt 13 erreicht haben (S. 50). * Entfernen Sie sämtliche USB-Kabel außer denen der USB-Tastatur und der USB-Maus (falls vorhanden). - Page 49 * Der Treiber kann mit dem folgenden Verfahren nicht installiert werden, wenn der Schalter auf OFF steht. Wenn Sie Windows 98/Me/2000/XP oder XP SP1 verwenden, müssen sie den Schalter ADVANCED (Erweitert) (Moduswahl) auf ON stellen, bevor Sie UM-1EX an Ihren Computer anschließen.
- Page 50 Operation of the UM-1EX Die Meldung “Neue Hardware gefunden” wird angezeigt. Bitte warten Sie. * Dieses Gerät ist mit einem Schutzschaltkreis ausgestattet. Nach dem Anschluss des UM-1EX benötigt das Gerät eine kurze Zeitspanne von einigen Sekunden, bis es den normalen Betrieb aufnimmt.
-
Page 51: Herstellung Der Verbindung Und Installation Der Treiber (Macintosh)
* Eine Meldung wie “This Installer package needs to...” (Dieses Installationspaket muss...) wird eventuell angezeigt. Klicken Sie auf “Continue” (Weiter). 5. In der Anzeige erscheint “Welcome to the EDIROL UM-1Driver Installer” (Willkommen beim EDIROL UM-1Treiber-Installationsprogramm). Klicken Sie auf [Continue] (Weiter). - Page 52 5. Bestätigen Sie, dass UM-1 im Dialogfeld Audio MIDI Setup erscheint. * Wenn UM-1 nicht erscheint oder grau angezeigt wird, bedeutet dies, dass der UM-1EX nicht richtig erkannt wird. Klicken Sie auf Rescan MIDI (MIDI neu scannen). Versuchen Sie auch den Anschluss des UM-1EX zu trennen und wieder anzuschließen.
- Page 53 7. Stellen Sie den Laufwerknamen ein. 1. Nach Auswahl des neuen externen Geräts klicken Sie auf Show Info. (Info anzeigen). 2. Geben Sie den Namen in das Feld Device Name (Gerätename) ein. 8. Verbinden Sie die Symbole ▼ und ▲ (sie bedeuten Ausgaben und Eingaben) des UM-1 Symbols mit denen des Symbols für das neue externe Gerät und verwenden Sie die Maus, um die Symbole zu ziehen.
- Page 54 Beenden Sie die Ausführung der Sequenzsoftware bevor Sie den UM-1EX von Ihrem Macintosh trennen. • Deaktivieren Sie die Ruhefunktion Ihres Macintosh. • Der UM-1EX funktioniert nicht in der Mac OS X Classic Umgebung. Verwenden Sie den UM- 1EX, wenn die Classic Umgebung nicht läuft. 10, 12...
-
Page 55: Connexion Et Installation Des Pilotes (Windows)
Windows XP/2000 1. Avant de connecter l’UM-1EX, démarrez Windows. Ne connectez pas l’UM-1EX avant d’avoir atteint l’étape 13 (p. 57). * Débranchez tous les câbles USB, sauf ceux du clavier USB ou de la souris USB, le cas échéant. * Ouvrez une session Windows en tant qu’utilisateur doté de droits d’administration (Administrateur, par exemple). - Page 56 * Si ce commutateur reste sur OFF, vous ne pourrez pas installer le pilote avec la procédure suivante. Si vous utilisez Windows 98/Me/2000/XP ou XP SP1, vous devez placer le commutateur mode AVANCÉ (sélecteur de mode) sur ON avant de connecter l’UM-1EX à votre ordinateur.
- Page 57 Operation of the UM-1EX Le message “Nouveau matériel détecté” s’affiche. Veuillez patienter. * Cet appareil est équipé d’un circuit de protection. Après avoir connecté l’UM-1EX, il est nécessaire d’attendre quelques secondes avant que l’appareil ne fonctionne normalement. Windows XP : 1.
-
Page 58: Connexion Et Installation Des Pilotes (Macintosh)
* Il se peut que le système vous indique que “ce package d’installation a besoin de (...)”. Cliquez sur “Continuer”.. 5. Un message de “bienvenue dans l’Assistant d’installation du pilote de l’EDIROL UM-1” s’affiche. Cliquez sur [Continuer]. 6. L’écran indique “Sélectionnez une destination”. - Page 59 * Il se peut que les paramètres d’installation d’une version antérieure du pilote soient restés dans le système. Si c’est le cas, cliquez sur UM-1 ou EDIROL UM-1 (en grisé) pour le sélectionner, puis sur Supprimer le périphérique sélectionné pour supprimer les paramètres.
- Page 60 7. Choisissez le nom du périphérique. 1. Sélectionnez le nouveau périphérique externe, puis cliquez sur Afficher les informations. 2. Saisissez le nom dans le champ Nom du périphérique. 8. Connectez les symboles ▼ et ▲ (qui signalent les entrées et les sorties) de l’icône de l’UM-1 à ceux de l’icône du nouveau périphérique externe en utilisant la souris pour tracer les connexions.
- Page 61 Avant d’utiliser l’UM-1EX avec un logiciel séquenceur, respectez les points suivants : • Connectez l’UM-1EX à votre Macintosh avant de démarrer votre logiciel séquenceur. • Ne débranchez pas l’UM-1EX de votre ordinateur tant que votre logiciel séquenceur est ouvert. Quittez le logiciel avant de débrancher l’UM-1EX de votre ordinateur.
-
Page 62: Collegamento E Installazione Dei Driver (Windows)
Utenti Windows XP/2000 1. Avviare Windows con l’UM-1EX scollegato. Non collegare l’UM-1EX al computer fino al passo 13 (p. 64). * Scollegare tutti i cavi USB, ad eccezione della tastiera e del mouse USB, se utilizzati. * Accedere a Windows utilizzando un nome utente con privilegi amministrativi, ad esempio Administrator. - Page 63 * Il driver non può essere installato seguendo la procedura sotto indicata se l’interruttore è impostato su OFF. Se si utilizza Windows 98/Me/2000/XP o XP SP1, è necessario impostare l’interruttore ADVANCED (selezione del modo) in posizione ON prima di collegare l’UM-1EX al computer.
- Page 64 Se viene visualizzato il messaggio “Consentire la connessione a Windows Update per la ricerca di software?”, scegliere “No” e quindi fare clic su [Avanti]. 2 Verificare che “EDIROL UM-1” sia visualizzato. quindi scegliere “Ricerca il miglior driver disponibile in questi percorsi” e fare clic su [Avanti].
-
Page 65: Collegamento E Installazione Dei Driver (Macintosh)
* È possibile che venga visualizzato un messaggio simile a “This Installer package needs to...” Fare clic su “Continua”. 5. Sullo schermo comparirà il seguente messaggio: “Welcome to the EDIROL UM-1Driver Installer”. Fare clic su [Continua]. 6. Sullo schermo verrà visualizzato il messaggio: “Select a Destination”. - Page 66 5. Verificare che UM-1 viene visualizzato nella finestra di dialogo Audio MIDI Setup. * Se UM-1 non viene visualizzato o se non è attivo, significa che l’UM-1EX non è stato riconosciuto in modo corretto. Fare clic su Rescan MIDI. Scollegare e ricollegare l’UM-1EX.
- Page 67 7. Impostare il nome del dispositivo. 1 Dopo aver selezionato nuovo dispositivo esterno, fare clic su Mostra Info. 2 Immettere il nome nel campo Device Name. 8. Collegare i simboli ▼ e ▲ (che rappresentano le uscite e le entrate) dell’icona UM-1 a quelli dell’icona nuovo dispositivo esterno utilizzando il mouse per trascinarli.
- Page 68 Prima di utilizzare l’UM-1EX con il software sequencer, leggere le seguenti indicazioni. • Collegare l’UM-1EX al Macintosh prima di avviare il software sequencer. • Non scollegare l’UM-1EX dal Macintosh mentre il software sequencer è in esecuzione. Chiudere il software sequencer prima di scollegare l’UM-1EX dal Macintosh.
-
Page 69: Conexión E Instalación De Los Controladores (Windows)
Usuarios de Windows XP/2000 1. Con el UM-1EX desconectado, inicie Windows. No conecte el UM-1EX al equipo hasta que llegue al Paso 13 (pág. 71). * Desconecte todos los cables USB excepto el del teclado USB y el ratón USB (si se utilizan). - Page 70 * El controlador no se puede instalar mediante el siguiente procedimiento si el interruptor está en OFF. Si está utilizando Windows 98/Me/2000/XP o XP SP1, debe encender el Interruptor de selección del modo ADVANCED antes de conectar el UM-1EX al ordenador.
- Page 71 Aparecerá un mensaje de “Hardware nuevo encontrado”. Espere. * Esta unidad está provista de un circuito de protección. Es necesario dejar pasar un pequeño intervalo (de unos segundos) después de conectar el UM-1EX para que la unidad funcione correctamente. Windows XP: 1.
-
Page 72: Conexión E Instalación De Los Controladores (Macintosh)
* Es posible que aparezca un mensaje parecido a “El paquete del programa de instalación necesita...”. Haga clic en “Continuar”. 5. Aparecerá el mensaje “Welcome to the EDIROL UM-1Driver Installer.” Haga clic en [Continue]. 6. La pantalla indicará “Select a Destination”. -
Page 73: Configuración Del Controlador
5. Confirme que UM-1 aparece en el cuadro de diálogo Audio MIDI Setup. * Si UM-1 no aparece o aparece en gris, significa que no se está reconociendo correctamente el UM-1EX. Haga clic en Rescan MIDI. Intente desconectar y volver a conectar el UM-1EX. - Page 74 7. Introduzca el nombre en device name. 1. Una vez seleccionado new external device, haga clic en Show Info. 2. Introduzca el nombre en el campo Device Name. 8. Conecte los símbolos ▼ y ▲ (que representan las salidas y entradas) del icono UM-1 a los del icono new external device utilizando el ratón para arrastrarlos entre ellos.
- Page 75 Salga del software del secuenciador antes de desconectar el UM-1EX del Macintosh. • Desactive la función de modo de suspensión del Macintosh. • El UM-1EX no funcionará en el entorno Classic de Mac OS X. Utilice el UM-1EX cuando no se esté ejecutando el entorno Classic.
- Page 76 When you need repair service, call your nearest EDIROL/Roland Service Center or authorized Information EDIROL/Roland distributor in your country as shown below. SOUTH AFRICA Paul Bothner(PTY)Ltd. Royal Cape Park, Unit 24 EUROPE Londonderry Road, Ottery 7800 EDIROL (Europe) Ltd. Cape Town, SOUTH AFRICA Studio 3.4 114 Power Road...
- Page 77 Galip Dede Cad. No.37 Beyoglu - Istanbul / TURKEY TEL: (0212) 249 85 10 U.A.E. Zak Electronics & Musical Instruments Co. L.L.C. Zabeel Road, Al Sherooq Bldg., No. 14, Grand Floor, Dubai, U.A.E. TEL: (04) 3360715 As of December 1, 2005 (EDIROL-1)
- Page 78 Memo...
-
Page 79: Federal Communications Commission
Cet appareil numérique de la classe B respecte toutes les exigences du Règlement sur le matériel brouilleur du Canada. DECLARATION OF CONFORMITY Compliance Information Statement Model Name : UM-1EX Type of Equipment : USB MIDI Interface Responsible Party : Roland Corporation U.S.
Need help?
Do you have a question about the UM-1EX and is the answer not in the manual?
Questions and answers