Sony VRD-VC20 Operating Instructions Manual
Video recordable dvd drive
Hide thumbs
Also See for VRD-VC20:
- Specifications (2 pages) ,
- Quick start manual (2 pages) ,
- Limited warranty (2 pages)

Related Manuals for Sony VRD-VC20


Summary of Contents for Sony VRD-VC20
- Page 1 2-514-544-12 (1) 7819900878 Video Recordable DVD Drive Operating Instructions VRD-VC20 © 2004 Sony Corporation...
-
Page 2: Safety Regulations
KLASSE 1 PRODUKT befindet sich auf Gehäuse Declaration of Conformity Trade Name: SONY CLASS 1 Model No.: VRD-VC20 LASER PRODUCT Responsible Party: Sony Electronics Inc. Address: 16450 W.Bernardo Dr., LASER KLASSE 1 San Diego, CA 92127 PRODUKT U.S.A. Telephone No.: 858-942-2230... - Page 3 CAUTION The mains plug on this equipment must be used to disconnect mains power. Please ensure that the socket outlet is installed near the equipment and shall be easily Accessible. Achtung Zur Trennung vom Netz ist der Netzsecker aus der Steckdose zu ziehen, welche sich in der Nähe des Gerätes befinden muß...
-
Page 4: Table Of Contents
Table of Contents Safety Regulations ......2 Stop timer recording ....29 Auto source selection ....30 Introduction Using the Drive as an Features ........... 7 External DVD Drive Stand-alone operation ....7 Connecting the drive to Computer-controlled a computer ........31 operation ........7 Others ........ - Page 5 Additional Information Precautions ........49 Support overview ......50 User support web site ....50 Update the drive firmware ..50 Technical support ....50 Specifications ........51 Troubleshooting ......53...
- Page 6 • is a trademark of Sony Corporation. • Pentium is a registered trademark of Intel Corporation. • Microsoft and Windows are registered trademarks of Microsoft Corporation. • Other system and product names used herein are registered trademarks or trademarks of their respective manufacturers, although the ™...
-
Page 7: Introduction
Introduction Features This drive offers the following features. Computer-controlled operation Stand-alone operation ❑ A video recordable DVD drive with Hi-Speed USB (USB 2.0-compliant) You can use this drive as a stand-alone DVD interfaces for computers, DV and analog recorder to record videos on Recordable/ audio/video input terminals for video Rewritable DVDs directly from connected devices. -
Page 8: Unpacking
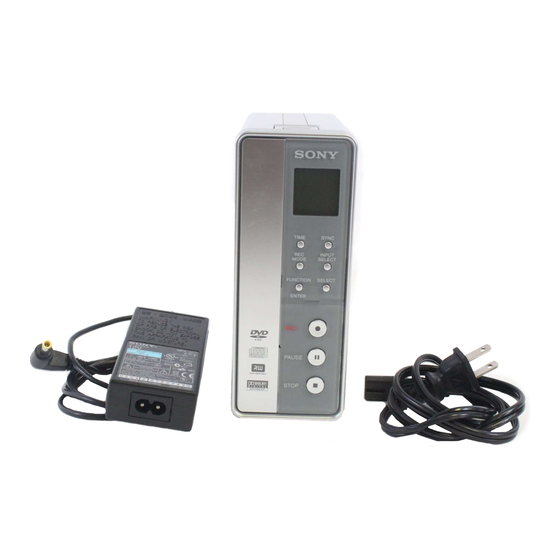
Unpacking Please confirm that the package contains the • Power cord following items. If any of these items appear to be missing and/or damaged, please contact your dealer. • Drive • AC adaptor (MPA-AC1) • Quick Start Guide • Operating instructions •... -
Page 9: Parts And Controls
Parts and controls C Display window Front Panel The blue LCD backlight goes out automaticaly when: • 5 minutes have passed without any operation during the stand-alone operation. • 1 minute has passed after the cable connection during the computer- controlled operation. - Page 10 L PAUSE button Rear Panel Pauses recording. M STOP button Stops recording. Display Window The display window works only when the drive is used as the stand-alone DVD recorder (p. 12), and indicates the following: A Power switch Turns the drive on or off. B USB connector Connect a USB cable when connecting the drive to a computer.
-
Page 11: System Requirements
System requirements When connected to a computer, the drive Notes should be used with a system that meets the • You must use discs that are compatible with the following requirements write speed you have selected. ❑ CPU: Pentium III, 800 MHz or higher •... -
Page 12: Stand-Alone Operation - Using The Drive As A Dvd Recorder
Stand-alone Operation - Using the Drive as a DVD Recorder Creating DVDs You can use this drive as a stand-alone DVD recorder to record videos on Recordable/Rewritable DVDs directly from a connected video cameras or video devices such as VCRs. Note Stand-alone operation of the drive is not available when the drive is connected to a computer with the USB cable and the computer is turned on. -
Page 13: Recording Mode
Recording methods The drive features synchronized recording mode and manual recording mode. Recording method Operation Synchronized recording − DV/ The digital video camera will start/stop playback i.LINK cable automatically, synchronized with the operations carried connection out on the drive. page 15 Synchronized recording −... -
Page 14: About Titles And Chapters On A Disc
About titles and chapters on a disc What are titles and chapters? DVD contents consist of sections, called titles, and smaller sub-sections, called chapters. On this drive, a title is created between the points where you start and stop a recording. Chapters are created automatically at specified intervals (default: 5 minutes), or they can be created manually ( page 25). -
Page 15: Synchronized Recording - I.link (Dv) Cable Connection
Synchronized recording — i.LINK (DV) cable connection You can record pictures on Recordable/Rewritable DVDs while playing them back on your digital video camera*. Connect the DV jack on the digital video camera and that on the drive using an i.LINK cable (not supplied), and the digital video camera will play/pause/stop automatically following operations carried out with the REC/PAUSE/STOP buttons on the drive. - Page 16 Hint The drive switches the input automatically when detecting the video signal (Auto Source Selection function page 30). Once you play back the video on the connected video camera (video signal is output), for example, to search a scene to be recorded, the drive switches the input to “DV” automatically. Make sure “DV”...
- Page 17 Press the eject button to eject the disc. Note When using DVD+R, DVD-R, or DVD-RW disc and ejecting the disc, the following message appears. To play these discs on DVD devices, you need to finalize the disc after recording ( page 27).
-
Page 18: Synchronized Recording - Av Cable Connection
Synchronized recording — AV cable connection You can record videos on Recordable/Rewritable DVDs while playing them back on your video device. Connect the video device to the drive using an AV cable, and the drive will start/stop recording automatically when you start/stop playback on the video device. - Page 19 Turn on the drive. The busy indicator lights up in green. Make sure "SYNC" is displayed on the display window. Busy indicator Hint The drive switches the input automatically when detecting the video signal (Auto Source Selection function page 30). Once you play back the video on the connected video device (video signal is output), for example, to search a scene to be recorded, the drive switches the input to “VIDEO”* automatically.
- Page 20 Press REC on the drive. The drive comes in standby for recording. Start playback on the video device. [Recording] appears on the display window and the REC button lights up during recording. [SIG] on the display window indicates that the drive is receiving signals from the video device.
- Page 21 To pause recording Press PAUSE. [Pause] appears on the display window. To resume recording, press REC or PAUSE again. Recording pauses also when you stop playback on the video device. To resume recording, restart playback. To check the time passed or remaining Press TIME.
-
Page 22: Manual Recording
Manual recording You can start/pause/stop recording manually by operating the drive and the connected device respectively. Connect a video device. See “Synchronized recording — i.LINK (DV) cable connection” on page 15 or “Synchronized recording — AV cable connection” on page 18. Turn on the drive. - Page 23 Select the recording conditions. Display a desired signal by pressing INPUT SELECT. Each time you press the button, [VIDEO], [S-VIDEO], or [DV] appears in sequence. If you have connected an S video cable, display [S-VIDEO]. If you have connected an i.LINK cable, display [DV].
- Page 24 Press STOP to stop recording. [STOP] appears on the display window, and stop playback on the video device. Wait for a moment until [Ready] appears. Press the eject button to eject the disc. Note When using DVD+R, DVD-R, or DVD-RW disc and ejecting the disc, the following message appears.
-
Page 25: Additional Operations
Additional operations Selecting a recording mode Press REC MODE. Each time you press the button, [HQ], [SP], or [SLP] appears in sequence. See page 13 for details on the recording mode. Note You cannot do this operation during recording. Selecting a chapter interval See page 14 for details on chapters. -
Page 26: Selecting Automatic Playback Mode
Selecting automatic playback mode You can set automatic playback mode on the disc before recording. In the default setting ([No]), the disc is to start playback with displaying the menu screen of the title recorded. Display [AutoPlay?] by pressing FUNCTION/ENTER. Each time you press the button, [Finalize?], [Erase All?], [Auto Play?], [Auto Chp], or [Stop Timer] appears in sequence. -
Page 27: Finalizing A Disc
Finalizing a Disc What is “Finalize”? To finalize the disc means to make the created disc compatible with other DVD devices, so that the disc can be played back on them. When using DVD+R, DVD-R, and DVD-RW disc, after recording is complete you need to finalize the disc to play them back on other DVD devices. -
Page 28: Erasing A Disc
Press FUNCTION/ENTER. Finalizing of the disc starts. When finalizing is complete, [Finalize Complete] appears. Eject the disc. Notes • Depending on the disc condition, recording condition, or DVD device, discs may not play even if the discs are finalized. • The drive can finalize only the discs recorded on this drive. •... -
Page 29: Stop Timer Recording
[Reconfirm?] appears on the display window. Press SELECT to select [Yes]. If you do not erase the disc, select [No]. Press FUNCTION/ENTER. Erasing of the disc starts. When erasing is complete, [Ready] appears. Eject the disc. Note You cannot erase title by title, or chapter by chapter. Stop timer recording Recording will stop automatically after the preset time. -
Page 30: Auto Source Selection
Press REC to start recording. Recording will stop after the preset time. Notes • The stop timer setting is cancelled when the operation is completed, or the power is turned off. • If you press TIME repeatedly during the stop timer recording, recorded time, remaining recording time, and remaining disc time are displayed in turn. -
Page 31: Using The Drive As An External Dvd Drive
Using the Drive as an External DVD Drive Connecting the drive to a computer Connect the drive to a computer using the supplied USB cable to use the drive as an external DVD drive. When connecting the drive to your computer for the first time, you need to install the driver software. -
Page 32: Connecting The Drive To A Computer
Connecting the drive to a computer Connect the supplied USB cable, the power cord, and the AC adaptor to the drive. USB Cable Power cord AC adaptor Turn on the drive. Power switch Turn on your computer. -
Page 33: Installing The Usb Driver
Connect the other end of the USB cable to your computer. Note Please connect the drive directly to a USB connector on the computer. Computer Install the drive on the computer. On Windows XP, see below. On Windows 2000, see page 35. Installing the USB driver On Windows XP Insert the supplied software disc into a drive on the computer. - Page 34 [Next] ( 4 ). The following screen will appear. If “The software you are installing for this hardware: Sony VRD-VC20 [Video Capture] has not passed Windows Logo testing to verify its compatibility with Windows XP.” is displayed, click [Continue Anyway].
- Page 35 On Windows 2000 Insert the supplied software disc into a drive on the computer. When connecting the USB cable to the computer, the following screen is displayed. Click [Next]. The following screen will appear. Check [Search for a suitable driver for my device (recommended)] ( 1 ), then click [Next] ( 2 ).
- Page 36 Check [Specify a location] ( 1 ), then click [Next] ( 2 ). The following screen will appear. Click [Browse] ( 1 ), browse for the drive you insert the software disc ( 2 ), then click [OK] ( 3 ). The following screen will appear.
-
Page 37: Disconnection
Installing the software Click [INSTALL SUITE] button to install the software. Click [INSTALL SUITE]. After installation is complete, continue to install other options or click [EXIT] to finish installation. Disconnection The disconnection procedure varies depending on your OS. When your computer detects the drive successfully, appears on the Windows task bar. -
Page 38: About Software
About software Use the supplied software to create discs and play back DVDs. The supplied software disc contains the following software. (Refer to the PDF or online documentation of each software for details about their operation.) Nero StartSmart Serves as the command center to quickly start all the software of the Nero suite. -
Page 39: Notes On Using Other Software With The Drive
• Using software other than the supplied software (such as commercially available software, shareware, or freeware) to write data to disc with this drive is not under warranty and Sony provides no customer service. • Make sure that the supplied writing software and other writing software do not coexist on your computer. -
Page 40: Maximizing Performance
Reaching the highest possible data transfer rate Make sure that you use high-speed certified discs for which this operation has been guaranteed by Sony. For the latest information about these discs, visit the user support web site. When using discs other than those mentioned above, the drive may limit writing speed to preserve a good reading quality. -
Page 41: Compatible Discs
Discs Compatible discs The following discs are compatible with the drive. Write Disc types Logo Read Write (Stand- Write speed alone) DVD+R Max. 16× DVD+R DL Max. 4× (Double layer) DVD+RW Max. 8× DVD-R Max. 16× DVD-RW Max. 6× DVD-ROM —... - Page 42 Disc types Logo Read Write Write speed CD-R Max. 48× CD-RW Max. 4× CD-RW Max. 10× (High Speed) CD-RW Max. 24× (Ultra Speed) CD-ROM — — CD-DA — — (audio only) CD Extra — — Video CD — — CD TEXT —...
-
Page 43: Recommended Discs
Recommended discs We recommend that you only use discs for which operation has been guaranteed. You can obtain the latest list of writable discs for which operation with this drive has been guaranteed at the user support web site (see page 50 for details). -
Page 44: Features Of Writable Discs
Features of writable discs You can use various discs with the drive to write data. Refer to the table below to find the type of disc that matches what you want to do. DVD+R DVD+RW DVD-R DVD-RW CD-R CD-RW DVD+R DL create DVD-Video that can be played back by most drives and/or... - Page 45 Writable CDs and compatibility The drive can write to CD-R and CD-RW discs, when used with writing software. To play back (read) these CD-R and CD-RW discs on other CD- ROM drives, make settings on the writing software according to the purpose of the data.
- Page 46 Further, because of the differences in quality and characteristics between various CD-ROM drive, CD player, CD-R disc, and CD-RW disc manufacturers, playback may not be possible depending on the combination. Writable DVDs and compatibility The drive can write to DVD+R DL, DVD+R and DVD-R discs, as well as to DVD+RW and DVD-RW discs, when used with writing software.
-
Page 47: Precautions On Writing/Playing Discs
Precautions on writing/playing discs Write speed and compatible discs • When writing data to disc at high speeds, you must use the appropriate type of disc. • Set the writing speed on your writing software. For details about the setting procedures, refer to your writing software documentation. - Page 48 About copy controlled CDs This product is designed to play back discs conforming to the compact disc (CD) standard. Audio CDs encoded with copyright protection technology are now marketed by various record companies. Be aware that some of these discs do not conform to the CD standard and you may not be able to play them back with the drive.
-
Page 49: Additional Information
Additional Information • Do not store discs in dusty, dirty or humid Precautions locations, in direct sunlight, or near heat- generating devices. • To protect important data, always keep Operation and storage conditions discs in their cases. Avoid using or storing the drive in a hot or •... -
Page 50: Support Overview
For contact information, refer to the Accessing the user support web warranty card. site Sony Storage Support web sites Note that technical support (As of March, 2005) conditions may vary according to the locality, and that charges and/ http://sony.storagesupport.com/... -
Page 51: Specifications
Buffer capacity Disc diameters 2 MB 12 cm Inquiry strings — 8 cm SONY DVD RW DRU-720A 12 cm 8 cm Laser The default setting is 40× . You must use the speed acceleration function to achieve 48× speed. Type: DL-7140-211RA... - Page 52 Interface USB port Hi-Speed USB (USB 2.0-compliant) DV IN 4-pin i.LINK (IEEE1394), S100 DVC-SD input VIDEO input 1 Vp-p/75 ohms S VIDEO input Y: 1 Vp-p/75 ohms C: 0.286 Vp-p/75 ohms AUDIO input 2 Vrms, Impedance more than 47 kilohms DV camcorder/Digital8 camcorder input only.
-
Page 53: Troubleshooting
Finalize the disc. p. 43 The disc you are using may not be of a certified brand by Sony. Try to use a disc of a brand of which operation has been certified by Sony. p. 43, The playback device you are using may have an p. - Page 54 Display Cause/remedy Recording Prohibited Copyright protection signal (CGMS or p. 6 Macrovision) was detected. You cannot record the source. No Disc Tray has no disc. Insert a disc. p. 16 Insert The disc may have been already recorded on — Blank Disc other recordable device that is not compatible with this drive.
- Page 56 Sony Corporation Printed in China...