Sony DVDirect VRD-MC3 Operating Instructions Manual
Video recordable dvd drive
Hide thumbs
Also See for DVDirect VRD-MC3:
- Operating instructions manual (88 pages) ,
- Specifications (2 pages) ,
- Quick start manual (2 pages)
Table of Contents
Advertisement
Quick Links
SONY
Recording videos
from HDD camcorders
...........................
Recording videos
from DVD camcorders ............................
Recording videos
from DV camcorders
..............................
Recording videos
from miscellaneous
video devices .........
Recording photos
from memory cards ................................
Recording photos
from HDD camcorders
...........................
Video Recordable
DVD Drive
Operating
Instructions
:
¸.¸¸¸-¸%¸¸¸¸
DvDirect
VRD-MC3
© 2006 Sony Corporation
Advertisement
Table of Contents

Related Manuals for Sony DVDirect VRD-MC3


Summary of Contents for Sony DVDirect VRD-MC3
- Page 1 DVD camcorders ......Recording videos from DV camcorders ......Recording videos from miscellaneous video devices ..Recording photos from memory cards ........ Recording photos from HDD camcorders ......Video Recordable DVD Drive Operating Instructions ¸.¸¸¸-¸%¸¸¸¸ DvDirect VRD-MC3 © 2006 Sony Corporation...
-
Page 2: Safety Regulations
I PRODUKT befiudet sich auf dem Geh_iuse. Declaration of CunR_rmity Trade Name: SONY Model No.: VRD-MC3 LASER PRODUCT Respuusible Party: Sony Electronics Inc. LASER KLASSE1 Address: 16530 Via Esprillo. CLASS1 PRODUKT San Diego. CA 92127 U.S.A. LUOKAN 1 LASERLAITE Telephone No.:... -
Page 3: Compliance Statements
CE Sicherheitsbestimmungen Compliance Diese Ausr(istung erftillt die Europiiischen EMC-Bestimmungen fiir die Verwendung Statements R)Igender / R)Igenden Umgebuug (en): • Wohngegenden • Gewerbegebiete Disposal of Old Electrical & • Leichtindustriegebiete (Diese Ausr(istung Electronic Equipment (Applicable erfiillt die Bestimmungen der Norm the European Union and other EN55022,... -
Page 4: Table Of Contents
Table of Contents Safety Regulations ......Creating/Viewing a Photo Compliance Statements ....Creating a Photo DUD ....Introducing DVDirect Types of Recording ..... Types of Photo DUD ....Introduction ........Suppolled Memory Cards and Features ........... Camcorders ......... Package Contents ...... - Page 5 Using the DVDirect With a Computer System Requirelnents ....Setting Up the Computer ....71 Installing the Software ....71 Connecting the DVDirect to a Computer ........Disconnection ......Using Memory Card Slots ..73 Using the Bundled Software ..74 Launching "Nero StartSmart"...
- Page 6 Dolby Laboratories. • Memory Stick and the memory stick logo are trademarks, or registered trademarks of Sony Corporation. Our product warranty is valid only when the supplied accessories (iucluding software) are used in the specilied or recommended...
-
Page 7: Introducing Dvdirect
Introducing DVDirect Introduction Burning video DVDs Burning photo DVDs You can record videos from connected FI You can archive photos from :t nlemory video cameras and AV devices directly card or HDD camcorder directly onto a onto DVDs without using a computer. DVD without using a compnter. -
Page 8: Features
Sony HDD Handycam ® and "DVD camcorder" reli:rs to the Sony DVD Handycam ®. The tunctions available when a camera is connected via USB cable as described in this manual apply only when the Sony HDD Handycam ®or Sony DVD Handycam ®is used. -
Page 9: Package Contents
Package Contents Please confirm that the package contains the following items. If ally of these items are missing o1"damaged, please contact your dealer. • DVDirect • Hi-Speed USB cable (for PC/Printer connection) • AC adaptor (£72 < • AC power cord •... -
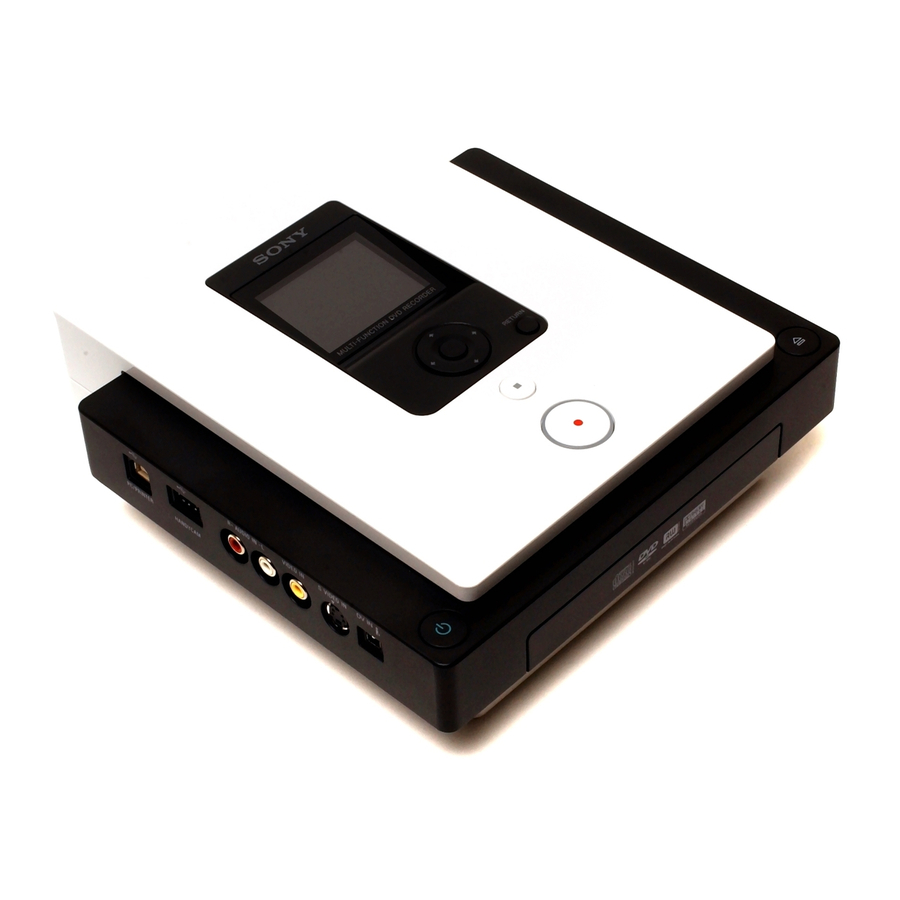
Page 10: Parts And Controls
Parts and Controls Front rear _ (Power) button Turns the r)VDirect on or off. Emergency eject hole If you cannot open tile disc tray with tire @ (Eject) button, turn off your computer, :rod then insert a thin, elongated object into this hole to eject the disc tray manually. Top panel The buttons and display for operating the DVDirect are located here (page I l). - Page 11 Top panel >.-_/® ® ® [] Display window < Displays a menu screen, images from a playback device, or photos fronl a memory card. [] tl_,l=_cursor / ,_) (Select) button Selects a flmction. RETURN button This returns the display to the main melm screen or to the previous screen when navigating nlenus.
- Page 12 USB cable here when Connect a DV (i.LINK) cable (not connecting a HDD or DVD camcorder. supplied) here when connecting the DVDirect to a digital video camera. Only Sony HDD or DVD camcorder input is supported. AUDIO IN kin connectors Connect...
- Page 13 Right side panel < Memory card LED Lights amber when accessing tile memory card. Memory Stick Duo slot Insert a "Memory Stick Duo" here. Multi memory card slot Insert a "Memory Stick," SD Card, or xD-Picture Card here. CompactFlash card slot Insert a CompactFlash card here.
-
Page 14: Turning The Power On/Off
Turning the Power On/Off 1 Connect the supplied AC power cord to the AC adaptor. 2 Insert the power plug of the AC adaptor into the DVDirect's DC IN connector. 3 Insert the power plug of the AC power cord into a power outlet. •... -
Page 15: Auto Setup Navigation
After t he power isturned o n, t he DVDirect automatically detects inserted memory cards and DVDdiscs a nd input s ignals from connected devices. A message indicating how toprepare forrecording then appears inthe display window. Byfollowing t his message, youcall a utomatically move ontothe recording procedure... - Page 16 Press t o1",_, to select the desired operation, and press the _ (Select) button. DV CamcorderNideo ,_, DVD: Create a video DVD fi'oma digital vide() camcorder connected via a DV (i.LINK) cable or from a vide() device connected via a vide() or S-video cable (page 31, 42).
-
Page 17: Inserting A Disc
Inserting a Disc To insert a disc, perform the following while the DVDirect is turned 1 Press the (_ (Eject) button. The disc tray ejects. <> ¢c2 Place the disc in the disc tray with its label facing up, and press <... - Page 18 When a new disc is inserted When a new disc is inserted, the disc will be formatted automatically. If the new disc inserted is a DVD+R disc, a message prompting you to select all input source appears. To continue with operations, press t o1"1_,to select a source to record from, and press the Q) (Select) button.
-
Page 19: Inserting A Memory Card
Inserting a Memory Card Insert the memory card into its corresponding memory card slot. Memory Memory Stick Duo Stick CompactFlash SD Card xD-Picture Card Memory Stick Duo Memory SticldSD CompactFlash Card/xD-Picture Card Push the card into the Push the "Memory <... -
Page 20: Creating A Video Dvd
Creating a Video Creating a Video DVD You call use the DVDirect as a stand-alone DVD recorder to burn videos directly onto DVDs fi'om a connected HDD, DVD, or DV camcorder or video device such as a VCR or DVR. You call play the created video DVD on other DVD devices or the DVD drives of computers. - Page 21 DVD camcorder The entire video content of the camera's 8-cm disc is recorded onto a 12-cm disc. One miniDVD Copy One DVD DV camcorder The entire content of the videotape is recorded onto a single disc. © ¢Q < < One DV tape Copy One DVD...
- Page 22 Consolidation Recording (page 39) This mode allows you to record the contents of multiple 8-cm discs from a DVD camcorder onto the corresponding number of 12-cm discs. Copy One DVD MuRiple mini DVDs (or more) Normal Video Recording (page 42) _ This mode allows you to create a video DVD using the @ (Record) (Stop) buttons on the DVDirect and the play, pause, and stop buttons on the...
-
Page 23: Supported Camcorders/Video Devices And Recording Modes
Consolida Normal Incremental -tion Video Type of Device Interface BURN Record- Recording Recording Recording Sony HDD camcorder 1) !!!il Sony DVD camcorder 1) DV camcorder 2) DV 1N D8 camcorder 2) DV 1N DV 1N camcorder2) 3) S VIDEO <... - Page 24 Notes on time required for recording When recording from all HDD o1"DVD camcoMer connected via USB cable, the length of time required depends on the REC mode (HQ, SP, or LP) used to shoot the video and the number of scenes the video contains. In general, videos shot ill higher image quality modes take longer to be recorded onto a disc.
-
Page 25: Writable Discs That Can Be Used For Creating Video Duds
Interface DVD-R DVD-R DVD-RW DVD+R DVD+R DVD+RW Type of Device Sony HDD camcorder Sony DVD camcorder !!,!i DV camcorder DV 1N D8 camcorder DV 1N... -
Page 26: About Created Video Duds
Titles and chapters The contents of a DVD consist of sections, called titles, and smaller sub- sections, called chapters. When you create a video with the DVDirect, titles and chapters are created as follows: For discs created through normal video recording or recording from DV camcorders connected via DV (i.LINK) cable Titles are created... - Page 27 DVD menus A DVD menu is displayed each time a DVD is inserted into a DVD player serves as a title page or table of contents for the video DVD. You can create DVDs that display thumbnail images of titles ill their menu screens, You call select...
-
Page 28: One Touch Recording Through Hdd Camcorder Control (Dvd Burn)
One Touch Recording Through HDD Camcorder Control (DVD BURN) You call create video DVDs from your HDD camcorder simply by pressing camera's [DVD BURN] button. 1 Press the _ (Power) button to turn on the DVDirect. A message prompting you to insert a disc appears ill the display window. -
Page 29: Dvd Burn
Touch [DVD BURN] on the camera's LCD screen, or press the DVD BURN button on the camera or Handycam Station. Recording starts, and the progress appears ill the display window. Current disc/number of © required discs < When all of the content of the HDD camcorder is recorded, recording <... -
Page 30: Dvd Burn
6 Press the @ (Eject) button. A message asking whether to finalize the disc ,just recorded on appears. Select whether to finalize the disc. For details on finalizing discs, see "What is 'finalize disc"?" (page 66). To finalize the disc: Select [Yes] and press the Q) (Select) button. -
Page 31: One Touch Recording (Full Recording)
One Touch Recording (Full Recording) When an HDD, DVD, o1" DV camcorder is connected to the DVDirect, you can use Full Recording to record the video contents of the camera onto a disc with a single touch of a button. Press the _ (Power) button... - Page 32 When using a DV camcorder Connect the camera's DV connector to the DVDirect's DV IN connector using a DV (i,LINK) cable (not supplied), DV (i.LINK) c_ble (not supplied) After couuectiug the camera, skip to step 6. Touch [HDD] (for an HDD camcorder) or [@ COMPUTER] (for a DVD camcorder) on the camera's LCD screen.
-
Page 33: Full Recording
Press 4- or _ to switch the recording mode. Pressing 4== or _ switches the recording mode displayed at the top right of the display window. For Full Recording, press 4== or _ until [Full] displays. The following appears ill the DVDirect's display window DV camcorder HDD or DVD camcorder... - Page 34 When using an HDD camcorder When the contents of the HDD camcorder do not fit onto a single disc, a disc will be finalized once it becomes full, and a message will appear in the display window. Remove the completed disc, and insert a blank disc.
-
Page 35: Incremental Recording
Incremental Recording After the video contents of an HDD camcorder are recorded onto a disc, additional video taken with the same HDD camcorder call be recorded onto a disc without recording the previous contents again. Press the @ (Power) button to turn on the DVDimct. A message prompting you to insert a disc appears ill the display window. -
Page 36: Full Recording
Press _ or ,_ to switch the recording mode. Pressing or _ switches the recording mode displayed in the top right of the display window. For Incremental Recording, press 4-- or _ until [Incremental] displays. g mode luired discs 7 Press the C) (Record) button to start recording. Recording begins for the portion of the camera's video content recorded... - Page 37 Press the C) (Eject) button. A message asking whether to finalize the disc ,just recorded on appears. ¢O Select whether to finalize the disc. For details on finalizing discs, see "What is 'finalize disc'?" (page 66). To finalize the disc: Select [Yes] and press the _,) (Select) button.
- Page 38 To stop recording You cannot stop while recording is ill progress. You can only stop recording by pressing the @ (Stop) button after a disc becomes full. Note on Incremental Recording Always use the _) (Power) button to turn off the DVDirect after Incremental Recording is finished.
-
Page 39: Consolidation Recording
Consolidation Recording When you have multiple 8-cm discs containing video taken with a DVD camcorder, you call consolidate and record the video onto the corresponding number of 12-cm discs. Press the @ (Power) button to turn on the DVDirect. A message prompting you to insert a disc appears ill the display window. Insert a disc (page 17). - Page 40 Once you touch [@ COMPUTER], the DVDirect detects the connected camera, and the display window on the DVDirect changes. Depending oil the DVD camcorder you are using, the above USB SELECT screen may not appear automatically and settings configuration for USB connection may be required beforehand.
- Page 41 Press the @ (Eject) button. A message asking whether to finalize the disc ,just recorded on appears. Select whether to finalide the disc. For details on finalizing discs, see "What is 'finalize disc'?" (page 66), © To finalize the disc: Select [Yes] aud press the Q) (Select) buttou, A coufirmatiou message will ¢o...
-
Page 42: Normal Video Recording
Normal Video Recording To burn video fi'om a video device such as a VCR or DVR onto a disc, connect the device to the DVDirect via an S-video or AV cable. Operate the video device to play back the portion you want to record, and use the {_) (Record) and @ (Stop) buttons on the DVDirect to record. - Page 43 For AV cables: Connect the video device's audio/video output connectors to the DVDirect's AUDIO IN/VIDEO IN connectors using the AV cable ()lot supplied). AV cable (not supplied) < The connectors oil a video device dilTcrdepending oil the device. Ret'crto the operating instructions for your device, and use the AV cable.
- Page 44 Operate the camera or video device to start playback of video. The following appears ill the DVDirect's display window. REC quality Remaining time The DVDirect detects and selects video input signals autonmtically when you play, back You can view video lrom the connected video device.
- Page 45 Press the _ (Stop) button to stop recording. Wait a moment until the display window changes. To record additional video, repeat steps 5 to 7. When you are finished recording, press the RETURN button to go back to the main menu, and press the @ (Eject) button.
-
Page 46: Previewing A Video Dud
Previewing a Video DVD You call play back and check a video DVD burned with the DVDirect in the display window on the top of the unit. • Sound camlot be heard when previewing the disc on the DVDirect. • You camlot output vide() images to external devices such as TVs. •... - Page 47 When a disc that has not been finalized is inserted: The last title on the disc starts to play automatically. Current title number/total title number tS"ess 'I_ o1"_1_ to select the title you want to view. To stop playback, press the @ (Stop) button.
-
Page 48: Creating/Viewing A Photo Dvd
Creating/Viewing a Photo Creating a Photo DVD You can easily record photos taken with your digital camera from a memory card onto a DVD. You call also create a slideshow DVDs. Still images stored on an HDD camcorder call also be recorded onto a disc. _NF&'t •... -
Page 49: Suppolled Memory Cards And Camcorders
DVDirect. Type of device Interface All photo Photo select recording recording Sony HDD © camcorder Memory card ("Memory Stick Duo," "Memory < Memory cm'd slols Stick," SD Card, on the DVDirecI... -
Page 50: About Created Photo Duds
=; _ MyComputer DSC00002 DSC00003 DSC00004 _: _ WinXP(C:) VRD MCl(D:) - ,_ AUDIOTS _._ DClM 100VRDMC VIDEO RM VIDEOTS Sony MemorySflck - MG(...E:) _'r Control Panel u!; i File names are automatically created when the photo DVD is created. -
Page 51: Recording Photos Stored On A Memory Card
Recording Photos Stored on a Memory Card Press the @ (Power) button to turn on the DVDirect. A message prompting you to insert a disc appears ill the display window. Insert a disc (page 17). The DVDirect starts reading the inserted disc. !!;ii Insert the memory card into its corresponding... - Page 52 During recording, the progress appears ill the display window, and the (_ (Record) button remains lit. Do nol inserl another menlory card while recording onto a disc is in progress. Doing so writing Callse elTor. When all of the photos are recorded onto the disc, recording automatically stops, aud the @ (Record) button dims.
- Page 53 To not finalize the disc: Select [No] and press @ (Select) button. The disc will be ejected without finalization. This disc is not completed yet, and it cannot be played with other DVD players or DVD drives of computers. Select whether to create a slideshow. ii i i II _'ess t or 11,to select whether to create a slideshow, and press the 'Q,)
-
Page 54: Recording Photos Stored On An Hdd Camcorder
Recording Photos Stored on an HDD Camcorder 1 Press the _ (Power) button to turn on the DVDirect. A message prompting you to insert a disc appears ill the display window. Insert a disc (page 17). The DVDirect starts reading the inserted disc. Press the RETURN button to display the main menu. - Page 55 Touch [HDD] on the camera's LCD screen. 60m#_ Once you touch [HDD], the DVDirect detects the connected camera, and the display window on the DVDirect changes. •_ © < Press the C) (Record) button to start recording. < During recording, the progress appears ill the display window, and the C) (Record) button remains lit.
- Page 56 10 Press the @ (Eject) button. A message asking whether to finalize the disc just recorded on appears. This message will not appear when using a DVD+RW disc. 1 1 Select whether to finalize the disc. For details on finalizing discs, see "What is 'finalize disc'?" (page 66).
- Page 57 • When a slideshow is created (m a disc, you cam/ot record additional photos onto such discs. • It takes a li:w minutes to complete finalizing for a photo backup DVD. The amount of time it takes to complete a slideshow DVD depends on the number and size of the photos.
-
Page 58: Viewing And Printing Photos
Viewing and Printing Photos You call view and check the photos recorded on DVDs or stored on memory cards ill the display window on the top panel of the DVDirect. You call also print these photos by connecting the DVDirect to a PictBridge-compatible printer. - Page 59 Press 't, _., 4-,, or _ to move the selection cursor to the photo you want to view or print, and press the (._) (Select) button. A larger display of the selected photo appears ill the display window. You can alsu print images directly h'om the thumbnail display screen. To do this, skip to step 6 afier moving the cursor to the photo you want to print.
- Page 60 8 Connect your printer to the DVDirect using the supplied USB cable. The printer starts printing. The message [tS"inting] will disappear when printing is finished. To conlinue printing other photos, press 't, '_,, 4", or _ to scroll and display the photo you wahl to prinl, and then press the _) (Record) bullon.
-
Page 61: Setup
Setup Using the Setup Menu You call change the various settings for creating discs ill the Setup menu screen. The following procedure displays the Setup menu. Press the @ (Power) button to turn on the DVDirect. The display window turns on. Press the RETURN button. -
Page 62: Rec Quality
Move the cursor by pressiug 11'or # to select items o1"options to change, and press the Q.) (Select) button to confirm. Select the recording quality to use when creating a video DVD. This setting only applies to Full Recording (DV camcorder) and Normal Video Recording modes. -
Page 63: Auto Chaptering
Specify a time interval at which to create chapter marks automatically on a video DVD. This setting only applies to Full Recording (DV camcorder) Normal Video Recording modes. Setting Default setting 5min 10min 15min Select the type of menu to apply to a video DVD created with the DVDirect. Setting Default setting Feature... -
Page 64: Slideshow Creation
Select whether to display a message prompting slideshow creation when you press the @ (t_iect) button after recording for a photo DVD. Setting Default setting Feature After the photos are recorded onto the disc, a slideshow is created and the disc is finalized automatically allowing immediate... - Page 65 The following message appears. Press t1'or 41, to select [Yes], and press the 'O (Select) button. The following message appears. Press t1'or 41' to select [OK], and press the O (Select) button. The DVDirect starts finalization. For video DVDs The following message appears.
- Page 66 For photo DVDs The following message appears. To complete the disc as a photo backup DVD, select [No]. To complete the disc as a slideshow DVD, select [Yes]. • It takes a few minutes to complete finalizing lbr a video DVD or photo backup DVD. •...
-
Page 67: Erase Disc
Do not finalize the disc • when you want to add videos to the same disc with the DVDirect later. • when you want to add photos to the same disc with the DVDirect later. • when you are not finished creating the disc (not yet playable on other... -
Page 68: Demo
The following message appears. Press t or 41,to select [Yes], and press the _ (Select) button. The following message appears. 3 Press t or 41, t o select [Yes], and press the _ (Select) button. The DVDirect starts erasing. After erasing is colnpleted, the disc call be eiected. -
Page 69: Color System
Displays the color system used to create discs with the DVDirect. A created disc cannot be played if there is a difference between the color system of the disc and that of the DVD player. appropriate color system is preset or the selling be seleclable... -
Page 70: System
Using the DVDirect With a Computer System Requirements When using the DVDirect with your computer (PC Mode), the computer system should meet the following requirements. CPU: Pentimn IlI, 800 MHz or higher (Pentium 4, 2 GHz or higher recommended) RAM: 256 MB (512 MB or more recommended) 1 GB (10 GB for DVD creation) free hard disk space or more recommended Operating system: Windows 2000 SP4 or Windows XP Home/Professional... -
Page 71: Setting Up The Computer
Setting Up the Computer Insert the supplied software disc into a drive on the computer. The installer will start automatically. If the "Langu,_tge Selectien" screen appe_trs, click a language button, and then click [Application Install] to contilme inst_fll;_tien. Click [Nero 7 Essentials] to install the software. Click [Nero 7 Essentials] <... -
Page 72: Computer
Before using Ihe DVDirecl wilh a computer, sel [PC Connect] in the Setup metal (page to [Use], Please note thai Ihis is not Ihe def:mll selting. 1 Connect the DVDirect to a power source using the AC adaptor (page 14). 2 Connect the supplied USB cable to the DVDirect. -
Page 73: Disconnection
The disconnection procedure varies depending on your OS. When your computer detects the DVDirect successfully, appea's o l Windows task bar. If you want to disconnect the DVDirect, you must first stop it by clicking this icon. Click on the task bar, and select to disconnect the DVDirect in the shortcut menu. -
Page 74: Using The Bundled Software
DVDirect is not under warranty, and Sony provides no customer service for such use. • Make sure that the bundled writing software and other writing software do not coexist on your computer. -
Page 75: Additional Information
Additional Information About Discs The following writable discs are compatible with the DVDirect. Using without Using with computer computer Disctype Logo Video DVD Photo DVD Read/ Write creation creation Playback DVD+R © DVD+R DL (Double layer) ..4,,, DVD+RW DVD÷.W High speed ... -
Page 76: Recommended Writable Discs
Disc diameters Read Write 12 cm 8 cm 12 cm 8 cm Only round discs should be used with the DVDirect. Never use odd-shaped discs (stars, hearts, card shape, etc.), as they may damage the DVDirect We strongly recommend that you only use discs for which operation has been guaranteed. -
Page 77: Compatibility
About playback/reading compatibility CD-R and CD-RW discs created with the DVDirect call be read on most CD- ROM drives. However, some older CD-ROM drives cannot read CD-RW discs. Ill addition, CD-R music discs created and finalized with the DVDirect call be played on most CD players, but there are some CD players and automobile players that do not support or guarantee playback of CD-R discs. - Page 78 _ Region Playback Control (RPC) standard. Do not attempt to make unauthorized changes to the region code. problems resulting from doing so are not covered by the warranty. • You can change the region code of the DVDirect from it's properties dialog box which is accessible li'om the Device Manager.
-
Page 79: About Memory Cards
About Memory Cards A "Memory Stick" is a compact, portable IC recording medium. The types of "Memory Stick" that call be used with the DVDirect are listed the table below. However, proper operation is )lot guaranteed for all "Memory Stick" functions. -
Page 80: About The Compactflash/Sd/ Xd-Picture Cards
Notes on using "Memory Stick" • If you slide the write-protect switch to LOCK with a fine-tipped object, you cannot record, edit, or delete images. Terminal Write Write enable protect position position Memo area Memo area "Memory Stick ..Memory Stick Duo" •... -
Page 81: Precautions
• To protect important data, always keep Precautions discs in their cases. • Do not wipe writable discs using a disc cleaner before recording data. Instead, Operation and storage conditions a blower to remove any dust. Avoid using or storing the DVDirect in hot •... -
Page 82: Support Overview
About the Bundled Software some regions. Detailed intbrmation about the supplied software is awtilable on the web site of the Sony Global Sites Information software lnanufactnrer. (As of June, 2006) http://www.nero.conl Product purchased in the USA:* http://sony.storagesupport.com/... -
Page 83: Specifications
Product purchased in China:* Specifications http://www.sony.com.cn/ed/cp Product purchased in Singapore: Stand-alone operation http://www.sony-asia.com/storage/ Recordable discs Product purchased in Taiwan:* DVD+R http://www.sony.com.tw/ds/ DVD+R DVD+RW Product purchased in Korea:* DVD-R http://www.sony.co.kr/cp DVD-RW Video encoding Product purchased in Brazil: MPEG-2 http://www.sony.com.br/eletronicos Audio encoding... - Page 84 You cannot use the DVDirect by connecting it to a computer with an i.LINK conllector. 21 Multi card slot 3) For Sony HDD or DVD camcorder (excluding camcorders supporting AVCHD lk_rnmt) only. connection General...
- Page 85 P/N 7819901750 Sony Corporation Printed in China http:/iwww.sony.net/...
Need help?
Do you have a question about the DVDirect VRD-MC3 and is the answer not in the manual?
Questions and answers