Sony VRD-MC1 Operating Instructions Manual
Video recordable dvd drive
Hide thumbs
Also See for VRD-MC1:
- Specifications (2 pages) ,
- Quick start manual (2 pages) ,
- Quick start manual (2 pages)

Related Manuals for Sony VRD-MC1


Summary of Contents for Sony VRD-MC1
- Page 1 Video Recordable DVD Drive Operating Instructions VRD-MC1 © 2005 Sony Corporation 2-661-941-02 (1) 7819901257B...
-
Page 2: Safety Regulations
Declaration of Conformity Trade Name: SONY Model No.: VRD-MC1 Responsible Party: Sony Electronics Inc. Address: 16530 Via Esprillo, San Diego, CA 92127 U.S.A. Telephone No.: 858-942-2230 This device complies with Part 15 of the FCC Rules. -
Page 3: Table Of Contents
Table of Contents Safety Regulations ... 2 Introducing DVDirect Features ... 6 Package Contents ... 7 Parts and Controls ... 8 Using DVDirect without a Computer About Auto Setup and the Main Menu ...11 To display the main menu ...11 Creating a Video DVD ...12 One touch recording and video recording ...12... - Page 4 About the CompactFlash/SD/ xD-Picture Cards ... 52 Precautions ... 53 Support Overview ... 54 User support web site ... 54 Update the system software ... 54 Technical support ... 54 Specifications ... 55...
- Page 5 • Manufactured under license from Dolby Laboratories. Dolby and the double-D symbol are trademarks of Dolby Laboratories. • Memory Stick and the memory stick logo are trademarks, or registered trademarks of Sony Corporation. ❑ Our product warranty is valid only when the supplied accessories (including software) are used in the specified or recommended system environment, in accordance with the documentation, and applies only to this DVDirect.
-
Page 6: Introducing Dvdirect
Introducing DVDirect Features This DVDirect offers the following features. Burning video DVDs ❑ You can burn videos on DVDs directly from connected video cameras and AV devices without using a computer. ❑ You can burn the entire contents of your digital video camera on DVDs with one- touch of the record button when using the i.LINK connection. -
Page 7: Package Contents
Package Contents Please confirm that the package contains the following items. If any of these items are missing and/or damaged, please contact your dealer. • DVDirect • Power cord • Quick Start Guide • Operating Instructions (this document) • Software disc •... -
Page 8: Parts And Controls
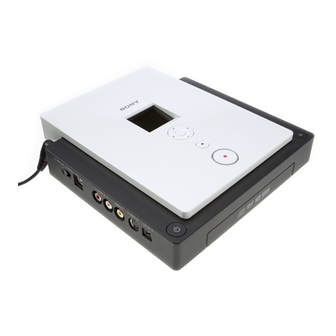
Parts and Controls Front and top panels A Display window Displays a menu screen, images from a playback device or photos from a memory card. Mm<, Cursor/ Select button Selects a function. Stop button Stops recording. Record button Starts recording. Lights in red when recording. -
Page 9: Usb Connector
Left side panel DC 12V IN A DC IN jack Connect the supplied AC power adaptor. Power AC adaptor cord Note • Be sure to use the supplied power cord. • Do not use damaged cables, such as cables with deformed connectors. - Page 10 Right side panel A Memory card LED Lights in amber when accessing the memory card. Never remove the memory card while the LED is lit. Otherwise data in the memory card may be damaged. B Memory Stick Duo slot Insert a “Memory Stick Duo.” Push the “Memory Stick Duo”...
-
Page 11: Using Dvdirect Without A Computer
2111 Using DVDirect without a Computer About Auto Setup and the Main Menu DVDirect automatically detects input signals from video connection, memory card and DVD disc right after turning on the power, and displays the appropriate message for preparation of recording in the display window. By following the message, you can automatically move to the recording procedure you intended without the complicated button operation (auto setup function). -
Page 12: Creating A Video Dvd
You can use this DVDirect as a stand-alone DVD recorder to burn videos on DVDs directly from a connected video camera or video device such as VCR/ DVR/PVR. You can play the created video DVD with other DVD devices, or the DVD drives of computers. -
Page 13: Video Recording
Connect the supplied power cord and AC adaptor to DVDirect. Connect your video device to DVDirect with an AV, S-VIDEO or DV (i.LINK) cable (not supplied). To LINE OUT or OUTPUT on VCR, DVR, etc. Signal flow AV cable To analog or digital video camera, etc. - Page 14 * If the video camera or VCR has an S VIDEO jack, use an S VIDEO cable (not supplied) for improved picture quality (compared to a video cable). You also need to connect audio cables for sound. ** If the digital video camera has a DV (i.LINK) jack, use a DV (i.LINK) cable (not supplied) for improved picture quality (compared to a video or S VIDEO cable).
- Page 15 Start playback on the video device. The image from the connected video device appears in the display window. Menu Hint DVDirect detects a video input automatically when you play back video on the connected video device. You can check video playback in the display window. The selected input is displayed in the top left.
-
Page 16: To Pause Recording
The following message appears. Eject Do you want to finalize the disc? Select [Yes] and press (Select). DVDirect starts finalizing the disc. Hints • If you select [No], the disc is ejected without finalizing. This disc is not completed yet and cannot be played with other DVD players or DVD drives of computers. -
Page 17: One Touch Recording (Dv Full Dubbing)
One Touch Recording (DV Full Dubbing) Note Before you start recording, change the [DV Full Dubbing setting] to [ON] in the Setup menu. page 33) Connect the supplied power cord and AC adaptor to DVDirect. Connect your digital video camera (i.LINK) cable (not supplied). - Page 18 Turn on DVDirect. The display window turns on. Power button Press the eject button, and insert a disc. A new blank disc will be formatted automatically. Wait until [Formatting the disc.] in the display window disappears and the display window changes. Press (Record) to start recording.
- Page 19 To pause recording Press (Record). To resume recording, press To stop recording Press (Stop). Note If the DV (i.LINK) cable is disconnected during the recording procedure, DVDirect can no longer detect signals from the video camera depending on the model. In this case, turn on the digital video camera and DVDirect again.
-
Page 20: Previewing A Video Dvd
Previewing a Video DVD You can play and check the video DVD burned by this DVDirect in the display window on the top of DVDirect. Notes • Sound will not be heard when previewing the disc in this DVDirect. • You cannot output video images to external devices such as TV. •... - Page 21 Press the eject button, and insert a video recorded disc. For a finalized disc The video titles recorded on the disc appear in the display window. Title 1 00:00:24 Title 3 00:00:16 Menu Selected title (highlighted in yellow) Press Mm < , to select the title you want to view, and press The selected title starts to play.
-
Page 22: Creating A Photo Dvd
Creating a Photo DVD You can easily record photos taken by your digital camera on DVDs from a memory card. You can also create a slide show DVD. Photo DVD to be created The following types of photo DVD can be created with DVDirect. You can decide which you intend to create according to a message appeared when ejecting the disc. -
Page 23: Storage Location Of Photos In The Photo Dvd
All photos are stored in the folder 100VRDMC. Desktop My Documents My Computer WinXP-J(C:) WinXP-E(D:) VRD_MC1(E:) AUDIO_TS DCIM 100VRDMC VIDEO_RM VIDEO_TS Sony MemoryStick - MG(G:) Control Panel Hints • File names are automatically created when the photo DVD is created. DSC00001 DSC00002 DSC00003 DSC00004... -
Page 24: Photo Recording
Photo Recording Connect the supplied power cord and AC adaptor to DVDirect. Insert the memory card into its corresponding memory card slot. Notes • Insert only one memory card into a memory card slot. Furthermore you cannot use more than one memory card slot at a time. •... - Page 25 Turn on DVDirect. The display window turns on. Power button Press the eject button, and insert a disc. A new blank disc is formatted automatically. Wait until [Formatting the disc.] in the display window disappears and the display window changes. Photos in the memory card appears in the display window.
- Page 26 Press (Record) to start recording. [Writing photos to disc.] appears in the display window and up during recording. (Record) turns off and recording is completed. Recording stops automatically when the photos are recorded. Hint You can continuously add photos from another memory card on the same disc. In this case, change the memory card, and if you press the display window, recording will start.
- Page 27 The following message appears. To complete the disc as a photo backup DVD, select [No]. To complete the disc as a slide show DVD, select [Yes]. Notes • For a photo backup DVD, it takes a few minutes to complete finalizing. •...
-
Page 28: Viewing And Printing Photos
Viewing and Printing Photos You can view and check the photos recorded on DVD or photos stored in a memory card in the display window on the top of DVDirect. You can also print out photos in a photo DVD or memory card by connecting this DVDirect to a PictBridge-compatible printer. - Page 29 Press the eject button and insert a photo recorded disc, or insert a memory card. Press to scroll and view the photos, or display a photo to print. One photo is displayed in the display window at a time. 1/123 Menu Print Hint...
- Page 30 Turn on the printer and set up for printing. Refer to the operating instructions of your printer for setup details. (See connection with a PictBridge-compatible device.) Press (Record). The following message appears. Connect your printer to DVDirect with the supplied USB cable. The printer starts printing.
- Page 31 Hint To continue printing other photos, press and then press (Record). Notes on viewing or printing photos • You cannot view or print photos from a photo DVD created by a device other than DVDirect, i.e., a computer created disc. •...
-
Page 32: Using The Setup Menu
Using the Setup Menu You can change the various setting to create a disc in the Setup menu screen. The following shows the procedure to display the Setup menu. Turn on DVDirect. The display window turns on. Press < The main menu appears. Hint <... -
Page 33: Dv Full Dubbing
DV Full Dubbing Set [ON/OFF] for the one touch recording feature ( Setting Rec Quality To create video DVD, you can select the recording quality. Default Rec Quality setting Auto Stop Timer To create video DVD, you can select the preset time to stop recording automatically. -
Page 34: Auto Chaptering
Auto Chaptering To create video DVD, you can specify a time to create chapter marks automatically in the disc. Setting 5min 10min 15min About title and chapter on a disc DVD contents consist of sections, called titles, and smaller sub-sections, called chapters. -
Page 35: Slide Show Bgm
Slide show BGM To create photo DVD (slide show DVD), you can select if you record a background music on the disc. Setting Note Only one background music is pre-installed in DVDirect and cannot be changed. Color system Select the color system of the disc. The disc cannot be played if the color system is different between the created disc and the DVD player. -
Page 36: Finalize Disc
Finalize disc Finalize a disc that has not been finalized when ejecting. ( Hint When you use a DVD+RW disc, you do not need to finalize it. Insert a disc to finalize, press press The following message appears. Press to select [Yes], and press The following message appears. - Page 37 DVDirect starts finalizing. For video DVD The following message appears. Finalizing... For photo DVD The following message appears. Slide show Create a slide show? (This may require time.) To complete the disc as a photo backup DVD, select [No]. To complete the disc as a slide show DVD, select [Yes]. Notes •...
- Page 38 What is “Finalize disc”? To finalize the disc means to make the created disc playable on other DVD devices. When ejecting a disc immediately after recording, DVDirect gives a message to ask if you wish to finalize the disc or not ( You can select to finalize the disc or not according to the purpose.
-
Page 39: Erase Disc
Erase disc Erase all data recorded in DVD+RW or DVD-RW. The erased disc is reusable as a blank disc. Insert a disc to erase, press (Select). Menu The following message appears. Setup Press to select [Yes], and press The following message appears. Setup Press to select [Yes], and press... -
Page 40: System
DVDirect erasing starts. Notes • Be aware that this operation erases all data. • You cannot erase individual titles or chapters. After erasing is completed, the disc can be ejected. System You can check the system software version of DVDirect. Press to select [System], and press in the display window. -
Page 41: Using Dvdirect With A Computer
Using DVDirect with a Computer System Requirements When using DVDirect with your computer (Drive Mode), the computer system should meet the following requirements ❑ CPU: Pentium III, 800 MHz or higher (with NeroVision Express: Pentium 4, 1.6 GHz recommended) ❑ RAM: 256 MB or higher ❑... -
Page 42: Setting Up The Computer
Setting Up the Computer Installing the software Insert the supplied software disc into a drive on the computer. The installer will start automatically. Click [INSTALL SUITE] button to install the software. Click [INSTALL SUITE]. After installation is completed, continue to install other options or click [EXIT] to finish installation. -
Page 43: Connecting Dvdirect To A Computer
Connecting DVDirect to a computer Connect the supplied USB cable, the power cord, and the AC adaptor to DVDirect. Power cord Set the mode switch on the left side of DVDirect to [PC/PRINT]. STANDALONE PC/PRINT Turn on DVDirect. Power button Turn on your computer. -
Page 44: Disconnection
Connect the other end of the USB cable to your computer. [Drive Mode] appears in the display window. Note Please connect DVDirect directly to a USB connector on the computer. Computer Click [MY computer] and make sure the icon of this DVDirect is added. You can now use DVDirect with your computer. -
Page 45: Using The Bundled Software
• Using software other than the bundled software (such as commercially available software, shareware, or freeware) to write data to disc with this DVDirect is not under warranty and Sony provides no customer service. • Make sure that the bundled writing software and other writing software do not coexist on your computer. -
Page 46: Maximizing Performance
Reaching the highest possible data transfer rate Make sure that you use high-speed certified discs for which this operation has been guaranteed by Sony. For the latest information about these discs, visit the user support web site. When using discs other than those mentioned above, DVDirect may limit writing speed to preserve a good reading quality. -
Page 47: Additional Information
Additional Information About Discs Compatible writable discs The following writable discs are compatible with DVDirect. Disc type Logo DVD+R DVD+R DL (Double layer) DVD+RW DVD+RW High speed DVD-R DVD-R DL (Dual layer) R DL R DL DVD-RW CD-R CD-RW CD-RW High speed CD-RW ultra speed... -
Page 48: Recommended Writable Discs
Disc diameters 12 cm 8 cm 12 cm 8 cm Note Only round discs should be used with this DVDirect. Never use odd-shaped discs (stars, hearts, card shape, etc.), otherwise DVDirect may be damaged. Recommended writable discs We strongly recommend that you only use discs for which operation has been guaranteed. -
Page 49: Precautions On Writing/Playing Discs
DVD+RW and DVD-RW discs Data can be written to or erased from this type of disc repeatedly. Typically, a new DVD+RW or DVD-RW disc can be rewritten about 1,000 times. About playback/reading compatibility CD-R and CD-RW discs created with DVDirect can be read on most CD-ROM drives. - Page 50 With this DVDirect, the region code can be set up to five times, including the initial assignment (RPC phase 2 times, the setting becomes permanent and can no longer be changed. From this point on, you are only able to play back DVD-Video whose region code matches the one set at the fifth time.
-
Page 51: About Memory Cards
About Memory Cards About “Memory Stick” A “Memory Stick” is a compact, portable IC recording medium. The types of “Memory Stick” that can be used with DVDirect are listed in the table below. However, proper operation cannot be guaranteed for all “Memory Stick”... -
Page 52: About The Compactflash/Sd/Xd-Picture Cards
Notes on using “Memory Stick” • You cannot record, edit or delete images if you slide the write-protect switch to LOCK with a fine-tipped object. Terminal Memo area “Memory Stick” The position and/or the shape of the write-protect switch may differ depending on the “Memory Stick”... -
Page 53: Precautions
Precautions Operation and storage conditions Avoid using or storing DVDirect in a hot or humid location, or where it might be subject to severe vibration or direct sunlight. Transportation • Please repack DVDirect in its original carton when shipping by itself. •... -
Page 54: Support Overview
• Guaranteed compatible discs • Operating instructions • Others Accessing the user support web site Sony Storage Support web sites (As of March, 2005) http://sony.storagesupport.com/ About the Bundled Software Detailed information about the supplied software is available on the web sites of the software manufacturer. -
Page 55: Specifications
Specifications Stand-alone operation Color system NTSC/PAL Recordable discs DVD+R (video DVD) DVD+R DL (video DVD) DVD+RW (video DVD) DVD-R (video DVD, photo DVD) DVD-RW (video DVD, photo DVD) Video encoding MPEG-2 Audio encoding Dolby Digital (2ch) Supported photo file (photo backup) JPEG, DCF2.0 compliant Printing PictBridge compliant, printer... - Page 56 Sony Corporation Printed in China...
Need help?
Do you have a question about the VRD-MC1 and is the answer not in the manual?
Questions and answers