Advertisement
Quick Links
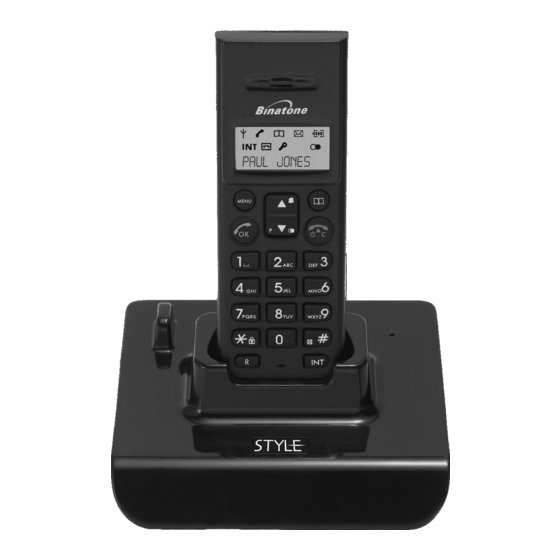
Phone Function Keys
Display
U
UP and DOWN button
U
Press to scroll through the
list of stored numbers
Press during programming
to move through the menu
Press during a call to
change the volume in the
earpiece
M E N U
MENU button
U
Press to access menu for
programming
O K
O K
PHONE / OK button
U
Press to make or answer a
M E N U
phone call
Press to select or confirm
O K
C
C
a menu option.
STAR / KEYPAD LOCK
A BC
D E F
button
U
Press
and hold
to lock/unlock
G H I
JK L
M N O
keypad
RECALL button
PQ RS
TU V
W XY Z
U
You may need the Recall
function during a call if your
phone is connected to a
PBX
I N T
or if you use BT's Select
Services.
MOUTHPIECE
* Style 1210 TAM shortcut button definition, please refer to TAM Operation guide.
Base station
2
"Out of range' warning
If you hear a warning tone during a call, and the sound in the earpiece becomes faint or
distorted, you may be going out of range of the base unit.
Move nearer to the base unit within 20 seconds, until the warning tone stops. Otherwise, your
call may be cut off.
Mains power connection
IMPORTANT - The Style 1200/ 12 0 base unit and charger pod must be used with the mains
1
adapter supplied with the unit.
Using any other adapter will result in non-compliance with EN60950, and will invalidate any
approval given to this apparatus.
Battery safety
ONLY use the rechargeable batteries supplied with the handset.
DO NOT use non-rechargeable batteries - they may burst and cause damage to your telephone.
CAUTION: Risk of explosion is replaced by an Incorrect type. Dispose of used batteries according
to the instructions. Use only with GP/SANIK, type no.
GP
30AAAM3BMX 3SN-2/3AAA 30H-S-JP1
rated 3.6VDC 300mAh Ni-MH rechargeable battery pack or GP / SANIK type no. GP30AAAKC
SN-AAA30J rated 1.2V 300mAh "AAA"size Ni-Cd rechargeable batteries.
Installation and Set-up
1/ Choose a suitable site for the base unit (see page4 )
2/ Connect the
telephone line cord into the base unit
Plug one end of the telephone line cord into the
jack on the back of the base
3/ Plug the main adaptor into your wall
s
socket. If you have one or more charger
pods, plug the mains adaptors accordingly
Make sure that the 230V AC, 50hz mains socket
is switched OFF when you plug the mains adapter
into the socket. Switch it ON only when you
have the adaptor plugged in safely.
4/ Fit the rechargeable batteries in
each handset
Push down on the top of the battery compartment
cover (located on the back of the handset) and slide the
cover off as shown. Life the battery pack and connect its plug
the jack inside the compartment.
st
5/ Charge the batteries for 15 hours
before 1
time use
m
Before you use the handset for the first time, it is important
that you charge the batteries fully. You will hear a 'beep'
when the handset is correctly positioned on the charging cradle.
P
Leave the handset on the base unit or charger pod for 15 hours
To keep the batteries charged, whenever you don't need to use
the handset (such as overnight,
or when you go out), leave it on the base unit or charger pod.
6/ Connect the base unit to the telephone line
Switch OFF power at the mains socket and insert the telephone line plug into the socket then
switch mains power back ON.
Plug the adaptor to the socket-outlet that near the equipment and shall be easily accessible.
5
you press '2',
if you want to insert the letter 'B' you press
A BC
twice and for 'C', three times etc. If you want to insert
'AA' then you will have to wait for the first 'A' to stop
flashing then insert the second 'A'. Press
for space.
press "0" for "+ - 0".
To create a contact in your phonebook
Press the PHONEBOOK button
The phonebook icon
will appear
Press the MENU button
. If the phonebook is empty the
M E N U
display shows "ADD?". If the phonebook is not empty, the display shows the first entry,
so then press the MENU button for the display to show "ADD"
Press the PHONE/OK button to add a name
, the display shows "NAME"
O K
Use the digit keys to insert characters for the name (max: 8 characters)
Press the PHONE/OK button to confirm
O K
Use the digit keys to insert the telephone number (max: 24 digit) e.g. "12345678"
Press PHONE/OK button to confirm and the display will show "SAVED"
O K
and then returnto the name
Press the HANG UP/C button to go back to idle mode
C
To view contacts in your phonebook.
Press the PHONEBOOK button, the display shows "FIRST NAME".
Press the UP/DOWN button to step through the list, or use the digit buttons for short-
cuts to names with the same inital letters as the button characters.
To see the number stored with the name, press the HASH(#) button. Press the HASH
button twice to see the rest of the number if it is more than 10 digits long, and press the
STAR(*) button to go back to the previous page and press again to go back to the name.
To delete a contact in the phonebook
Press the PHONEBOOK button. The phonebook icon will appear and the first entry.
Press the UP/DOWN button to get to the contact you want to delete.
Press the MENU button and then the DOWN button to display DELETE.
M E N U
Press PHONE/OK to delete it, and the display will then show the next phonebook entry.
O K
To delete all phonebook entries
Press the PHONEBOOK button. The phonebook icon will appear and the frist entry.
Press the MENU button and then the DOWN button to display DELETE ALL.
M E N U
Press PHONE/OK twice to confirm the delete, and the display will go back to idle mode.
O K
To edit contacts in phonebook
Press the PHONEBOOK button
The phonebook icon
will appear
Use the UP/DOWN button to get to the contact you want to edit
Press the MENU button
M E N U
, the display shows
"ADD"
Press the DOWN button twice
, the display shows
Press the PHONE/OK button to confirm
O K
Press the HANG UP/C button to delete characters
Use the digit buttons to insert new characters
C
Once you have edited the name press PHONE/OK and
O K
8
What's on the display?
EARPIECE
U
The display of your telephone
CALLER ID (CID) button
U
contains one line of text
Press to view caller ID list
(showing details of names and
PHONEBOOK button
numbers) and two lines of icon
U
Press to store names and numbers
What the symbols mean?
Press to access phonebook
U
Signal Level
HANG UP / CLEAR button
C
C
U
Press to end call
Call
Press during programming to
go back to the previous option
or to clear digits or characters
Battery Charge
from the display.
Level
Press and hold to turn the handset
OFF, and press and hold turn back on.
REDIAL
/ PAUSE
button
Intercom Call
U
Press to view redial list
Press to pause (you may
Phonebook
need this function when your
phone is connected to a PBX)
Caller Display
HASH / MUTE button
U
Keypad Locked This appears when the keypad is locked
Press to mute when speaking
on the phone
Ringer Off
Press to view additional digits when
a number in memory exceeds 10 digits.
Redial
Press to view date/time of a call in
Caller ID list.
Answering
M
achine
button
INTERCOM
I N T
U
(Only for Style1210 model)
Press this to make intercom calls.
Contents
Cover Page
U
Charging batteries for the first time 1
Unpacking your phone
Your Phone Function Keys
U
Base station
U
What's on the display?
U
HANDSET LOCATOR button
What the symbol mean?
-Register handsets
Read First before Use
U
Press this to make the
Choosing a site for the base
handset ring, if you have
unit and charger pod
forgotten where you put it
Radio signals between handset and
(the button is located under
base unit
the base)
Interference
"Out of range" warning
Your Telephone Operations
Switching on/off
Press
and hold
C
Press the HANG UP/C button and hold for three seconds for 'OFF'
C
** You can switch the handset off and save battery charge.
Notes: When the handset is OFF, it cannot be used for making calls including emergency
calls. When the handset is OFF, only the base unit will ring during an incoming call.
To answer a call when the handset is switched off, you need to switch it back on.
It may take a some time for the handset to re-establish a radio link with the base unit
To lock/unlock the key pad
To lock: press the STAR button and hold for
/
seconds until the key symbol appears on the LCD
To unlock: press the
2
seconds until the key symbol disappears on
Set time & date
Set time and date
Press the MENU button, the display shows "PHONEBOOK"
M E N U
Press the DOWN button
Press the PHONE/OK button
O K
Enter the date using the digit keys 0 to 9 - format DD/MM
P
Press the PHONE/OK button
O K
Enter the time using the digit keys 0 to 9 - format HH:MM (It's a 24 hour clock)
Press the PHONE/OK button to confirm
O K
Press and hold the HANG UP/C button to go back to idle mode
C
Note: You can turn on/off the time
st
time use
Press the MENU button, then DOWN to select the
Press the Phone/OK button then DOWN once to show "DISPLAY",
Press the Phone/OK button to switch between ON( ) and OFF(X) and when you have
maybe your selection. Press the HANG UP/C button.
C
hange
your handset's
Press the MENU button, the display shows "PHONEBOOK"
M E N U
Press the DOWN button four times
Press the PHONE/OK button twice
+
O K
The screen displays the current handset name "HANDSET"
Press HANG UP/C button to delete the text and enter
C
the new name of your handset by using the digit keys
O K
Press PHONE/OK button to confirm
Press and hold the HANG UP/C button to go back to idle mode
C
Select your phone language
Press the MENU button, the display shows "PHONEBOOK"
M E N U
Press the HANG UP/C button to delete numbers
C
Use the digit buttons to insert new numbers
A BC
D E F
O K
Once you have edited the number press PHONE/OK,
Press and hold the HANG UP/C button to go back to idle mode
C
JK L
G H I
M N O
To store a last number redial entry in phonebook
Use the DOWN button to get to the number you want to store
PQ RS
TU V
W XY Z
The redial icon
M E N U
Press MENU button
Press PHONE/OK to confirm.
O K
Press the Phone/OK button and the number you are storing will apear.
O K
Use the HANG UP/C button and digit buttons to modify the number.
C
Press the Phone/OK button to confirm and store the entry.
O K
Press the HANG UP/C button to go back to idle mode
C
e.g. "JANE"
Dialing from phonebook
Press PHONEBOOK button
Use the UP/DOWN button or digit buttons to go through your
phonebook to find the person you want to call
Press the PHONE/OK button to make the call and the phone icon will appear
O K
The screen displays the telephone number you are dialing
Press the HANG UP/C button to end the call
C
Caller ID log
Caller display lets you see the phone number of your callers on the handset's display before
you answer.
The Style 1200/1210 will store the numbers of the last 20 callers, so you can call them back
later. When the Caller ID log is full, the next incoming number will overwrite the oldest one.
If the incoming number matches an entry in the phonebook, it will display the name from the
phonebook.
If the call is from someone who withheld their number the display will show "WITHHELD", or
if it is from someone whose number is unavailable ( e.g. an international call) it will display"UNKNOWN".
If the caller ID icon is on, it indicates one or more new calls have heen received.
When the calls list is viewed the caller ID icon will be turned off.
To review the caller ID log
Press the UP button to access the caller ID log
Use the UP/DOWN button to go through the caller list.
** You can call the caller directly by pressing the PHONE/OK button
Press the HANG UP/C button to go back to idle mode
C
To delete the caller ID log
Press the UP button to access the caller ID log
Use the UP/DOWN button to go to the entry you want to delete
Press the MENU button
M E N U
"MODIFY"
* To delete all entries in your caller ID log, press the DOWN button three times.
Press the PHONE/OK button to confirm and the next number will appear
O K
* Press the PHONE/OK button twice to confirm delete all
then go back to idle mode
the telephone number will appear
This shows that there is signal between the handset and its
base. If it flashes, it means that
there is no
signal
.
This shows when somebody is using the telephone. It
flashes while your handset is ringing for an incoming call.
.
When ever this shows
, it indicates 'nearly empty'; put
the handset on the base unit to charge the battery. While
the battery is being charged, the level shown keeps changing.
This flashes while your handset is ringing for an intercom
call and shows on the screen when the call is connected.
This appears when you are using the Phonebook. You can
store names and numbers or make calls to contacts.
This appears when your calls log has new records.
This appears when the handset ringer is off
This appears when you are reviewing the redial list or
calling a number from the redial list
This appears when your answering machine (TAM) is
on and flashes when a message is received.
U
Page
1
Set time and date
Change your handset's name
1
Select your phone language
2
Making and answering calls/earpiece
volume adjustment during calls
2
Mute function
3
Last number redial function
3
Memory/Phonebook management
4
Dialing from phonebook
Caller
ID log
4
Handset ringer volume melody & ke y tone
,
Using a multi-handset system
4
Paging h
andset
4
5
3
to turn the handset 'ON'
2
STAR
button and hold for
the LCD
, the display shows
"DATE/TIME"
Twice
on standby display
.
DATE/TIME,
name
, the display shows "HANDSET"
up to 8 characters for
6
the display will show
e.g. 12345678
will appear
, the display shows "COPY TO PB"
Use the digit buttons to insert the name
and the call ID log icon
will disappear
and the call ID log ico
n
will
and DOWN key twice
, the display shows "DELETE"
9
Mains power connection
U
Battery safety
Installation and Set-up
Choose a suitable site for the base unit 5
Connect the
telephone line cord into
the base unit
Plug the main adaptor into your wall socket
Charge the batteries
Connect the base unit to the telephone line
Your Phone Operations
U
Switching on/off your phone
To lock/unlock the key pad
Read First Before Use
T
Choosing a site for the base unit and charger pod
If you h a ve a B r oa d a n d lin e
If you connect your telephone to a line with a broadband
connection, you will need to insert a microfilter between
the telephone line, otherwise you may get interference
between the telephone and the broadband, which could
cause problems.
In a home with broadband, every telephone must have a
microfilter connected, not just the one at the telephone
point that your modem is connected to. If you need more
broadband microfilters, contact your broadband supplier.
The base unit and charger pod(s)
should
be to placed on level surface, in a position where:
the mains adapter plug will reach an easily accessible 230-V AC switched mains supply
socket - never try to lengthen the mains power cable
the base unit's telephone line cable will reach your telephone line socket or extension
socket (the charger pod does not have a telephone line connection)
it should not close to another telephone - this can cause radio interference
Page
U
it should not close to a sink, bath or shower , or anywhere else where it might get wet
6
it should not close to other electrical equipment - fridges, washing machines, microwave ovens,
6
fluorescent lights, televisions etc.
6
it is away from hot, humid conditions and strong sunlight
Radio signals between handset and base unit
7
To use your handset and base unit together, you must be able to establish a radio link between
7
them. Be aware that:
7
any large metal objects, like a refrigerator, a mirror, filing cabinet etc, between the
handset and the base unit may block the radio signal.
7
other solid structures, like walls, may reduce the signal strength.
9
Interference
9
10
If the sound quality gets worse as you move around while on a call, this is probably caused by
11
interference between the handset and the base unit, perhaps because you are too near to
12
another phone or other electrical equipment.
Move to a different position to clear the interference. If you do not move, it might caused a short
break or your call may be cut off.
Press the DOWN button four times, the display shows "HANDSET"
Press the PHONE/OK button and the DOWN button twice then press "OK"
O K
The screen displays the current language "ENGLISH"
Press UP or DOWN button to go through the language list.
Press PHONE/OK button to select the language
O K
Press and hold the HANG UP/C button to go back to idle mode
C
Making and answering calls / Earpiece volume adjustment during calls
Make a call
Press the PHONE/OK button to make the call
O K
The screen displays the call
icon and you should
Dial the telephone number that you require.
Press UP or DOWN button to adjust the volume of
the earpiece during your conversation (3 volume levels)
Press the HANG UP/C button to end the call
C
Note: You can also make a call by using the Pre-dial function: Dial your correspondent
telephone number first (if you enter a wrong number use the HANG UP/C button to delete
and re-enter) then press the PHONE/OK button to make the call.
Answer a call
Note: you can also answer a call by using the Auto-answer function, see page
to switch it on.
Press the PHONE/OK button to answer a call when the telephone rings
O K
The screen displays shows the call
Press UP or DOWN button to adjust the volume of the earpiece during your
conversation(3 volume
levels)
Press the HANG UP/C button to go back to idle mode
C
Mute function
The mute function will mute the microphone of your telephone so that the person
at the other end will not be able to hear you.
To Mute: press the HASH button
To Un-mute: press
the HASH button for
Note: The microphone will be un-muted automatically when a new call is made.
Last number redial function
Each handset has a Last Number Redial list to store the last 10 different number dialled out.
To access to the Last Number Redial list press the
The Redial icon
will appear, along with the last number dielled
Press UP or DOWN button to get the number you want to redial
Press PHONE/OK to make the call to the number selected.
O K
Press and hold the HANG UP/C button to go back to idle mode
C
Memory/Phonebook management
Each handset has a phonebook memory, which can hold up to 40 names and numbers.
How to enter characters?
To use the characters you press the button where you
see the character e.g. if you want to insert the letter 'A'
To store a Caller ID contact in the phonebook
Press the UP button to access the caller ID log
and the caller ID log icon
would disappear
"MODIFY"
Use the UP/DOWN button to go to the entry you want to one
Press the MENU button
, the display shows "COPY TO PB"
M E N U
Press the PHONE/OK button
O K
Use the digit buttons to insert the name
Press the PHONE/OK button and the number that your have stored will appear
O K
Press the PHONE/OK button again, then press the HANG UP/C button go back to
O K
idle mode.
Handset ringer volume, melody and key tone
Change handset ringer volume
Press MENU button
, the display shows "PHONEBOOK"
M E N U
Press the DOWN button twice
, the display shows
Press the PHONE/OK button
, the display shows "HS VOLUME"
O K
Press the PHONE/OK button
, the display shows
O K
Use the UP/DOWN button to adjust volume.
There are seven levels
(VOL 1 - 7 / OFF).
.
Press the PHONE/OK button to confirm
O K
Press and hold the HANG UP/C button to go back to idle mode
C
Change handset ringer melody
Press MENU button
, the display shows "PHONEBOOK"
M E N U
Press the DOWN button twice
, the display shows "HS RINGER"
Press the PHONE/OK button
,the display shows
O K
Press the DOWN button once
, the display shows "HS MELODY"
Press the PHONE/OK button
, the display shows "MELODY 4"
O K
Use the UP/DOWN button to choose melody.
There are eight options.
Press the PHONE/OK button to confirm
O K
Press and hold the HANG UP/C button to go back to idle mode
C
Turn on/off key tone
Press MENU button
, the display shows "PHONEBOOK"
M E N U
Press the DOWN button four times
Press the PHONE/OK button
, the display shows
O K
Press the DOWN button once
, the display shows "KEYTONE
Press the PHONE/OK button to turn key tone on( )
disappear
O K
Press and hold the HANG UP/C button to go back to idle mode
C
Base ringer volume and melody
Change base ringer volume
Press MENU button
, the display shows "PHONEBOOK"
M E N U
Press the DOWN button three times
Handset registration
12
5
Advanced use of your Phone
13
5
Handset advanced settings
13
5
Set to default settings
13
Change your PIN code
14
Select dialing mode
14
5
Set flash time (Recall)
15
To turn Baby call ON/OFF:
15
5
Troubleshooting
15
5
Cleaning and Care
17
5
6
Declaration of Conformity
17
6
Guarantee and Service
18
6
Technical Details
18
M E N U
O K
C
C
A BC
D E F
G H I
JK L
M N O
PQ RS
TU V
W XY Z
I N T
4
hear the dialing tone.
13
for how
icon.
for 2 seconds until the display shows MUTE.
2
seconds until MUTE disappears.
DOWN button
7
"HS RINGER"
"VOLUME 7"
"HS VOLUME"
, the display shows "HANDSET"
"H S NAME"
/
" (ON)
or
off(X)
.
, the display shows
"BS RINGER"
10
Advertisement

Related Manuals for Binatone 1210


Summary of Contents for Binatone 1210
- Page 1 M E N U To see the number stored with the name, press the HASH(#) button. Press the HASH The Style 1200/1210 will store the numbers of the last 20 callers, so you can call them back Press the DOWN button twice , the display shows “HS RINGER”...
- Page 2 , the display shows “PHONEBOOK” M E N U Unpacking your phone In the unlikely event that you need to return your Style1200/1210 to our Repair Centre while Press the DOWN button to select “BS RINGER” In the box you will find: it is under guarantee, there will be a £5 handling charge.
Need help?
Do you have a question about the 1210 and is the answer not in the manual?
Questions and answers