Table of Contents
Advertisement
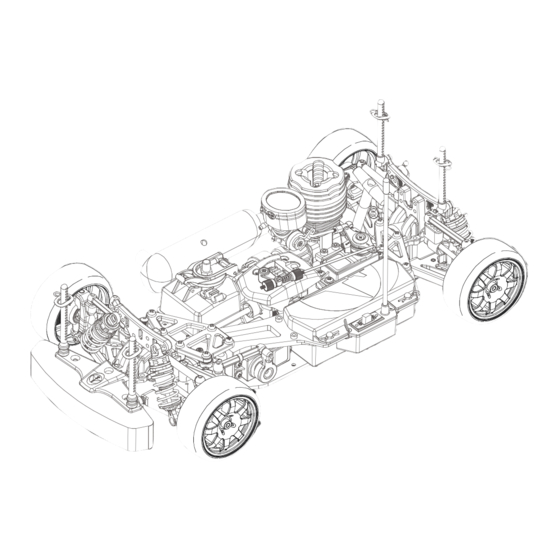
1/10 SCALE NITRO POWERED 4WD TOURING CAR SERIES
This radio control model car is not a toy! Before beginning assembly, please read this manual thoroughly.
The contents are subject to change without prior notice due to product improvements and specificatrion changes.
Maintenance Manual & Parts Catalogue
Introduction
Thank you for purchasing this Thunder Tiger product. This manual contains the steps and instructions required to assemble
your car. Please read this manual completely before attempting to start maintenance. Follow the directions in this manual closely
to reduce problems during operation. We offer online help on our www.acehobby.com or www.thundertiger.com and forums
and our product specialists are ready to take your call if you have any technical questions. Have fun and enjoy the exciting world
of R/C.
TOMAHAWK VX
24
tiger.com.tw
1:10
No.6194-F
www.thundertiger.com
www.
Advertisement
Table of Contents

Related Manuals for THUNDER TIGER TOMAHAWK VX


Summary of Contents for THUNDER TIGER TOMAHAWK VX
- Page 1 Maintenance Manual & Parts Catalogue Introduction Thank you for purchasing this Thunder Tiger product. This manual contains the steps and instructions required to assemble your car. Please read this manual completely before attempting to start maintenance. Follow the directions in this manual closely to reduce problems during operation.
-
Page 2: Table Of Contents
STEP9 Steering Servo / Throttle/Brake Control Servo TOMAHAWK VX PART LIST P.13 P.27 STEP10 Radio Box P.14 TOMAHAWK VX OPTION PART LIST P.33 STEP11 Installation of Rear End WHEEL & TIRE OPTION PART LIST P.16 P.34 STEP12 Installation of Radio Box P.16... -
Page 3: Manual Format
Manual Format How to read the instruction manual? Example STEP4 Indicates the assembly step number and the Front Suspension parts that are to be assembled. Displays actual size drawings, and part quantities used. 10x15x4mm All parts, except screws, are identified by its Ball Bearing order numbers. -
Page 4: Step1 Front Differential / Rear Differential
STEP1 Front Differential / Rear Differential 2.5x14mm F/H Philip Machine Screw 8x14x4mm Ball Bearing 3x5mm Washer 5x8mm Washer 4.4x0.8mm O-Ring silicon oil 3x19mm You may also use silicone oil to replace grease for the differentials. Fill up to 80%. We recommend using #7000 silicone oil for the front differential and # 10000 silicone oil for the rear differential. - Page 5 STEP2 2-Speed Transmission Unit 2 2.9x1.8mm O-Ring 5x14x5mm Ball Bearing 2.5 x 5 mm F/H Philip Machine Screw 6x9mm 4x6mm Firmly tighten the set screw onto the flat spot. Washer Set Screw STEP2 2-Speed Transmission Unit 2 3x25mm BT Philip Machine Screw Brake Cam Brake Pad Note Direction...
-
Page 6: Step3 Front Differential Unit
STEP3 Front Differential Unit 6mm(L) Ball Stud 5x11x4mm Ball Bearing 3x12mm BT Philip Machine Screw 2.5mm E-Clip2 2.9x1.8mm O-Ring 14x10.5x0.1mm A d j u s t t h e Diff Shim backlash with the shims. Leave one unit of drive axle for later step. - Page 7 STEP4 Front Suspension Front Shock Tower 3x10mm BT Philip Machine Screw 6mm(L) Ball Stud STEP4 For Right Front Suspension Marked "R" "R" 10x15x4mm Ball Bearing 6mm(L) Ball Stud Marked "L" "L" Caster Block Bushing 3x12mm BT Machine Screw In the chassis set, these dog bones have been assembled in one-piece unit.
-
Page 8: Step5 Rear Differential Unit
STEP4 Front Suspension 6mm(L) Ball Stud Marked "S-CM" "S-CM" 2x4mm BT Self-Tapping Screw For Right 2.5x20mm Outer Hinge Pin (Front) STEP5 Rear Differential Unit 6mm(L) Ball Stud 3x12mm BT Philip Machine Screw 14x10.5x0.1mm Diff Shim Assemble Earlier Refer to Page 5 Adjust the backlash with the shims. - Page 9 STEP6 Rear Suspension Marked "." Roll Center Adjustment: "." By replacing the suspension arm mount bushings (setup of roll center), you can acquire different handling and steering responses according to the different track conditions. The kit included various spare bushings for your further replacement. 6mm(S) Ball Stud 3x10mm...
-
Page 10: Step6 Rear Suspension
STEP6 Rear Suspension Rear Shock Tower 6mm(L) Ball Stud (PD9104) 3x10mm BT Philip Machine Screw Marked "S-CM" 2x4mm "S-CM" BT Self-Tapping Screw w/washer 2.5x22mm Outer Hinge Pin (Rear) For Right STEP6 Rear Suspension Body Clip 3x8mm BT Philip Machine Screw Rear Body Post Adjust height to suit body. -
Page 11: Step7 Shock Absorber
STEP7 Shock Absorber Shock Shaft Attach the shock eyelet onto the shock shaft until it reaches the mark line on the shaft 2.5mm E-Clips Shock Eyelet 2.8x1.9mm O-Ring Cover the shaft with cloth before griping it with pliers. Silicon oil Pull down the piston and slowly fill in the silicon oil. - Page 12 STEP7 Shock Absorber Front Shock Absorbers Rear Shock Absorbers...
-
Page 13: Step8 Steering Bellcrank
STEP8 Steering Bellcrank Top View 6mm(L) Ball Stud Rear Swing Post Screw 5x8x2.5mm Ball Bearing Side View Rear Note direction STEP8 Steering Bellcrank 3x8mm BT Philip Machine Screw Front Chassis Brace 3x18mm BT Philip Machine Screw Marked "S-ST" Marked "S-ST" "S-ST"... -
Page 14: Step9 Steering Servo / Throttle/Brake Control Servo
"T" Back Marked "T" for Thunder Tiger stock servo. Find the appropriate servo horn mount for your servo from the chart below. Install the servo horn arm with the stock mounting screw. See the graphic for the correct neutral angle. -
Page 15: Step10 Radio Box
STEP9 Steering Servo / Throttle/Brake Control Servo 3x10mm Note: !!!The use of the servo spacer may very BT Philip Tap Screw W / Washer depending on the manufacturer's stock servo you purchased. Check the servo to see if a spacer is needed. ... - Page 16 STEP10 Radio Box Battery Batteries not included in the kit Black to Black Red to Red STEP10 Radio Box Body Clip Antenna Thread antenna cord through the tubing. Must be purchased separately Pay close attention here Hint...
-
Page 17: Step11 Installation Of Rear End
STEP11 Installation of Rear End M3 Lock Nut Rear Suspension 3x10mm F/H Philip Machine Screw STEP12 Installation of Radio Box 3x10mm F/H Philip Machine Screw Radio & Servo Tray Unit... -
Page 18: Step13 Installation Of Front End
STEP12 Installation of Rear Brace 3x8mm BT Philip Machine Screw 3x18mm BT Philip Machine Screw Rear Chassis Brace STEP13 Installation of Front End Front Suspension 3x8mm BT Philip Machine Screw 3x10mm F/H Philip Machine Screw 3x12 mm F/H Philip Machine Screw M3 Lock Nut... -
Page 19: Step14 Installation Of 2-Speed Transmission Unit
STEP14 Installation of 2-Speed Transmission Unit 3x10mm F/H Philip Machine Screw Check O-ring Inside STEP15 Installation of Fuel Tank 3x10mm F/H Philip Machine Screw 2.9x1.8mm O-Ring 3x6mm BT Philip Machine Screw Tube Clip Pay close attention here... -
Page 20: Step16 Engine Set
STEP16 Engine Set Engine Assembly Spring Washer 5x8x2.5mm Ball Bearing 5x8mm Washer 5x10x4mm Ball Bearing Washer 3x6mm Socket Hex Machine Screw 3x10mm Socket Hex Machine Screw 3x28mm Socket Hex Machine Screw STEP16 Installation of Engine Set 3x8mm BT Machine Screw Tighten the screws with one sheet of paper inserted between both gears. -
Page 21: Step17 Muttler & Fuel Tube
Fuel Tube STEP17 Muttler & Fuel Tube Fuel Tube & Tuned Pipe 3x10mm F/H Philip Machine Screw M3 Lock Nut Pressure Tube Tube clip Cut the silicone tube to 265mm length for the fuel tube. 265mm Cut the silicone tube to 195mm length for the pressure tube. -
Page 22: Step19 Front Bumper / Front Body Mounts
STEP19 Front Bumper / Front Body Mounts Adjust height to suit body. 3x10mm F/H Philip Machine Screw Body Clip 3x8mm F/H Philip Machine Screw STEP20 Tire/Wheels Tire insert foam Install the tire onto the wheel. Glue the tire to the wheel with instant glue in four spots around the tire on both sides. Warning: Follow the adhesive instructions for proper use and safety. -
Page 23: Step20 Tire/Wheels
STEP20 Tire/Wheels 4x12mm Socket Hex Machine Screw Washer STEP21 5.5mm Body Shell Body Clip 5.5mm Round Tap Screw 5.5mm 5.5mm Antenna Hole 5.5mm Drill holes with the specified diameter Assemble left and right side the same way Pay close attention here... -
Page 28: Tomahawk Vx Part List
TOMAHAWK VX PART LIST (10) PD7712 SHOCK CAP PD8088-1 SHOCK CAP PD8093 SHOCK BLADDER PD8098 SHOCK PISTON SET PD9052 REAR BULK SET PD9053 FRONT BULK SET PD9054 OUTDRIVE CUP SET PD9051 DIFFERENTIAL CASE PD9055 DIFFERENTIAL GEAR SET PD9057 DRIVE PINION SET 13T... - Page 29 TOMAHAWK VX PART LIST PD9072 BUMPER SET PD9073 URETHANE BUMPER PD9074 SHOCK TOWER SET PD9075 FRONT SUSP. ARMS PD9077 STEERING BLOCK SET PD9078 CASTER BLOCK SET PD9079 FRONT UNINI SHAFT PD9076 REAR SUSP. ARMS PD9080 OUTER HINGE PIN SET PD9081 UPPER LINK SET PD9082 SUSP.
- Page 30 TOMAHAWK VX PART LIST PD9096 MUFFLER PD9097 SILICONE TUBING PD9098 MANIFOLD PD9099 SHOCK SET SOFT 2.5x1.8mm PD9100 SHOCK SPRING BLUE PD9101 SHOCK SHAFT PD9102 SHOCK ACCESSORIES PD9103 SHOCK EYELET PD9104 BALL STUD (L) PD9105 BALL STUD (S) PD9106 TH/BK LINKAGE SET...
- Page 31 TOMAHAWK VX PART LIST PD9120 PAINTED BODY SET PD9121 CLEAR BODY W/DECAL XANAVI GT-R (R34) PD9122 DECAL SET XANAVI GT-R (R34) 1/10 SLICK TIRE W/FOAM PD9134 XANAVI GT-R (R34) 26mm PD9131 M2.6x 10(20) PD1683 M3x10B (20) PD8178 2.9xW1.78(20) PD9132 M2.6x12(20) PD9133 M2x4B(20) CTP.
- Page 32 TOMAHAWK VX PARTS LIST PART# DESCRIPTION NOTE PD7712 ANTENNA BAG,BLACK PD8088-1 SHOCK CAP PD8093 SHOCK BLADDER PD8098 SHOCK PISTON SET DIFFERENTIAL CASE PD9051 PD9052 FRONT BULK SET PD9053 REAR BULK SET OUTDRIVE CUP SET PD9054 PD9055 DIFFERENTIAL GEAR SET PD9057...
- Page 33 TOMAHAWK VX PARTS LIST PART# DESCRIPTION NOTE PD9108 TH/BK SERVO HORN SET PD9109 BODY POST SET PD9110 HEX ADAPTER SET PD6601-R 5-SPK WHEEL ,26mm(CHROME/RED) ,26mm PD9112 10-SPK WHL ,26mm(BLACK) ,26mm PD9113 8-SPK WHL,26mm(BLACK) ,26mm 9262 1/10 AIR CLEANER, DUAL FOAM...
-
Page 34: Tomahawk Vx Option Part List
TOMAHAWK VX OPTION PART LIST PD7714 OUTDRIVE CUP PD9140 FLAME DECAL, BLUE PD9141 FLAME DECAL, YELLOW PD9142 FLAME DECAL, RED PD9143 CFRP BUMPER TOP PLATE PD9144 CFRP FRONT SHOCK TOWER PD9145 CFRP REAR SHOCK TOWER PD9146 CFRP BULK LOWER COVER... - Page 35 TOMAHAWK VX OPTION PART LIST PD7722 ALUM STEERING BLOCK SET PD7723 ALUM CASTER BLOCK SET PD7724 ALUM HUB CARRIER SET PD7876 ALUM HEX ADAPTER PD7968 ALUM STEERING BELLCRANK PD7969 ALUM STEERING SLIDER PART# DESCRIPTION NOTE OP OUTDRIVE CUP PD7714 ALUM STEERING BLOCK SET...
-
Page 36: Wheel & Tire Option Part List
TOMAHAWK VX PARTS LIST WHEEL & TIRE OPTION PART LIST 5-SPOKE WHEEL 5 RACING DISH WHEEL 5-SPOKE WHEEL 5 PD6601-L C/BLUE , 26mm PD7649 WHITE , 26mm PD6681 CHROME , 26mm PD7699 WHITE , 26mm PD6601-P C/PURPLE , 26mm PD7650 WHITE...
Need help?
Do you have a question about the TOMAHAWK VX and is the answer not in the manual?
Questions and answers