Table of Contents
Advertisement
Quick Links
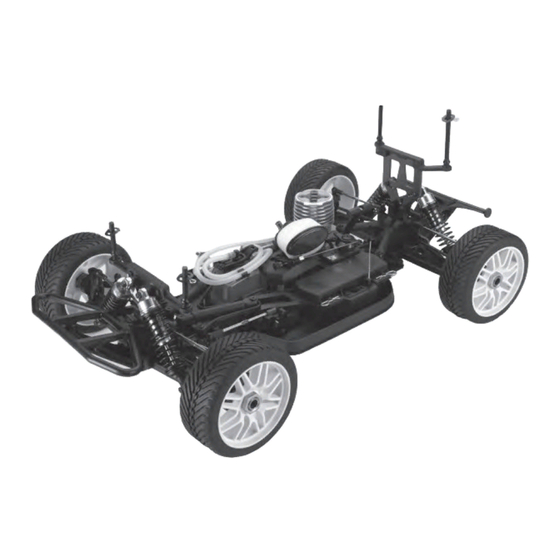
1:8 NITRO POWERED 4WD SHAFT-DRIVEN RALLY CAR
This radio control model car is not a toy! Before beginning assembly, please read this manual thoroughly.
本產品為高性能模型非一般玩具,組裝與操作前,請詳閱本產品說明書。
The contents are subject to change without prior notice due to product improvements and specificatrion changes.
本套件所附之零件可能跟圖示有所差異。因產品後續之設計研發或功能不斷改善之因,我們將保留產品規格變更權力,不再另行通知使用者。
Instruction Manual & Parts Catalogue
Thunder Tiger Corporation guarantees this model kit to be free from defects in both material and workmanship. The total monetary value under
warranty will in no case exceed the cost of the original kit purchased. This warranty does not cover any components damaged by use or modification.
Part or parts missing from this kit must be reported within 60 days of purchase. No part or parts will be sent under warranty without proof of purchase.
To receive part or parts under warranty, the service center must receive a proof of purchase and/or the defective part or parts. Should you find a
defective or missing part, contact the authorized Thunder Tiger Service/Distributor nearest you. Under no circumstances can a dealer or distributor
accept return of a kit if assembly has started.
本公司對於製造過程中產生之瑕疵,負完全品質保證責任。
保證事項僅限於產品本身與隨產品所附之零配件。
品質保證不包含下列事項
因使用、組裝或調整本產品所發生之損壞。
其他所有非產品本身品質所造成之損壞。
1:8
引擎動力四驅競速越野車
操作說明書及零件包型錄
WARRANTY
品質保證事項
No.6723-F
Advertisement
Table of Contents

Subscribe to Our Youtube Channel
Related Manuals for THUNDER TIGER TOMAHAWK XL


Summary of Contents for THUNDER TIGER TOMAHAWK XL
- Page 1 品質保證事項 Thunder Tiger Corporation guarantees this model kit to be free from defects in both material and workmanship. The total monetary value under warranty will in no case exceed the cost of the original kit purchased. This warranty does not cover any components damaged by use or modification.
-
Page 2: Table Of Contents
前言 Thank you for purchasing this Thunder Tiger product. This manual contains the steps and instructions required to assemble your car. Please read this manual completely before attempting to start maintenance. Follow the directions in this manual closely to reduce problems during operation. -
Page 3: Important Notes & Warning 重要注意事項
2. Thunder Tiger assumes and accepts no responsibility for personal and/or property damages resulting from the use of improper building materials, equipment and operations. By the act of assembling or operating this product, the user accepts all resulting liability. -
Page 4: Items Required For Operation 周邊配件
ITEMS REQUIRED FOR OPERATION 周邊配件 Screw Drivers, Lexan Body Reamer, Hobby Knife, Glow Fuel, Methanol 10% to 30% No.1266 Lexan Scissors. Nitro 5% to 18% Caster / Synthetic Oil Fuel Bottle, 350CC 十字起子、一字起子、挖孔器、車殼剪、美工刀 模型專用燃料(含10%~30%硝基甲烷、 加油壺 5%~18%潤滑油) Tools Included 附屬工具 Open And Wrench 開口扳手... -
Page 5: Charging The Glow Plug Igniter 電夾充電方式
CHARGING THE GLOW PLUG IGNITER 電夾充電方式 Glow plug igniter and charger has to be purchased separately. 充電電夾需另外選購 a. Plug the charger into an AC outlet, and then pull on the igniter lever to accept the charging adapter. b. At this point, the small red LED indicator on the charger should light up indicating the charging sequence is in progress. c. -
Page 6: Radio Operation 遙控器操作
RADIO OPERATION 遙控器操作 a. When turning radio system on. Turn the transmitter on first, then turn on the ESC. b. When turning the radio system off. Turn the ESC off first, then turn off the transmitter. c. Servo Reversing:It is sometimes necessary or convenient to reverse the output direction of the servo. The direction of the rotation for each individual servo can be changed by simply flipping the reversing switch that corresponds to the channel number on the receiver where the servo is plugged in. -
Page 7: Transmitter Controls 發射機各部功能簡介
TRANSMITTER CONTROLS 1. Transmitter Antenna: Straighten up the antenna before operating the model. 2. Battery Level Indicator: Three LEDs indicate the battery voltage level. If the Red LED flashes, please replace the batteries. 3. HI/LO Throttle ATV (Adjustable Travel Volume): Allows you to independently preset the maximum travel of the throttle servo either side (high / low) of neutral. -
Page 8: Binding Process 安全校頻配對步驟
BINDING PROCESS 安全校頻配對步驟 A binding feature is included in the ACE RC Cougar 2.4GHz spread spectrum system to ensure the transmitter and receiver bind properly and prevent interference from other controllers. To manually bind Tx/Rx, please proceed as per the following steps: a. -
Page 9: F/S-Fail Safe 防暴衝設定
F/S-FAIL SAFE 防暴衝設定 How to Set the Fail Safe (F/S) Position a. After binding the transmitter and receiver, you can continually set up the F/S position. Turn on the transmitter power and then receiver power. b. Press the “Binding SW” button on the receiver. 10 seconds later, the LED will turn green flash on the receiver. (Caution! Don't release the “Binding SW”... -
Page 10: Operating Radio Steering Function 遙控器設定-轉向
OPERATING RADIO STEERING FUNCTION 遙控器設定-轉向 a. Check the radio steering functions. With the radio transmitter and receiver on, turn the steering wheel/stick to the left. The front tires/wheels should turn left accordingly. If not, flip the steering servo reverse switch. b. -
Page 11: Operating Radio Throttle/ Brake Function
OPERATING RADIO THROTTLE/ BRAKE FUNCTION 遙控器設定-油門、中立、煞車 a. Check the radio throttle/brake functions. With the radio transmitter and receiver on, pull the trigger / push the stick forward. The carburetor should be fully opened and the brake disengaged. To reverse this function, flip the throttle/brake servo reverse switch. b. -
Page 12: Fuelling 燃油的添加
(replace with new one). After checking, reinstall the glow plug. The glow plug used for this engine can be: Thunder Tiger 9281, McCoy #9 / #59, Novarossi C4S / C5S / C6S,OS #8 / #A3 / #A5, and Picco P6S / P7S. -
Page 13: Starting The Engine 發動引擎
STARTING THE ENGINE 發動引擎 Not pull on over 35cm a. Turn on the radio (transmitter first, then receiver). b. Clip the glow plug igniter onto engine's glow plug. c. Pull on the engine starter, release, repeat until the engine starts. Throttle maybe required to be opened momentarily, but release back to neutral immediately after it starts. -
Page 14: Engine Break-In 引擎磨合
ENGINE BREAK-IN 引擎磨合 For a new engine (break-in setting), the high speed needle needs to be set as rich as possible. Turn the high speed needle 1/4 turn counterclockwise from initial setting (2 1/2 turns from fully closed). Repeat step 15b. Keep doing this until the engine stalls at full throttle, then turn the high speed needle 1/4 turn clockwise. -
Page 15: Shock Adjustment 避震器懸吊調整
SHOCK ADJUSTMENT 避震器懸吊調整 Use the included shock clips to adjust for spring pre-load. Pressing the entire car down, release, and the car should returm to ride height (indicated on set-up page). More pre-load clips will produce higher ride height, and less clips will produce lower ride height. Amount of clips used to front and rear shocks can be different, but clips should be the same for the left and right. -
Page 16: Driving Tips 駕駛的小技巧
DRIVING TIPS 駕駛的小技巧 a. Hold your elbows in and keep the b. Squeeze the throttle trigger or pull the c. Squeeze the throttle trigger and transmitter antenna pointing straight throttle stick gently and steer the car release. Repeat this action to control to left and right. -
Page 17: Troubleshooting 常見問題與解決方法
TROUBLESHOOTING 常 見 問 題 與 解 決 方 法 If you have trouble starting or keeping your EB4 S2.5 running, here's a quick checklist of what to look for first. 如果您的 有行駛上的問題,您可以參考下的說明。 EB4 S2.5 如果問題無法解決,請與購買經銷商聯絡。 Description 問題 Problem 可能原因 Solution 解決方法... - Page 22 TOMAHAWK XL SPARE PARTS LIST 零件表 AD2555 PD05-0020 PD05-0022 PD05-0024 PD07-0032 FLYWHEEL COLLET,5mm RR UNIVERSAL SHAFT,6723 HEX ADAPER,6723 FR UNIVERSAL SHAFT,6723 SHOCK MOUNT 飛輪固定座 傳動軸組 六角輪轂轉換器 前傳動軸組 避震器固定塊 PD07-0033 PD07-0034 PD07-0036 PD07-0037 PD08-0017 SHOCK SPRING SHOCK SET,TA-T SHOCK ACCESSORIES,MMGT SHOCK EYELET,TA TIRE SET,HB35˚...
-
Page 23: Tomahawk Xl Car Spare Parts List 零件表
TOMAHAWK XL SPARE PARTS LIST 零件表 PD7502 PD7712 PD7726 PD7735 PD7736 REAR BUMPER ANTENNA TUBE OP ST TURNBUCKLE,TA-T INNER HINGE PIN SET SUSP.ARM MOUNT BUSHING 後防撞板組 天線管零件包 改裝轉向拉桿組 擺臂插銷組 擺臂軸套 PD7746 PD7901 PD7902 PD7905 PD7906 DIFFERENTIAL GEAR SET FRONT BULKHEAD... - Page 24 TOMAHAWK XL SPARE PARTS LIST 零件表 PD9051 PD9064 PD9065 PD9066 PD9068 DIFFERENTIAL CASE CTR DIFF. COVER CTR DIFF. MOUNT DISC BRAKE SET FLY WHEEL 差速器本體 中差座上蓋 中差座 剎車組 飛輪組 PD9070 PD9077 PD9078 PD9087 PD9090 CLUTCH SHOE SET STEERING BLOCK SET...
- Page 25 TOMAHAWK XL SPARE PARTS LIST 零件表 FLYWHEEL COLLET,5mm REAR BUMPER AD2555 飛輪固定座 PD7502 後防撞板組 RR UNIVERSAL SHAFT,6723 ANTENNA TUBE PD05-0020 後傳動軸組 PD7712 天線套管 HEX ADAPER OP ST TURNBUCKLE,TA-T PD05-0022 六角輪轂轉換器 PD7726 改裝轉向拉桿組 FR UNIVERSAL SHAFT,6723 INNER HINGE PIN SET PD05-0024 前傳動軸組...
-
Page 26: Tomahawk Xl Car Optional Parts List 選購零件表
TOMAHAWK XL OPTION PARTS LIST 選購零件表 PD07-0048 PD07-0049 PD7719 PD7722 PD7723 ALUM CASTER BLOCK SET SHOCK SPRING SHOCK SPRING CTR DIFF SET ALUM STEERING BLOCK SET 鋁合金改裝C型座組 避震器彈簧 避震器彈簧 中差齒輪組 鋁合金改裝轉向臂 PD7724 PD7730 PD7742 PD7965-1 PD7965-2 ALUM HUB CARRIER SET... - Page 27 JD7532...
Need help?
Do you have a question about the TOMAHAWK XL and is the answer not in the manual?
Questions and answers