Olympus J500 - Pearlcorder Microcassette Dictaphone User Manual
User guide
Hide thumbs
Also See for J500 - Pearlcorder Microcassette Dictaphone:
- User manual (10 pages) ,
- User manual (2 pages) ,
- User manual
Table of Contents
Advertisement
Quick Links
A 1
B
Battery-power
indicator
C
User's Guide
Thank you for purchasing an Olympus Pearlcorder. To get
the most out of this product, be sure to carefully read these
instructions before use.
Make a test recording first to be sure that your recordings
will be error-free.
D
Cassette cover
a
Shinjuku Monolith, 3-1 Nishi-Shinjuku 2-chome, Shinjuku-ku, Tokyo 163-0914, Japan. Tel. 03-3340-2111
c
Two Corporate Center Drive, Melville, NY 11747-3157, U.S.A. Tel. 1-800-622-6372
(Premises/Goods delivery) Wendenstrasse 14-18, 20097 Hamburg, Germany. Tel. 040-237730
(Letters) Postfach 10 49 08. 20034 Hamburg. Germany.
2-8 Honduras Street, London EC1Y 0TX, United Kingdom, Tel. 020-7253-2772
http://www.olympus.com
D1-2669-04
E
AP0311
•
WARNING
•
Be absolutely sure to observe the following
precautions:
• NEVER dispose of used batteries in fire or other heat source, and
VOLUME control knob
NEVER attempt to overhaul, charge, or short-circuit them. They
might overheat and catch fire, or explode. Discard batteries only as
stipulated by local regulations.
• Keep batteries out of the reach of children. If swallowed, contact a
physician immediately.
a
•
•
PAUSE switch
•
F
•
3
Do NOT force metallic objects or readily inflammable
matter into the vents in an AC adaptor. Fire, electric
WARNING
shock or malfunction may result.
a
2
A
1
2
Battery cover
3
BATT.
CHECK
BATTERY CHECK
button
1
2
3
•
•
2
1
•
46/
STOP/
EJECT
•
•
b
E
1
2
3
4
1
2
MODE switch
TAPE SPEED switch
F.PLAY
OFF VCVA
SPEED 2.4 1.2
3
4
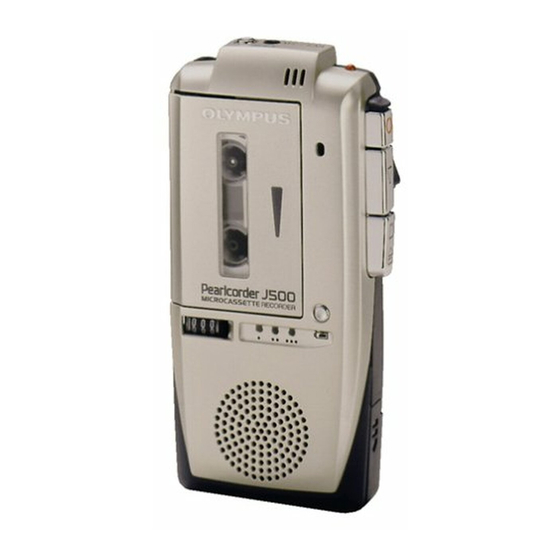
Built-in microphone
a
REC
s/REC
indicator
b
VOLUME
REC button
F
b
PAUSE
STOP button
4/STOP
1
2
3
1
2
SPEED 2.4 1.2
F.PLAY
OFF VCVA
4
4
s/REC
a
REC button
VOLUME
b
MIC/EAR jack
s/REC
English
Power Supply
A
Installing the Batteries
1
Slide open the battery cover in the direction of the arrow.
2
Install two size AAA batteries, observing the correct
polarity.
3
Close the battery cover.
As the batteries lose their charge, the REC indicator dims, and the
tape speed, sound volume, and sound quality degrade. When you
B
notice any of these signs occur, you should replace the batteries.
B
Battery-Power indicator (J500 only)
Press the BATTERY CHECK button to get a visual measure of the
available battery life. The more battery life you have, the more lights
will be lit. When there is one (red) light lit only, it is a good time to
change the batteries.
C
Note: Remove the batteries from the unit before leaving it out of
service for a long period of time.
Powering the Unit from an AC Outlet
Connect an AC adaptor (sold separately) to the unit (Olympus Model
A321 AC Adapter).
D
Note: Be sure to purchase only a specified (or equivalent) AC
adaptor. Using an AC adaptor of other specifications may cause fire
or electric shock.
Loading a Microcassette
1
Press the STOP/EJECT button to open the cassette cover.
2
Load a Microcassette in the illustrated direction.
3
a
Push the cassette cover lightly to close it.
• Use an Olympus Microcassette labeled
• Take up any slack in a tape before loading.
Remember that slack in tape can lead to damage to the tape.
b
• If you have trouble closing the cassette cover, turn the hub of the
cassette slightly and load the cassette again.
Tip for Preserving Important Recordings →c
c
• A Microcassette has a protect lug for each side. The REC button
cannot be pressed when a cassette with the right-hand protect lug
broken (using a screwdriver or similar object) is loaded. (The left-
hand lug is for the opposite side of the tape.)
• If you want to record on a tape that has a broken lug, cover the
opening of the lug with adhesive tape.
Recording
This unit has a combined MIC/EAR jack. Recording is disabled
when an earphone is plugged into this jack. Before recording,
make sure that an earphone is not plugged into the MIC/EAR
jack.
E
Normal Recording
1
Set the MODE switch to OFF.
2
Choose a tape speed with the TAPE SPEED switch.
3
Turn the VOLUME control knob to adjust the MIC. sensitivity.
Most recording situations will require having the VOLUME control
knob set to MAX (maximum).
4
Press the REC button and the PLAY button at the same
time.
The REC indicator lights, and recording through the built-in
microphone begins.
Tape speed
With the TAPE SPEED switch set to 2.4 cm/s (Normal recording)
An MC-60 (60-minute) tape allows up to 1 hour of recording (30
minutes per side), with the best possible recording quality.
With the TAPE SPEED switch set to 1.2 cm/s (Longer recording)
An MC-60 (60-minute) tape allows up to 2 hours of recording (60
minutes per side), and a 90-minute tape allows up to 3 hours of
recording (90 minutes per side).
→a
Slide the PAUSE switch up to PAUSE.
Pause
Recording pauses. To resume recording, slide the switch back down.
→b
Stop
Press the STOP button.
Recording stops. The PAUSE switch is automatically reset.
F
Other Recording Modes
VCVA (Variable Control Voice Actuator) Recording
Recording starts automatically upon sensing voice and stops
automatically when silence lasts 3 to 4 seconds. This feature is
suitable for recording conversations interrupted by periods of silence.
The volume of voice to be sensed (actuation level) is adjustable. This
allows optimal recording to suit specific environments, whether noisy
or quiet. (Test recording at a few levels is recommended to ensure
accurate recording.)
1
Set the MODE switch to VCVA.
2
Choose the desired tape speed with the TAPE SPEED switch.
3
Turn the VOLUME control knob to adjust the actuation level.
When you increase the volume setting, the sensitivity is increased to
begin recording even when the source sound is of low volume. When
you reduce the volume setting, the sensitivity is lowered to begin
recording only when the source sound is of high volume.
4
Press the REC button and the PLAY button at the same
time.
Recording starts automatically when sound volume reaches the
actuation level you have set.
Note: When VCVA recording has completed, press the STOP button
in order to prevent degraded performance and conserve battery life.
→a
Press the REC button during playback.
Insert Editing
If you press the REC button during playback, recording will start at
that point. This is useful for editing previously recorded passages.
However, this function will overwrite your existing recordings.
b
Recording with an External Microphone
external microphone (not supplied) into the MIC/EAR jack.
Sound can be recorded with greater clarity. The built-in microphone is
disabled. Recorded sound cannot be heard from the speaker while a
microphone is plugged into this jack.
A
1
2
AAA
3
B
C
C
D
D
1
STOP
EJECT
2
3
•
a
•
.
→a
•
b
→b
c
•
•
E
1
MODE
OFF
2
TAPE SPEED
3
VOLUME
MIC
4
REC
TAPE SPEED
2.4cm/s
TAPE SPEED
a
PAUSE
PAUSE
b
STOP
F
1
MODE
VCVA
2
TAPE SPEED
3
VOLUME
4
REC
PLAY
a
REC
b
MIC
→b
Plug an
A
1
2
AAA
2
3
REC
B
J500
BATTERY CHECK
:
C
AC
AC
:
AC
AC
D
1
STOP/EJECT
2
3
•
→a
•
•
→b
→c
•
REC
•
E
1
MODE
OFF
2
TAPE SPEED
3
VOLUME
MIC
VOLUME
MAX
4
REC
PLAY
REC
TAPE SPEED
2.4 cm/s
MC-60 60
1
30
1.2 cm/s
TAPE SPEED
1.2 cm/s
MC-60 60
2
60
90
3
90
→a
PAUSE
PAUSE
→b
STOP
PAUSE
F
VCVA Variable Control Voice Actuator
3~4
1
MODE
VCVA
2
TAPE SPEED
3
VOLUME
4
REC
PLAY
:
VCVA
STOP
EAR
→a
REC
:
→b
MIC/
Advertisement
Table of Contents

Subscribe to Our Youtube Channel
Related Manuals for Olympus J500 - Pearlcorder Microcassette Dictaphone


Summary of Contents for Olympus J500 - Pearlcorder Microcassette Dictaphone
- Page 1 Note: Remove the batteries from the unit before leaving it out of service for a long period of time. Powering the Unit from an AC Outlet Connect an AC adaptor (sold separately) to the unit (Olympus Model A321 AC Adapter). User’s Guide Note: Be sure to purchase only a specified (or equivalent) AC adaptor.
- Page 2 English Play This unit has a combined MIC/EAR jack. Playback is disabled when an external microphone is plugged into this jack. Before playback, make sure that an external microphone is not F.PLAY OFF VCVA SPEED 2.4 1.2 plugged into the MIC/EAR jack. Normal Playback MODE Set the MODE switch to OFF.
Need help?
Do you have a question about the J500 - Pearlcorder Microcassette Dictaphone and is the answer not in the manual?
Questions and answers