
Related Manuals for PRESONUS HP60 - V1.1


Summary of Contents for PRESONUS HP60 - V1.1
- Page 1 Six-C Channe el Head dphone Mixin ng Syst t em User r’s Manu rsion 1.1 © 2007, PreSon nus Audio Elec ctronics, Inc. All R ights Reserved...
- Page 2 PreSonus reserves the right to update any unit returned for repair. PreSonus reserves the right to change or improve the design of the product at any time without prior notice. This warranty does not cover claims for damage due to abuse, neglect, alteration or attempted repair by unauthorized personnel, and is limited to failures arising during normal use that are due to defects in material or workmanship in the product.
-
Page 3: Table Of Contents
TABLE OF CONTENTS 1 OVERVIEW 1.1 Introduction ..................1 1.2 Features ....................2 1.3 What is in the Box ................3 2 OPERATION 2.1 Quick Start Up ..................4 2.2 Sample Hook Up Diagram ..............6 3 CONTROLS & CONNECTIONS 3.1 Front Panel Layout ................ -
Page 5: Introduction
ERVIE 1.1 IN NTRODU UCTION Thank y you for pur rchasing the e PreSonus HP60 Six x-Channel H Headphone Mixing Sys stem. PreSonu us Audio E lectronics h has designe d the HP6 0 utilizing high-grade componen ts to ensure o... -
Page 6: Overview
OVERVIEW 1.2 FEATURES The PreSonus HP60 is the most flexible and advanced headphone mixing system designed for the professional and project recording studio. The HP60 features dual stereo inputs and external input for each channel -- allowing the user to mix between three stereo audio streams (mix A, mix B &... -
Page 7: What Is In The Box
ERVIE 1.3 W WHAT IS IN THE Your HP P60 package e contains th he following • PreSon nus HP60 • HP60 U User’s Manu ual v1.0 • 6’ Stan ndard IEC P Power Cable • PreSon nus Warrant ty Card... -
Page 8: Operation
OPERATION 2.1 QUICK START GUIDE The goal of the HP60 Quick-Start guide is to help get your HP60 connected to your system as quickly as possible. The following step-by-step instructions are based on a common studio environment. Your actual setup may change based on your needs and applications. Connect the Power 1) Turn every knob on the HP60’s front panel completely counterclockwise (left). - Page 9 OPERATION External Input connection 10) For each of the headphone channels, connect the artist’s instrument direct out from Stereo Ext. In your DAW or Mixer to the connection on their respective channels. (For Example: If a vocalist is on headphone channel 5, take the direct output of their vocals from your DAW or Mixer and connect it to the channel 5 Stereo Ext.
-
Page 10: Sample Hookup Diagram
OPERATION 2.2 SAMPLE HOOKUP DIAGRAM... -
Page 11: Controls & Connections
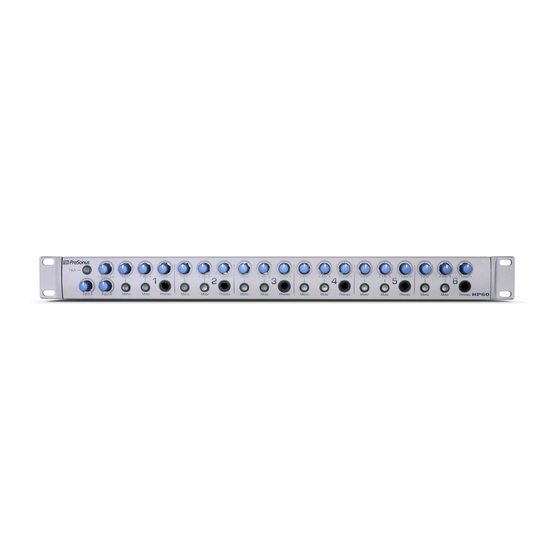
CONTROLS & CONNECTIONS 3.1 FRONT PANEL LAYOUT The front panel of the HP60 is divided into two sections: the Master Input Controls and the six numbered Headphone Channel Controls. 3.1.1 Master Input Controls • Input A & Input B. These knobs control the input levels of the Input A and Input B (Mix A &... -
Page 12: Headphone Channels: Level Controls
CONTROLS & CONNECTIONS 3.1.2 Headphone Channels: Level Controls • Ext In. The external in knob controls the input level and amount of the Stereo Ext. on the rear of the chassis for the channel. • Mono. When the Mono button is pressed, the Stereo Ext. -
Page 13: Back Panel Layout
CONTROLS & CONNECTIONS 3.2 BACK PANEL LAYOUT The back panel of the HP60 is divided into four sections: Power, the six numbered Headphone Channels, Talkback and Inputs A & B. 3.2.1 Power Power. The Power switch turns the HP60 on and off. The ‘ | ’ down is the ON position. IEC Power Input. -
Page 14: Headphone Channels: Rear Connections
CONTROLS & CONNECTIONS 3.2.2 Headphone Channels: Rear Connections • Stereo Ext. In. The Stereo External In jack accepts a stereo ¼” TRS plug and is used for connecting a third, channel-specific Mix. This is commonly used for a Ext. In direct input of the artist’s instrument –... -
Page 15: Talkback
CONTROLS & CONNECTIONS 3.2.3 Talkback • External Control. The External Control jack accepts a ¼” TS plug and is used for connecting a footswitch to control the ON / OFF toggle of the External Mic. • MIC. The MIC input accepts a balanced XLR input and is used for connecting a dynamic microphone to be used as the talkback microphone with the HP60’s Talkback Communication System. -
Page 16: Mix Inputs
CONTROLS & CONNECTIONS 3.2.4 Mix Inputs • Left (mono). The Left jack accepts a ¼” balanced TRS plug and is used for the left input of the stereo pair. This jack should be used alone when connecting a mono source as the Mix’s Input. •... -
Page 17: Technical Information
TECHNICAL INFORMATION 4.1 SPECIFICATIONS Audio Inputs Dynamic Microphone Input Type ..................XLR Female Balanced Input Impedance ..................... 1200Ω Maximum Gain ....................50dB Maximum Input Level ..................-10dBu Frequency Response ..............10Hz to 40kHz, ±1dB Input A & Input B (Left & Right) Type .................... - Page 18 Dimensions ....19" (W) x 1.75" (H) x 5.5" (D) (48.26cm x 4.45cm x 13.97cm) Weight .................... Approximately 5 lbs. As a commitment to constant improvement, PreSonus Audio Electronics, Inc. reserves the right to change any specification stated herein at any time in the future without notification.
-
Page 19: Troubleshooting
5) Isolate the problem to your HP60 by disconnecting any extraneous equipment in your signal chain. For technical assistance, visit our Web site at www.PreSonus.com, call us at 225.216.7887 between 9am and 6pm CST (GMT -06:00) or e-mail us at techSupport@PreSonus.com.
Need help?
Do you have a question about the HP60 - V1.1 and is the answer not in the manual?
Questions and answers