LG HS201 - LED Projector Slim Line Design Just 1.8 Lbs Owner's Manual
Owner's manual
Hide thumbs
Also See for HS201 - LED Projector Slim Line Design Just 1.8 Lbs:
- Specifications (6 pages) ,
- Manual de usuario (42 pages)
Table of Contents
Advertisement
Quick Links
Please read this manual carefully before operating
your set.
Retain it for future reference.
Record model number and serial number of the set.
See the label attached on the bottom of the set and
quote this information to your dealer when you require
service.
Model number :
Serial number :
HS200
HS200G
HS201
HS201G
OWNER'S MANUAL
Advertisement
Table of Contents

Related Manuals for LG HS201 - LED Projector Slim Line Design Just 1.8 Lbs


Summary of Contents for LG HS201 - LED Projector Slim Line Design Just 1.8 Lbs
- Page 1 Please read this manual carefully before operating your set. HS200 Retain it for future reference. Record model number and serial number of the set. HS200G See the label attached on the bottom of the set and quote this information to your dealer when you require HS201 service.
- Page 2 DLP PROJECTOR DLP PROJECTOR Warning - Class B (b) For a Class B Digital device or peripheral, the instructions furnished the user shall include the fol- lowing or similar statement, placed in a prominent location in the text of the manual: NOTE: This equipment has been tested and found to comply with the limits for a Class B digital device, pursuant to part 15 of the FCC Rules.
-
Page 3: Table Of Contents
Contents Contents Safety Instructions ............4 TIME Menu Options Sleep time Function..............26 Names of parts Auto Off Function ..............26 Main Body ................7 Control Panel ................7 OPTION Menu Options Connecting Part ................ 8 Selecting Language ..............26 Remote Control ............... -
Page 4: Safety Instructions
Safety Instructions Safety Instructions Please take note of the safety instructions to prevent any potential accident or misuse of the projector. ● Safety Instructions are given in two forms as detailed below. WARNING : The violation of this instruction may cause serious injuries and even death. NOTES : The violation of this instruction may cause injuries or damage to the projector. - Page 5 Safety Instructions Power WARNING Never touch the power plug with Prevent dust from collecting on Do not plug-in too many items into a wet hand. the power plug pins or outlet. one power outlet. This may cause an electric shock This may cause a fire hazard! It may result in overheating of the outlet hazard!
- Page 6 Safety Instructions Using WARNING If the projector is in a room that Don’t look at the laser beam directly Always open the lens door or as it can cause eye damage! experiences a gas leak, do not remove the lens cap when the touch the projector.
-
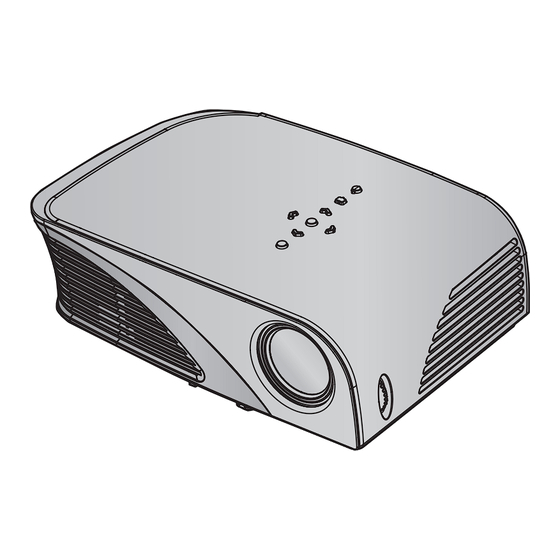
Page 7: Names Of Parts
Names of parts Names of parts Main Body * The projector is manufactured using high-precision technology. You may, however, see on the Projector screen tiny black points and/or bright points (red, blue, or green). This can be a normal result of the manufacturing process and does not always indi- cate a malfunction. -
Page 8: Connecting Part
Names of parts Connecting Part IR (Remote control sensor) * Do not block the IR port for normal operation of remote control. Headphone port VIDEO IN AUDIO IN DC IN Kensington Security System Connector RGB IN HDMI (Refer to page 13) * When using HDMI/USB connector at the same time, if the size of the jack connecting to the connector is too big, they may not be connected together. -
Page 9: Remote Control
Names of parts Remote Control MUTE Button POWER Button INPUT Button KEYSTONE +, - Button VOLUME +, - Button RETURN Button MENU Button ◉OK, ∧/∨/</> Button BLANK Button AUTO Button Q.MENU Button USB Button USB control Buttons STILL Button (Functions as the STILL button in any mode other than DivX.) PAGE Button... -
Page 10: Accessories
Names of parts Accessories Remote Control 3V Battery Owner’s manual Polishing Cloth Power Cord Computer Cable Adapter RGB to Component Cable Portable bag Lens cap and Strap (*Only for HS200G/HS201G model) ▪ Use a remote control up to 6 meters distance and 30 degree (left/right) within the receiving unit scope. -
Page 11: Installing And Composition
Installing and Composition Installing and Composition Installation Precautions Provide proper ventilation for this projector. • Do not place the projector on a carpet, rug or other simi- • The projector is equipped with ventilation holes(intake) on lar surface. It may prevent a adequate ventilation of the the bottom and ventilation holes(exhaust) on the front. -
Page 12: Basic Operation Of The Projector
Installing and Composition Basic Operation of the Projector 1. Place the projector on a sturdy and horizontal surface with the PC or AV source. 2. Place the projector with the desired distance from the screen. The distance between the projector and the screen determines the actual size of the image. -
Page 13: How To Install The Projector Using The Tripod
Installing and Composition How to install the projector using the tripod * You can install this projector using a tripod for the camera. You can assemble the projector instead of the camera on camera tripod. * When stabilizing the tripod, we recommend using the locking bolt of the standard size 4.5mm or less.The maximum size allowed for the locking bolt is 6.5mm.(If it is longer than the maximum allowed size, it may damage the projector.) Part connected to the projector Part connected to the tripod... -
Page 14: Turning On The Projector
Installing and Composition Turning on the Projector 1. Make sure the power cord is connected correctly. 2. Press the POWER button on the top cover or the POWER button on the remote control. (The light on the control panel will be turned on.) •... -
Page 15: Connection
Connection Connection Connecting to a Desktop PC * You can connect the projector to a computer with VGA, SVGA, XGA, SXGA output. * Refer to page 39 for resolutions the projector supports. < How to connect > Audio Cable Connect the RGB IN of the projector and the computer output port with a computer cable. -
Page 16: Connecting To A Dvd Player
Connection Connecting to a DVD Player * Depending on the equipment, the component output jacks (Y, PB, PR) of the DVD Player may be labeled as Y, Pb, Pr/Y, B-Y, R-Y/Y, Cb, Cr. < How to connect a HDMI source > HDMI Cable 1. -
Page 17: Function
Function Function * The On-Screen Display (OSD) in this manual may be slightly different from your projector. * This operating guide explains operation of RGB(PC) mode mainly. PICTURE Menu Options Picture mode Q-Menu * Use the Picture mode function to set the projector for the best picture appearance. Aspect Ratio 16:9 Picture Mode... -
Page 18: Picture Reset Function
Function Picture Reset Function * Settings of the selected PICTURE function for each input and Picture Mode return to the default factory settings. 1. Press the MENU button. Then, move to PICTURE with the ∧, ∨, <, > buttons and press the ◉OK button. PICTURE ꔂMove ꔉOK Picture Mode... - Page 19 Function Color Temperature ● Set to warm to enhance hotter colors such as red, or set to cool to make picture bluish. ● Adjusts the contrast to keep it at the best level according to the brightness of the screen. Dynamic Contrast The picture is improved by making bright parts brighter and dark parts darker.
-
Page 20: Screen Menu Options
Function SCREEN Menu Options To Change PJT Mode * This function turns the projected image upside down or flips horizontal. 1. Press the MENU button. Then, move to SCREEN with the SCREEN ꔂMove ꔉOK ∧, ∨, <, > buttons and press the ◉OK button. PJT Mode : Front Aspect Ratio... -
Page 21: Auto Configure Function
Function Auto Configure Function * This function assures you of getting the best video quality by automatically adjusting the horizontal size and synchronization of the image. * Auto Tracking function works in RGB PC input only. Press the AUTO button of the remote control. •... -
Page 22: Audio Menu Options
Function AUDIO Menu Options What is FM Wireless Audio? (HS200/HS200G only) FM Wireless Audio is a function to send out audio signals from the projector using FM frequency (88.5 ~95.5 MHz). The frequency of Projector and FM receiver should be same in order to output the sound from FM receiver normally. The signal can be received by using FM receiver within 1m of distance. -
Page 23: Installing Instructions (Hs200/Hs200G Only)
Function Installing Instructions (HS200/HS200G Only) • This product is for domestic use. • If used in a medical institution, it may cause an error for medical equipments.Please do not use in a medical establishment. • Please maintain the distance between the projector and FM receiver within 1m. •... -
Page 24: To Listen Through The Fm Receiver Speaker (Hs200/Hs200G Only)
Function To listen through the FM receiver speaker (HS200/HS200G Only) 1. Press the MENU button. Then, move to AUDIO with the ∧, ∨, <, > AUDIO buttons and press the ◉OK button. ꔂMove ꔉOK FM Wireless Audio : Off • Frequency 88.5 MHz 2. -
Page 25: Adjusting Speaker Balance
Function Adjusting Speaker Balance * Adjust the left/right sound of speaker to suit your taste and room situations. AUDIO 1. Press the MENU button. Then, move to AUDIO with the ∧, ∨, <, > ꔂMove ꔉOK buttons and press the ◉OK button. FM Wireless Audio : Off •... -
Page 26: Time Menu Options
Function TIME Menu Options Sleep time Function Q-Menu * The sleep timer turns the projector off at the preset time. Aspect Ratio 16:9 1. Press the Q.MENU button on the remote control. Picture Mode Vivid Sleep Timer ◄ ► 2. Press the ∧, ∨ buttons to move to Sleep Timer. Eject USB Eject Close... -
Page 27: Using Blank Function
Function Using Blank Function * This function may be effective if you need to get the attention of the audience during presentations, meetings or briefings. 1. Press the BLANK button on the remote control. • The screen turns off to a background color. •... -
Page 28: To Adjust The Brightness Of The Screen
Function To adjust the brightness of the screen 1. Press the MENU button. Then, move to OPTION with the ∧, ∨, <, > OPTION ꔂMove ꔉOK buttons and press the ◉OK button. Menu Language : English Blank Image : Black 2. -
Page 29: Information Menu Options
Function Demo Mode Function 1. Press the MENU button. Then, move to OPTION with the ∧, ∨, <, > OPTION ꔂMove ꔉOK buttons and press the ◉OK button. Menu Language : English Blank Image : Black 2. Press the ∧, ∨ buttons to move to Demo Mode and press the ◉OK Screen Capture button. -
Page 30: Usb
* Image shown may differ from your projector. To use the USB device Connecting the USB device * When you connect a USB device, this screen is displayed, automatically. In USB device, you can not add a new folder or delete the existing folder. 1. -
Page 31: Photo List
PHOTO List * It is available to playback the photo file(*.jpg) in the USB device. The On Screen Display may be different from your set. Images are an example to assist with the projector operation. Supported photo file: *.JPG • You can play JPG files only. •... -
Page 32: Full Screen Menu
Full Screen Menu 1. Press the USB button. Then, move to PHOTO LIST with the <, > buttons and press the ◉OK button. 2. Press the ∧, ∨, <, > buttons to move to desired photo and press the ◉OK button. 3. -
Page 33: Music List
MUSIC List * You can use the Music List menu to play MP3 files form a USB storage device. The On Screen Display on your model may be slightly different. Supported music file: * .MP3 Bit rate range 8Kbps ~ 320Kbps •... -
Page 34: Music Selection And Popup Menu
Music Selection and Popup Menu 1. Press the USB button. Then, move to MUSIC LIST with MUSIC LIST the <, > buttons and press the ◉OK button. Page 1/1 No Marked DriveA Title Duration Arirang Up Folder 3945 KB,128 Kbps 2. -
Page 35: Movie List
MOVIE List * The movie list is activated once USB is detected. It is used when playing movie files on projector. Supported Movie File Extension Maximum Video Codec Frame Audio Codec Explanation name Resolution supported MPEG4 DivX 3.XX DivX 4.XX •... -
Page 36: Screen Components
Screen Components 1. Moves to upper level folder MOVIE LIST Page 1/1 No Marked 2. Preview: Display the title/folder name of the movie in the Movie Title Duration selected folder Up Folder 3. Current page/Total pages 4. Total number of marked movies 5. -
Page 37: Playing The Movie
Playing the Movie * You can adjust various method during the movie play. 1. Press the USB button. Then, move to MOVIE LIST with the <, > buttons and press the ◉OK button. 2. Press the ∧, ∨, <, > move to a desired movie file and press the ◉OK button. -
Page 38: To See The Divx Registration Code
To See The DivX Registration Code * Confirm the DivX registration code number of the projector. Using the registration number, movies can be rented or purchased at www.divx.com/vod. 1. Press the MENU button. Then, move to USB with the ∧, ∨, <, > buttons and press the ◉OK button. -
Page 39: Information
Information Supported Monitor Display * The following table lists the display formats supported by the projector. Format Vertical Freq.(Hz) Horizontal Freq.(kHz) * If the projector does not support the input signal, “Out of Range” message appears on the screen. * The projector supports DDC1/2B type as Plug & Play function. (Auto recognition of PC monitor) * PC synchronization signal types supported :Separate type synchronization. -
Page 40: Maintenance
Information Maintenance * The projector needs little maintenance. You should keep the lens clean because any dirt or stains may appear on the screen. If any parts need to be replaced, contact your dealer. When cleaning any part of the projector, always turn the power off and unplug the projector first. -
Page 41: Memo
Information Memo... - Page 42 Information Memo...
-
Page 43: Specifications
0.44 ~ 2.41m(15 ~ 80 inches) (Projection distance) Projection Offset 100% Remote control distance Video compatibility NTSC/PAL/SECAM/NTSC4.43/PAL-M/PAL-N/PAL-60 Power , 4.74A AC-DC Adapter LG, PA-1900-08 Audio Output 1W + 1W Height(mm/inches) 60/2.4 (without leg), 63/2.5 (with leg) Width(mm/inches) 183/7.2 Length(mm/inches) 122/4.8 Weight(g/pound) 800/1.76... - Page 44 P/NO : MFL62345717 (0912-REV00)
Need help?
Do you have a question about the HS201 - LED Projector Slim Line Design Just 1.8 Lbs and is the answer not in the manual?
Questions and answers