Advertisement
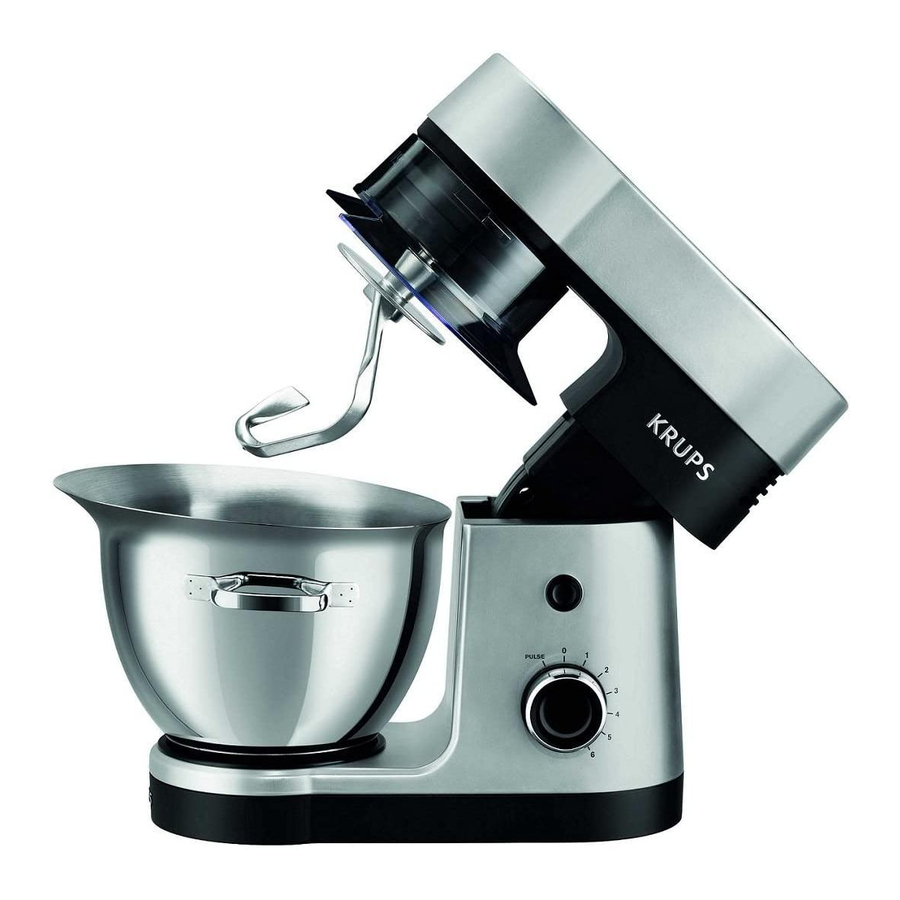
DESCRIPTION

- Motor unit
- Electronic speed selector
- Multi-function head (a3) release button
- Multi-function head
- High speed outlet (for use with blender, juice extractor* or grinder*)
- Safety cover
- Mixer accessories outlet (kneader, balloon whisk, mixer)
- Power cord storage
- b Bowl assembly
- Stainless steel bowl
- Lid
- Mixer accessories
- Kneader
- Mixer
- Balloon whisk
- Blender jug (depending on model)
- Measuring cap
- Lid
- Lid seal
- Jug
- Blade seal
- Blade
BEFORE FIRST USE
- „„Before using for the first time, wash all accessory parts in warm water and washing up liquid.
- „„Place the appliance on a flat, clean and dry surface. Make sure that the selector button (a1) is in "0" position and plug in your appliance.
- „„You have several options for starting your appliance:
- „Intermittent operation (pulse): turn the selector button (a1) to the "pulse" position. Using a succession of pulses can give you better control when preparing certain foods.
- „Continuous operation: Turn the selector button (a1) to the desired position from "1" to "max" depending on the food you are preparing.
You can change it as required during preparation.
- „„To stop the appliance, turn the button (a1) to "0".
- „„
![]()
The appliance will start only if the cover (a5) and the head (a3) are locked. The appliance will stop immediately if you unlock the cover (a5) and/ or the head (a3) during operation. Lock the cover and/or the head, turn the control button (a1) to the "0" position, and then start the appliance normally by selecting the desired speed. - „„Your appliance comes with a microprocessor that controls and analyses the operating power. If the load becomes too high, your appliance will stop automatically. To restart your appliance, turn the selector button (a1) to the "0" position and remove some of the ingredients. Allow your appliance to cool down for a few minutes. You can then select the desired speed to complete your preparation.
The paragraph numbering corresponds to the numbers in the diagrams.
MIXING / KNEADING / BEATING / EMULSIFYING / WHISKING
- „„You can prepare up to 1.2 kg of dough or mixture using the stainless steel bowl (b1) and its lid (b2) depending on the food.
ACCESSORIES USED:
- „Stainless steel bowl (b1).
- „Lid (b2)
- „Kneader (c1) or mixer (c2) or balloon whisk (c3).
ASSEMBLING THE ACCESSORIES
- „„Press the button (a2) to release the multi-function head (a3) and raise it until it locks in place. Fig. 1 and 2.
![]()
![]()
- „„Fit the bowl lid and turn anti-clockwise to lock in place.
- „„Insert the desired accessory (c1, c2 or c3) on the outlet (a6), push and rotate it anticlockwise a quarter turn to lock the accessory in its housing. Fig. 3.
![]()
- „„Lock the stainless steel bowl (b1) by turning clockwise on the appliance and put in the ingredients.
- „„Place the stainless bowl (b1) on the appliance with the handles positioned as shown in Fig 4. Lock the bowl by turning it anti-clockwise.
Note: It is not essential to use the lid but it prevents splashing. Fig. 4.
![]()
- „„Lower the multi-function head (a3) to the horizontal position: press the button (a2) and manually lower the multi-function head (a3) until it locks (the button (a2) returns to its initial position). Fig. 5.1.
![]()
- „„Make sure that the cover (a5) is locked correctly (turned clockwise as far as it will go) on the high-speed outlet (a4). Fig. 5.2.
![]()


USAGE
- „„Start by turning the selector button (a1) to the desired position according to the recipe.
- „„The appliance starts running immediately.
- „„You can add food through the hole in the lid (b2) during preparation. „„
- To stop the appliance, turn the button (a1) to "0".
Tips:
- „„Kneading
- „Use the kneader accessory (c1)at speed "1".
- „You can knead up to 500 g of flour (e.g white bread, wholemeal bread, rye bread, mulit-grain bread, rich short crust pastry (made with all butter), etc.).
- „Maximum operating time: 15 min.
- „„Mixing
- „Use the mixer (c2)at speed "1" to "max".
- „You can mix up to 1.2 kg of light dough or mixture (light cake mixture, sponge cake, biscuit or cookie dough).
- „Never use the mixer (c2) to knead heavy dough.
- „Maximum operating time: 15 min.
- „„Beating / emulsifying / whisking
- „Use the balloon whisk (c3)at speed "1" to "max".
- „You can prepare: mayonnaise, aioli, sauces, whisked egg whites (up to 8 egg whites), whipped cream (up to 500 ml), meringues etc.
- „Never use the balloon whisk (c3) to knead heavy dough or mix light dough.
- „Maximum operating time: 10 min.
DISMANTLING THE ACCESSORIES
- „„Wait for the appliance to come to a complete stop.
- „„Using the button (a2), release the multi-function head (a3) and raise it to the vertical position. Fig. 1 and 2.
- „„Release the accessory (c1), (c2) or (c3) from the multi-function head by pushing the accessory into the head and rotating it clockwise a quarter turn.
- „„Remove the stainless steel bowl by turning it anti-clockwise. Remove the lid by turning it anti-clockwise.
BLENDING/MIXING (DEPENDING ON MODEL)
- „„Depending on the type of the food, you can use the blender (d) to prepare up to 1.25 L of thick mixtures and 1 L of liquid mixtures.
ACCESSORIES USED:
- „Blender jug (d4)
- „Measuring cap (d1), Blender lid (d2)
- „Blender seal (d3), Blade seal (d5) and Blade (d6)
ASSEMBLING THE BLENDER
- „„Place the multi-function head (a3) in the horizontal position: press the button (a2) and manually lower the multi-function head (a3) until it locks (the button (a2) returns to its initial position).
- „„Unlock the safety cover (a5) from the high-speed outlet (a4) by rotating it anticlockwise and then remove it. Fig. 6.
![]()
- „„Make sure that the speed selector is in the "0" position.
- „„Carefully place the blade seal (d5) on the blade (d6), fit this blade assembly in the bottom of the jug (d4) (the jug must be upright) and tighten it by turning it one quarter turn clockwise. Fig. 7a.
![]()
- „„Handle the sharp blades with care to prevent injury. Fig. 7b.
![]()
- „„Lock the blender jug (d) on the outlet (a4) by rotating it clockwise. Fig. 7c.
![]()
- „„Place the food in the blender jug, and lock the lid (d2) fitted with the measuring cap (d1), by rotating it anti-clockwise.


USAGE
- „„Start by turning the selector button (a1) to the desired position according to the recipe.
Use the "Pulse" position for better mixing control and for better blending of your preparation.
You can add food through the hole in the measuring cap (d1) during preparation. „„ - To stop the appliance, turn the button (a1) to "0".
Tips:
You can prepare:
- „finely blended soups, cream soups, stewed fruit, milkshakes and cocktails.
- „liquid batter (pancake, fritters, Yorkshire pudding, waffles, clafoutis and custard flans).
- „ If ingredients stick to the sides of the jug during processing, turn off the appliance, remove the jug and scrape down the ingredients onto the blades using a spatula, then replace the jug on the appliance so that you can carry on.
- „„Never fill the blender jug with boiling liquid. Only use liquids or foods at simmering temperatures or below.
- „„Do not use the blender jug when it is empty or with hard and/or dry ingredients (like ice cubes, sugar, hard spices, coffee beans, etc).
- „„Always use the blender jug with its lid.
- „„Never remove the lid before the blades have stopped completely.
- „„Always pour liquid ingredients into the blender jug first before adding solid ingredients. „„Maximum operating time: 2 min.
DISMANTLING THE ACCESSORY
- „„Wait for the appliance to come to a complete stop before removing the blender by unlocking it in the anti-clockwise direction and put back the cover (a5) by locking it on the outlet (a4) (clockwise). Fig. 5.2.
FINELY CHOPPING SMALL QUANTITIES (DEPENDING MODEL)
ACCESSORY USED:
- „Assembled grinder.
- „„You can use the grinder to:
- Chop in a few seconds by pulsing: dried figs, dried apricots, etc.
Quantity / max time: 100g / 5s
- „„This grinder is not designed for hard products like coffee beans or hard spices.
ADJUSTING THE CORD LENGTH
- „„For more convenient use or for storage, you can reduce the cord length by pushing it inside the motor unit (a) via the opening on the rear (a7).
CLEANING
- „„Unplug the appliance.
- „„Do not immerse the motor unit (a) in water or under running water. Wipe them with a dry or slightly damp cloth.
- „„For easier cleaning, rinse the accessories immediately after use. Handle the sharp blades with care to prevent injury. Fig. 7b.
- „„Wash, rinse and dry the accessories: they are dishwasher-safe.

- „„The kneader (c1) and mixer (c2) attachments have a protective coating: take care not to damage this coating during cleaning (do not use sharp blades or scouring pads).
Tips:
- „„In the event any of your accessories are coloured by food (carrots, oranges, etc.), rub with a cloth soaked in cooking oil and then clean them as usual.
- „„Blender jug (d): pour some hot water containing a few drops of washing up liquid into the blender. Close the lid. Place it on the appliance and pulse a few times. After removing it, rinse the jug in running water and allow to dry (jug upside down).
STORAGE
- „„Do not store your appliance in a humid environment.
WHAT TO DO IF YOUR APPLIANCE DOES NOT WORK
If your appliance does not work, check:
- „that it is plugged in correctly.
- „that the accessories are correctly locked.
- „that the safety cover (a5) is present and locked when the high-speed outlet (a4) is not used.
- „that the multi-function head (a3) is locked in a horizontal position.
Your appliance comes with a microprocessor that controls and analyses the operating power. If the load becomes too high, your appliance will stop automatically. To restart your appliance, turn the rotary button (a1) to the "0" position and remove some of your ingredients. Allow your appliance to cool down for a few minutes. You can then select the desired speed to complete your preparation.
Your appliance still does not work? Contact an authorised service centre (see the list in the service booklet).
HELPLINE:
If you have any product problems or queries, please contact our Customer Relations Team first for expert help and advice:
0845 330 6460 – UK
(01) 677 4003 – Ireland
SAFETY INSTRUCTIONS
Please read the instructions for use carefully before using your appliance for the first time and retain them for future reference: the manufacturer cannot accept any liability for non compliant appliance use.
- „„This appliance is not intended for use by persons (including children) with reduced physical, sensory or mental capacities, or lack of experience and knowledge, unless they have been given supervision or instruction concerning use of the appliance by a person responsible for their safety. Children should be supervised to ensure that they do not play with the appliance.
- „„Check that the power rating of your appliance corresponds to your electrical supply. Any incorrect connection invalidates the guarantee.
- „„This appliance has been designed for indoor and domestic use only, and at an altitude below 2000m.
- „„Clean the surfaces in contact with food prior to first use, referring to the "Before first use" chapter of these instructions, and after each use, referring to the "Cleaning" chapter. Refer to the "Cleaning" chapter for maintenance and cleaning of your appliance.
- „„Always disconnect the appliance from the supply if it is left unattended and before assembling, disassembling or cleaning.
- „„Do not use the appliance if it is not working properly or if it has been damaged. Contact an authorised service centre (see list in the service booklet).
- „„Any maintenance other than routine cleaning and upkeep by customers must be carried out by an approved service centre (see list in the service booklet).
- „„Do not place the appliance, the supply cable or the plug in water or any other liquid.
- „„The power cord must be kept out of the reach of children and must not be placed near or come into contact with the hot parts of the appliance, sources of heat or sharp corners.
- „„Do not pull on the power cord to unplug the appliance.
- „„Do not use the appliance if the power cord or plug is damaged. The power cord must be replaced by an authorized service center (see the list in the service booklet) in order to avoid danger.
- „„Do not place the accessories in a microwave oven.
- „„For your own safety, use only accessories and spare parts designed for your appliance and sold in an approved service centre.
- „„Remember: you may injure yourself if you use the appliance incorrectly.
- „„The blades of knives (d6) are very sharp: handle them with caution to avoid injury when emptying the bowl, assembling / disassembling the blades from the appliance, cleaning.
- „„Always remove the mixing bowl (d) or the juicer (depending of model) before activating the release button (a2) of the multifunction head (a3).
- „„When using the following accessories: mincer head, vegetable slicer, juicer, fresh pasta kit or coulis kit, always use the pusher to guide the foods into the feed tube. Never use your fingers or a fork, spoon, or knife, or any other object (accessories according to model).
- „„Never touch moving parts and always wait for the appliance to come to a complete halt before removing the accessories.
- „„Do not touch the balloon whisks, the kneader or the mixer while the appliance is in operation.
- „„Do not allow long hair, scarves, ties etc. to dangle over the appliance during operation.
- „„Never insert utensils (spoon, spatula...) into the feed tubes of the lids of the bodies or trays, or of the drum chamber (accessories according to model).
- „„Do not operate the mixing bowl (d1) without its lid (d2).
- „„Only use one accessory at a time.
- „„Never fill the mixing bowl with a boiling liquid (above 80°C, 176°F).
- „„Do not use the mixing bowl when empty or with only solid ingredients.
- „„Always use the mixing bowl with its lid.
- „„Never remove the lid until the appliance has come to a complete halt.
- „„When using the mixing bowl, always put in the liquid ingredients before the solid ingredients.
- „„Do not use the bowls (b1, d4) as containers (freezing, cooking, sterilisation...).
- „„Never use this appliance with items other than food ingredients. In order to avoid overflowing, do not go over the maximum level of the bowl or the maximum quantity indicated in the user instructions.
- „„Do not use the appliance if the rotating sieve or the protecting cover of the juice extractor is damaged or has a visible craks. (accessories according to model)
- „„Switch off the appliance and disconnect from supply before changing accessories or approaching parts that move in use.
- „„Be careful if hot liquid is poured into the food processor or blender as it can be ejected out of the appliance due to a sudden steaming.
- „„This appliance is not intended to be used in the following applications, and the guarantee will not apply for:
- „staff kitchen areas in shops, offices and otherworking environments;
- „farm houses;
- „by clients in hotels, motels and other residential type environments;
- „bed and breakfast type environments.
- „„Refer to the different diagrams and to the "accessory assembly" and "accessory disassembly" paragraphs for assembling and disassembling accessories from the appliance.
- „„Refer to the user instructions for speed control and time of use for each accessory.
EUROPEAN MARKETS ONLY
- „„For all accessories except whisk (c3) and graters (g4, g5, g6): This device should not be used by children. Keep the appliance and its cord out of reach of children.
- „„Children shall not play with the appliance
- „„This appliance may be used by persons with reduced physical, sensory or mental capabilities, or whose experience or knowledge is not sufficient, provided they are supervised or have received instruction to use the device safely and understand the dangers.
- „„The balloon whisk (c3), the grater drums and reibekuchen drum can be used by children aged from 8 years and above if they have been given supervision or instruction concerning use of the appliance in a safe way and if they understand the hazards involved. Cleaning and user maintenance shall not be made by children unless they are aged from 8 years and above and supervised. Keep the appliance and its cord out of reach of children aged less than 8 years. (accessories according to model).
Documents / ResourcesDownload manual
Here you can download full pdf version of manual, it may contain additional safety instructions, warranty information, FCC rules, etc.
Advertisement


Need help?
Do you have a question about the PERFECT MIX 9000 and is the answer not in the manual?
Questions and answers