Advertisement
- 1 About the Wacom Intuos Pro
- 2 Getting started with your pen tablet
- 3 Connecting by Bluetooth wireless
- 4 Sketching on paper
- 5 On-Screen Controls
- 6 Working with the pen
- 7 Using the Wacom Desktop Center
- 8 Setting up your work area
- 9 Troubleshooting
- 10 Functions reference
- 11 Toggle functions reference
- 12 Caring for your device
- 13 Features of your Wacom Intuos Pro
- 14 Working on battery power
- 15 Working with multiple monitors
- 16 Using your pen with Windows Ink
- 17 Installing the driver
- 18 Testing the ExpressKeys
- 19 Using and customizing ExpressKeys
- 20 Testing the pen
- 21 Opening Wacom Tablet Properties
- 22 Documents / Resources
About the Wacom Intuos Pro
Your Wacom Intuos Pro pen tablet gives you many different ways to express yourself creatively and to work the way you want.
- Interact with your pen tablet by using the Pro Pen 2 or by touching the tablet surface directly to design and edit artwork, photos, and videos.
- Sketch on paper attached to your tablet so that you can digitally capture your sketches. Connect your tablet to your computer with a USB cable or work wirelessly using a Bluetooth connection.
- Change the surface texture by replacing the top sheet of your tablet with different Texture Sheets. Test the samples included with your tablet to see which one you like best.
After installing the Wacom driver on your computer, your Wacom Intuos Pro functions as an input device for your Windows or Mac operating system. Check out illustrations and information about your tablet and learn how to set up your pen display.
Included with your Wacom Intuos Pro
When you unpack your Wacom Intuos Pro, make sure that you have the following items and accessories:
- Wacom Intuos Pro tablet
- Pro Pen 2
- Pro Pen 2 stand
- Extra pen nibs (inside the bottom of the Pro Pen 2 stand)
- Pro Pen color identification rings
- USB cable
- Quick Start Guide
- Texture Sheet sample card
If you purchased the Paper Edition, make sure you also have the following:
- Wacom Paper Clip
- Wacom Finetip pen Paper for sketching
- Finetip refills
- Accessory case
- Paper Edition Quick Start Guide
Finding more information
- Register your pen tablet and set up the Wacom Inkspace App for paper sketching at the Wacom Intuos Pro Getting Started page of the Wacom website.
- Purchase Texture Sheets and other accessories at the Wacom Store.
- Review the Important Product Information, which describes safety precautions, specifications, warranties, and the license agreement for your device, on the Wacom Desktop Center.
- Locate the model number of your Wacom Intuos Pro on the back of your tablet.
Getting started with your pen tablet
To set up your pen tablet and get started, connect it to your computer and install the driver software.
The Quick Start Guide included in the box contains images that can help you to set up your pen tablet.
User Help
Help topics give you quick access to information about the features and capabilities of your pen tablet. You can access the Help topics from Wacom Tablet Properties by clicking the ? icon or from the Wacom Desktop Center Help menu.
Note: The User Help is common to Windows and Mac computers. Screenshots are from a Windows computer, unless otherwise noted.
Information about your specific computer hardware, operating system, and application software is not included. Refer to the product information provided with those products.
Connecting by Bluetooth wireless
You can work wirelessly by pairing your tablet to a computer through a Bluetooth wireless connection.

Check to see if your computer has a built-in Bluetooth antenna. If not, purchase and install a Bluetooth adapter or dongle before attempting to connect wirelessly.
Note: You can also pair to a mobile device by Bluetooth, but you can only transfer paper sketches while connected.
Connecting to a computer or mobile device by Bluetooth wireless
- If your tablet is currently connected to your computer by USB, disconnect the USB cable from yourcomputer.
- The Touch Ring LED turns off and then turns back on again.
- Open your computer or mobile device's Bluetooth menu and turn on Bluetooth.
- Press and hold the Touch Ring center button on your tablet for three seconds.
- The blue LED near the Wacom logo blinks, and the tablet is discoverable by Bluetooth.
- In your computer or mobile device's Bluetooth menu, watch for your tablet's name to appear.
- Select your tablet when it appears. The name is preceeded byBT.
- ClickPair or complete the pairing per your operating system's instructions.
- The blue LED lights for five seconds when your tablet is connected by Bluetooth.
- Close your computer or mobile device's Bluetooth menu when pairing is done.
After you pair your computer and your tablet, you can switch between a Bluetooth and USB connection by plugging and unplugging the USB cable.
Your tablet is battery-powered when you are connected by Bluetooth.
Sketching on paper
You can sketch on paper attached to your Wacom Intuos Pro with a supported inking pen so that you can digitally capture your paper sketches. Record your sketches on the tablet while you are drawing, open the Wacom Inkspace App so that your sketches are transferred, and then export your sketches to your computer to work on in your preferred applications.
Installing the Wacom Inkspace App so you can access your sketches
Install the Wacom Inkspace App before creating your first paper sketch so you can access your digital sketches.
- To install the Wacom Inkspace App on your computer, go to the Getting Started page and select your operating system. To install the Wacom Inkspace App on your mobile device, install it from your preferred app store.
- Follow the prompts toset up your device.
- Log in with your Wacom ID when prompted or create one if you do not have one yet.
Note: If you install the Wacom Inkspace App on multiple computers or mobile devices and log in with your Wacom ID, your sketches sync across all installations of the Wacom Inkspace App.
Which pen should I use?
- Use an inking pen, such as the Wacom Finetip pen included with the Paper Edition or the Wacom Ballpoint pen, to sketch on paper on your tablet.
- When you want to switch back to interacting directly with your pen on the tablet surface in tablet mode, use the Wacom Intuos Pro Pen 2 or other supported pen.
Note: If the Wacom Intuos Pro Pen 2 comes close to the active area, the tablet automatically saves your current sketch and switches out of paper sketching to tablet mode. The + in the Touch Ring disappears. Hold your inking pen above the tablet surface to switch back to paper sketching.
Tip: Store your Wacom Intuos Pro Pen 2 in the pen stand or pen case away from the tablet while you are paper sketching.
Wacom Tablet Properties
Use Wacom Tablet Properties to customize your pen tablet or tools. When you open Tablet Properties, icons for all connected tablets and all tools that have been used on the tablet are displayed in the Tool list, as well as a Touch icon for tablets with touch. All settings apply to the selected tablet or pen display.
To customize your device, make changes to the controls available on the tabs for ExpressKeys, Display Toggle, and other features. Changes will take effect immediately.
Tool Tips are available for most Tablet Properties items. Position the screen cursor over an item and let it rest there. The appropriate Tool Tip will pop up in a few moments.

The above screenshot is for descriptive purposes; it may not match your screen.
Tablet Properties features:
- The Device, Tool, and Application icons show your settings for those items.
- Click Functions to customize the ExpressKey and Touch Ring settings.
- Display Toggle options are available on multiple monitor systems.
- Click Touch to customize your touch settings.
- Click the other Tool icons to customize those settings. A tool icon appears after you have used that tool.
- Default returns the selected tab to its default settings.
- About displays the software version and diagnostic information.
- Options displays Advanced settings.
- The ? icon displays the Help topics for the selected tab.
Notes:
- Wacom Tablet Properties will not launch unless a supported tablet or pen display is connected to the computer.
- If you have only an Intuos connected, you will not see the Device and Tool rows in Tablet Properties.
- Settings can only be viewed or changed for an attached tablet or pen display.
- The Application list is optional. It is not necessary to select or add applications in order to customize your pen tablet tool(s).
On-Screen Controls
Wacom On-Screen Controls allow you to create a set of up to eight pen tablet or pen display functions, called a Screen Key panel, that will appear on your screen. Select a function from the Screen Key panel by tapping the corresponding key with your pen or mouse, or with your finger if your device has touch functionality.

To create a new Screen Key panel, or to edit, duplicate, or delete an existing panel:
- Open Wacom Tablet Properties.
- ClickFunctions in the Tools list.
- Click the On-Screen Controls tab. TheEdit buttons at the bottom left provide the following options for Screen Key panels, from left to right:
![]()
- Click the appropriate button for the desired function. A dialog titled New Panel opens for a newScreen Key panel. For an existing panel, the dialog shows the panel's name.
- Enter your preferences for a new Screen Key, or edit an existing one, and clickOK. The new or edited panel will appear in the Panels list. For more information, see Customizing On-Screen Controls.
Note: The default layout for a Screen Key panel is a 1 x 8 vertical strip, with one key initially assigned to Settings. The rest of the keys will be disabled until you choose settings for them.

On the Screen Key panels:
- To keep the panel open, click the Push Pin icon.
To open Wacom Tablet Properties to the On-Screen Controls tab from the panel, click the Wrench icon.


Working with the pen
All Wacom products are shipped with a cordless, battery-free pen that you can use to interact with your device. You can hold, write, and draw as you normally would with a pen or pencil.

Pen styles vary depending on the pen tablet or pen display that you purchased.
If the pen tip is worn, you can replace the nib.
Personalizing your pen with a color ring
If your pen includes color rings, you can use them to identify and personalize your pen.
- Unscrew the cone near the pen tip.
- Remove the color ring that is already on the pen and slide on your preferred color ring.
- Replace the cone.
Specialty pens
Pens designed for more advanced artwork, such as an Art Pen or an Airbrush, can be used with many pen tablets and pen displays.
To discover other pens and tools that can be used with your pen tablet or pen display, go to the Wacom Store.
Multi-Touch
The multi-touch features of your pen tablet or pen display enable you to interact with a computer using only your fingertips on the surface.
You can use touch as you would on any other Mac or Windows device. Touch is activated whenever you touch the tablet in the active area.
When using touch, you can usually position your fingers as far apart as is comfortable. However, placing your fingers too closely together may be interpreted by the tablet as input from a single finger, or the tablet may confuse which finger performed an action. Keep your fingers within the active area.
Take care to prevent accidental touches on the tablet when making gestures. For example, if the palm of your hand touches the active area of the tablet during while scrolling or zooming, you may trigger an unanticipated right-click.
In some cases, touch is enabled and disabled with a physical switch on the device.
On some tablet models that support both pen input and touch, the pen disengages touch whenever the pen tip or eraser is within the tablet proximity range. Lift the pen and your hand away from the tablet active area to enable touch.
Using the Wacom Desktop Center
The Wacom Desktop Center helps you keep your driver and products up-to-date, customize your devices, and learn more about how to use pen tablets and pen displays.

The above screenshot is for descriptive purposes; it may not match your screen.
Customizing your device
- If available for your device, the pen displays and pen tablets that are connected to your computer display under My Devices.
- Select a device to display settings menus.
- Select one of the settings menus, and Wacom Tablet Properties opens so you can change the settings.
Running the Setup Wizard
- If available for your device, select your device from My Devices, and select Run Setup Wizard. Follow the prompts.
Backing up your settings
- If available for your device, click Backup Settings to backup, restore, and reset your device settings.
- These settings can be stored locally or to your Wacom ID.
- Note: Settings can only be restored to the device that they were created on. Backing up your files
![]()
Currently available on MobileStudio Pro only.- You can set up Wacom Echo to automatically back up your drawings, notes, and any other files stored on your tablet or computer, if you are using Windows 10. Updating your tablet
- If available for your device, you are notified of driver, firmware, or BIOS updates by a notification next to Updates.
- Select Updates, and then click the update to install it. Getting apps and products
- Click Marketplace to find apps that can improve your workflow.
- Click Store to research and purchase Wacom products. Getting Support for Wacom products
- Select Support to view FAQs and tutorials on the Wacom website and to contact Support.
- If available for your device, select a device under My Devices to view documentation, tutorials, and Important Product Information.
- Go to More > Online Help or Help > Online Help to view help topics.
Logging in with your Wacom ID
- Log in with your Wacom ID so you can access the Wacom Cloud. Click your name to view and update your profile.
- Click More to configure how the Wacom Desktop Center starts up, to access help for your product, and to find social media related to Wacom.
Setting up your work area
- Position your tablet, pen, and keyboard for easy access.
- Adjust your monitor so you can view it comfortably without eyestrain, placing it about one arm's length away from you.
- Position the tablet so the screen cursor follows the same direction as your hand movements on the tablet.
- If you are using the tablet as a creative tool, consider placing the tablet below the keyboard and centered underneath your monitor.
Mapping
Select the Mapping tab to define the relationship between pen movement on the tablet surface and cursor movement on the monitor screen. When you select the Mapping tab, you will see a graphic of your pen tablet and monitor(s), and mapping controls.
By default the entire active area of the tablet maps to the entire monitor. If more than one monitor is in use the tablet will map to all monitors. Images dynamically update to illustrate the selected mapping relationship. See Working with multiple monitors.

The above screenshot is for descriptive purposes; it may not match your screen.
- Use the Orientation setting (Intuos Pro) to set your preferred display mode. This setting applies to all tools and applications.
Mode options control how the screen cursor moves. - Pen Mode sets the cursor movement to correspond with the position of your pen on the tablet. Wherever you place your pen on the tablet, the cursor will jump to a corresponding point on the screen. This is the default setting for the pen. The Pen Mode options are:
- Screen Area: Select the portion of the display to be mapped to the tablet. See Screen area mapping.
- Tablet Area: Select a portion of the active area for tablet-to-screen mapping. See Tablet area mapping.
- Mouse Mode enables you to move the screen cursor with a "pick up and slide" motion, similar to using a standard mouse.
Check the Use Windows Ink box to make sure that Windows Ink functions correctly when you work with your pen in Windows applications. See Pen and digital ink capabilities in Windows.
Use the Force Proportions box to maintain proportions of images.
- Force Proportions unchecked: The correct proportions are not maintained. The selected tablet area is mapped to the selected display area. Drawing a circle on the tablet may create an ellipse on the display screen. This is the default setting for all tools.
- Force Proportions checked: The correct vertical and horizontal proportions are maintained. Drawing a circle on the tablet results in a circle on the display screen. Depending on your settings, some portions of the tablet active area may no longer be usable when this option is selected.
Notes:
- If you frequently switch between Pen mode and Mouse mode, you can assign the Mode Toggle... function to one of your tool buttons. See Button functions: toggles.
- Although Intuos Pro is optimized for use with 16: 10 aspect ratio displays, the default settings automatically adjust for use with other aspect ratio displays.
Testing the Tablet
- Turn on your computer and wait until the system is ready to use.
- Check the USB connection. A tablet status LED should light whenever the tablet is properlyconnected and your computer has registered it as a USB device. If not:
- Make sure the USB cable is securely connected to an active USB port on your computer.
- Check the tablet USB cable for damage.
- If you are connecting the tablet to a USB hub (or hub device with USB ports), be sure the USB hub is properly connected to your computer and is active.
- If a status LED does not illuminate after your computer is on and has finished booting up, your USB port may be disabled. Verify that you have connected the tablet to an active USB port.
- Connect the tablet to a different USB port, or to a USB port on another computer.
- For best results when troubleshooting no power to the tablet (a status LED does not light), plug the tablet directly into the system USB port located on your computer.
- Temporarily eliminate any external hubs in use until you determine that the system recognizes the tablet and that it is functional. When the tablet is working properly, you can then usually move the tablet to a USB hub.
- Test touch. Attempt to move the screen cursor by tracking your finger across the surface. Then tapto select an item. On tablets with a status LED, the LED should brighten when you touch the active area of the tablet.
- If the tablet driver does not load properly, basic touch movement will be recognized, but other actions and gestures will not. If gestures are not recognized, re-install the driver. See Installing the driver.
- Check the ExpressKeys and Touch Ring. See Testing the ExpressKeys or Touch Ring.
- Check any other tool(s) you may be using, such as the optional mouse.
- If any of these tests fail, you may have defective hardware. See Technical Support.
- After testing, use Wacom Tablet Properties to reconfigure your pen tablet and tools for any custom settings you may have been using.
Troubleshooting
If you encounter problems with your pen tablet or pen display, Wacom recommends the following:
- If the tablet driver failed to load properly, perform the recommended action in any error messagethat may appear on your screen. If that does not help, review the troubleshooting procedures for the technical problem you are encountering with your pen tablet or pen display.
- Visit the Wacom website for your region to view the product FAQs (Frequently Asked Questions).
- If you are still having a compatibility conflict with your pen tablet and a new hardware or softwareproduct, go to Customer Support to see if a new driver is available for your pen tablet.
- Test your tablet and tools.
Consult the topics for testing your pen tablet or pen display, and specific Troubleshooting topics for pen and touch, wireless connection (for Intuos or Intuos Pro), and Mac- or Windows-specific issues.
If you have tried these suggestions but cannot resolve the problem, go to Customer Support.
Functions reference
Use Wacom Tablet Properties to customize the functions that are assigned to tool buttons, ExpressKeys, and other elements of your pen tablet or pen display. Note that button function options may vary, depending on your tablet model. Button functions for toggle-only controls are described in Button functions: Toggle settings.
Clicks:
- Click: Simulates a primary mouse button click. Be sure at least one button performs this function so you can always navigate and click.
- Right click: Simulates a right mouse button click to display a context menu.
- Middle click: Simulates a middle mouse button click.
- Double click: Simulates a double-click. For easier double-clicking, use this function instead of tapping twice with the pen tip.
- Click lock: Simulates holding down the primary mouse button. Press the tool button once to initiate click lock, and again to release it. Use Click lock to drag objects or select blocks of text. 4th click or 5th click: Simulates a fourth or fifth mouse button click.
Keystroke: Displays the Define Keystroke dialog to create keystroke combinations for ExpressKeys, mouse, and other functions.

- Enter your keystroke combination in the Keys box. The combinations can include letters, numbers, function keys and modifier keys. You can also choose combinations from the Add Special dropdown menu.
- Enter a Name for the defined keystrokes pair(s) and click OK.
- The Delete button removes the last entry in the Keys box. The Clear button clears the Keys box.
- After defining a keystroke sequence, click OK.
- Note: Because the Enter (Windows) and return (Mac) keys can be selected as a defined keystroke, they cannot be used to select OK.
- Enter a name for the keystroke definition. You can create different keystroke functions for different applications.
- When defining keystrokes for the Touch Ring or the mouse fingerwheel, use the two Keys entry boxes for clockwise and counter-clockwise movement on the ring, or for front and back movement of the mouse fingerwheel.
To learn which keystroke shortcuts are supported by a particular application, see the instructions for the application.
Modifier...: Dialog that enables you to simulate modifier keys: Shift, Alt, or Ctrl for Windows, or Shift, Option, Command, and Control for Mac. Use the Key setting to perform modifier functions, and a modifier to simulate pressing the associated button on a mouse.
On-Screen Controls: Displays an menu where you can select an On-Screen Control panel to launch.
Back and Forward: Simulates the Back or Forward command in browser applications.
Pan/Scroll: Enables you to position a document or image within the active pane by pressing a pen button set for Pan/Scroll and then dragging with the pen tip across the tablet active area. Use the Pan/Scroll slider to set a scrolling speed for use in applications that do not support grabber hand (pixel-level) panning.
Auto Scroll/Zoom: Sets the Touch Ring to zoom in most graphics applications and scroll in most other applications. (Available on some devices.)
Scroll and Zoom: Sets the Touch Ring for scrolling or zooming actions. (Available on some devices.) Scroll Up: Scrolls your active application up.
Scroll Down: Scrolls your active application down.
Zoom In: Zooms your active application in.
Zoom Out: Zooms your active application out.
Show Desktop: Minimizes all open windows to display a clean desktop.
Switch Application: Brings up the application switching dialog with focus on the next open application.
Launchpad: Displays Launchpad menu where you can start applications.
Open/Run: Opens a dialog to select a specific application, file, or a script to launch. Browse to select the item, and it will appear in the Name box. Click OK to assign the item as your tool button option.
Pressure Hold: Locks the pressure at the current pressure level until the button is released. For example, you can paint with pressure sensitivity until you reach the brush size you like. You can then press the button and continue painting with the same size brush until the button is released.
Erase: Sets your strokes to erase mode.
Tablet PC Options: Displays a menu of Tablet PC options.
Disabled: Disables the button function.
Application Defined: This is for applications, such as CAD programs, that have built-in tablet support. It reports only the button number to the application. It may also be used by some integrated applications for direct control of the ExpressKeys and Touch Ring.
Default: Resets the button to its default function.
Toggle functions reference
You can use Wacom Tablet Properties to customize the functions that are assigned to tool buttons, pen, ExpressKeys, and other elements. The following button functions control toggle settings. Other button functions are described in Button functions.
Precision Mode: Use the slider to change the mapping around the current pen tip position. Press the button again to return to normal mapping.
Display Toggle: This setting is for multiple monitor systems. It toggles the current tablet mapping and screen cursor between different displays when you press an ExpressKey that has been assigned to this function.
Mode Toggle: This setting for pen buttons toggles between Pen mode and Mouse mode. When first setting a button to Mode Toggle... in Mouse mode, use the sliders to adjust the screen cursor acceleration and tracking speed.
Skip: Sets the Touch Ring center button to skip a function mode that has been assigned this option in the toggle sequence.
Ink Toggle: (Mac) Toggles the Ink in any Application function of Ink on and off. When Handwriting recognition is turned on, Ink recognizes and converts your handwriting into text and inserts it into a document.
Touch On/Off: Use Touch On/Off when you want to work in pen mode only (not supported on tablets with a physical Touch on/off switch). Disable touch by pressing an ExpressKey you have assigned to Touch On/Off. Press the ExpressKey again to enable touch.
On Screen Keyboard: Use On Screen Keyboard option to toggle the Windows On Screen Keyboard for pen or touch keyboard input.
Settings: Displays an interactive diagram showing the current settings of the current ExpressKey, Touch Ring, pen, and touch settings. Click on any section of the diagram to open the appropriate Tablet Properties tab and adjust settings as needed.
Mouse mode settings can be accessed from a number of different locations within Wacom Tablet Properties. However, only one Mouse Acceleration and Speed setting can be made for each tool and application you are customizing.
Note: The mouse mode settings are independent of system settings. Changes you make to these settings in Wacom Tablet Properties do not affect similar computer system settings. However, changes made to similar system settings may affect your tablet settings.
Glossary
Active area. The navigation and drawing area of the tablet where touch or your pen tablet tools are detected.
Application-specific settings. Pen tablet tool and tablet settings that have been customized for individual applications. Application-specific settings are in effect whenever you use the application.
Aspect. The ratio between the vertical and horizontal dimension of the tablet or display.
Bluetooth. A wireless technology standard for exchanging data over short distances.
Click force. The amount of force you must apply to the pen tip for a click to occur.
Digital Ink. Typically, handwritten content which has been created using a pen on a computer in the form of sketches, ink mark-up, or handwriting. The handwriting can be converted to typewritten text or used in its original format.
Display Toggle. A feature that allows you to work with your tablet on all displays or on one display at a time. Available only on multiple monitor systems.
Double-click assist. A feature that makes it easier to double-click by setting the size of the double-click distance.
Double-click distance. The maximum distance (in screen pixels) that the screen cursor can move between clicks and still be accepted as a double-click. Increasing the double-click distance makes double-clicking easier, but may cause a delay in brush strokes in some graphics applications.
Double-click speed. The maximum time that can pass between clicks and still be accepted as a doubleclick.
Eraser-aware application. A software application that has built-in support for the pen eraser. These applications take advantage of the eraser in different ways, depending on what makes sense for the application.
Expand. A motion used when navigating with touch. Touch the tablet surface with two fingers spaced closely together, then move your fingers apart.
ExpressKeys. The customizable control keys located on your pen tablet.
ExpressKeys Left. Setting with the Touch Ring and ExpressKeys oriented to the left of the tablet.
ExpressKeys Right. Setting with the Touch Ring and ExpressKeys oriented to the right of the tablet.
Fingerwheel. The control wheel on the optional Airbrush.
LED. Light-Emitting Diode. Used as tablet indicator light(s).
Mapping. The relationship between the tool position on your pen tablet and the cursor position on the monitor screen.
Modifier. Modifier keys include Shift, Alt, and Ctrl for Windows, or Shift, Control, Command, and Option for Mac. You can customize your tool buttons or ExpressKeys to simulate a modifier key.
Mouse Acceleration. A setting on the Mapping tab that allows you to adjust the screen cursor acceleration when using mouse mode.
Mouse mode. A method for positioning the screen cursor. When you place a tool on the pen tablet, you can move the screen cursor with a pick-up-and-slide motion similar to using a traditional mouse. This is known as relative positioning, and is the default setting for the optional mouse.
Mouse Speed. A setting on the Mapping tab that allows you to adjust the speed at which your screen cursor moves when using mouse mode.
Nib. The replaceable pen tip.
Pairing. A method of creating a virtual cable link between two devices.
Pan. A motion used when navigating with touch. Touch the tablet surface with your fingers and move them in the same direction.
Pen input. A method of controlling a computer using the pen.
Pen mode. A pen input method of positioning the screen cursor. When you place your pen on the tablet, the screen cursor will jump to the corresponding point on the screen. This is known as absolute positioning, and is the default setting for the pen tablet tools. Pen mode allows you to quickly position the screen cursor without having to first find it and then move it across the desktop.
Pinch. A motion used when navigating with touch. Touch the tablet with two fingers spaced slightly apart, then move or 'pinch' your fingers together on the tablet surface.
Pixel. The smallest unit of measure on your display screen.
Pressure sensitive. A quality of the Wacom pen tip and eraser that senses the amount of pressure being applied. This is used to create natural-looking pen, brush, and eraser strokes in applications that are pressure-sensitive.
Pressure-sensitive application. Any application that supports pressure-sensitive input.
Proximity. The height above the tablet active area where pen detection occurs.
OnScreen Control Radial Menu. A hierarchical menu (in radial format) in On-Screen Controls. Each level of the menu consists of eight menu slices which contain various features and options to choose from. You can customize the buttons of your pen or tablet to display this menu.
Rotate. A motion used when navigating with touch. Touch the tablet with two fingers spaced slightly apart and rotate them in a circular fashion, move them in opposing directions, or hold one finger stationary and track your other finger around the stationary finger.
Screen cursor. The pointer on the display screen. Screen cursors come in different shapes (such as an I-beam, arrow, or box), depending on which application you are running.
Swipe. A motion used when navigating with touch. Touch the tablet surface with three, four, or five fingers and sweep them quickly across the tablet in the same direction.
Tap. A motion used when navigating with touch. Touch and lift a single finger (or multiple fingers, depending on the gesture) from the tablet.
Tilt-sensitive. A quality of the pen tip and eraser that senses the amount of tilt between the tool and the tablet. This is used to create natural-looking pen, brush, and eraser strokes in applications that are tiltsensitive.
Touch. A method of interacting with a computer using only your fingers on the tablet. May also be referred to as touch input.
Touch Ring. The customizable control ring located on your pen tablet.
Touch Strips. The customizable control strips located on the back of the Cintiq 22.
Touch sensor. The navigation area of your pen tablet where touch is detected. The touch sensor resides within the active area, and does not accept pen input.
Track. A motion used when navigating with touch. Touch and move a single finger across the tablet surface.
USB. Universal Serial Bus. A hardware interface standard for connecting computer peripheral devices.
Wacom Link adaptor Adapter for the MobileStudio Pro which converts USB-C connection allowing Desktop Mode to function on machines without a USB-C port.
Ordering
To purchase parts and accessories for your device, go to the Wacom Store.
You may also contact your local dealer, distributor, or Customer Support for your region.
Note: Some parts and accessories may not be available in all regions.
Technical Support
If you have a problem with your pen tablet or pen display, be sure you have checked the product Help.
You can access Help by clicking the question mark icon in the Wacom Tablet Properties, or selecting the Online Help option from the Wacom Desktop Center. If the Help does not have the answer you are looking for, try the following options:
- Review the Quick Start Guide to be sure the tablet is set up correctly.
- Check the Help Troubleshooting tables for a solution to the problem.
- Visit Wacom Customer Support and check the product FAQs (Frequently Asked Questions). Download the latest driver software for your pen tablet from the Wacom website for your region, and install the new driver. Restart your computer, and see if the problem has been resolved.
If you contact Customer Care, please be at your computer with the following information available.
- The make and model of your computer, and operating system version.
- Peripheral devices connected to your computer.
- The software application and version you were using when the problem occurred.
- The exact wording of any error message that appeared on your screen.
- What happened and what you were doing when the problem occurred. How you tried to solve the problem.
You can also contact Technical Support by visiting the Wacom website for your region and completing a Customer Support Email Inquiry form.
Caring for your device
Follow these care and maintenance tips to ensure optimum performance of your device.

Do not not spill liquids onto your device or pen. They will fail if exposed to liquids.
Maintaining your device
- Clean your devices using an anti-static cloth or slightly damp cloth and light pressure.
![]()
Do not use alcohol or detergent.
- Do not wrap the cables around the device when storing it.
- Replace your pen nibs frequently to avoid scratching the surface with worn pen nibs.
- Avoid extremes in temperature.
- Do not disassemble the device or the pen, except to add a color ring to the pen. Taking apart the product voids your warranty.
Replacing the pen nib
Tip: Replace your pen nib when it is approximately 1 mm (1/25 inch) or has a sharp edge.
Where to find replacement nibs
- For some devices, the nibs are in a plastic bag or under the back cover of the device.
- If your pen includes a pen stand, unscrew the pen stand to find the nibs.
- Tip: If your pen includes the Pro Pen 2 stand, you can screw it back together by lining up the dots on the bottom of the stand and the recess. Then, gently guide the bottom of the stand to the right until you feel it click into place.
Where to find the nib replacement tool
- For some devices, the nib replacement tool is a metal ring in your pen stand or in a plastic bag.
- Otherwise, use the small hole on the bottom of some pen stands as the nib removal tool.
Pen stands vary depending on the pen tablet or pen display that you purchased.


- To replace the pen nib, use the nib removal tool to grab the old nib and pull it straight out of the pen.
- Get a replacement nib and slide the end of the new nib straight into the barrel of the pen.
- Push the nib in slowly and firmly until it stops.
If you need pen nibs or other accessories, go to the Wacom Store.
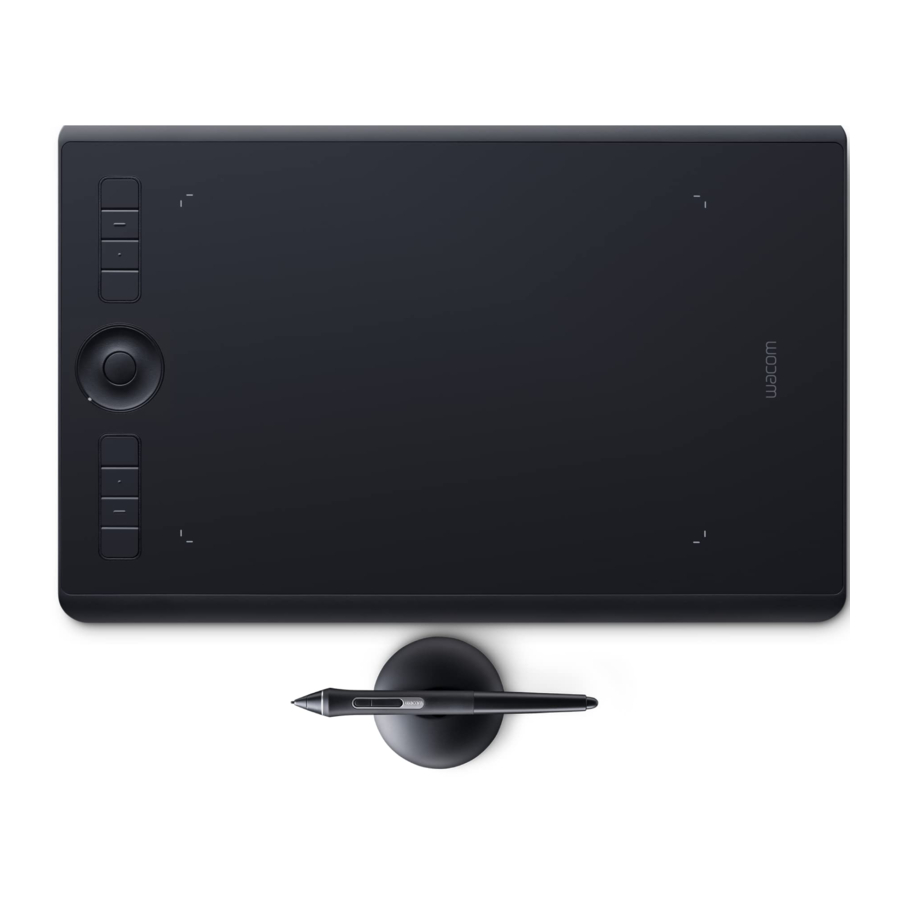
Features of your Wacom Intuos Pro
- Touch Ring center button
- Press to wake up the tablet from sleep when connected by Bluetooth.
- Press and hold for three seconds when you are pairing by Bluetooth.
- Press when you want to start a new page when you are paper sketching.
- Press twice when you want to start a new layer when you are paper sketching.
- Press when you want to switch between functions that you assigned to the Touch Ring.
- The LED light moves around the Touch Ring when you press the center button to change functions.
- Touch Ring
- You can assign four functions to the Touch Ring.
- To use the Touch Ring, slide your finger around the ring.
- Power button for Bluetooth
- Press and hold for two seconds to turn your tablet on or off while connected by Bluetooth.
- The Touch Ring LEDs light when you turn on the tablet. The lights go off when you turn off the tablet.
- Press to send your tablet to sleep or to wake up from sleep while connected by Bluetooth.
- The Touch Ring LED lights when the tablet is awake and turns off when the tablet goes to sleep.
- Press and hold for two seconds to turn your tablet on or off while connected by Bluetooth.
- ExpressKeys™: You can assign functions, keystrokes, button clicks, and modifier keys to ExpressKeys. When you press an ExpressKey, it acts as a shortcut to the function that you assigned to it.
- Active area: The active area is the area on the tablet that you interact with by pen, touch, and paper sketching. It is indicated by corner markers on the tablet surface.
- You can change the texture of the active area with a Texture Sheet available at the Wacom Store. Peel the covering off the back of the Texture Sheet and place the sticky side down on your tablet's surface. Peel the protective covering off the front of the Texture Sheet to start working on the customized surface.

| Number | Item |
| 1 | On/off switch for touch input |
| 2 | Power button for Bluetooth |
| 3 | Reset button |
| 4 | Touch Ring center button |
| 5 | Battery and Bluetooth LED |
| 6 | USB port |
| 7 | Pen tether slots |
Working on battery power
When your tablet is on and not connected by USB to your computer or a charger, a built-in battery powers your tablet. The LED near the Wacom logo notifies you when your battery needs to be charged.
- If the LED blinks orange, your tablet's battery is getting low and needs to be charged. To charge the battery, connect your tablet with a USB cable to your computer, to a powered USB hub, or to a USB charger.
- The LED is solid orange when the battery is charging.
- You can also check the battery status at any time to see if your tablet needs to be charged soon.
- Go to the Wacom Desktop Center and check the battery icon next to your device's name.
- Go to the Wacom Inkspace App and hover your mouse over the battery charging icon.
- When you are working on battery power, the tablet goes to sleep if you do not interact with it for a period of time.
- You can wake up the tablet by pressing the Touch Ring center button or the power button. If that does not work, press and hold the power button for two seconds.
Customizing On-Screen Controls
To customize a Screen Key panel:
- Select the name of the panel in thePanels list.
- Select the functions for each of the keys from the dropdown menus underKey Assignments. Each key will display the function you assign to it.
- If you selectKeystroke as your assigned function, the Keystroke dialog box will open for you to enter the keystrokes.
Note: You can assign a function to as many of the keys as you like. However, at least one key must be assigned a function in each Screen Key panel for the panel to be displayed on the screen. - Change the order of the dropdown menus in theKey Assignments list, using the Drag icon to the left of the menu to drag the menu to a new position in the list.
- Set a key function to repeat on button hold by clicking theRepeat checkbox to the right of the Key Assignment.
- Change the position of a Screen Key panel by holding down the drag bar at the top of the panel withyour pen, mouse, or finger and dragging the panel to the new position.
In the New Panel dialog:
- Change the layout of a Screen Key panel by clicking on the desiredLayout icon on the New Panel dialog.
- Set the overall size of the panel by adjusting theSize slider. The panel will also resize to adjust to the number of assigned keys on the panel.
- Display the panel at the location of the cursor by clicking theDisplay at cursor checkbox.
The above screenshot is for descriptive purposes; it may not match your screen.


To assign a Screen Key panel to any ExpressKey or button:
- Select the appropriate tab to set the control.
- Select On-Screen Controls from the dropdown menu for the ExpressKey or button, then choose thepanel you want to assign to that item.
The above screenshot is for descriptive purposes; it may not match your screen.


Also see:
On-Screen Controls
Working with multiple monitors
If you have more than one monitor connected to your computer, you can configure how your pen tablet maps to those monitors. Depending on which setting you choose, you can either see a copy of your work on each monitor or you can see your work spread across multiple monitors.
Go to your computer's display properties menu to select the setting you want.
- Select extend if you want to use multiple monitors as one continuous display.
How it works: As you move your pen across the pen tablet, your cursor moves across all monitors in the order set in your computer's display properties menu. - Select duplicate or mirror if you want all monitors to display a copy of same content.
How it works: As you move your pen across the tablet, your cursor moves across the area of one monitor, and your work is duplicated in each monitor.


Tips
- Set an ExpressKey or pen side switch to Display Toggle to quickly switch between your pen tablet and each monitor.
- Set an ExpressKey or pen side switch to Mode Toggle so you can easily switch between using the pen to work and using the pen like a mouse.
Screen Area Mapping
Use the Screen Area option of the Mapping tab to define which portion of the display screen your tablet will map to.
- Full maps the entire monitor(s) area. This is the default setting. See also Working with multiple monitors.
- Monitor maps the entire area of a single monitor that you choose. If more than one monitor is connected, an option is available for each detected monitor.
- Portion... In the Portion of Screen dialog, choose a method for defining a portion of the display:
- Drag the corners of the foreground graphic to select the screen area.
- Select the Click to Define Screen Area button and move the screen cursor to select the screen area. Be sure to follow any prompts.
- Enter coordinate values.


Tablet Area Mapping
Use the Tablet Area option of the Mapping tab to define the tablet area that will be mapped to the screen area.
- Full maps the entire active area of the tablet. This is the default setting.
- Portion... In the Portion of Tablet dialog, choose a method for defining a portion of the display:
- Drag the corners of the foreground graphic to select the screen area.
- Select the Click to Define Tablet Area button and use your tool on the tablet to select the area. Be sure to follow any prompts.
- Enter coordinate values.
The above screenshot is for descriptive purposes; it may not match your screen.


Using your pen with Windows Ink
You can take advantage of the many pen features that Microsoft Windows supports. All versions of Windows except Windows 7 Starter and Home Basic support them, and Windows 10 and the Windows Ink Workspace provide features on top of that.
- Handwriting recognition: Convert your handwritten content to typed text.
- Gestures: Use touch gestures on the tablet to trigger customizable actions. To customize gestures, go to the Flicks tab in the Pen and Touch control panel.
- Digital Ink (Microsoft Office 2007 or later): Use the enhanced digital mark-up and inking tools found on the Review tab in applicable applications.
- Windows Input Panel: Use handwriting or an on-screen keyboard to directly enter text with your Wacom pen.
Note: The Pen Flicks and press-and-hold-to-right-click features are disabled in some graphics applications.
Windows Ink is on by default. If you want to turn off Windows Ink, unselect Use Windows Ink in Wacom Tablet Properties.
Installing the driver
You must install the driver to make your device work, unless your device comes with a preinstalled driver. Refer to the Getting Started Guide to see if your device has a pre-installed driver or not.
- Go to Customer Support and selectDrivers.
- ClickDownload next to the latest driver that corresponds to your computer's operating system.
- Follow the prompts to finish installation.
Updating the driver and firmware
Updated drivers and firmware are made available on the Wacom Desktop Center and at Customer Support periodically. Check in and update regularly so that your device has the latest features and functionality.
Do not update firmware while your device is connected to your computer wirelessly, if that functionality is available for your device. Plug your tablet into your computer by USB before you update firmware.
- From the Wacom Desktop Center, select Updates, and then click the update to install it.
- If the Wacom Desktop Center is not available for your device, go to Customer Support and select Drivers to find the latest updates.
Note: Your device will not work if you uninstall the driver. If you uninstall the driver, reinstall the latest driver from the drivers page so that your device works again, with default settings.
Testing the ExpressKeys
If your ExpressKeys or a Touch Ring do not work as you expect, check the assigned functions or reset them to their default conditions. See Testing a pen or mouse for more information on testing your pen tablet components.
- Open Wacom Tablet Properties and click on theAbout button. In the dialog that appears, click Diagnose... The Diagnostics dialog shows dynamic information about the tablet, your tool(s), and appropriate information for touch-sensitive tablets.
- If more than one pen tablet is connected to your system, select the one you are testing in theTablet Info column.
- Use the information shown in the dialog when testing your tablet and tools.
The above screenshot is for descriptive purposes; it may not match your screen.


Testing the ExpressKeys
- With the Diagnostics dialog open, observe theTablet Info column as you test each ExpressKey. Be sure you have selected the tablet you are testing from the Tablet Info column.
- Test the keys by pressing them one at a time. Each time you press a key, its number is shown nextto theLeft Buttons category.
- When you are done, click theClose button.
Testing the Touch Ring
- With the Diagnostics dialog box open, observe theTablet Info column as you test the Touch Ring. Be sure you have selected the tablet unit you are testing from the Tablet Info column.
- For a Touch Ring, slide your finger around the entire circumference of the Touch Ring and watchtheLeft Touch number indicating your current finger position on the Touch Ring.
- Press the Center Button to toggle between the four modes and note whether the correspondingLEDs illuminate. If any of the functions are set to Skip, the corresponding LED will be skipped in the toggle sequence.
- When you are done, click on theClose button to exit the dialog.
If these tests fail, you may have defective hardware. See Technical Support.
![]()
Some applications can override and control the ExpressKey or Touch Ring functions.
Consider closing any open applications except Wacom Tablet Properties when testing the Touch Ring. For details, see Using integrated applications.
Customizing the Touch Ring
To customize the Touch Ring, select the Touch Ring tab. Touch Ring functions can be modified to perform various zooming, scrolling, or custom keystroke operations. The ring can be toggled between four customizable functions by pressing the Center Button.

The above screenshot is for descriptive purposes; it may not match your screen.
Use slider controls to set the rate at which zooming, scrolling or rotating occurs, or the speed at which keystroke events are sent to an application. The Show touch ring setting checkbox enables or disables display of the Touch Ring settings diagram.
Touch Ring functions can be defined for use with specific applications. See Using the Touch Ring for more information.
Tips:
- To customize the Touch Ring for other actions, select the Keystroke... option and define a custom keystroke function. See Button functions for more information about the Keystroke... option. To learn which keystroke shortcuts are supported by a particular application, see the documentation that came with the application.
- Choose Skip to set the Touch Ring Center Button to skip a function mode in the toggle sequence.
- To zoom images at the current position of the screen cursor in Photoshop CS3 (or later), open the Photoshop general preferences pane. Check the Zoom with Scroll Wheel option and click OK.
- To set the brightness of the Touch Ring status LEDs and active area markers, click the Options... button at the bottom of Wacom Tablet Properties. In the Options dialog, change the Brightness Adjustment setting as needed.
Some applications can override and control the Touch Ring functions. For details, see Using integrated applications.
Touch Ring
Use the Touch Ring by sliding your finger around the ring to zoom in or out, scroll up or down, or to issue assigned keystroke functions. Use Wacom Tablet Properties to customize the Touch Ring. See Wacom Tablet Properties overview and Customizing the Touch Ring.
Press the Center Button to toggle between four customizable modes. As you toggle between settings, a corresponding status LED illuminates. Any disabled settings are skipped in the toggle sequence.
Important: Some applications can override and control the Touch Ring functions you select from the Wacom Tablet Properties. For details, see Using integrated applications.
Touch Ring default settings:

- Auto Scroll/Zoom. Sets the ring to zoom or scroll in graphics applications. Some applications mayinterpret zooming as scrolling, or the reverse, or they may completely ignore zooming or scrolling.
Move your finger clockwise along the Touch Ring to zoom in or scroll down in most applications. Tap the upper portion of the Touch Ring for single increment changes. Move your finger counter-clockwise to zoom out or scroll up. Tap the lower portion of the Touch Ring for single increment changes. - Cycle Layers. Enables you to cycle up or down through a stack of layers when working in AdobePhotoshop. Move your finger clockwise along the ring to cycle up through layers.
- Brush Size. Sets the ring to increase or decrease the brush size of your drawing tool when working inAdobe Photoshop.
- Canvas Rotation. Enables you to rotate or flip an entire image when working in Adobe Photoshop CS4(or later).
A diagram of the current Touch Ring settings appears briefly on your display screen when you press the Center Button.

The above screenshot is for descriptive purposes; it may not match your screen.
Using and customizing ExpressKeys
Press the customizable ExpressKeys to perform frequently used functions or keystrokes, or to simulate button clicks or modifier keys. All ExpressKeys can be set in Wacom Tablet Properties, using the options from the dropdown menu for each key.
The position and orientation of the ExpressKeys vary, depending on the Intuos model.
To customize the ExpressKeys, select the Tablet tab. Each ExpressKey can be customized to perform a modifier, keystroke, or other function using the dropdown menus. The current setting for each function is shown in the corresponding menu.
The ExpressKeys can be operated in combination with one another. For example, customize one key for the Ctrl function and another for Alt. When you press both keys at the same time, a Ctrl+Alt function is initiated. ExpressKey functions can also be defined for use with specific applications.

The above screenshot is for descriptive purposes; it may not match your screen.
The Show Express View checkbox enables or disables the Express View display. When enabled, rest your finger on an ExpressKey to show the ExpressKey settings. See Express View.
Some applications can override and control the ExpressKey functions. See Using integrated applications.
Display Toggle
Display Toggle is available when working on multiple monitor systems. This feature allows you to work with your tablet on all displays or on one display at a time. See Working with multiple monitors.
In Wacom Tablet Properties, the Display Toggle tab is automatically available when your pen tablet is installed on a multi-monitor system. This tab lets you set which monitor(s) will be included in the toggle sequence.
After setting an ExpressKey or pen side switch to Display Toggle, you can use it to toggle the current tablet mapping between a base mapping (the current setting from the Mapping tab) and other monitors. See Mapping tab. The display options are:
- The entire display area of a multi-monitor system is set up for extended mode and assigned to the active area of the pen tablet.
- The Display Toggle function has been assigned to toggle the tablet mapping to the next display in sequence.


The above screenshot is for descriptive purposes; it may not match your screen.
All monitors are selected in the toggle sequence by default. Uncheck any monitor you want removed from the sequence. When you toggle to another monitor, the active tablet area is mapped to that monitor (in pen mode). Toggling once more after the last selected monitor returns the system to the base mapping.
The base mapping is the tablet and display mapping defined in the Mapping tab. By default, this includes all monitors unless you have defined one monitor as your primary monitor.
When using application-specific settings with Display Toggle, be sure that each customized application in the Application list (including All Other) has a tool button or ExpressKey assigned to Display Toggle.
Any of the following actions will return the toggle sequence to the base mapping:
- Launching a graphics application that supports pressure sensitivity.
- Logging out of or rebooting the system.
- Switching users (Fast User Switching).
- Placing the system in sleep mode.
- Changing the Mapping or Display Toggle settings.
- Changing the resolution or number of displays on your system.
- Using the Mode Toggle... function.
- Selecting Pen Mode or Mouse Mode from On-Screen Controls.
Tip: To toggle between monitors without including the full display option, disable the first display on the Display Toggle tab. Then go to the Mapping tab and set the current Screen Area to the first display.
Testing the pen
If your pen does not work properly, first try these fixes and then use the diagnose tool in Wacom Tablet Properties to verify if your pen is working correctly.
- Go to thePen tab in Wacom Tablet Properties and check that the functions assigned to the pen tip and side switch are what you expect.
- If the assigned functions are as expected, update your driver software.
- If updating your driver does not fix the issue, reset your pen to default settings by going to thePen tab in Wacom Tablet Properties and clicking Default.
- If that does not work, use the diagnose tool to verify if your pen is working correctly.
Using the diagnose tool in Wacom Tablet Properties
- Open Wacom Tablet Properties.
- If you have more than one device connected to your system, select the device you are using the pen with from the Device list.
- Click About, and then click Diagnose.


The above screenshot is for descriptive purposes; it may not match your screen.
Note: Your device might not have all of the options listed.
- Hold your pen within 10 mm (0.4 inch) of the surface of the device while watching the Pointing Device Info.
- You should see a value appear after Proximity, Device Name, Device Type, and Device S/N (serial number).
- Move the pen along the surface of the device.
- As you move the pen, the X Data and Y Data values should change.
- Press on the surface with the pen tip and then with the eraser.
- As you are pressing, the Switches and Pressure values should change from approximately 0% to approximately 100% when you are pressing with full pressure.
- Press the tip, eraser, and each side switch, one at a time. When you are pressing each side switch, hold the pen tip slightly above the device surface. As you press each item, the Switches number should change to match these numbers:
- Pen tip = 1
- Pen lower side switch = 2
- Pen upper side switch = 3
- Pen eraser = 1
- Airbrush tip = 1
- Airbrush side switch = 2
- Airbrush eraser = 1
- Move the pen from a vertical position toward the right and then toward the left.
- The X Tilt value should change to approximately +60 when you move to the right.
- The X Tilt value should change to approximately -60 when you move to the left.
- Move the pen from a vertical position toward the bottom of the device and then toward the top of the device.
- The Y Tilt value should change to approximately +60 when you move toward the bottom.
- The Y Tilt value should change to approximately -60 when you move toward the top.
- If you are testing an Art Pen, place the pen tip on the surface of the device and slowly rotate the pen on its axis.
- The Rotation value should change as you rotate the pen.
![]() If you are testing an Airbrush, move the fingerwheel forward and backward.
If you are testing an Airbrush, move the fingerwheel forward and backward. - The Wheel value should decrease to approximately 0 when the fingerwheel is all the way forward.
- The Wheel value should increase to approximately 1000 when the fingerwheel is all the way backward.
Integrated Applications
Some software applications may directly control ExpressKey, Touch Ring or Rocker Ring settings, which may cause them to perform differently than the function set in Wacom Tablet Properties. Note: Not all pen displays have a Touch Ring or Rocker Ring.
- When an ExpressKey setting is overridden by an application, the ExpressKey will automatically update, using either Application Defined or the new function name. Some or all of the ExpressKeys may be overridden, depending on the application.
- When an application overrides the Touch Ring or Touch Strip, all its modes are affected. If an application overrides only some of the available functions, the remaining mode(s) are set to Skip. An integrated application will have control only when that application is active and in the foreground. When you close that application or select a new application pane to work in, your Wacom Tablet Properties settings are returned to their previous state.
- To review settings for the current front-most application, set an ExpressKey to Settings and press the key at any time.
Applications that have been integrated will typically give you an opportunity to disable this functionality when first using your Wacom device with the application. Refer to your application documentation for specific details how to customize or disable this feature. If that information is not available, you can use Wacom Tablet Properties to create application-specific settings that will override the behavior of the integrated application.
Express View
You can enable Express View to see the current settings for your ExpressKeys at any time.
- Check the Show Express View checkbox on the ExpressKeys tab.
- Lightly touch any ExpressKey to view the current ExpressKeys settings on your screen.
The display will fade out after 2 seconds on the screen.
To disable the display, uncheck the Show Express View box.
Some applications can override and control the ExpressKey functions.
The above screenshot is for descriptive purposes; it may not match your screen.

Opening Wacom Tablet Properties
You can customize your device and tools in Wacom Tablet Properties.
To open Wacom Tablet Properties:
- Windows 10: Click on the Windows Start button and select Wacom Tablet > Wacom Tablet Properties.
- Windows 8.1: Right-click in the bottom left-hand corner of the Start screen. Select Wacom Tablet > Wacom Tablet Properties.
- Windows 8.1 Classic View: Press the Windows key on your keyboard or select the Windows icon in the Charms bar to access the Start screen. Right-click in the bottom left-hand corner of the screen. Select Wacom Tablet > Wacom Tablet Properties.
- Windows 7: Click on the Windows Start button and select All Programs. Select Wacom Tablet > Wacom Tablet Properties.
- Mac: Open System Preferences from the Apple menu or from the Applications folder and click on the Wacom Tablet icon.
- Windows and Mac: If your device supports it, you can open Wacom Tablet Properties from the
- Wacom Desktop Center by clicking on the name of your device under My Devices and selecting one of the settings.
Note: The tabs and options that you see in Wacom Tablet Properties are different depending on your device.
Documents / ResourcesDownload manual
Here you can download full pdf version of manual, it may contain additional safety instructions, warranty information, FCC rules, etc.
Advertisement


Need help?
Do you have a question about the Intuos Pro and is the answer not in the manual?
Questions and answers