Table of Contents
Advertisement
///
Tomcat K8E
S2865
Version 1.1
Copyright
Copyright © TYAN Computer Corporation, 2004-2005. All rights reserved. No
part of this manual may be reproduced or translated without prior written
consent from TYAN Computer Corp.
Trademark
All registered and unregistered trademarks and company names contained in
this manual are property of their respective owners including, but not limited to
the following.
TYAN, Tomcat K8E are trademarks of TYAN Computer Corporation.
AMD, Opteron, and combinations thereof are trademarks of AMD Corporation.
AMI, AMIBIOS are trademarks of American Megatrends Inc.
Microsoft, Windows are trademarks of Microsoft Corporation.
SuSE,is a trademark of SuSE AG.
IBM, PC, AT, and PS/2 are trademarks of IBM Corporation.
®
Broadcom
is a trademark of Broadcom Corporation and/or its subsidiaries
ATI and Rage XL are trademarks of ATI Corporation
Notice
Information contained in this document is furnished by TYAN Computer
Corporation and has been reviewed for accuracy and reliability prior to printing.
TYAN assumes no liability whatsoever, and disclaims any express or implied
warranty, relating to sale and/or use of TYAN products including liability or
warranties relating to fitness for a particular purpose or merchantability. TYAN
retains the right to make changes to product descriptions and/or specifications
at any time, without notice. In no event will TYAN be held liable for any direct or
indirect, incidental or consequential damage, loss of use, loss of data or other
malady resulting from errors or inaccuracies of information contained in this
document.
1
http://www.TYAN.com
Advertisement
Table of Contents

Subscribe to Our Youtube Channel
Related Manuals for TYAN TOMCAT K8E


Summary of Contents for TYAN TOMCAT K8E
- Page 1 In no event will TYAN be held liable for any direct or indirect, incidental or consequential damage, loss of use, loss of data or other malady resulting from errors or inaccuracies of information contained in this document.
-
Page 2: Table Of Contents
Page 61 3.14 Load Fail-Safe/Optimized Defaults……………………………… Page 62 3.15 Supervisor/User Password Setting……………………………… Page 62 3.16 Save & Exit Setup /Exit without Saving………………………… Page 63 Chapter 4: Diagnostics Beep Codes……………………………………………………….. Page 65 Flash Utility………………………………………………………... Page 65 BIOS Post Code………………………………………………….. Page 66 http://www.TYAN.com... - Page 3 Chapter 5: Setting up RAID Configuration Setting up the BIOS……………………………………………… Page 71 Configuring the NVIDIA RAID BIOS…………………………… Page 73 Making a Driver Disk from TYAN CD………………………….. Page 80 Appendix Glossary Technical Support http://www.TYAN.com...
-
Page 4: Check The Box Contents
2 x Ultra-DMA-100/66 IDE cable 1 x IEEE1394a Cable 1 x USB2.0 cable 1 x Tomcat K8E user’s manual 1 x Tomcat K8E Quick Reference guide 1 x TYAN driver CD 1 x I/O shield 1 x NV RAID driver diskette (Depending on CD version) NOTE: If CD version is M2.2, the box contents include CD and diskette. -
Page 5: Chapter 1: Introduction Congratulations
CAD, Graphics Design, and High Bandwidth Video Editing, etc. Remember to visit TYAN’s Website at http://www.TYAN.com. There you can find information on all of TYAN’s products with FAQs, online manuals and BIOS upgrades. 1.2 - Hardware Specifications... - Page 6 •Three audio jacks •One COM port (via cable) • •Tyan 2x9 front-panel pin header Stacked two USB2.0 ports and one •2x25 pin TYAN SMDC pin header RJ45 (Marvell 88E1111-CAA PHy + Base-T nVIDIA MAC) 10/100/1000 •One Parallel pin header port with link/activity LED...
-
Page 7: Software Specifications
Microsoft Windows XP (64-bit) Microsoft Windows Server 2003 (32-bit) Microsoft Windows Server 2003 (64-bit) SuSE Professional 9.x SuSE Enterprise Server 9.0 RHEL3.0 Update 4 TYAN reserves the right to add support or discontinue support for any OS with or without notice. http://www.TYAN.com... - Page 8 NOTE: http://www.TYAN.com...
-
Page 9: Chapter 2: Board Installation
Chapter 2: Board Installation You are now ready to install your motherboard. The mounting hole pattern of the Tomcat K8E matches the ATX specification. Before continuing with installation, confirm that your chassis supports an ATX motherboard. How to install our products right… the first time The first thing you should do is reading this user’s manual. -
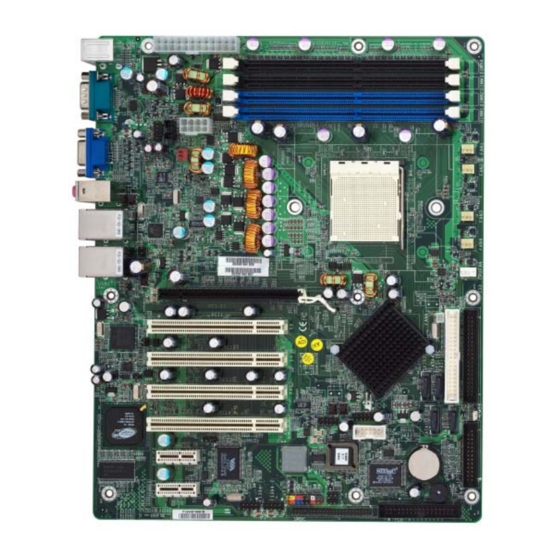
Page 10: Board Image
2.1- Board Image This picture is representative of the latest board revision available at the time of publishing. The board you receive may or may not look exactly like the above picture. http://www.TYAN.com... -
Page 11: Block Diagram
2.2 - Block Diagram Tomcat K8E (S2865) Block Diagram http://www.TYAN.com... -
Page 12: Board Parts, Jumpers And Connectors
This diagram is representative of the latest board revision available at the time of publishing. The board you receive may not look exactly like the above diagram. Jumper Legend OPEN - Jumper OFF, without jumper cover CLOSED – Jumper ON, with jumper cover http://www.TYAN.com... - Page 13 Chassis Fan Connector (Fan5) CPU_Fan Connector J30/J37/J31/J38 Serial ATA RAID Connectors PCI Slot Volt Select Header CD_in Connector J32/J33 IDE Connectors JP5/JP6 SMDC/ASF2.0 Select Header PCI-E1 PCI Express x16 Slot PCI 1/2/3/4 PCI Slots PCI-E2/E3 PCI Express x1 Slot http://www.TYAN.com...
- Page 14 RAGEXL PCI-E 2 PCI-E 2 J 10 BIOS SMSC PCI-E3 DME1737 JP5/JP6 J 11 JP5/JP6: SMDC/ASF2.0 Select Header Support ASF2.0, for LAN2 only (Default) Support SMDC card, for LAN2 only **Refer to p. 81 Appendix for information on SMDC. http://www.TYAN.com...
- Page 15 Use these headers to connect to the USB devices via the enclosed USB cable. J40: COM2 Header Use these pin definitions to connect a port to COM2. *TYAN does not provide cable for this header. It is designed for OEM use only. Signal Signal...
- Page 16 DME1737 J 11 J17/J28: Front Panel LAN1/LAN2 Link and Active LED Connectors J17 for LAN1, J28 for LAN2 Pin 1: LED+, Pin 2: LED- Use these headers to connect with the front panel link/activity LEDs for LAN1 and LAN2. http://www.TYAN.com...
- Page 17 Power off system and disconnect power supply from AC source Use jumper cap to close Pin_2 and 3 for several seconds to Clear CMOS Replace jumper cap to close Pin_1 and 2 Clear Reconnect power supply to AC source Power on system http://www.TYAN.com...
- Page 18 DIMM 2 DIMM 1 PCI E1 1 1 1 1 1 1 PCI 1 nVIDIA nForce Ultra PCI 2 JP2 8 PCI 3 PCI 4 RAGEXL PCI-E 2 PCI-E 2 J 10 BIOS JP10 SMSC PCI-E3 DME1737 J 11 JP11 http://www.TYAN.com...
- Page 19 JP3: PCI Slot Volt Select Header Select 3.3 volt for PCI slot Select 5 volt for PCI slot (Default) J9: CD_in Connector Connect CD-ROM (DVD) audio out. Pin 1: CD_in Left Pin 2: Ground Pin 3: Ground Pin 4: CD_in Right http://www.TYAN.com...
- Page 20 JP10: 1394 Enable/Disable Jumper Disable on-board 1394 Enable on-board 1394 (Default) JP11: VGA Enable/Disable Jumper Enable on-board VGA (Default) NOTE: If there is any VGA card in the PCI-E slot, the system will auto-detect PCI-E slot. Disable on-board VGA http://www.TYAN.com...
-
Page 21: Installing The Processor
Check our website for latest processor support. http://www.tyan.com TYAN is not liable for damage as a result of operating an unsupported configuration. The diagram is provided as a visual guide to help you install the socket processor and may not be an exact representation of the processor you have. -
Page 22: Heatsink Retention Frame Installation
The following diagram will illustrate how to install the most common CPU back plates: 1. Mounting screws 2. Heatsink retention frame 3. CPU socket 4. Motherboard PCB 5. Adhesive insulator material 6. Backplate assembly NOTE: Please see next section for specific instructions on how to install mounting bracket. http://www.TYAN.com... -
Page 23: Thermal Interface Material
CPU lid (applying too much will actually reduce the cooling). Always check with the manufacturer of the heatsink & processor to ensure the Thermal Interface material is NOTE compatible with the processor & meets the manufacturer’s warranty requirements http://www.TYAN.com... -
Page 24: Heatsink Installation Procedures
2. After tightening screws secure metal clip to plastic retention bracket center tab. Repeat for the other side of heatsink. 3. After securing metal clip to plastic retention bracket center tab, push down on plastic clip to lock plastic clip to side tab. http://www.TYAN.com... - Page 25 Repeat for other side. 2. Insert screw through metal clip. BE SURE METAL CLIP IS LOCKED ONTO RETENTION FRAME TAB. 3. Tighten screw through metal clip. Repeat on the other side. DO NOT OVER TIGHTEN. http://www.TYAN.com...
-
Page 26: Finishing Installing The Heatsink
(which should already be attached to the heatsink) to the motherboard. The following diagram illustrates how to connect fans onto the motherboard. Once you have finished installing all the fans you can connect your drives (hard drives, CD-ROM drives, etc.) to your motherboard. http://www.TYAN.com... -
Page 27: Tips On Installing Motherboard In Chassis
Some chassis’ include plastic studs instead of metal. Although the plastic studs are usable, TYAN recommends using metal studs with screws that will fasten the motherboard more securely in place. Below is a chart detailing what the most common motherboard studs look like and how they should be installed. -
Page 28: Installing The Memory
•All installed memory will be automatically detected and no jumpers or settings need to be set. •The Tomcat K8E supports up to 4GB of memory. •Registered Memory is not supported. * Not validated at the time of print and subject to change. - Page 29 To remove the memory module, simply push the latches outwards until the memory module pops up. Then remove the module. YOU MUST ALWAYS unplug the power connector from the motherboard before performing system hardware changes. NOTE Otherwise you may damage the board and/or expansion device. http://www.TYAN.com...
-
Page 30: Attaching Drive Cables
Attaching Serial ATA Cables The Tomcat K8E is also equipped with 4 Serial ATA (SATA) channels. Connections for these drives are also very simple. There is no need to set Master/Slave jumpers on SATA drives. - Page 31 Tyan has supplied two SATA cables and one SATA power adapter. If you are in need of other cables or power adapters please contact your place of purchase. The following pictures illustrate how to connect an SATA drive 1.SATA drive cable connection 2.
-
Page 32: Installing Add-In Cards
G0_B_ G0_B_ G0_B_ (32bit) AD26 INTC_B INTD_C INTD_D INTD_A Onboard T0_PC_ IEEE1394 AD22 INTD_C YOU MUST ALWAYS unplug the power connector from the motherboard before performing system hardware changes. NOTE Otherwise you may damage the board and/or expansion device. http://www.tyan.com... -
Page 33: Connecting External Devices
Mouse/Keyboard USB x 2 Serial Port S2865G2NR USB x2 + LAN Stacked PS/2 Mouse/Keyboard Serial Port VGA Port NOTE: Peripheral devices can be plugged straight into any of these ports but software may be required to complete the installation. http://www.tyan.com... - Page 34 The chart below illustrates the different LED states. 10/100/1000 Mbps LAN Link/Activity LED Scheme Left LED Right LED Link Green 10 Mbps Active Blinking Green Link Green Green 100 Mbps Active Blinking Green Green Link Green Yellow 1000 Mbps Active Blinking Green Yellow No Link http://www.tyan.com...
-
Page 35: Installing The Power Supply
2.14 - Installing the Power Supply There are two power connectors on your Tomcat K8E S2865. The Tomcat K8E S2865 requires that you have an EPS12V power supply that has a 24-pin and an 8-pin power connector. The Tomcat K8E also supports ATX 2.x and ATX12V power supplies (20-pin + 4-pin). - Page 36 NOTE http://www.tyan.com...
-
Page 37: Chapter 3: Bios Setup
The table below shows how to navigate in the setup program using the keyboard. Function Moves from one selection to the next Left/Right Arrow Keys Changes from one menu to the next Up/Down Arrow Keys Moves between selections Enter Opens highlighted section PgUp/PgDn Keys Changes settings http://www.tyan.com... -
Page 38: Getting Help
Chipset section unless you are absolutely sure of what you are doing. The Chipset defaults have been carefully chosen either by TYAN or your system manufacturer for best performance and reliability. Even a seemingly small change to the Chipset setup options may cause the system to become unstable or unusable. - Page 39 Supervisor / User Password Use this menu to set User and Supervisor Passwords. Save & Exit Setup Save CMOS value changes to CMOS and exit setup. Exit Without Saving Abandon all CMOS value changes and exit setup. http://www.tyan.com...
-
Page 40: Standard Cmos Features
¡ ÷ : Move Enter: Select +/-/PU/PD: Value F10: Save ESC: Exit F1: General Help F5: Previous Values F6: Fail-Safe Defaults F7: Optimized defaults Date / Time Setup System Date: Adjusts the system date. mmMonths ddDays yyYears System Time: Adjusts the system clock. hhHours (24hr. format) mmMinutes SSSeconds http://www.tyan.com... - Page 41 None / 360K, 5.25in / 1.2M, 5.25in / 720K, 3.5in / 1.44M, 3.5in / 2.88M, 3.5in Halt On Determines if the computer should stop when an error is detected during power up. No Errors / All Errors / All, But Keyboard / All, But Diskette / All, But Disk/Key http://www.tyan.com...
-
Page 42: Advanced Bios
[Press Enter] Console Redirection [Disabled] Small Logo (EPA) Show ¡ ô ¡ õ ¡ ö ¡ ÷ : Move Enter: Select +/-/PU/PD: Value F10: Save ESC: Exit F1: General Help F5: Previous Values F6: Fail-Safe Defaults F7: Optimized defaults http://www.tyan.com... - Page 43 3.7.3 CD-ROM Boot Priority (Option) This item allows you to select the CD-ROM boot priority. It is available only when the CD-ROM drive is connected. Phoenix-AwardBIOS CMOS Setup Utility CD-ROM Boot Prioiry 1. Ch1 M. DVD-ROM DDV1621 Item Specific Help http://www.tyan.com...
- Page 44 This feature determines how Gate A20 is used to address memory above 1MB. When set to Fast, the motherboard chipset controls the operation of Gate A20. But when set to Normal, a pin in the keyboard controller controls Gate A20. Fast / Normal http://www.tyan.com...
- Page 45 This BIOS feature determines how systems with more than 64MB of memory are managed. A wrong setting can cause problems like erroneous memory detection. Non-OS2 / OS2 Installed O/S This feature is used to select Linux if your are running Linux operation systems. Others / Linux http://www.tyan.com...
- Page 46 This feature allows you to select the baud rate of transfer. Agent Address Address connection 3F8h/2F8h/3E8h/2E8h Agent after boot Keep Agent running after OS boot. Enabled / Disabled Small Logo (EPA) Show This option toggles the display of the EPA Energy Star logo at POST. Enabled / Disabled http://www.tyan.com...
-
Page 47: Advanced Chipset
1x / 2x / 3x / 4x / 5x / Auto HT Width This feature is used to set the Hyper Transport width. ¡ õ 8 ¡ ô 8 / ¡ õ 16 ¡ ô 8 /¡ õ 8 ¡ ô 16 / ¡ õ 16 ¡ ô 16 http://www.tyan.com... -
Page 48: Dram Configuration
DRAM starts to carry out a read command after receiving it. This also determines the number of CLKs for the completion of the first part of a burst transfer. In other words, the lower the latency, the faster the transaction. 2 / 2.5 / 3 http://www.tyan.com... - Page 49 At least one / All are ECC MCE enable This option is used to enable the MCE (memory check exception) function for ECC. Disabled / Enabled Chip-Kill mode enable This option is used to enable the function of Chip-Kill mode. Disabled / Enabled http://www.tyan.com...
- Page 50 Enabling this option will cause the BIOS code from ROM to be copied on to the much faster RAM at location F0000h-FFFFFh, thus increasing system performance. However, if any program writes to this memory area, a system error may result. Disabled / Enabled http://www.tyan.com...
-
Page 51: Integrated Peripherals
[Standard] Parallel Port Mode x ECP Mode Use DMA ¡ ô ¡ õ ¡ ö ¡ ÷ : Move Enter: Select +/-/PU/PD: Value F10: Save ESC: Exit F1: General Help F5: Previous Values F6: Fail-Safe Defaults F7: Optimized defaults http://www.tyan.com... -
Page 52: Ide Function Setup
DMA driver (Windows 95 OSR2 or a third party IDE bus master driver). Auto / Disabled IDE DMA transfer access This feature is used to enable the function of IDE DMA transfer access. Disabled / Enabled http://www.tyan.com... - Page 53 Primary/Secondary RAID. Enabled / Disabled NOTE: Please refer to p. xx for information on how to make a NV RAID driver diskette from TYAN CD. OhChip USB This setting is used to configure the version of OnChip USB. Disabled / V1.1+V2.0 / V1.1...
- Page 54 Select an address and corresponding interrupt for the first serial port. 3F8/IRQ4 / 2F8/IRQ3 / 3E8/IRQ4 / 2E8/IRQ3 / Auto Onboard Serial Port 2 Select an address and corresponding interrupt for the second serial port. 3F8/IRQ4 / 2F8/IRQ3 / 3E8/IRQ4 / 2E8/IRQ3 / Auto http://www.tyan.com...
-
Page 55: Power Management Setup
[Disabled] AMD Cool’n’Quiet/Power Now [BUTTON ONLY] POWER ON Function ¡ ô ¡ õ ¡ ö ¡ ÷ : Move Enter: Select +/-/PU/PD: Value F10: Save ESC: Exit F1: General Help F5: Previous Values F6: Fail-Safe Defaults F7: Optimized defaults http://www.tyan.com... - Page 56 This feature is used to enable the function of intruder detection. Enabled / Disabled PowerOn After Pwr-Fail This option defines the state of the system when power fails and returns again. If On is selected, the system automatically switches on when power is resumed. http://www.tyan.com...
- Page 57 Auto / Disabled Power on Function This option defines how the system can be waked up from the sleep mode. Button only / keyboard+BTN / KB+Mouse+BTN / Mouse+BTN http://www.tyan.com...
-
Page 58: Pnp/Pci Configuration
DMA assignments of all of the boot and PNP devices in the system. If you set this option to Manual, you will be able to manually assign all IRQ and DMA information. Auto (ESCD) / Manual IRQ Resources This option is used to manually assign IRQ resources. http://www.tyan.com... -
Page 59: Pc Health Status
CPU Fan Speed Fan3 Speed Fan2 Speed Fan1 Speed ¡ ô ¡ õ ¡ ö ¡ ÷ : Move Enter: Select +/-/PU/PD: Value F10: Save ESC: Exit F1: General Help F5: Previous Values F6: Fail-Safe Defaults F7: Optimized defaults http://www.tyan.com... - Page 60 45¢ J / 50¢ J / 55¢ J / 60¢ J Min PWM Duty Cycle Set This item allows you to set minimum PWM Duty Cycle. 0% / 30% / 40% / 50% http://www.tyan.com...
-
Page 61: Frequency/Voltage Control
Default if you are not sure. Default / +0.02V / +0.04V / +0.06V DRAM Voltage Regulator This option controls how much voltage is supplied to your DRAM. Select Default if you are not sure. Default / +0.01V / +0.02V / +0.03V http://www.tyan.com... -
Page 62: Load Fail-Safe/Optimized Defaults
Setup freely. When a password has been enabled, you will be prompted to enter it every time you try to enter Setup. This prevents an unauthorized person from changing any part of your system configuration. http://www.tyan.com... -
Page 63: Save & Exit Setup /Exit Without Saving
Setup selections stored in CMOS. After saving the values the system is restarted again. Exit without Saving This allows you to exit Setup without storing in CMOS any change. The previous selections remain in effect. This exits the Setup utility and restarts your computer. http://www.tyan.com... - Page 64 NOTE: http://www.tyan.com...
-
Page 65: Chapter 4: Diagnostics
BIOS flash failure, you must contact your dealer for a replacement BIOS. There are no exceptions. TYAN does not have a policy for replacing BIOS chips directly with end users. In no event will TYAN be held responsible for damages done by the end user. -
Page 66: Bios Post Code
Program chipset default values into chipset. Chipset default values are MODBINable by OEM customers. 16h: Initial onboard clock generator if Early_Init_Onboard_Generator is defined. See also POST 26h. 18h: Detect CPU information including brand, SMI type (Cyrix or Intel) and CPU level (586 or 686). http://www.tyan.com... - Page 67 Test DMA Channel 0. 37h: Test DMA Channel 1. 39h: Test DMA page registers. 3Ch: Test 8254 3Eh: Test 8259 interrupt mask bits for channel 1. 40h: Test 8259 interrupt mask bits for channel 2. 43h: Test 8259 functionality. http://www.tyan.com...
- Page 68 2. Auto assign ports to onboard COM ports if the corresponding item in Setup is set to “AUTO” 6Fh: 1. Initialize floppy controller 2. Set up floppy related fields in 40:hardware. 75h: Detect & install all IDE devices: HDD, LS120, ZIP, CDROM….. http://www.tyan.com...
- Page 69 Program P6 class write combining 95h: Update keyboard LED & typematic rate 96h: Build MP table Build & update ESCD Set CMOS century to 20h or 19h Load CMOS time into DOS timer tick Build MSIRQ routing table FFh: Boot attempt (INT 19h) http://www.tyan.com...
- Page 70 NOTE: http://www.tyan.com...
-
Page 71: Setting Up The Bios
Chapter 5: Setting up RAID Configuration The Tomcat K8E S2865 provides support for NVIDIA RAID 0, 1, and 0+1. The RAID (Redundant Array of Independent Disks) technology uses multiple drives to either increase total disk space or to offer data protection. - Page 72 ¡ ô ¡ õ ¡ ö ¡ ÷ : Move Enter: Select +/-/PU/PD: Value F10: Save ESC: Exit F1: General Help F5: Previous Values F6: Fail-Safe Defaults F7: Optimized defaults Use the arrow keys to select the RAID Config. http://www.tyan.com...
-
Page 73: Configuring The Nvidia Raid Bios
RAID prompt appears as part of the system POST and boot process prior to loading the OS. You have a few seconds to press F10 before the screen disappears. Press F10. The NVIDIA RAID utility – Define a New Array screen appears. http://www.tyan.com... - Page 74 Striping block size is given in kilobytes, and affects how data is arranged on the disk. It is recommended to leave this value at the default Optimal, which is 64KB, but the values can be between 4 KB and 128 KB (4, 8, 16, 32, 64, and 128 KB) http://www.tyan.com...
- Page 75 Stripping Block: Optional Free Disks Array Disks Disk Model Name Disk Model Name 1.0M ST380023AS [¡ ÷ ] Add 1.1M ST380023AS [¡ ö ] Del [F6] Back [F7] Finish [TAB] Navigate [ ¡ ô ¡ õ ] Select [Enter] Popup http://www.tyan.com...
- Page 76 The Array List screen appears, where you can review the RAID arrays that you have set up. NVIDIA RAID Utility - Array List - Boot Status Vendor Array Model Name Healthy NVIDIA MIRROR 74.53G [Ctrl-X] Exit [ ¡ ô ¡ õ ] Select [B] Set Boot [N]New Array [ENTER] Detail http://www.tyan.com...
- Page 77 If you want to mark this disk as empty and wipe out all its contents, press C. At the prompt, press Y to wipe out all the data, otherwise press N. Press Enter again to go back to the previous screen and then press F10 to exit the RAID setup. http://www.tyan.com...
-
Page 78: Installing The Raid Drivers
Select the SCSI Adapter you want from the following list, or press ESC to return to the previous screen. NVIDIA RAID CLASS DRIVER (required) NVIDIA NForce Storage Controller (required) Enter=Select F3=Exit http://www.tyan.com... - Page 79 NOTE: Each time you add a new hard drive to a RAID array, the RAID driver will have to be installed under Windows once for that hard drive. After that, the driver will not have to be installed. http://www.tyan.com...
- Page 80 5.3 Making a Driver Disk from TYAN CD Follow the steps below to make a NV RAID driver diskette from the TYAN CD provided. Start the system and insert the TYAN CD into the CD-ROM drive to boot from CD. You will see the following menu. Then press 1 and Enter to boot the system to Tyan diskette maker.
- Page 81 The following picture pops up after selecting nVidia. TYAN Driver Diskette Maker ** nVidia** ====Choose Chipset Model==== nVidia NVRAID EXIT After selecting nVidia, selecting the OS to start the diskette making. TYAN Driver Diskette Maker ====nVidia NVRAID SATA and RAID Driver====...
- Page 82 Follow the instruction on menu to insert a diskette and press [ENTER]. Please insert a formatted diskette into A:/ and press [ENTER] Writing image to drive A: Track: 36 Hoad: 8 Sector: 1 Using "ESC" key to quit the Tyan diskette maker. The system will automatically restart. http://www.tyan.com...
- Page 83 Tyan SMDC is not a peripheral card. Unlike regular peripheral card such as AGP card, Network card or SCSI card, SMDC does not require any hardware specific driver. As long as a standby power comes into the system, SMDC will begin looking after the system.
- Page 84 Features of Tyan Server Management Monitor various system components remotely - such as fans, processor temperature, and more Remote power on and power off Console redirect -the ability to view system remotely Alert and error actions -such as audible beep, e-mail, power down and reboot...
- Page 85 The CPU can manipulate data in a buffer before copying it to a disk drive. While this improves system performance (reading to or writing from a disk drive a single time is much faster than doing so repeatedly) there is the possibility of http://www.tyan.com...
- Page 86 CPU. This frees up CPU resources for other tasks. As with IRQs, it is vital that you do not double up devices on a single line. Plug-n-Play devices will take care of this for you. http://www.tyan.com...
- Page 87 BIOS, it is a ROM chip which can, unlike normal ROM, be updated. This allows you to keep up with changes in the BIOS programs without having to buy a new chip. TYAN’s BIOS updates can be found at http://www.tyan.com ESCD (Extended System Configuration Data): a format for storing information about Plug-n-Play devices in the system BIOS.
- Page 88 PnP (Plug-n-Play): a design standard that has become ascendant in the industry. Plug-n-Play devices require little set-up to use. Devices and operating systems that are not Plug-n-Play require you to reconfigure your system each time you add or change any part of your hardware. http://www.tyan.com...
- Page 89 AcceleRAID 150, 200 or 250, to implement RAID on a system board-embedded SCSI bus or a set of SCSI busses. SISL: SCSI Interrupt Steering Logic ( LSI ) (only on LSI SCSI boards) Sleep/Suspend mode: in this mode, all devices except the CPU shut down. http://www.tyan.com...
- Page 90 CPUs without damaging the sensitive CPU pins. The CPU is lightly placed in an open ZIF socket, and a lever is pulled down. This shifts the processor over and down, guiding it into the board and locking it into place. http://www.tyan.com...
-
Page 91: Technical Support
(which can have expensive consequences). If these options are not available for you then Tyan Computer Corporation can help. Besides designing innovative and quality products for over a decade, Tyan has continuously offered customers service beyond their expectations. - Page 92 Authorization (RMA) number. The RMA number should be prominently displayed on the outside of the shipping carton and the package should be mailed prepaid. TYAN will pay to have the board shipped back to you. Notice for the USA Compliance Information Statement (Declaration of...
Need help?
Do you have a question about the TOMCAT K8E and is the answer not in the manual?
Questions and answers