
Related Manuals for maxwatt MX9000ES


Summarization of Contents
Initial Setup and Safety
Unpacking and Inspection
Inspect generator upon delivery for missing parts and damage.
Safety Signs
Comply with safety signs and symbols fitted to the generator and manual.
General Warnings and Disclaimers
Hazardous Gas and Electrical Safety
Warnings about Carbon Monoxide poisoning and Electric Shock/Electrocution hazards.
Fire and Explosion Prevention
Do not overload. Operate in well-ventilated areas. Keep muffler away from combustibles.
Operation Safety Rules
Work Area Safety
Operate outdoors only. Avoid explosive atmospheres. Keep area clean and lit.
Personal Safety
Stay alert, use common sense. Do not operate when tired or under influence.
Generator Safety Rules
Safe Operation Practices
Adhere to intended use, avoid operating under influence, use safety equipment, do not modify.
Operational Hazards and Precautions
Carbon Monoxide and Exhaust Dangers
CO poisoning and other exhaust risks. Operate outdoors, ensure ventilation.
Electrical Safety and Fire Prevention
Avoid wet conditions, bare wires, sparks, and smoking near the generator.
Service and Fueling Safety
Proper Use and Fueling Precautions
Use equipment properly. Dissipate static charge before fueling and use portable containers.
Static Electricity Hazards during Fuelling
Sources of Static Charge
Hazards from ungrounded containers, flowing petrol, and personal static charge.
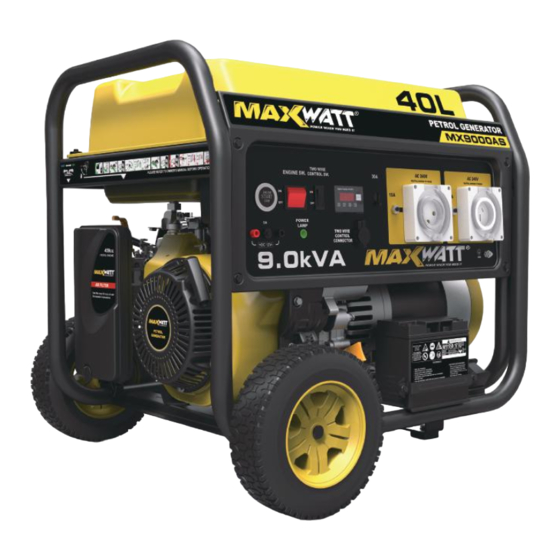
Key Control Panel Features
Indicators and Protectors
Low oil, digital meter, thermal protector, DC breaker, RCBO switch functions.
Outlets and Terminals
12V outlet, 240V AC outlets, and ground terminal descriptions.
Assembly Instructions
Preparation and Component Attachment
Remove shipping bracket, attach wheels, feet, and battery as per instructions.
Generator Set Up
Power Load Planning
Plan power load to not exceed generator's rate capacity. Calculate running and start wattage.
Portable Power Source Setup
Plug devices directly into generator outlets. Match device to outlet rating. Do not overload.
Building Backup Setup
Arrange for licensed electrician to connect generator via transfer switch for backup power.
Site Selection and Extension Cords
Extension Cord Guidelines
Use only Australian approved outdoor-rated, grounded extension cords. Heavy duty required.
Site Requirements
Position generator on a dry, firm, level surface. Ensure adequate clearance and ventilation.
Ventilation and Exhaust Clearance
Outdoor Operation and Ventilation
Operate outdoors, ensure unobstructed airflow for cooling. Maintain clearance from structures.
Exhaust Safety Distances
Keep exhaust system at least 2 meters from combustibles. Equip with spark arrestor if needed.
Environmental and Operational Conditions
Wet Conditions and Dust
Avoid operating in rain, snow, or dust. Hearing protection recommended due to noise levels.
Temperature Considerations
Generator operates best within specific temperature ranges. Power may decrease at high temperatures.
Power Loading Management
Starting Power Consumption
Motorized appliances draw more power at start. Consult equipment for specific requirements.
Starting the Engine
Engine Oil and Fueling Procedures
Fill with correct oil, check level. Turn OFF before fueling, keep away from ignition sources.
Using the Generator Safely
Safe Operation Practices
Follow safety guidelines for operation, avoid hazards, do not allow unqualified persons to operate.
Generator Location and Clearance
Optimal Placement and Ventilation
Operate outdoors, ensure unobstructed airflow for cooling. Maintain clearance from structures and exhaust.
Exhaust Safety Distances
Keep exhaust system at least 2 meters from combustibles. Equip with spark arrestor if needed.
Engine Starting Procedures
Pre-Start Checks and Fuel Valve Operation
Disconnect loads, ensure flat surface, turn off master switch, turn fuel valve ON.
Starting Methods
Recoil Start Operation
Pull starter grip lightly, then pull cord briskly. Move choke lever to RUN when engine starts.
Engine Speed and Load Connection
Connecting Loads Safely
Connect loads carefully to avoid overloading the generator. Consider starting power requirements.
Connecting Loads
AC and DC Connections
Connect appliances to AC outlets. Use 12V DC outlet for charging lead acid batteries.
Stopping the Generator
Carbon Build Up Prevention
Running at low loads for long periods can cause carbon build-up on the spark plug.
Storage Procedures
Preparation for Storage
Disconnect loads, turn off fuel, cool engine, choose location, remove spark plug, disconnect battery.
Regular Operation During Storage
Operate engine regularly to maintain parts.
Maintenance and Repair
Service Safety Precautions
Turn off generator, disconnect plug/wire before servicing. Use qualified technicians and approved parts.
Inspection and Cleaning Tasks
Inspect fuel system for leaks. Clean and inspect spark arrester if blocked by carbon deposits.
Generator Cleaning and Component Maintenance
Cleaning and Filter Maintenance
Keep generator clean. Maintain petrol tank filter, air filter, and replace fuel filter as needed.
Spark Plug Replacement
Proper spark plug clearance ensures normal running. Replace plug if necessary.
Maintenance Schedule and Recommendations
General Maintenance Advice
Regular maintenance improves performance and extends life. Service by approved dealer.
Troubleshooting Guide
Common Generator Issues and Solutions
Guide for common issues like engine not starting, no output, overload, overheating, rough operation.
Warranty Conditions
Limited Warranty Policy
"Walk-in" warranty policy. Take generator to nearest service agent. Transportation charges borne by consumer.
Service Agent Responsibilities
Service agent repairs/replaces defective parts at their discretion. Repairs are free of charge.
Warranty Exclusions
Limited Parts Warranty
Table listing parts with potential out-of-box failures (less than 20 running hours).
Warranty Terms and Conditions
Warranty Service Process
Return to store for repair. Manufacturer defect repairs are free. Lead time 14-21 days. Proof of purchase required.
Need help?
Do you have a question about the MX9000ES and is the answer not in the manual?
Questions and answers