
Related Manuals for maxwatt MX3200i


Summary of Contents for maxwatt MX3200i
-
Page 2: Table Of Contents
TABLE OF CONTENTS GENERAL SAFETY INFORMATION......Page 4 ELECTRICAL SAFETY INFORMATION......Page 5 SAFETY STICKERS AND EXPLANATIONS....Page 7 SPECIFICATIONS............Page 5 PRE-OPERATING INSPECTION........Page 9 CONTROLS AND FEATURES........Page 10 PRE-OPERATION CHECKS..........Page 15 ELECTRICAL CONNECTION........Page 20 MAINTENANCE.............Page 47 10. TRANSPORTING AND STORAGE........Page 52 11. TROUBLE SHOOTING...........Page 58 12. - Page 3 ABOUT YOUR GENERATOR Thank you for purchasing a MAXWATT generator (hereinafter referred to as “the generator”). This generator is suitable for use on various trade worksites, recreational uses such as camping and for use as backup power whether residential or commercial.
- Page 4 The owner/ user must pay special attention to these instructions. MAXWATT is constantly improving its products. All information supplied in this manual is based on the latest product information available at the time of printing. The specifications outlined herein are subject to change without notice or obligation.
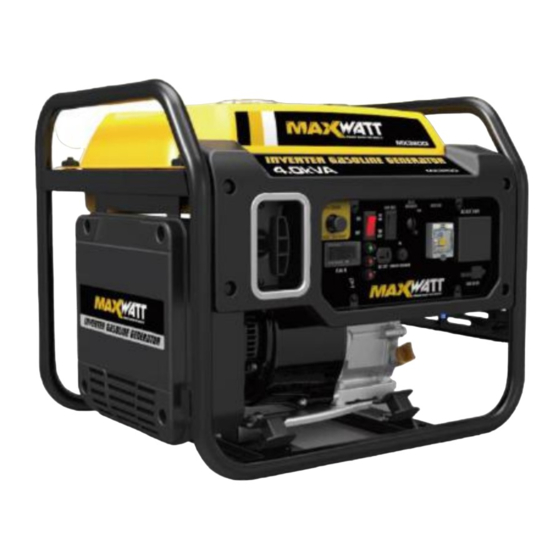
- Page 5 SPECIFICATIONS Model MX3200i Displacement 230cc Type 4-Stroke OHV Running watts 3000 Starting watts 3300 AC Load 240V Phase Single Frequency 50 Hz Fuel Capacity 3.96 gal. (15 L) Net Weight 96.6 lb. (43.9 kg) HAZARD SIGNAL WORD DEFINITIONS...
- Page 6 For any queries on the above, please contact Gentech Industries, the official service agent for all MAXWATT generators and water pumps. The range of MAXWATT generators is safe and reliable, but incorrect usage of these products may cause personal injury and damage to the machine.
- Page 7 without oil. For oil type, please see “Recommended Oil Type” section of this manual on page 9. Fresh regular RON 91 fuel must be used in this unit. DO NOT use Premium or Ethanol based fuels. SAFETY SIGNS Comply with the instructions provided by the safety signs and symbols fitted to the generator and in this manual.
- Page 8 taste it. ONLY run an engine OUTDOORS and AWAY from building air intakes. NEVER run an engine inside any enclosed or semi-enclosed spaces, including homes, basements, garages, sheds, boxes, RV’s, boats or pick-up truck beds. These spaces can trap poisonous gases, EVEN if you run a fan or open windows.
- Page 9 indicated by a NEGATIVE, NEG or (-) first. Reconnect the cable last. HEAT Unintentional spark can result in fire or electric shock. FIRE / EXPLOSION DO NOT overload the engine (per rate capacity) and OPERATE ONLY in an area with adequate cooling ventilation so the engine does not overheat.
- Page 10 the generator’s rate capacity. INSPECT COMPONENTS Closely inspect to make sure that there are not any components missing or damaged. ARRANGE FOR PROFESSIONAL INSTALLATION of a transfer switch if you will be connecting the generator to your building’s system. GENERAL SAFETY RULES FOR OPERATION Save all warnings and instructions for future reference.
- Page 11 WORK AREA SAFETY Intended for outdoor use only. DO NOT operate in confined spaces or indoors as carbon monoxide released from the exhaust can kill. DO NOT operate in explosive atmospheres such as in the presence of flammable liquids, gases or dust.
- Page 12 Use personal protection equipment. Always wear eye protection. Wear approved safety impact eye goggles, dust mask, non-skid safety shoes, hard hat and hearing protection for appropriate conditions. DO NOT overreach. Keep proper footing and balance at all times. This enables better control of the generator in unexpected situations.
- Page 13 GENERATOR SAFETY RULES DO NOT force the generator. Use the correct generator for your application. The correct generator will do the job better and safer at the rate for which it was designed. DO NOT use the generator if the engine switch does not turn it on and off.
- Page 14 DO NOT operate the engine unless all safety overs, guards and barriers are in place and in good working order – and that all controls are properly adjusted for safe operation. DO NOT operate the generator with damaged, missing or broken parts.
- Page 15 instructions on how to do this.) The running generator gives off carbon monoxide, a poisonous gas that can kill you. You CANNOT smell it, see it, or taste it. Follow all instructions for site selection and positioning of the generator and avoid inhaling the exhaust.
- Page 16 DO NOT operate the engine or handle any electrical equipment while standing in water, while barefoot, while hands are wet or while in the rain or snow. An electric shock may result. Avoid contact with bare wires, terminals, connections, etc.
- Page 17 The equipment may only be used, maintained or repaired by those persons who understand and have been instructed about the potential dangers. Independent changes in the equipment cancel any manufacturer’s liability for any damages that result from these changes. APPROPRIATE USE ...
- Page 18 Many objects can accumulate and retain a static electric charge. Objects made of non-conductive materials (e.g. plastics) easily accumulate and retain static electrical charge, as can objects made of conductive material (e.g. metal, water) if they are not electrically grounded. To avoid static electricity while fuelling, certain steps must be followed before and during the fuelling process in order to minimise and safely dissipate static charge build-up:...
- Page 19 TYPICAL SOURCES OF STATIC ELECTRIC HAZARDS DURING FUELLING The following objects can accumulate a static electric charge and cause an ignition spark in typical fuelling situations: Ungrounded tanks/containers: Any ungrounded fuel tank or container can accumulate a static electric charge as a result of contact with other objects or friction during transportation.
- Page 20 the grounded petrol dispenser nozzle. A person dispensing the petrol can carry a static electric charge on their body, typically resulting from contact with their car seat or electronics. The static electricity can discharge a spark between that person’s hand and either the grounded dispenser nozzle or the fuel tank opening.
- Page 21 Make sure you plug each electrical device/appliance into the correct generator outlet based on the device’s plug configuration and voltage/amperage rating. NEVER exceed the amperage rating of an outlet. Note: You must NOT overload the generator. Overloading may cause serious damage to the generator and attached electrical devices.
- Page 22 power needs. Note: Regardless of whether you use your generator as a back-up power source connected to a building or as a portable power source, you MUST NOT overload the generator. Overloading may cause serious damage to the generator and attached electrical devices.
- Page 23 Please consult a qualified electrician, electrical inspection or the local agency having jurisdiction: In some areas, generators are required to be registered with local utility companies. If the generator is used at a construction site, there may be additional requirements that must be observed.
- Page 24 If the generator is not grounded through your building’s system, follow the procedure below. This procedure can only be carried out by a licensed electrician. Drive a ¾” or 1” copper pipe or rod into the ground close to the generator. The pipe/rod must penetrate moist earth –...
- Page 25 EXTENSION CORDS Extension cords may be used to power devices that are located at a distance from the generator. However, use only Australian approved outdoor-rated, grounded extension cords. Locate the generator in a convenient place and where possible, avoid long extension leads and possible damage to leads by pedestrian or vehicular traffic.
- Page 26 SELECT A SUITABLE SITE Before using the generator, you must select a suitable OUTDOOR location for installation and operation that meets the following criteria: DRY, LEVEL SURFACE The generator should be positioned on a dry, firm and level surface. Ensure that the generator sits level and will not slide or shift during operation.
- Page 27 Ensure that working, battery-operated or battery back-up carbon monoxide alarms are used in any dwelling/structure that is in close proximity to the running operator. Note: This generator is NOT designed or approved for use in vehicles or marine applications. Never run the generator inside RVs or other vehicles such as boats or on pick-up truck beds.
- Page 28 Do not allow debris to accumulate and block airflow. Do not operate with a tarp, blanket, or cover surrounding the generator. HOT EXHAUST CLEARANCE Make sure your generator’s exhaust system is at least 2 meters from all combustible materials and buildings/ structures.
- Page 29 Make sure that all parts of the canopy are at least 2m from the exhaust and allow for adequate clearance above the generator so that heat does not build up. OPERATE AWAY FROM DUST/DIRT Do not use the generator in extremely dusty or dirty conditions. Excessive dust and dirt can cause premature failure of the machine.
-
Page 30: Safety Stickers And Explanations
must always be operated outdoors, in a well-ventilated area and away from doors, windows and other vents. When operated above 25 degrees Celsius, there may be a decrease in power. Maximum wattage and current area subject to and limited by such factors as fuel BTU content, ambient temperatures, altitude, engine condition etc. - Page 31 POWER LOADING MANAGEMENT Your generator MUST be sized properly to provide both the running and starting (surge) wattage of the devices you will be powering. Before using your generator, determine the running and starting wattage requirements of all the electrical devices you will be powering simultaneously.
- Page 32 Use the following formula to convert voltage and amperage to watts: Volts x Amps = Watts To prolong the life of your generator and attached devices, follow these steps to add electrical load: 1. Start the generator without any electrical load attached.
- Page 33 exceeds the generator’s capacity, it may be necessary to group one or more of the tools and/or equipment for connection to a separate generator. Once the generator is running, simply connect the power cords of 120V AC dual outlets and/or the power cord of a 12V DC tool to the DC terminals.
- Page 34 Guidance for starting wattages is provided in the table’s footnotes. To size your generator correctly, you need to use watts – here are some useful calculations: Watts = Volts x Amps. Example: 240 Volts x 5 Amps = 1200 watts.
-
Page 35: Controls And Features
2. CONTROLS AND FEATURES... - Page 36 CONTROL FUNCTIONS LOW IDLE MODE When the switch is in the “ON” position the throttle controls the engine speed according to the connected electrical load. The results are better fuel consumption and less noise. When the switch is in the” OFF” position the engine runs at 4,500 rpm regardless of the electrical load.
- Page 37 Overload Alarm (Red) The Overload Alarm comes on when a connected device requires more power than the generator is able to produce. The Output Indicator (Green) will go off and the Overload Alarm (Red) will stay on, but the engine will continue to run. Caution Do not overload the generator.
- Page 38 After checking, restart the engine. Note: The Overload Alarm may come on for a few seconds when first using electrical devices that require a large starting current, such as compressors, pumps or refrigerators. When starting the unit, if the Low Oil Alarm light flickers and the engine will not start, you will need to add engine oil before attempting to restart the engine.
- Page 39 12V 8A DC The 12V 8A DC Output is provided for battery charging. Follow the instructions in the owner’s manual for the battery charging procedures. 8A DC Circuit Breaker The 8A DC Circuit Breaker turns off automatically if the current exceeds 8A.
-
Page 40: Pre-Operation Checks
PRE-OPERATION CHECKS UNPACK THE GENERATOR: Remove the generator from its packaging. Inspect the generator to ensure that no damage has incurred in shipping or handling. If the unit appears to be damaged do not add oil or fuel or attempt to start the generator. - Page 41 In order to add engine oil, you will need to remove the side panel from the generator see Figure 1. Place the generator on a level surface.DO NOT tilt the generator while adding oil. It can cause you to overfill the oil and or cause the oil leak into areas in which it is not intended.
- Page 42 RECOMMENDED ENGINE OIL: Only use 4 stroke automotive oil (API or SE) alternatively you can use a higher grade (SG, SH or SJ). SAE 15W-40 is recommended for general all temperature use. If single viscosity oil is used, select the appropriate viscosity for the average temperature in your area.
- Page 43 Screw on the fuel cap and wipe away and spilled fuel. Note: Use only unleaded fuel, the use of leaded fuel will cause severed damage to the internal engine parts. After filling the fuel ensure that the fuel tank cap is securely tightened STARTING THE ENGINE: ALWAYS OPERATE THE GENERATOR IN A...
- Page 44 Pull choke lever out to the “START” position. Grasp the carrying handle firmly to prevent the generator from falling over when pulling the recoil starter. Pull the recoil starter slowly until it is engaged and then pull it briskly. After the engine starts, warm up the engine until the engine does not stop when the choke knob is returned to its original position.
- Page 45 STOPPING THE ENGINE: Stopping the engine whilst in the “generator” function: Disconnect the load from the AC receptacle. Turn the engine switch to the “OFF” position Turn the fuel switch off. Turn the engine switch to the “OFF” position. Turn the fuel switch off. BATTERY CHARGING:...
- Page 46 4.6.1 Start the engine first and allow it to reach idle before connecting the generator to the battery. Battery Charging is performed using the 12V DC outlet only. 4.6.2 Be sure the Throttle switch is turned “OFF” while charging the batteries. 4.6.3 Be sure to connect the red battery charger lead to the positive (+) battery terminal, and connect the black lead to the negative (-)
-
Page 47: Maintenance
4.6.9 Refer to the owner’s manual of the battery to determine charging times. Note: Never start or stop the generator with electrical devices plugged in or turned on. MAINTENANCE: For all your service, maintenance and warranty queries please contact Gentech Industries. Please refer to the back page for all contact details. - Page 48 keep your generator in the safest and most efficient condition possible. 5.1 PERIODIC MAINTENANCE: 5.2 SPARK PLUG MAINTENANCE: 5.2.1. Remove the spark plug cable from the spark plug. 5.2.2. Use a spark plug socket tool , or a...
- Page 49 13/16 in. or 21 mm socket (not included) to remove the plug. 5.2.3. Inspect the electrode on the plug. It must be clean and not worn to produce the spark required for ignition. 5.2.4. Make certain the spark plug gap is 0.7 - 0.8 mm or (0.028 - 0.031 in.).
- Page 50 Change oil when the engine is warm. Refer to the oil specification to select the proper grade of oil for your operating environment. Remove the oil drain plug Allow the oil to drain completely. Replace the drain plug. Remove oil fill cap/dipstick to add oil. Add up to 0.6 qt.
- Page 51 Remove the foam element -1. Wash the foam element in solvent and dry it. Oil the foam element and squeeze out excess oil. The foam element should be wet but not dripping. NOTE: Do not wring out the foam element when squeezing it as this could cause it to tear.
- Page 52 5.5 MUFFLER SCREEN AND SPARK ARRESTOR MAINTENANCE This should be performed every 6 months or 100 hours. The air filter may need to be cleaned more frequently when using in unusually wet or dusty areas. Remove the screws 1 and then remove the cover 2.
- Page 53 Check the muffler screen and spar arrester replace if they are damaged. Install the spark arrester. Install the muffler cap. Install the cover and tighten the screws. 5.6 FUEL FILTER MAINTENANCE This should be performed every 12 months or 300 hours. 1.
- Page 54 Warning! Gasoline is highly flammable. Do not perform maintenance while smoking or near an open flame.
- Page 55 MAINTENANCE LOG MAINTENANCE LOG Your Maxwatt generator is protected by a 2 year limited warranty (3 month on battery) that covers the product for normal use. The warranty statement is found on the back of this manual. You must understand that negligence or misuse is not covered in the warranty and failure to properly maintain and service the engine, can void your warranty.
- Page 56 STORAGE: Long term storage of your generator will require some preventative procedures to guard against deterioration. Be sure all appliances are disconnected from the generator. Add a properly formulated fuel stabilizer to the tank (2-3 times manufacturer’s recommended amount). Run the generator for 10 minutes so the treated fuel cycles through the fuel system and carburetor.
- Page 57 10. Reattach the spark plug and spark plug cap. 11. If the generator includes a battery, disconnect and charge according to Generator Battery. 12. Clean the generator according to Generator Maintenance. 13. Store the generator in a cool, dry place out of direct sunlight.
- Page 58 ventilated place with a generator cover placed over it. The generator must always remain in a vertical position when stored, carried or operated.
-
Page 59: Troubleshooting
TROUBLESHOOTING: 8.1 Troubleshooting Diagram:... - Page 61 If the engine will still not start then contact Gentech Industries for technical assistance. The details are on the back page of this operator’s manual. Do not attempt to do anything further, contact Gentech Industries immediately for assistance.
-
Page 62: Circuit Diagram
Circuit Diagram... - Page 63 WARRANTY INFORMATION 2 YEAR TRADE WARRANTY This warranty is provided by Gentech Industries PTY LTD. Express Warranty Subject to the exclusions set out below, we warrant that this product will be free from defects in materials or workmanship for 24 months from the date of purchase. The benefits conferred by this warranty are in addition to all rights and remedies which you may be entitled to under the Australian Consumer Law and any other statutory rights you...
- Page 64 “This is a “walk in” warranty policy and is limited to the range of generators specified herein”. We recommend that you take the generator to the nearest service agent for assistance. Please visit www.maxwatt.com.au for more information. To qualify for this warranty: “The warranty applies to the first purchaser and each...
- Page 65 What the appointed Service Agent will repair or replace under warranty: “The appointed Service Agent will repair or replace, at its sole discretion, any part that is proven to be defective in material or workmanship under normal use during the applicable warranty time period.
- Page 66 WARRANTY PROCEDURES:...
- Page 67 BELOW IS A LIST OF GENERATORS THAT ARE COVERED UNDER THIS WARRANTY: MODELS WARRANTY PERIOD WARRANTY PERIOD PRIVATE/RESIDENTIAL COMMERCIAL/RENTAL MAXWATT 24 months or 500 24 months or 300 running hours which ever running hours which ever come first come first...
- Page 68 6. Consumable parts including but not limited to keys, spark plugs, fuel and oil filters, recoil starter ropes, wheels, lubricants, oil grease and fuel. 7. Cleaning adjustments and normal periodic maintenance work including but not limited to cleaning of the battery, carburettor, engine oil, fuel tank and injectors.
- Page 69 BELOW IS A TABLE OF PARTS THAT ARE LIMITED BY THIS WARRANTY PART OUT OF BOX < 20 RUNNING FAILURE HOURS STATOR ROTOR CIRCUIT BREAKER IGNITION COIL SPARK PLUG BATTERY WHEELS AND AXLE HANDLES RECOIL STARTER *NOTE: OUT OF BOX FAILURE REFERS TO A MACHINE THAT HAS RUN FOR <...
- Page 70 DISCLAIMER OF CONSEQUENTIAL DAMAGE AND LIMITITATION OF IMPLIED WARRANTIES Gentech Industries PTY LTD disclaims any responsibility for the loss of time or use of the product, transportation, commercial loss or any other incidental or consequential loss or damage. Any implied warranties are limited to the duration of this written limited warranty policy and procedures manual.
- Page 71 NOT AS ADVERTSIED /INCORRECT ITEM If your order arrives and it’s not what you ordered, please contact either the store the order came from or on the online support team at customercare@maxwatt.com.au.
- Page 72 FAULTY PRODUCT Please contact the store that fulfilled your order. Store contact details can be found on your order confirmation email. The store will need to assess whether the fault is a major or minor fault and will either arrange for the product to be repaired or replace.
Need help?
Do you have a question about the MX3200i and is the answer not in the manual?
Questions and answers