Table of Contents
Advertisement
AV RECEIVER
HT-RC430
Instruction Manual
Contents
Safety Information and Introduction ............2
Table of Contents ...........................................5
Connections .................................................11
Turning On & Basic Operations..................19
Advanced Operations ..................................35
Controlling Other Components...................46
Appendix .......................................................52
E
n
Advertisement
Table of Contents

Related Manuals for Onkyo HT-RC430


Summary of Contents for Onkyo HT-RC430
-
Page 1: Table Of Contents
Contents AV RECEIVER Safety Information and Introduction ....2 HT-RC430 Table of Contents ...........5 Connections ..........11 Turning On & Basic Operations....19 Instruction Manual Advanced Operations ........35 Controlling Other Components....46 Appendix ............52... -
Page 2: Safety Information And Introduction
Safety Information and Introduction 9. Do not defeat the safety purpose of the polarized or D. If the apparatus does not operate normally by grounding-type plug. A polarized plug has two blades following the operating instructions. Adjust only WARNING: with one wider than the other. A grounding type plug those controls that are covered by the operating TO REDUCE THE RISK OF FIRE OR ELECTRIC SHOCK, has two blades and a third grounding prong. -
Page 3: Precautions
If water or any other liquid gets inside water. Dry the unit immediately afterwards with a • Increase the separation between the equipment and this unit, have it checked by your Onkyo dealer. clean cloth. Don’t use abrasive cloths, thinners, receiver. -
Page 4: Supplied Accessories
• Remove expired batteries as soon as possible to prevent damage from leakage or corrosion. Thank you for purchasing an Onkyo AV Receiver. Please read this manual thoroughly before making connections and plugging in the unit. Following the instructions in this manual will enable you to obtain optimum performance and listening enjoyment from your new AV Receiver. -
Page 5: Table Of Contents
Using the Audio Settings .......... 44 Connecting the Power Cord ........18 Controlling Other Components Turning On & Basic Operations iPod/iPhone Playback via Onkyo Dock ....46 Turning On/Off the AV Receiver ........19 Using the Onkyo Dock ..........46 Turning On ..............19 Controlling Your iPod/iPhone........ -
Page 6: Features
Safety Information and Introduction Features Connections • 4 HDMI Inputs and 1 Output Amplifier • Onkyo for System Control • 3 Digital Inputs (2 Optical/1 Coaxial) • 60 Watts/Channel @ 8 ohms (FTC) • Component Video Switching (2 Inputs/1 Output) •... -
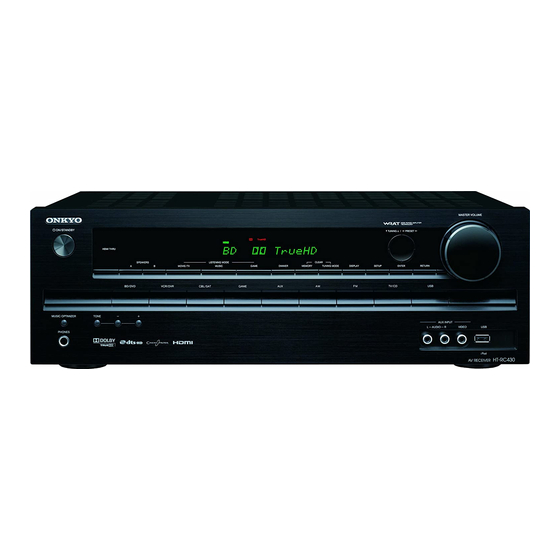
Page 7: Front & Rear Panels
Safety Information and Introduction Front & Rear Panels Front Panel For detailed information, see the pages in parentheses. SETUP button (35) ON/STANDBY button (19) TUNING / , PRESET (24), cursor and ENTER buttons HDMI THRU indicator (43) RETURN button SPEAKERS A and B buttons (31) MASTER VOLUME control (20) Remote control sensor (4) MUSIC OPTIMIZER button (33, 45) -
Page 8: Display
Safety Information and Introduction Display For detailed information, see the pages in parentheses. A and B speaker indicators (31) M.Opt indicator (33, 45) Listening mode and format indicators (26, 42) Tuning indicators AUTO indicator (24) TUNED indicator (24) FM STEREO indicator (24) SLEEP indicator (32) HDMI indicator (43, 57) MUTING indicator (33) -
Page 9: Rear Panel
Safety Information and Introduction Rear Panel DIGITAL IN COAXIAL and OPTICAL jacks Composite video and analog audio jacks (BD/DVD IN, VCR/DVR IN and OUT, CBL/SAT IN, COMPONENT VIDEO IN and OUT jacks GAME IN, TV/CD IN) HDMI IN and OUT jacks MONITOR OUT V jack FM ANTENNA jack and AM ANTENNA terminal SUBWOOFER PRE OUT jack... -
Page 10: Remote Controller
Receiver mode. RECEIVER). You can also use the remote controller to control Controlling the AV Receiver / buttons (24) Onkyo Blu-ray Disc/DVD player, CD player, and other components. D.TUN button (24) See “Entering Remote Control Codes” for more DISPLAY button details (➔... -
Page 11: Connections
Connections Connecting the AV Receiver Surround Surround right left Connecting Your Speakers Connecting the Speaker Cables The following illustration shows how to connect the speakers to each pair of terminals. ■ Push-type speaker terminals Strip 3/8" to 1/2" (10 to 12 mm) of insulation from the ends of the speaker cables, and twist the bare wires tightly, as shown. - Page 12 Connections Speaker Configuration Attaching the Speaker Cable Labels The following table indicates the channels you should use The speaker terminals are color-coded for identification depending on the number of speakers that you have. purpose. No matter how many speakers you use, a powered Speaker Color subwoofer is recommended for a really powerful and solid...
- Page 13 Connections Speaker Connection Precautions • Don’t connect more than one cable to each speaker Using a Powered Subwoofer terminal. Doing so may damage the AV receiver. Read the following before connecting your speakers: • Don’t connect one speaker to several terminals. •...
-
Page 14: About Av Connections
Connections ■ AV Cables and Jacks Optical digital audio About AV Connections Optical digital connections allow you to enjoy digital ■ sound such as PCM , Dolby Digital or DTS. The audio HDMI Connecting AV components quality is the same as coaxial. HDMI connections can carry digital video and audio. -
Page 15: Connecting Components With Hdmi
Connections Connecting Components with HDMI VCR or DVD recorder/digital video recorder Game console TV, projector, etc. Satellite/cable set-top box, etc. Blu-ray Disc/DVD player ■ If your TV doesn’t support Audio Return Channel (ARC), you See also: Audio Return Channel (ARC) function need to connect an optical digital cable together with the HDMI •... -
Page 16: Connecting Your Components
Connections Connecting Your Components Note The on-screen menus appear only on a TV that is connected to the HDMI OUT. If your TV is connected When USB input is selected, you can input video signals from to other video outputs, use the AV receiver’s display the AUX INPUT VIDEO jack. -
Page 17: Connecting Onkyo Components
Connecting a Recording Component Connecting Onkyo Components See “Recording” for details on recording (➔ page 34). Make sure that each Onkyo component is connected with an analog audio cable (connection in the hookup examples) (➔ page 16). Make the connection (see the illustration). -
Page 18: Connecting The Antennas
Connections Connecting the Antennas Connecting the Power Cord This section explains how to connect the supplied indoor FM antenna and AM loop antenna. Plug the power cord into an AC wall outlet. The AV receiver won’t pick up any radio signals without any antenna connected, so you must connect the antenna to use the tuner. -
Page 19: Turning On & Basic Operations
Turning On & Basic Operations Turning On/Off the AV Turning On Turning Off Receiver ON/STANDBY on the front panel. ON/STANDBY on the front panel. Press Press ON/STANDBY Press RECEIVER followed by on the remote Press RECEIVER followed by on the remote controller. -
Page 20: Playback
(➔ page • “Playing a USB Device” (➔ page (➔ page • “Listening to AM/FM Radio” • “iPod/iPhone Playback via Onkyo Dock” (➔ page • “Controlling Other Onkyo Components” (➔ page To adjust the volume, use VOL / . Select a listening mode and enjoy! See also: •... -
Page 21: Controlling Contents Of Usb Devices
Press this button repeatedly to cycle through the repeat These buttons navigate through the menus. modes. This button cycles through pages. PLAYLIST • See “Controlling Other Onkyo Components” about the operation In Standard Mode (iPod/iPhone), this button selects Press USB (➔ page 48). -
Page 22: Understanding Icons On The Display
Turning On & Basic Operations Understanding Icons on the Display Playing an iPod/iPhone via USB Use / to select a music file, and press ENTER or to start playback. This section describes icons that appear on the AV The on-screen menus appear only on a TV that is receiver’s display during media playback. -
Page 23: Playing A Usb Device
Turning On & Basic Operations Playing a USB Device The on-screen menus appear only on a TV that is connected to the HDMI OUT. This section explains how to play music files from a USB device (e.g., USB flash drives and MP3 players). See also: (➔... -
Page 24: Listening To Am/Fm Radio
Turning On & Basic Operations ■ Tuning into Radio Stations Manual tuning mode Listening to AM/FM Radio In manual tuning mode, FM stations will be in mono. ■ Auto tuning mode This section describes the procedure using the buttons Press TUNING MODE so that the AUTO indicator on the front panel unless otherwise specified. - Page 25 Turning On & Basic Operations ■ Presetting AM/FM Stations Selecting Presets You can store a combination of up to 40 of your favorite To select a preset, use PRESET on the AV AM/FM radio stations as presets. receiver, or the remote controller’s CH +/–. Tune into the AM/FM station that you want to store as a preset.
-
Page 26: Using Basic Functions
Turning On & Basic Operations Using Basic Functions MOVIE/TV button This button selects the listening modes intended for use with movies and TV. Using the Listening Modes MUSIC button This button selects the listening modes intended for use Selecting Listening Modes with music. - Page 27 Turning On & Basic Operations About Listening Modes Input Source Speaker Layout The following audio formats are supported by the listening The illustration shows which speakers are activated in each The AV receiver’s listening modes can transform your mode. channel. See “Sp Config (Speaker Configuration)” for the listening room into a movie theater or concert hall, with speaker setup (➔...
- Page 28 Turning On & Basic Operations ■ Onkyo-Original DSP Listening Modes Listening Mode Description Input Speaker Source Layout Listening Mode Description Input Speaker T-D (Theater- With this mode you can enjoy a virtual Source Layout Dimensional) surround sound even with only two or three...
- Page 29 Turning On & Basic Operations ■ Listening Modes Listening Mode Description Input Speaker Source Layout Listening Mode Description Input Speaker In this mode, audio from the input source is Source Layout output without surround-sound processing. Direct In this mode, audio from the input source is D S D The speaker configuration (presence of output without surround-sound processing.
- Page 30 Turning On & Basic Operations Listening Mode Description Input Speaker Note Source Layout These listening modes cannot be selected during USB or iPod playback. Dolby Pro Logic II Dolby Pro Logic II expands any 2-channel The AV receiver can input the DSD signal from HDMI IN. Setting the output setting on the player source for 5.1-channel playback.
-
Page 31: Using The Home Menu
Turning On & Basic Operations ■ Info Using the Home Menu Selecting Speakers A and B You can view the information of the following The Home menu provides quick access to frequently used You can use two sets of front speakers with the AV items: “Input”... -
Page 32: Using The Sleep Timer
Turning On & Basic Operations Using the Sleep Timer Setting the Display Brightness Displaying Source Information With the sleep timer, you can set the AV receiver to turn You can adjust the brightness of the AV receiver’s display. You can display various information about the current off automatically after a specified period. -
Page 33: Changing The Input Display
Muting the AV Receiver The Music Optimizer function enhances the sound quality You can temporarily mute the output of the AV receiver. When you connect an -capable Onkyo component, you of compressed music files. must configure the input display so that can work Press RECEIVER followed by MUTING. -
Page 34: Using Headphones
Turning On & Basic Operations Using Headphones Recording This section explains how to record the selected input Connect a pair of stereo headphones with a source to a component with recording capability. standard plug (1/4 inch or 6.3 mm) to the PHONES jack. -
Page 35: Advanced Operations
Advanced Operations On-screen Setup Explanatory Notes Common Procedures in Setup Menu The setup menus provides a convenient way to change the Menu Sp Config AV receiver’s various settings. Settings are organized into ■ Remote indicator Subwoofer 10 categories. The on-screen menus appear only on a TV that is RECEIVER connected to the HDMI OUT. -
Page 36: Setup Menu Items
Advanced Operations Menu item Setting target Setup menu items Level Cal Left (➔ page Center Menu item Setting target Right HDMI Input BD/DVD (➔ page Surround Right VCR/DVR Surround Left CBL/SAT Subwoofer GAME Audio Adjust Input Ch (Mux) (➔ page Input Ch (Mono) TV/CD Panorama... -
Page 37: Hdmi Input
Advanced Operations HDMI Input Component (Component Video Input) Note • If no video component is connected to HDMI output (even if the HDMI input is assigned), the AV receiver selects the video source based on the setting of “Component (Component Video Input)”. -
Page 38: Digital Audio (Digital Audio Input)
Advanced Operations ■ Front Digital Audio (Digital Audio Input) Sp Config (Speaker Configuration) Small: Large: Select based on the cone diameter. Note Menu Digital Audio Menu Sp Config • If the “Subwoofer” setting is set to “No”, this setting is fixed to “Large”. -
Page 39: Sp Distance (Speaker Distance)
Advanced Operations Sp Distance (Speaker Distance) Level Cal (Level Calibration) Note • For a more accurate setting, look up the frequency response in the manuals supplied with your speakers and set accordingly. • Choose a higher crossover frequency if you want more sound from your subwoofer. -
Page 40: Audio Adjust
Advanced Operations Dolby Audio Adjust ■ ■ PL II Music (2ch Input) Neo:6 Music These settings apply to only 2-channel stereo sources. Center Image Panorama 0 to 2 to 5 Menu Audio Adjust With this setting, you can specify by how much the front left and right channel output is attenuated in order to create With the Audio Adjust functions and settings, you can the center channel. -
Page 41: Source Setup
Advanced Operations Preset Name For Input Selector Audio Selector Source Setup ■ ■ Name Audio Selector - - -, Blu-ray, DVD, HD DVD, VCR, DVR, Tivo, ARC: CableSTB, SAT STB, PS3, Wii, Xbox, PC, TV, CD, The audio signal from your TV tuner can be sent to Items can be set individually for each input selector. -
Page 42: Hardware
1, 2, or 3 operation for 30 minutes with no audio and no video signal Normally, the AV receiver detects the signal format When several Onkyo components are used in the same input. automatically. However, if you experience either of the room, their remote ID codes may overlap. -
Page 43: Hdmi Setup
Advanced Operations ■ Audio TV Out • When the source equipment is connected with the HDMI Setup connection, it may malfunction if “HDMI Ctrl (RIHD)” is set to “On”. ■ This preference determines whether the incoming audio HDMI Through signal is output from the HDMI output. You may want to turn this preference on if your TV is connected to the Menu HDMI Setup... -
Page 44: Using The Audio Settings
Advanced Operations ■ Audio Return Ch (ARC) Speaker Levels Using the Audio Settings ■ Auto: You can change various audio settings from the Home Subwoofer Level (➔ page 31). The audio signal from your TV tuner can be sent to menu –15 dB to 0 dB to +12 dB in 1 dB steps the HDMI OUT of the AV receiver. - Page 45 Advanced Operations Late Night Music Optimizer CinemaFILTER ■ ■ ■ Late Night Music Optimizer Cinema Filter For Dolby Digital and Dolby Digital Plus sources, the options are: The Music Optimizer function enhances the sound quality Turn this setting on to soften overly bright movie Low: of compressed music files.
-
Page 46: Controlling Other Components
AV receiver is on , the AV receiver will For the latest information on the Onkyo Dock automatically turn on, select your iPod/iPhone as the input components, see the Onkyo web site at: source, and your iPod/iPhone will start playback. -
Page 47: Controlling Your Ipod/Iphone
• For detailed operation of iPod/iPhone, please refer to the remote control code 81993 (with instruction manual of the RI Dock. This button does not turn the Onkyo DS-A2 or DS-A2X RI ■ With the RI Control Dock on or off. Also, your iPod/iPhone may not respond the... -
Page 48: Controlling Other Onkyo Components
You can use the AV receiver’s remote controller to control controlled by pointing the remote controller at the AV your other Onkyo AV components. This section explains Look up the appropriate remote control code in the receiver, not the component. This allows you to control... -
Page 49: Resetting The Remote Mode Buttons
Resetting the REMOTE MODE Buttons Resetting the Remote Controller If you want to control an Onkyo component by pointing the You can reset a REMOTE MODE button to its default You can reset the remote controller to its default settings. -
Page 50: Controlling Other Components
By pressing the REMOTE MODE button that’s been Number: 1 to 9, 0 programmed with the remote control code for your TOP MENU Number: +10 component, you can control Onkyo component as DISPLAY / / / , ENTER described below. SETUP... - Page 51 Controlling Other Components ■ CD player / CD recorder / MD recorder operation Press the appropriate REMOTE Available buttons MODE button first. Number: 1 to 9, 0 Number: +10 / / / , ENTER SETUP DISPLAY MUTING DISC +/– SEARCH REPEAT RANDOM MODE...
-
Page 52: Appendix
If you can’t resolve the issue yourself, try resetting the ■ Make sure that all audio connecting plugs are pushed AV receiver before contacting your Onkyo dealer. Can’t turn on the AV receiver in all the way. To reset the AV receiver to its factory defaults, turn it Make sure that the power cord is properly plugged —... - Page 53 Appendix ■ ■ There’s no sound with a certain signal format About DTS signals If the input signal format is set to “PCM” or “DTS”. Set it to “Off”. Check the digital audio output setting on the — When DTS program material ends and the DTS —...
- Page 54 Appendix ■ Can’t control other components Video Tuner If it’s an Onkyo component, make sure that the ■ ■ There’s no picture Reception is noisy, FM stereo reception is noisy, cable and analog audio cable are connected properly. or the FM STEREO indicator doesn’t light Connecting only an cable won’t be enough.
- Page 55 Appendix ■ ■ The AV receiver’s remote controller doesn’t The following settings can be made for the USB Device Playback control my iPod/iPhone composite video inputs ■ Can’t access the music files on a USB device You must use the buttons on the unit to make these Make sure your iPod/iPhone is properly inserted in —...
- Page 56 Onkyo is not responsible for damages (such as CD rental fees) due to unsuccessful recordings caused by the unit’s malfunction. Before you record important data, make sure that the material will be recorded correctly.
-
Page 57: Connection Tips And Video Signal Path
Appendix Connection Tips and Video Connection Formats Audio Connection Formats Video Signal Path Video components can be connected by using any one of Audio components can be connected by using any of the the following video connection formats: composite video, following audio connection formats: analog, optical, The AV receiver supports several connection formats for component video, or HDMI, the latter offering the best... -
Page 58: Using An Rihd-Compatible Tv, Player, Or Recorder
HDMI, is the name of the system control function found on • The AV receiver will enter standby mode when the TV is • Sharp TV set to standby. Onkyo components. The AV receiver can be used with ■ CEC (Consumer Electronics Control), which allows Players/Recorders •... - Page 59 Appendix ■ How to connect and setup Change each item in the “HDMI Setup” menu Operate with the remote controller. according to the following settings: (➔ page 48). For buttons that can be operated Confirm the connecting and setting. • HDMI Ctrl (RIHD): On Note 1.
-
Page 60: About Hdmi
Appendix About HDMI Supported Audio Formats About Copyright Protection • 2-channel linear PCM (32–192 kHz, 16/20/24 bit) The AV receiver supports HDCP (High-bandwidth Digital Designed to meet the increased demands of digital TV, Content Protection) , a copy-protection system for digital HDMI (High Definition Multimedia Interface) is a new •... -
Page 61: Usb Features
• Protected WMA music files on an MP3 player cannot be played. ■ AAC (.aac/.m4a/.mp4/.AAC/.M4A or .MP4) • Onkyo accepts no responsibility whatsoever for the loss or AAC stands for MPEG-2/MPEG-4 Audio. damage to data stored on a USB device when that device is used with the AV receiver. -
Page 62: License And Trademark Information
Manufactured under license from Dolby Laboratories. Dolby, Pro Logic and the double-D symbol are trademarks of Dolby Laboratories. Music Optimizer™ is a trademark of Onkyo Corporation. “HDMI, the HDMI Logo, and High-Definition Multimedia Interface are trademarks or registered trademarks of HDMI Licensing LLC in the United States and other countries.”... -
Page 63: Specifications
Appendix ■ Specifications Video Section HDMI Input IN 1, IN 2, IN 3, IN 4 Input Sensitivity/Output Level and Impedance Amplifier Section Output 1 Vp-p/75 Ω (Component Y) Video Resolution 1080p 0.7 Vp-p/75 Ω (Component P 1 Vp-p/75 Ω (Composite) Audio Format Dolby TrueHD, DTS-HD Master Audio, Rated Output Power... - Page 64 1301, 555 Tower, No.555 West NanJin Road, Jin an, Shanghai, China 200041, Tel: 86-21-52131366 Fax: 86-21-52130396 http://www.cn.onkyo.com/ Y1201-1 SN 29401114 (C) Copyright 2012 ONKYO SOUND & VISION CORPORATION Japan. All rights reserved. * 2 9 4 0 1 1 1 4 *...
Need help?
Do you have a question about the HT-RC430 and is the answer not in the manual?
Questions and answers