
Related Manuals for Lennox 13H14


Summary of Contents for Lennox 13H14
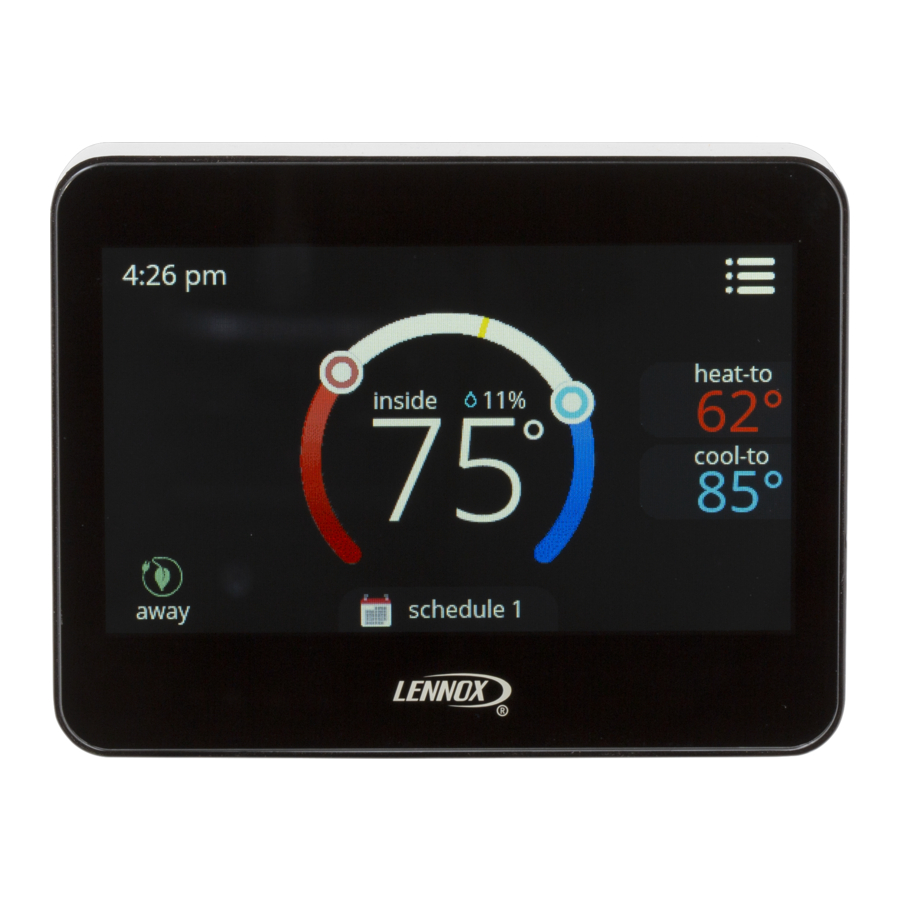
- Page 1 Installation and Setup Guide Color Touchscreen Programmable Thermostat ® ComfortSense 7500 (13H14)
-
Page 2: Table Of Contents
Table of Contents Shipping and Packing List ® ComfortSense 7500 touchscreen, 7-day Shipping and Packing List ....programmable thermostat and back plate ® ComfortSense 7500 Thermostat . -
Page 3: Comfortsense ® 7500 Thermostat
Dimensions (H x W x D) ® ComfortSense 7500 Thermostat (Catalog No. 13H14) Case dimensions: 3-5/16 x 4-5/16 x 7/8 in. (84 x 110 x 22mm) Description Features Compressor Short-Cycle Protection ® The ComfortSense 7500 thermostat is an electronic 7-day universal multi‐stage A 5-minute compressor short-cycle protection... - Page 4 NOTE - The outdoor sensor uses standard thermostat wiring; it may be wired using two wires IMPORTANT of a multi-wire cable. The outdoor sensor must be connected to oper When the outdoor sensor is connected, the ® ate a system with a Humiditrol accessory.
- Page 5 CAUTION CAUTION Always turn off power at the main power source This is a 24VAC low-voltage thermostat. Do not by switching the circuit breaker to the OFF posi install on voltages higher than 30VAC. tion before installing or removing this thermo Do not short (jumper) across terminals on the stat.
-
Page 6: Thermostat Installation
THERMOSTAT INSTALLATION Before beginning installation, note the type of DO NOT S Install on voltages higher than 30VAC. equipment, number stages, accessories being installed. This thermostat is a S Short (jumper) across terminals on the gas 24VAC low-voltage thermostat and requires a valve or at the system control to test common wire to the thermostat to operate. - Page 7 Not close to entrance or automatic 4. Use steps A through J (step J applicable doors when using provided wall plate) to install the thermostat. Not close to heat generating equipment such as kitchen equipment Not in an enclose environment unless CUT OR DRILL A SMALL HOLE a remote indoor sensor is used.
- Page 8 TRIM 1/4” INSULATION FROM END OF EACH WIRE (USE A LEVEL) ALIGN WALL PLATE 1/4” DRILL 3/16” HOLES AT MARKED LOCATIONS ON WALL FOR ANCHORS USE UNIT WALL PLATE AS TEMPLATE TO MARK DESIRED MOUNTING HOLE LOCATIONS ON WALL. NOTE: INSTALLATION OF WALL PLATE IS OPTIONAL.
- Page 9 Thermostat Installation with Wall Plate F - Place wall plate over H - Attach back plate to wall J - Attach thermostat to holes in wall. plate. back plate. G - Insert wall anchors I - Insert provided screws through back through wall plate into wall.
- Page 10 Thermostat Installation without Wall Plate G - Place back plate I - Attach thermostat to over wall anchors in wall. back plate. F - Insert wall anchors H - Insert provided screws through through wall plate into wall. back plate into wall anchors.
-
Page 11: Wiring Thermostat
WIRING THERMOSTAT TERMINAL DESIGNATIONS Tc - Outdoor Temp. Sensor Connection 1 (Opt.) Thermostat wiring connections with various units, To - Outdoor Temp. Sensor Connection 2 (Opt.) including dual fuel, zone control, and applications Humidification relay (to Humidifier) ® that include Humiditrol Enhanced Dehumidification relay (to DS terminal) - Page 12 INDOOR UNIT FOR REMOVE Y1 TO DS OR HUMIDITROL R TO DS JUMPER ON APPLICATIONS EDA UNIT PURPLE OUTDOOR SENSOR (x2658) NOT REQUIRED SINGLE STAGE BLACK Y1-Y2 JUMPER (OR ON-BOARD CLIPPABLE LINK) – IN FOR SINGLE STAGE COOLING; REMOVED FOR 2- STAGE COOLING.
- Page 13 Figure 4. CBX32MV-XXX-230-06 or Higher and CBX40UHV Wiring Diagrams (Condensing Unit Applications)
- Page 14 Figure 5. CBX32MV-XXX-230-06 or Higher and CBX40UHV Wiring Diagrams (Heat Pump Unit Applications)
- Page 15 WHEN 2-STAGE HEAT IS USED, THERMOSTAT IS CBX25UH AND CBX25UHV DO NOT HAVE TERMINAL CONFIGURED FOR MULIT-STAGE HEAT, CONNECT STRIPS IN UNIT. THERMOSTAT W2 TO AIR HANDLER W2 AND REMOVE JUMPER BETWEEN R AND W2. FOR HUMIDIFIER, 48G95 OR EQUIVALENT ISOLATION RELAY REQUIRED - 24VAC, 5VA MAX CAN BE USED WITH ALL THERMOSTAT CUT ON-BOARD LINK FORM DS-TO-R (W914...
- Page 16 CB30 and CBX32M TSTAT ML180, ML193, ML195, EL180E, EL195E, ELO183, SLO185 TSTAT ML180, ML193, ML195, EL180E, EL195E, ELO183, SLO185 TSTAT Figure 7. Thermostat Wiring Diagrams (continued)
- Page 17 CBX25UH, CBX25UHV, CBX32MV ML180, ML193, ML195, TSTAT EL180E, EL195E, ELO183, TSTAT SLO185 Figure 8. Thermostat Wiring Diagrams (continued)
- Page 18 EL296E, EL296V, EL280P TSTAT TSTAT SL280V Figure 9. Thermostat Wiring Diagrams (continued)
- Page 19 CBX25UH, CBX25UH, CBX25UHV, CBX25UHV, CBX32MV TSTAT CBX27UH TSTAT Figure 10. Thermostat Wiring Diagrams (continued)
- Page 20 ML180, ML193, ML195, EL296E, SL280V, EL180E, EL195E, EL296V, SLP98 ELO183, SLO185 TSTAT TSTAT Figure 11. Thermostat Wiring Diagrams (continued)
Need help?
Do you have a question about the 13H14 and is the answer not in the manual?
Questions and answers