Table of Contents
Troubleshooting

Related Manuals for Panasonic LP-MA00-LS1


Summarization of Contents
For the Proper Use of Product
Usage environment
Guidelines for optimal operation environment to prevent product failure.
Installation and mounting
Procedures and considerations for physically installing the laser marker head and cables.
For the Proper Use of Product
Wiring
Guidelines for correct and safe electrical wiring connections for the product.
Operation
Procedures and precautions for operating the laser marker system.
Network security
Risks and precautions when connecting the product to a network.
Order Placement Recommendations and Considerations
SAFETY PRECAUTIONS
General safety considerations and design requirements for product use.
ACCEPTANCE INSPECTION
Instructions for performing an acceptance inspection of the product.
WARRANTY PERIOD
Details about the product's warranty period and exclusions.
Related Regulations and Standards
Applicable regulations and standards
Lists regulations and standards the product meets for various regions.
Implementing safety measures for the laser products
Removing and eliminating dust or gas
Procedures for safely removing generated dust or gas.
To use the laser marker in the European region
Specific considerations for using the laser marker in the European region.
How to Read this Document
Symbol indications
Explanation of symbols used within the document for user guidance.
For the Safety Use of Laser Product
Radiation information
Provides detailed information about laser radiation classes and specifications for different models.
Radiation information
Radiation range
Illustrates and quantifies the radiation range and distances for various laser marker models.
Safety protection measures for users
Construction of interlock system
Guidelines for building protective interlock systems to prevent laser exposure.
Wearing protective goggles
Mandatory requirement to wear specific protective goggles for eye safety.
Key control
Importance of key-actuated master control for preventing unauthorized operation.
Safety protection measures for users
Appointment of laser safety manager
Role and responsibilities of a designated laser safety manager.
Safety functions on laser marker
Key switch
Used for system power ON/OFF and preventing unauthorized operation.
Emergency stop switch
Forcibly stops laser pumping and radiation in emergencies.
Interlock connector 1, 2
Connectors for constructing interlock systems to stop laser pumping and radiation.
Labels
Warning label for maintenance
Warning about disconnecting power before maintenance to avoid injury and shock.
Laser marker operation at inputting the safety functions
Laser Stop 1 CLOSE to OPEN
Operation when Laser Stop 1 input is activated to stop laser emission.
Laser Stop 2 CLOSE to OPEN
Operation when Laser Stop 2 input is activated to stop laser emission.
1-3 Specification
Optical and scanning specifications
Provides detailed optical and scanning parameters for different laser marker models.
Laser and general specifications
Lists general specifications related to the marking laser, data, and ports.
1-3 Specification
Power voltage
Specifies the required power voltage range for the product.
Operating ambient temperature
Specifies the acceptable operating ambient temperature range.
Installation direction
Specifies the acceptable installation directions for the head and controller.
1-4 Outer Dimensional Drawing
1-4-1 Head
Provides dimensional drawings and specifications for the laser marker head.
1-4 Outer Dimensional Drawing
1-4-2 Controller
Provides dimensional drawings and specifications for the laser marker controller.
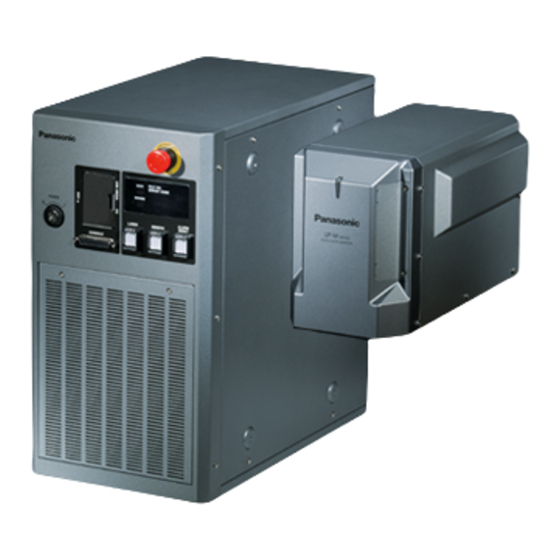
2-2 Name of Each Part
2-2-1 Head
Identifies and describes the individual parts of the laser marker head.
2-2 Name of Each Part
2-2-2 Controller
Identifies and describes the individual parts of the laser marker controller's front panel.
2-2 Name of Each Part
Rear
Identifies and describes the individual parts on the rear panel of the controller.
2-3 Installation
2-3-1 Installation environment
Specifies the environmental conditions required for product installation and operation.
2-3 Installation
2-3-2 Installation method
Provides detailed instructions on how to install the laser marker head.
2-3 Installation
2-3-3 Installation direction
Details the acceptable installation directions for the laser marker head and controller.
2-3 Installation
2-3-4 Installation space
Specifies the required space around the head and controller for proper air cooling.
2-3 Installation
2-3-5 Marking field and marking center position
Defines the marking field dimensions and marking center position for various models.
2-3 Installation
2-3-6 Lasing position check
Explains how to check and adjust the lasing position using dual pointer and guide laser.
2-4 Connecting Laser Marker
2-4-1 Connecting head, controller, terminal block
Step-by-step guide for connecting the head, controller, and terminal blocks.
2-4 Connecting Laser Marker
2-4-2 Connecting ground and power supply
Instructions for correctly connecting the ground and power supply for safety.
2-4 Connecting Laser Marker
2-4-3 When using PC
Procedures for installing and using the PC software for laser marker control.
2-4 Connecting Laser Marker
2-4-4 When using console
Instructions for connecting and using the optional touch panel console.
2-4 Connecting Laser Marker
2-4-5 When using monitor and mouse
Guidelines for connecting and using a monitor and mouse for operation.
2-5 Operation Method for Laser Marker
Control by the manually screen operation
Methods for controlling the laser marker via its screen interface.
Control by external devices (remote control mode)
Methods for controlling the laser marker using external devices like PLCs.
2-5 Operation Method for Laser Marker
2-5-1 Start-up & termination
Step-by-step guide for starting up the laser marker system.
2-5 Operation Method for Laser Marker
Termination
Procedures for safely terminating the laser marker operation and powering down.
2-5-2 Operation procedure of test marking and run mode
Test marking procedure
Detailed steps for executing the test marking function.
Run mode procedure
Detailed steps for operating the laser marker in run mode with external signals.
3-1 Operation by External Devices
3-1-1 Operation method using external control device
Outlines methods for controlling the marker via I/O or serial communication.
3-1 Operation by External Devices
3-1-2 Operation procedure with external control
Provides an operational example for controlling the marker from external devices like PLCs.
3-2 Before External Control
Setting flow to start external control
Describes the sequence of settings required to initiate external control.
3-2 Before External Control
3-2-1 DIP switch setting
Details how DIP switch settings affect external control methods and modes.
3-2 Before External Control
3-2-2 Communication condition setting
Configuration of communication parameters for I/O and serial control.
3-2 Before External Control
3-2-3 Shift to remote mode
Methods for switching the laser marker to remote control mode.
3-3 Control by I/O
3-3-1 Type of I/O interfaces
Identifies the different I/O interfaces available on the controller's rear side.
3-3 Control by I/O
3-3-2 Terminal and connector for I/O
Details the I/O terminal block and connector pin assignments for external control.
3-3 Control by I/O
3-3-3 Signals on input/output terminal
Lists and describes all signals available on the input/output terminals.
3-3 Control by I/O
Input signal operation in I/O terminal
Explains how input signals on I/O terminals function and their descriptions.
3-3 Control by I/O
Output signal operation in I/O terminal
Explains how output signals on I/O terminals function and their descriptions.
3-3 Control by I/O
3-3-4 Signals on I/O connector
Lists all signals available on the I/O connector and their functions.
3-3 Control by I/O
Input signal operation in I/O connector
Details how input signals on the I/O connector operate.
3-3 Control by I/O
Output signal operation in I/O connector
Details how output signals on the I/O connector operate.
3-4 Connecting I/O Terminals
3-4-1 Factory default wiring
Describes the default terminal connections using short bars.
3-4 Connecting I/O Terminals
3-4-2 Connecting common terminals
Explains how to connect common terminals using internal or external power.
3-4 Connecting I/O Terminals
3-4-3 Sensor connection example
Provides examples of sensor connections for triggering operations.
3-4 Connecting I/O Terminals
3-4-4 Connection example of laser stop terminals
Shows how to connect laser stop terminals for temporary disabling of laser radiation.
3-5 Timing Chart
3-5-1 Basic input/output
Illustrates the timing relationships between basic input and output signals.
3-5 Timing Chart
3-5-2 Marking trigger input
Timing chart for the marking trigger input and related outputs.
3-5-3 Equidistant marking (flying object marking)
Timing chart for equidistant marking when processing moving objects.
3-5 Timing Chart
3-5-4 Guide laser
Timing chart for the guide laser function, including select inputs.
3-5 Timing Chart
3-5-5 Select file
Timing chart for selecting files using input signals and the SET input.
3-5 Timing Chart
3-5-6 Time hold input and date gap output
Timing chart for time hold input and date gap output functions.
3-5-7 Counter end output
Timing chart for the counter end output signal.
3-5 Timing Chart
3-5-8 Count-up/count-down value correction
Timing chart for correcting counter values using count-up/down inputs.
3-5 Timing Chart
3-5-9 Counter reset input
Timing chart for resetting counter values using input signals.
3-5 Timing Chart
3-5-10 Rank / external offset marking
Timing chart for rank and external offset marking functions.
3-5 Timing Chart
3-5-11 Safety function input (laser stop 1)
Timing chart illustrating the behavior with laser stop 1 input.
3-5 Timing Chart
3-5-12 Safety function input (laser stop 2)
Timing chart illustrating the behavior with laser stop 2 input.
3-5 Timing Chart
3-5-13 Safety function input (interlock)
Timing chart illustrating the behavior with interlock inputs.
3-6 Connection with Displacement Sensor
3-6-1 Displacement sensor input connector specifications
Details the specifications of the displacement sensor input connector.
3-6 Connection with Displacement Sensor
3-6-2 Input and output of displacement sensor
Specifies input/output ranges and settings for the displacement sensor.
3-6 Connection with Displacement Sensor
3-6-3 Input circuit of displacement sensor
Shows the input circuit diagrams for the displacement sensor trigger and error signals.
3-6 Connection with Displacement Sensor
3-6-4 Displacement sensor input connecting sample
Provides a sample wiring diagram for connecting a displacement sensor.
3-6 Connection with Displacement Sensor
3-6-5 Timing chart of displacement sensor input
Timing chart illustrating the operation of displacement sensor inputs.
3-7 Interlock Connector
3-7-1 Connector type and signals
Details the connector type, signals, and specifications for interlock connections.
3-7 Interlock Connector
3-7-2 Input and output circuit of interlock
Shows the input and output circuit diagrams for the interlock system.
3-7-3 Interlock connector connecting samples
Provides sample connection diagrams for interlock connectors with safety devices.
3-8 Control of Laser Gate
Laser gate action overview
Explains the overall operation and control of the laser gate.
3-8-1 Laser gate terminal specifications
Lists the specifications and signals for the laser gate terminal.
3-8 Control of Laser Gate
3-8-2 Input circuit of laser gate
Shows the input circuit diagrams for the laser gate control signals.
3-8 Control of Laser Gate
3-8-3 Output circuit of laser gate
Shows the output circuit diagrams for the laser gate status.
3-8 Control of Laser Gate
3-8-4 Laser gate terminal connection example
Provides sample connection diagrams for controlling the laser gate with external devices.
3-8 Control of Laser Gate
3-8-5 Laser gate operation
Timing chart for the laser gate origin point recovery operation.
3-8 Control of Laser Gate
Marking operation timing chart during remote and operating modes
Timing chart for marking operations when controlled remotely or via screen.
3-8 Control of Laser Gate
Test marking, laser check radiation and laser power measurement timing chart
Timing charts for test marking, laser check, and power measurement operations.
3-9 Connection for Serial Communication
3-9-1 RS-232C
Details the interface specifications and connection for RS-232C serial communication.
3-9 Connection for Serial Communication
Connecting to external control devices
Instructions for connecting external devices via RS-232C.
RS-232C communication conditions
Specifies the communication parameters for RS-232C.
3-9 Connection for Serial Communication
3-9-2 Ethernet
Details the port specifications and communication conditions for Ethernet.
3-9 Connection for Serial Communication
Connecting to external control devices
Instructions for connecting external devices via Ethernet using direct or network connections.
4-2 Maintenance Details of Parts
4-2-1 Protection glass of laser emission port
Details on the protection glass, its deterioration, replacement interval, and method.
4-2 Maintenance Details of Parts
Cleaning steps for protection glass of laser emission port (Daily maintenance)
Step-by-step guide for daily cleaning of the protection glass.
4-2 Maintenance Details of Parts
4-2-2 Replacement of the protection glass
Procedure for replacing the protection glass of the laser emission port.
4-2 Maintenance Details of Parts
4-2-3 Air filter
Information about the air filter, its effects from deterioration, and replacement.
4-2 Maintenance Details of Parts
4-2-4 Air-cooling fan and intake vent
Details on air-cooling fans and intake vents, their deterioration, and cleaning steps.
4-2 Maintenance Details of Parts
4-2-5 Cleaning of head
Instructions for cleaning the laser marker head, noting its hot surface.
4-2 Maintenance Details of Parts
4-2-6 Laser oscillator
Information about the laser oscillator, its deterioration, and replacement interval.
How to confirm operating hours
Method to check the operating hours of the laser oscillator.
4-2 Maintenance Details of Parts
4-2-7 Laser output optimize
Procedure for optimizing laser output for improved accuracy.
4-2 Maintenance Details of Parts
4-2-8 Galvano scanner
Information about the galvano scanner, its deterioration, and replacement.
4-2-9 Laser gate
Information about the laser gate, its deterioration, and replacement.
4-2 Maintenance Details of Parts
4-2-10 Internal shutter
Information on the internal shutter, its deterioration, and confirmation of operation count.
4-2-11 Battery inside the controller
Details about the controller's internal battery, its deterioration, and replacement interval.
4-2 Maintenance Details of Parts
4-2-12 Replacement of fuse
Step-by-step instructions for replacing the controller's fuse.
4-5 Disposal of Laser Marker
Disposal of old equipment and batteries
Specific instructions for disposing of old equipment and batteries in EU countries.
Troubleshooting
Start-up
Common issues and solutions related to starting up the laser marker.
Laser pumping
Common problems and solutions related to laser pumping failures.
Troubleshooting
Display
Troubleshooting steps for issues related to the touch panel console, monitor, and mouse.
Troubleshooting
Marking
Common problems encountered during the marking process and their solutions.
Troubleshooting
Marking quality
Troubleshooting steps for issues affecting the quality of the marking output.
Troubleshooting
Moving objects
Troubleshooting steps for issues related to marking moving objects on a conveyor.
Troubleshooting
External control
Troubleshooting steps for problems with external device communication.
Troubleshooting
Others
Solutions for miscellaneous issues like unintended laser emission and USB drive recognition.
Error Indication
Alarm
Details errors that trigger an alarm state, stopping operation.
Release method of alarm
Procedures for releasing the laser marker from an alarm state.
Warning
Release method of warning
Procedures for releasing the laser marker from a warning state.
Need help?
Do you have a question about the LP-MA00-LS1 and is the answer not in the manual?
Questions and answers