
Related Manuals for Olympus IPLEX NX IV9675N


Summarization of Contents
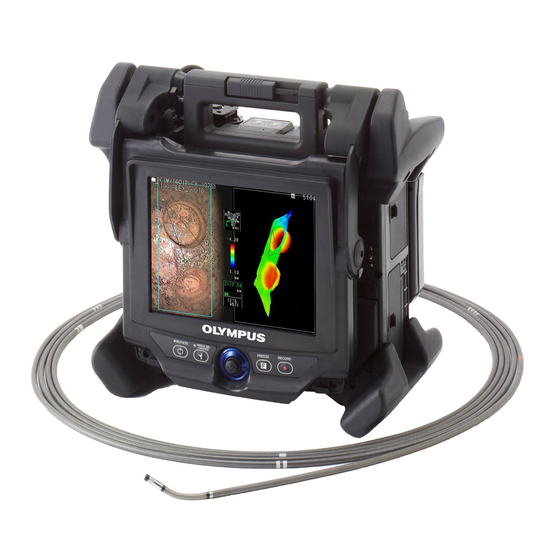
1 Introduction
Intended Use
Defines the instrument's purpose for inspecting machinery interiors without causing damage.
Instruction Manual
Guides users on operations, handling, and safe use of the instrument.
Product Configuration
Details required devices and compatible items, referencing the System chart.
2 Safety Precautions
General Safety Precautions
Provides essential safety guidelines for handling the instrument and its use.
Hook Assembly Precautions
Covers specific safety measures and procedures for handling the hook assembly.
1 Unpacking
1-1 Unpacking
Details the process of unpacking the instrument and verifying included items.
2 Nomenclature
2-1 Nomenclature
Provides a detailed breakdown of the base unit and LCD unit components.
2-2 Distal end/optical adapter nomenclature
Illustrates and names components of the distal end and optical adapters.
2-3 LCD monitor nomenclature
Identifies icons, indicators, and elements on the instrument's live screen.
3 Pre-operation preparation and inspection
3-1 Transporting of the carrying case
Explains methods for safely transporting the instrument's carrying case.
3-2 Placing the instrument
Describes how to position the main unit on a flat surface for operation.
3-3 Preparing the power supply
Covers loading the battery and connecting the AC adapter for power.
3-4 Taking out the insertion tube
Details the procedure for safely removing the insertion tube from the drum.
3-5 Attaching and removing the optical adapter
Provides step-by-step instructions for attaching and detaching optical adapters.
3-6 Removing the scope unit
Explains how to detach and attach the scope unit to the main unit.
3-7 Connecting the remote control unit to the main unit
Guides on connecting the remote control unit to the main instrument unit.
3-8 Connecting the SDHC card/USB flash drive
Details how to load and remove SDHC cards and USB flash drives.
3-9 Attaching/removing the shoulder strap
Describes how to attach and detach the shoulder strap for carrying the unit.
3-10 Attaching the hook assembly
Provides instructions for inserting the hook assembly into the optical adapter channel.
3-11 Replacing the hook
Explains the procedure for replacing a hook on the spring shaft.
3-12 Replacing the safety cap
Details how to replace the safety cap on the universal cord.
3-13 Using the handle holder
Illustrates how to use the handle holder for retrieval tools.
3-14 Using the channel port grip and the belt clamp
Covers attaching the channel port grip and belt clamp for secure handling.
3-15 Pre-operation/post-operation inspections
Lists checks to perform before and after operating the instrument.
4 Basic operation
4-1 Turning ON the power
Explains how to power on and off the main unit and indicators.
4-2 Turning ON the light
Details how to manually turn the illumination on/off and adjust intensity.
4-3 Operating the instrument
Describes operation using touch panel, buttons, and joysticks.
4-4 Observing the inspection object
Guides on inserting the tube, angulation, and observing the inspection object.
4-5 Withdrawing the scope unit
Explains how to safely withdraw the scope unit, including hook issues.
4-6 Adjusting the image display
Covers freezing, zooming, and adjusting image brightness and exposure.
4-7 Switching the folder on the live screen
Describes how to navigate and switch folders for image recording/playback.
4-8 Recording images
Details image preparation, recording still images and movies.
4-9 Playing back the image
Explains viewing recorded images in full-screen and thumbnail views.
4-10 Displaying live images on the external monitor
Guides on connecting a VGA cable to display live images on an external monitor.
4-11 Using recorded images on a PC
Explains how to use recorded images on a PC with InHelp VIEWER software.
5 Menu operations and functions
5-1 Menu operations
Details operating the instrument using the touch panel or remote control.
5-2 Using the live screen/freeze screen
Covers initial settings like title, white balance, sharpness, and saturation.
5-3 Using the thumbnail/view screens
Explains file/folder operations like delete, move, rename, and make folders.
6 Stereo measurement function
6-1 Measurement Flow
Outlines the step-by-step process for performing stereo measurements.
6-2 Attaching the stereo optical adapter
Provides instructions for securely attaching the stereo optical adapter.
6-3 Checking measurement values
Explains how to check measurement accuracy using the check tool.
7 Scaler measurement function
7-1 Measurement flow
Shows the procedure for scaler measurement, from attaching adapter to measuring.
7-2 Attaching the optical adapter
Guides on attaching standard optical adapters, other than stereo ones.
7-3 Observing the measurement area
Describes checking the live screen image for suitability for measurement.
7-4 Measurement
Details setting reference points, length, specifying measurement points.
8 Troubleshooting
8-1 Troubleshooting guide
Lists common error messages and their recommended actions for resolution.
8-2 Requesting repair of this product
Provides instructions on contacting Olympus for instrument repair services.
9 Storage and maintenance
9-1 Replacing the battery
Recommends battery replacement criteria and provides contact info.
9-2 Replacing the O-ring
Explains how to replace the O-ring on optical adapters and its importance.
9-3 Cleaning components
Details cleaning procedures for the insertion tube, distal end, and optical adapter.
9-4 Storage precautions
Provides guidelines for storing the instrument properly to prevent damage.
10 Specifications
10-1 Operating environment
Lists operating temperature, pressure, altitude, and humidity requirements.
10-2 Other specifications
Details optical system, distal end dimensions, angulation, and flexibility.
10-3 Optical adapter specifications
Provides technical specifications for various optical adapter types.
Appendix
System chart
Illustrates the system components and their interconnections.
Need help?
Do you have a question about the IPLEX NX IV9675N and is the answer not in the manual?
Questions and answers