Viking VCSO210SS Use And Care Manual
Combi steam/convect oven
Hide thumbs
Also See for VCSO210SS:
- Cookbook (52 pages) ,
- Service manual (44 pages) ,
- Installation manual (8 pages)
Table of Contents
Advertisement
Advertisement
Table of Contents
Troubleshooting

Related Manuals for Viking VCSO210SS


Summary of Contents for Viking VCSO210SS
- Page 1 Viking Use & Care Manual Combi Steam/Convect Oven ™...
- Page 2 We appreciate your choice of a Viking Combi Steam/Convect™ Oven and hope that you will again select our products for your other major appliance product needs. For more information about the complete and growing selection of Viking products, contact your dealer or visit us online at vikingrange.com.
-
Page 3: Table Of Contents
Table of Contents Getting Started _______________________________ 3 Warnings __________________________________3-4 Important Safety Instructions_________________5-7 Important–Please Read And Follow __________8-24 About Unpacking and Examining Your Oven _ 8 Choosing a Location for Your Oven _________ 8 Ordering a Built-In Kit _____________________ 9 Electrical Grounding Instructions ____________ 9 Extension Cord __________________________ 10 Radio or TV Interference __________________ 10 About Your Combi Steam/Convect™... - Page 4 Table of Contents Microwave ______________________________ 45 Defrost _________________________________ 52 Manual Cooking ________________________ 54-64 Cooking Time Input ______________________ 55 Steam Convection _______________________ 55 Convection _____________________________ 58 Steam __________________________________ 60 Microwave ______________________________ 62 Manual Defrost __________________________ 64 Other Convenient Features _______________ 65-70 Automatic Cooking Time Adjustment (More Or Less Time Adjustment) ___________ 65 Extending Cooking Time...
-
Page 5: Getting Started
Warnings Warning and Important Safety Instructions appearing in this manual are not meant to cover all possible conditions and situations that may occur. Common sense, caution, and care must be exercised when installing, maintaining, or operating this appliance. ALWAYS contact the manufacturer about problems or conditions you do not understand. -
Page 6: Precautions To Avoid
Warnings PRECAUTIONS TO AVOID POSSIBLE EXPOSURE TO EXCESSIVE MICROWAVE ENERGY (a) Do not attempt to operate this oven with the door open since open-door operation can result in harmful exposure to microwave energy. It is important not to defeat or tamper with the safety interlocks. -
Page 7: Important Safety Instructions
• Do not operate this appliance if it has a damaged cord or plug, if it is not working properly or if it has been damaged or dropped. • This appliance should be serviced only by qualified service personnel. Contact nearest Viking Authorized Servicer for ex- amination, repair or adjustment. • Do not cover or block any openings on the appliance. • Do not store or use this appliance outdoors. Do not use this product near water—for example, near a kitchen sink, in a wet... - Page 8 20 seconds before removing the container. - Use extreme care when inserting a spoon or other utensil into the container. • If the appliance light fails, consult a VIKING AUTHORIZED SERVICER. • Do not operate any heating or cooking appliance beneath this appliance, except a properly installed electric wall oven or a...
-
Page 9: Save These Instructions
IMPORTANT SAFETY INSTRUCTIONS • Do not mount unit over or near any portion of a heating or cook- ing appliance, except a properly installed electric wall oven or a warming drawer. • Do not mount over sink. • Do not store anything directly on top of the appliance surface when the appliance is in operation. SAVE THESE INSTRUCTIONS... -
Page 10: Important-Please Read And Follow
Latches the cavity or on the door. If there is any damage, do not operate the oven and contact your dealer or a VIKING AUTHORIZED SERVICER. CHOOSING A LOCATION fOR YOUR OvEN You will use your oven frequently so plan its location for ease of use. -
Page 11: Ordering A Built-In Kit
Drawer Microwave. Carefully follow both the electric wall oven/warming drawer/ microwave drawer installation instructions and Viking’s Built-in Kit instructions. Be sure that the clearance of the floor between the Combi Steam/Convect™ Oven and the electric wall oven/warm- ing drawer/microwave drawer is a minimum of 2 inches (5.1 cm). -
Page 12: Extension Cord
AbOUT YOUR COmbI STEAm/CONvECT™ OvEN This Use and Care Guide is valuable: read it carefully and always save it for reference. The Viking Combi Steam/Convect™ Oven Cookbook is a valuable asset. Check it frequently for cooking principles, techniques, hints and recipes. -
Page 13: About Cooking Options
IMPORTANT– Please Read and Follow Be aware that, unlike microwave-only ovens, Steam Ovens have a tendency to become hot during cooking with Steam Convection, Convection or Steam. The oven is for food preparation only. It should not be used to dry clothes or newspapers. -
Page 14: For Steam Cooking
IMPORTANT– Please Read and Follow require little change. Note information in all of the charts in the cookbook for all cooking options that use Steam Convection (Roast, Convenience Foods, Broil) and Steam (Cook, Reheat, Keep Warm and Proof). • Always attend the oven when in use. • Use utensils/cookware suitable for the cooking mode as de- scribed on pages 17-21. - Page 15 IMPORTANT– Please Read and Follow cooKING HINts Blanching Steam mode can be used to blanch vegetables to prepare them for freezing. Place the prepared vegetables in the steam basket on the high rack in the baking tray. Use upper level in oven. Press STEAM, MANUAL and desired time 4 - 5 minutes.
-
Page 16: About Microwave Cooking
IMPORTANT– Please Read and Follow • Check that food is thoroughly cooked/reheated before serving. • Cooking time will be affected by the shape, depth, quantity and temperature of food together with the size, shape and material of the container. • Never heat oil or fat for deep frying as this may lead to overheat- ing and fire. cAutIoN Always use dry pot holders or oven mitts to remove food or utensils from the oven. Be careful when opening the oven door to allow steam to dissipate. -
Page 17: About Food When Using The Microwave Mode
IMPORTANT– Please Read and Follow • Turn foods over once during microwaving to speed cooking of such foods as chicken and hamburgers. Large items like roasts must be turned over at least once. • Rearrange foods like meatballs halfway through cooking both from top to bottom and from the center of the dish to the out- side. - Page 18 IMPORTANT– Please Read and Follow AbOUT fOOD WHEN USING THE mICROWAvE mODE fooD DoN't Popcorn • Use specially bagged • Pop popcorn in popcorn for the regular brown bags microwave. or glass bowls. • Listen while popping • Exceed maximum corn for the popping time on popcorn to slow to 1 or 2 package.
-
Page 19: About Utensils And Coverings
IMPORTANT– Please Read and Follow AbOUT UTENSILS AND COvERINGS The chart below will help you decide what utensils and coverings should be used in each mode. cooKING moDE utENsIls - stEAm covERINGs coNvEctIoN / stEAm mIcRoWAvE coNvEctIoN Aluminium Foil, Foil Small flat pieces Containers of aluminum foil... - Page 20 IMPORTANT– Please Read and Follow AbOUT UTENSILS AND COvERINGS The chart below will help you decide what utensils and coverings should be used in each mode. cooKING moDE utENsIls - stEAm covERINGs coNvEctIoN / stEAm mIcRoWAvE coNvEctIoN Non-heat- resistant Glassware Heat- resistant Check...
- Page 21 IMPORTANT– Please Read and Follow AbOUT UTENSILS AND COvERINGS The chart below will help you decide what utensils and coverings should be used in each mode. cooKING moDE utENsIls - stEAm covERINGs coNvEctIoN / stEAm mIcRoWAvE coNvEctIoN Paper Towels, Paper towels: Paper To cover for Plates...
- Page 22 IMPORTANT– Please Read and Follow AbOUT UTENSILS AND COvERINGS The chart below will help you decide what utensils and coverings should be used in each mode. cooKING moDE utENsIls - stEAm covERINGs coNvEctIoN / stEAm mIcRoWAvE coNvEctIoN Roasting Bags Roasting bags Follow should only manufacturer’s...
-
Page 23: About Children
Viking is not responsible for any damage to the oven when accessories are used. For automatic cooking, use the recommended container in the cooking chart in this Use and Care Guide or the cookbook. - Page 24 IMPORTANT– Please Read and Follow tEmP fooD 165˚F (74˚C) For leftover, ready-to-reheat refrigerated, deli and carry out “ fresh” food, whole chicken or turkey, chicken or turkey breasts and ground poultry used in chicken or turkey burgers. Note: Do not cook whole, stuffed poultry. Cook stuffing separately to 165°F (74°C). • To test for doneness, insert a meat thermometer in a thick or dense area away from fat or bone.
- Page 25 IMPORTANT– Please Read and Follow containers, foods and drinks. Do not drink beverage or soup without checking the container’s temperature. • Do not touch the oven door, outer cabinet, rear cabinet, oven cavity, ventilation openings, accessories, dishes and the escap- ing steam from the air vent openings during operation because they will become hot.
- Page 26 • If any objects drop inside the air vent openings, turn off the oven immediately, unplug and consult a Viking Authorized Servicer. • Do not touch the plug with wet hands when inserting or remov- ing from the outlet. Plug securely into the electric wall receptacle and remove by gripping on the plug end. Never pull using just the cord.
-
Page 27: Product Control
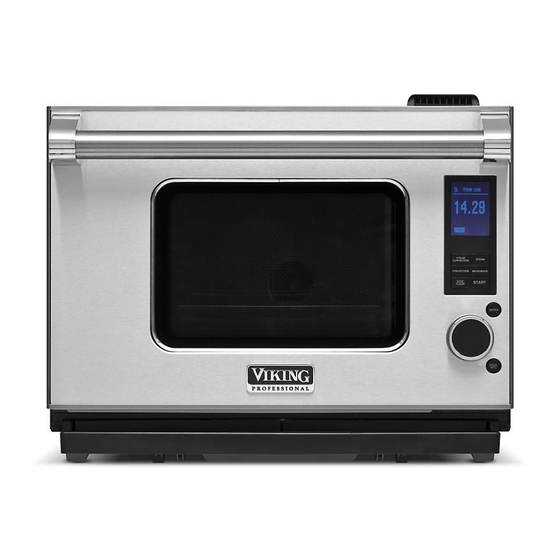
Part Names 1 Air vent opening 2 Handle 3 LCD display 4 Control panel 5 Oven light 6 Upper level 7 Lower level 8 Reservoir lid (see page 27) 9 Reservoir (see page 27) 10 Door gasket 11 Latches 12 Ceramic oven floor 13 Door hinges 14 Steam outlets 15 Drip tray lid (see page 28) -
Page 28: Control Panel
Part Names CONTROL PANEL 34 - 42, 55 - 58 43 - 45, 60 - 62 Number next to 58 - 60 45 -53, 62 - 64 the control panel illustration indicates pages on which there are feature descriptions and usage information. -
Page 29: Important Instructions
Important Instructions READ CAREfULLY bEfORE COOkING IN STEAm CONvECTION & STEAm RESERvOIR To fill the reservoir with fresh cold tap water is a must for Steam Convection and Steam in both automatic and manual Cooking. Be sure to follow the directions below. 1. -
Page 30: Drip Tray
Important Instructions • There may be a few water drops when removing the reservoir. Wipe the oven dry with a soft cloth. • Do not block the air holes on the lid of the reservoir. It will cause trouble during cooking. • A small amount of water will drain into the drip tray when the reservoir is removed. Empty after cooking. DRIP TRAY be sure to cook with drip tray in posi- tion and follow the directions below. The drip tray and the lid are packed with the oven. Place the drip tray and lid un- der the oven door as shown in Figure 4. -
Page 31: Steam Convection & Steam In Automatic And Manual Cooking
Important Instructions STEAm CONvECTION & STEAm IN AUTOmATIC AND mANUAL COOkING BEfoRE cooKING 1. Make sure the reservoir is filled with fresh cold tap water and is installed. (See page 27.) 2. Make sure the empty drip tray is installed. (See page 28.) 3. -
Page 32: Descale Function
Important Instructions Water function is very useful to prevent scale build up and the use of stale water. It causes evaporation of the internal steam system. 1. Press BACK/INFO, turn the dial to select DRAIN WATER and press ENTER. 2. Make sure the reservoir is removed and press START. 3. -
Page 33: Important Instructions ____________________
Important Instructions 4. Do not place any food in the oven. Press START to begin descaling. 5. When the oven has stopped and is cool, remove reservoir, empty, rinse and refill with cold tap water. Replace reservoir. Remove the descaling guide as shown in Figure 4. Remove baking tray, empty, rinse and dry. -
Page 34: Operation
Before Operating Before operating your new Combi Steam/Convect™ Oven make sure you read and understand this Use and Care Guide completely. • Before the Combi Steam/Convect™ Oven can be used, follow these steps: 1. Place the drip tray correctly. See page 28. 2. Close the door. Plug in the oven. Check that the display lights. 3. -
Page 35: Back
Before Operating bACk 1. Press BACK/INFO if you want to go back to the previous page during programming before pressing START. 2. After pressing START, it is not possible to return to a previous page. Clean The Oven Before First Use The steam generator heats the water which is used for cooking. -
Page 36: Automatic Cooking
Automatic Cooking Automatic Operation is available with Steam Convection, Steam and Microwave. Refer to each function for the details. STEAm CONvECTION Steam Convection has 8 options: Balanced Meals, Poultry, Meats, Fish, Grilled Vegetables, Potatoes, Frozen Pizza and Convenience Foods. Refer to the Steam Convection Chart for details on pages 40-42. BAlANcED mEAls • Suppose you want to cook Balanced Meals Complete Dinners Chicken with Standard time. - Page 37 Automatic Cooking ENTER. 4. Turn the Dial to enter amount (3.5 lb) and press ENTER. 5. Make sure STANDARD is selected and then press ENTER. 6. Press START to preheat. No food in oven. 7. When preheat is over, place food in the oven by following the directions in the display and the cooking chart.
- Page 38 Automatic Cooking • After cooking, the display may show . The oven will now coolinG automatically cool and you will hear the sound of the cooling fan. The fan may continue to operate up to 13 minutes depending on the oven and parts temperature. WARNINGS: • The oven door, outer cabinet and oven cavity will become hot. Use pot holders or oven mitts when adding or removing foods to prevent burns. • Do not open the oven with your face close to the oven. Steam from the oven may cause burns. REcIPEs foR BAlANcED mEAls bRUNCH mEDLEY bALANCED mEAL 2 eggs 2 grapefruit halves 2 egg whites 2 teaspoons brown sugar 2 teaspoons fat free half 4 fully cooked turkey and half sausage links...
- Page 39 Automatic Cooking CHICkEN bALANCED mEAL 2 boneless chicken breasts, 1/2 pound sweet potato approximately 12 ounces wedges, approximately 1/2 x 1/2 x 2 -1/2 inches 1 tablespoon mango curry sauce 12 fresh asparagus spears Press STEAM CONVECTION and then program the oven for AUTO, BALANCED MEALS, COMPLETE DINNERS, CHICKEN and press START to begin preheating.
- Page 40 Automatic Cooking fAjITA bALANCED mEAL 1 tablespoon fajita 1 cup red pepper strips seasoning mix 1 cup green pepper strips 1 tablespoon salad oil 1/2 cup fat-free refried beans 1 tablespoon water 2 8-inch whole wheat 1/2 pound mixture of raw, tortillas peeled and deveined shrimp, chicken breast...
- Page 41 PORk bALANCED mEAL 2 boneless pork chops, 1-1/3 cups new potatoes, cut approximately 12 ounces into 1/2-inch wedges 1/2 pound zucchini strips, 1 teaspoon olive oil approximately 1/2 x 1/2 x 2-1/2 inches Press STEAM CONVECTION and then program the oven for AUTO, BALANCED MEALS, COMPLETE DINNERS, PORK and press START to begin preheating.
- Page 42 Automatic Cooking stEAm coNvEctIoN cHARt ovEN fooD AmouNt coNtAINER/RAcK lEvEl Poultry Whole chicken* 2.5 - 7.5 lb Low rack in baking Lower tray Chicken pieces 0.5 - 3.5 lb High rack in baking Lower (bone-in)* tray. Add 3/4 cup water to the baking tray.
- Page 43 Automatic Cooking stEAm coNvEctIoN cHARt ovEN fooD AmouNt coNtAINER/RAcK lEvEl Fish Fish steaks* 0.3 - 2.0 lb High rack in baking Upper tray Thick fillets (3/4 to 0.3 - 2.0 lb High rack in baking Upper 1 inch thick)* tray Grilled vegetables* 1 - 6 Baking tray...
- Page 44 Automatic Cooking stEAm coNvEctIoN cHARt ovEN fooD AmouNt coNtAINER/RAcK lEvEl Convenience foods Frozen prepared poultry - nuggets* 0.3 - 1.5 lb High rack in baking Upper tray - patties* 0.3 - 1.5 lb High rack in baking Upper tray Refrigerated 0.3 - 1.5 lb High rack in baking Upper...
-
Page 45: Steam
Automatic Cooking STEAm Steam has 3 options: Vegetables, Fish/Seafood and Poached Eggs. Refer to the Steam Chart for details. • Suppose you want to cook 6 servings of Quick Cooking, Veg- etables with Standard time. 1. Press STEAM, turn the Dial to select AUTO and press ENTER. 2. Turn the Dial to select VEGETABLES and press ENTER. 3. - Page 46 Automatic Cooking • After cooking, the display may show . The oven will now coolinG automatically cool and you will hear the sound of the cooling fan. The fan may continue to operate up to 13 minutes depending on the oven and parts temperature. • Press ENTER once at step 3 in Vegetables New potatoes, Fish/ Seafood and Poached eggs. WARNINGS: • The oven door, outer cabinet and oven cavity will become hot. Use pot holders or oven mitts when adding or removing foods to prevent burns. • Do not open the oven with your face close to the oven. Steam from the oven may cause burns. stEAm cHARt ovEN fooD AmouNt coNtAINER/RAcK lEvEl Vegetables Steam basket Upper on high rack in Quick Cooking 1 - 6 servings baking tray Med.
-
Page 47: Microwave
• Do not use the baking tray and metal racks. mIcRoWAvE cooKING WItH sENsoR Viking's Sensor is a semi-conductor device that detects the vapor (moisture and humidity) emitted from the food as it heats. The sensor adjusts the cooking times and power level for various foods and quantities. - Page 48 Automatic Cooking • More or less food than the quantity listed in the chart should be cooked following the guidelines in any microwave cookbook. • During the first part of cooking with Sensor function, sensinG will appear on the display. Do not open the oven door or press STOP/CLEAR during this part of the cooking cycle.
-
Page 49: Sensor Popcorn
Automatic Cooking sENsoR PoPcoRN • Suppose you want to pop a regular size popcorn with Standard time. 1. Press MICROWAVE, turn the Dial to select AUTO and press ENTER. 2. Turn the Dial to select SENSOR POPCORN and press ENTER. 3. Turn the Dial to select REGULAR and press ENTER. 4. -
Page 50: Sensor Cook Chart
Automatic Cooking sENsoR cooK cHARt fooD AmouNt PRocEDuRE Baked Potatoes 1 - 6 med. Pierce. Place on paper- towel-lined Combi Steam/ Convect™ Oven. After cooking, remove from microwave, wrap in aluminum foil and let stand 5 to 10 minutes. Fresh Vegetables: Wash and place in casserole. - Page 51 Automatic Cooking sENsoR cooK cHARt fooD AmouNt PRocEDuRE Frozen Entrees 6 - 17 oz. Use this setting for frozen convenience foods. It will give satisfactory results for most brands. You may wish to try several and choose your favorite. Remove package from outer wrapping and follow package directions for covering.
- Page 52 Automatic Cooking sENsoR cooK cHARt fooD AmouNt PRocEDuRE Rice .5 - 2.0 cup Place rice into a deep casserole and add double quantity of water. Cover with lid or plastic wrap. After cooking, stir, cover and let stand 3 to 5 minutes or until all liquid has been absorbed.
-
Page 53: Reheat Chart
Automatic Cooking • The final result will vary according to the food condition (e.g. initial temperature, shape, quality). Check food temperature after heating. If additional time is needed, continue to heat manually. SENSOR REHEAT (QUICk WAY) • Suppose you want to reheat with Sensor Reheat with Standard time. 1. Press MICROWAVE, turn the Dial to select SENSOR REHEAT and press ENTER. 2. -
Page 54: Defrost
Automatic Cooking REHEAt cHARt fooD AmouNt PRocEDuRE Fresh rolls/ 1 - 8 pcs Use this pad to warm rolls, muffins muffins, biscuits, bagels etc. Large items should be considered as 2 or 3 regular size. Arrange on plate; cover with paper towel. For refrigerated rolls or muffins, it may be necessary to double the entered amount to ensure the... -
Page 55: Automatic Cooking ______________________
Automatic Cooking defrosting time, turn the Dial to add time and press START. If not, press STOP/CLEAR. NOTE: • Enter the weight of the food only. Do not include the weight of the container. • Any Defrost selection can be programmed with More or Less Time Adjustment. See page 65. • To defrost other foods or foods above or below the weights allowed on Defrost Chart, use time and 30% power. See Manual Defrost on page 64. • The programmed defrosting times are average times. To ex- tend defrosting times preprogrammed in the automatic opera- tion, see Extending Cooking Time At The End Of Cooking on page 65. DEfRost cHARt fooD AmouNt PRocEDuRE Ground .5 - 2.0 lb Remove any thawed pieces after each Meat audible signal. -
Page 56: Manual Cooking
Manual Cooking Manual Cooking is an option in Steam, Steam Convection, Con- vection and Microwave. Refer to the Manual Cooking Chart. The chart gives information on each setting. mANuAl cooKING cHARt ADJustmENt tEmP tEmP tImE 2 lEvEl PREHEAt* RANGE DuRING RANGE cooKING cooKING... -
Page 57: Cooking Time Input
Manual Cooking COOkING TImE INPUT Your oven can be programmed for up to 2 hours 30 minutes de- pending on the cooking mode. Refer to the chart. The input unit increment varies from 5 seconds to 5 minutes, depending on the total length of time and cooking mode as shown in the table. -
Page 58: Manual Cooking
Manual Cooking • Suppose you want to cook Cornish hens at a temperature of 375°F for 1 hour and 10 minutes with preheating. 1. Press STEAM CONVECTION, turn the Dial to select MANUAL and press ENTER. 2. Turn the Dial to select STEAM ROAST and press ENTER. 3. Turn the Dial to select WITH PREHEAT. Press ENTER. 4. - Page 59 Manual Cooking 8. After cooking, will appear. If you wish to extend cooking eXtend time, turn the Dial to add time and press START. If not, press STOP/CLEAR. After the oven has cooled, remove and empty the reservoir, wipe oven cavity. Wait a few minutes, then empty the drip tray.
-
Page 60: Convection
Manual Cooking preheat temperature. For Broil, press START after selecting WITH PREHEAT. Preheat will start. When the oven reaches the programmed temperature, follow the message in the display. • To extend cooking time, see Extending Cooking Time At The End Of Cooking on page 65. • Keep the door closed. If opened during cooking, steam will escape and a longer cooking time will be required. • The amount of water in the reservoir is sufficient for one cooking operation. Water does not need to be added during cooking. • During and after cooking, condensed water may be on the door, oven walls and oven floor. Dry any liquid residue with a soft cloth. - Page 61 Manual Cooking 1. Press CONVECTION, turn the Dial to select BAKE OR ROAST and press ENTER. 2. Turn the Dial to select WITH PREHEAT. Press ENTER. 3. Turn the Dial to select 2 LEVELS cooking and press ENTER. 4. Turn the Dial to enter the desired temperature 450°F and press ENTER.
-
Page 62: Steam
Manual Cooking programmed temperature, follow the message in the display. • To extend cooking time, see Extending Cooking Time At The End Of Cooking on page 65. • Keep the door closed. If opened during cooking, heat will escape and a longer cooking time will be required. • After cooking, the display may show . The oven will now coolinG automatically cool and you will hear the sound of the cooling fan. The fan may continue to operate up to 13 minutes depending on the oven and parts temperature. WARNINGS: • The oven door, outer cabinet and oven cavity will become hot. Use pot holders or oven mitts when adding or removing foods to prevent burns. • Do not open the oven with your face close to the oven. Steam from the oven may cause burns. STEAm Steam has 4 functions: Steam Cook, Steam Reheat, Steam Keep Warm and Proof. -
Page 63: Steam Reheat
Manual Cooking stEAm REHEAt Use Steam Reheat to reheat gently without drying. Steam Reheat can be programmed up to 35 minutes. • Suppose you want to reheat rice for 20 minutes. 1. Press STEAM, turn the Dial to select MANUAL and press ENTER. 2. Turn the Dial to select STEAM REHEAT. Press ENTER. 3. -
Page 64: Microwave
Manual Cooking 5. After cooking, will appear. If you wish to extend cooking eXtend time, turn the Dial to add time and press START. If not, press STOP/CLEAR. After the oven has cooled, remove and empty the reservoir, wipe oven cavity. Wait a few minutes, then empty the drip tray. -
Page 65: Microwave Time Cooking
Manual Cooking mIcRoWAvE tImE cooKING • Suppose you want to cook for 5 minutes at 100% power level. 1. Press MICROWAVE, turn the Dial to select MANUAL and press ENTER. 2. Turn the Dial to enter the desired cooking time 5 minutes and press START. to sEt PoWER lEvEl There are eleven preset power levels. Using lower power levels increases the cooking time, which is rec- ommended for foods such as cheese, milk and long slow cooking of meats. -
Page 66: Manual Defrost
Manual Cooking • Suppose you want to defrost for 5 minutes at 30% power level. 1. Press MICROWAVE, turn the Dial to select MANUAL and press ENTER. 2. Turn the Dial to enter defrosting time 5 minutes and press ENTER. 3. Turn the Dial to select power level 30%. 4. Press START. mANUAL DEfROST If the food that you wish to defrost is not listed on the Defrost Chart or is above or below the limits in the "Amount"... -
Page 67: Other Convenient Features
Other Convenient Features AUTOmATIC COOkING TImE ADjUSTmENT (mORE OR LESS TImE ADjUSTmENT) You can adjust cooking results as you like. Should you discover that you like any automatic settings slightly more done, select MORE in the cooking time page before START. The display will show more Should you discover that you like any automatic settings slightly less done, select LESS in the cooking time page before START. -
Page 68: Temperature Adjustment
Other Convenient Features ExtEND tImE At END Auto 0 - 30 min Steam Convection Manual 0 - 30 min Convection Manual 0 - 30 min Auto 0 - 10 min Steam Manual 0 - 10 min Auto: except Defrost Auto: Defrost 0 - 10 min Microwave Manual... -
Page 69: Other Convenient Features
Other Convenient Features 3. Preheat* + Convenience Foods (Steam Convection) + Bake or Roast (Convection) * Preheat can be omitted. • Suppose you want to cook in Sequence Cooking with Preheating in patterns 2. First stage is at a temperature of 375°F for 1 hour and 10 minutes. Second stage is at a temperature of 400°F for 10 minutes. 1. -
Page 70: Info
Other Convenient Features INfO Back/Info provides 9 features and step-by-step instructions for special functions. MAINTENANCE 1. DRAIN WATER 2. DESCALE 3. STEAM CLEAN SETTINGS 4. CLOCK 5. CONTRAST 6. SOUND ON/OFF 7. DEMO 8. CHILD LOCK 9. SLEEP MODE These features can be selected by pressing BACK/INFO in time of day or home page and then turning the Dial and pressing ENTER. -
Page 71: Demonstration Mode
Other Convenient Features souND oN/off You can mute the oven. 1. Press BACK/INFO, turn the Dial to select SOUND ON/OFF and press ENTER. 2. Turn the Dial to select SOUND ON/OFF and press ENTER. The sound setting will be held in the memory even if the oven power is off. -
Page 72: Other Convenient Features _______________
Other Convenient Features slEEP moDE Sleep Mode means that the display backlight will be automatically turned off if the oven is not used for 15 minutes. Initial setting of the sleep mode is ON. 1. Press BACK/INFO, turn the Dial to select SLEEP MODE and press ENTER. -
Page 73: Product Care
Cleaning and Care CLEAN THE OVEN REGULARLY. Spatters and residue remaining from prolonged use, especially at high temperatures, are hard to clean and may interfere with good oven operation as well as decrease the useful life of the oven. ImPORTANT CAUTIONS: • Disconnect the power cord if possible. -
Page 74: Oven Cleaning - Interior
Cleaning and Care OvEN CLEANING - INTERIOR stEAm clEAN The Steam Clean function helps to loosen any grease, oil or food residue. The steam will make the oven easy to clean; however, it is not a self-cleaning function. It will take approximately 20 minutes for the cleaning cycle. -
Page 75: Baking Tray / High Rack / Low Rack / Steam Basket
If not, steam will leak from the door. Do not use Combi Steam/ Convect™ Oven if it has a damaged door gasket as steam would not be contained in the oven. Consult a Viking Authorized Service. bAkING TRAY / HIGH RACk / LOW RACk /... -
Page 76: Troubleshooting Chart
Troubleshooting Chart is displayed or you think the oven is not working properly, check the chart below before consulting a Viking Authorized Ser- vicer. This will help to prevent unnecessary service calls. mEssAGE oN DIsPlAY ActIoN ERROR Due to technical error, call... -
Page 77: Troubleshooting Chart
Troubleshooting Chart mEssAGE oN DIsPlAY ActIoN INFORMATION Replace drip Remove and replace the drip MESSAGE tray. tray correctly. See page 28. In case the drip tray is not installed correctly, replace will be shown in drip tray the display. Empty drip empty drip tray and replace tray and will be shown in the display... - Page 78 • Disconnect the oven from the power source, wait one minute and then plug into the wall out- let. If the problem exists, consult a Viking Authorized Servicer. The display is • Open the door and close. Is fine but START the oven light off? Press START will not function again.
- Page 79 Troubleshooting Chart quEstIoN / sItuAtIoN ANsWER Steam Water is found Steam has condensed inside the inside the oven oven. Wipe dry with a sponge. when the door is opened. Steam comes It is normal for used steam to come out of the air from the air ventilation opening on ventilation the top of the oven.
- Page 80 Troubleshooting Chart quEstIoN / sItuAtIoN ANsWER Smoke / When using the See page 33 for step-by-step Aroma oven for the instructions for cleaning the oven first time, it may before the first use. smoke or smell. The oven cavity See Clean The Oven Before First smells after Use on page 33 for step-by-step cooking.
-
Page 81: Service Call Check
A. After the oven stops, is the inside of the oven filled with steam? If “NO” is the answer to any of the above questions, please check electrical outlet, fuse and/or circuit breaker. If they are functioning properly, CONTACT YOUR NEAREST VIKING AUTHORIZED SERVICER. A microwave oven should never be serviced by a “do-it-yourself” repair person. -
Page 82: Specifications
Specifications AC Line Voltage: Single phase 120V, 60Hz, AC only AC Power Required: Microwave 1.04 kW 9.0A Convection 1.5 kW 12.5A Output Power: Microwave 700W* Convection Heater 1450W Frequency: 2450 MW Outside Dimensions (WxHxD): " x 17 " x 18 "... -
Page 83: Combi Steam/Convect™ Oven Warranty
(36) months from the date of original retail purchase. Viking Range Corporation, warrantor, agrees to repair or replace, at its option, any part which fails or is found to be defective during the warranty period. - Page 84 Viking Range Corporation 111 Front Street Greenwood, Mississippi 38930 USA (662) 455-1200 For product information call 1-888-VIKING1 (845-4641) or visit the Viking Web site at vikingrange.com TINSLB029MRR0...
Need help?
Do you have a question about the VCSO210SS and is the answer not in the manual?
Questions and answers