Denon DVD-3930CI Operating Instructions Manual
Denon dvd audio-video / super audio cd player operating instructions dvd-3930ci
Hide thumbs
Also See for DVD-3930CI:
- Operating instructions manual (59 pages) ,
- Instrucciones de funcionamiento (56 pages) ,
- Specifications (2 pages)
Table of Contents
Advertisement
Quick Links
Advertisement
Table of Contents

Related Manuals for Denon DVD-3930CI


Summary of Contents for Denon DVD-3930CI
- Page 1 DVD AUDIO-VIDEO / SUPER AUDIO CD PLAYER DVD-3930CI OPERATING INSTRUCTIONS...
-
Page 2: Safety Instructions
ENGLISH ¢ SAFETY PRECAUTIONS CAUTION RISK OF ELECTRIC SHOCK DO NOT OPEN CAUTION: TO REDUCE THE RISK OF ELECTRIC SHOCK, DO NOT REMOVE COVER (OR BACK). NO USER-SERVICEABLE PARTS INSIDE. REFER SERVICING QUALIFIED PERSONNEL. The lightning flash with arrowhead symbol, within an equilateral triangle, is intended to alert the user to the presence of uninsulated “dangerous voltage”... -
Page 3: Note On Use
This product, when installed as indicated in the instructions contained in this manual, meets FCC requirements. Modification not expressly approved by DENON may void your authority, granted by the FCC, to use the product. 3. NOTE This product has been tested and found to comply with the limits for a Class B digital device, pursuant to Part 15 of the FCC Rules. -
Page 4: Table Of Contents
Getting Started Thank you for purchasing this DENON DVD Audio-Video / Super Audio CD player. Please read the operation instructions thoroughly in order to acquaint yourself with the DVD Audio-Video / Super Audio CD player and achieve maximum satisfaction from it. - Page 5 Marking scenes you want to see again later·····························46 Adding marks ···············································································46 Calling out marked scenes···························································46 Zoomed play ·················································································47 Setting the video format ·····························································47 Adjusting the brightness of the display·····································47 Others About the DENON LINK function················································48 Advanced AL24 Processing··························································48 Copyright protection technology················································48 Resetting························································································48 Registered trademarks·································································48 Troubleshooting············································································49 Specifications ················································································50...
-
Page 6: Accessories
Note ENGLISH About discs Discs usable on this set The discs playable on the DVD-3930CI are the discs shown on the table at the right. Do not use discs with special shapes, as they could damage the player. NOTE: •... -
Page 7: Holding Discs
Getting Started Playable discs Mark (logo) Signal content Disc size DVD-Audio (*1) DVD-Video (*1) Digital audio 12 cm/ DVD-R/DVD+R (*2) Digital video 8 cm (MPEG2 format) DVD+R DVD-RW (*2) (*3) DVD+RW (*2) DVD+ReWritable SUPER Digital audio 12 cm AUDIO CD Stereo Multi- ch Digital audio... -
Page 8: Cautions On Handling
ENGLISH Getting Started Cautions on handling • Do not get fingerprints, oil or dirt on discs. • Take special care not to scratch discs when removing them from their cases. • Do not bend or heat discs. • Do not enlarge the hole at the center. •... -
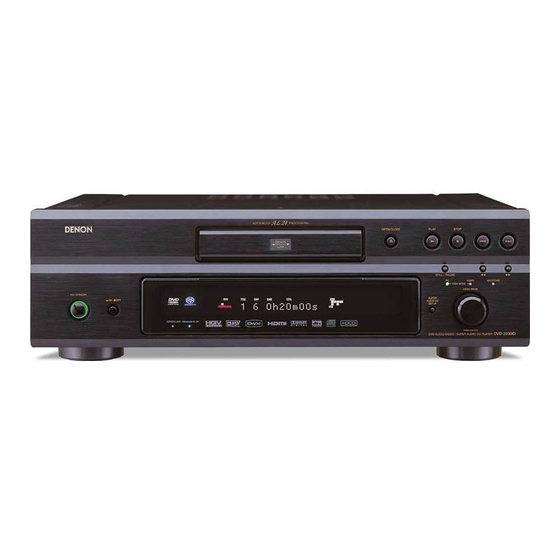
Page 9: Part Names And Functions
Power indicator...(34) Skip buttons ( Power switch ( OFF)...(15, 34) ¢ £ STOP button ( DENON LINK indicator ...(48) PLAY button ( Advanced AL24 indicator ...(48) STILL/PAUSE button ...(35) Display OPEN/CLOSE button (5) ...(34) Remote control sensor ...(5) Disc Tray...(4) SUPER AUDIO CD SETUP button...(38) -
Page 10: Rear Panel
Control terminal for system extension. RS-232C input/output terminal Control terminal for system extension. Remote control unit AC inlet ...(12) HDMI OUT terminal ...(11) DENON LINK output terminal ...(11) DIGITAL OUT COAXIAL/ OPTICAL terminals...(9, 12) ENGLISH Getting Started POWER ON/OFF buttons ...(34) HDMI SELECT/FORMAT buttons...(29) -
Page 11: Connections
Pin-plug cable Coaxial digital connections Coaxial digital cable (75 Ω/ohms pin-plug cable) Digital connections (Optical) Optical fiber cable DENON LINK connections DENON LINK cable (Included) Signal direction Audio signal Video signal Video cable Video connections Video cable (75 Ω/ohms pin-plug cable) -
Page 12: Connection To A Tv
525p AND 625p DVD PLAYER, PLEASE CONTACT OUR CUSTOMER SERVICE CENTER. NOTE: • Connect the DVD-3930CI’s video output either directly to the TV or indirectly via an AV amplifier. Do not connect it via a VCR (video cassette recorder). Some discs include copy prohibit signals. If such discs are played via a VCR, the copy guard system may disturb the picture. -
Page 13: Connection To A Device With 2-Channels Of Analog Audio Inputs
Connections ¢ Audio signals output from the DVD-3930CI’s digital audio output terminals Bitstream output With “DIGITAL OUTPUT” as initial setting Disc type Audio recording format NORMAL Dolby Digital Dolby Digital bitstream DVD-Video DTS bitstream PCM output With “DOWN SAMPLING” as initial setting... -
Page 14: Denon Link Connections
• Digital transfer is possible up to 24 bit/2ch for 192/176.4 kHz, 24 bit/6ch for 96 kHz or less. • When making DENON LINK connections, be sure to check the version of the AV amplifier to be connected then make the “DENON LINK” setting at “initial settings” appropriately ( DENON LINK terminals of different versions are interconnected, there may be no sound or only noise. -
Page 15: Digital Connection To A Recording Device (Md Recorder, Etc.)
• The audio signals from the HDMI terminal (sampling frequency, bit length, etc.) may be restricted by the connected device. • Set the DVD-3930CI’s resolution according to the resolutions with which the connected TV or monitor are compatible. • Use a cable including the HDMI logo (HDMI certified product) for connection of the HDMI terminal. -
Page 16: Making The Initial Settings
Use this procedure to make the settings for the “AUTO” function selected with the HDMI FORMAT button on the remote control unit. Set the DENON LINK terminal’s output according to the DENON LINK version of the connected AV amplifier. Description Set this according to the screen of the connected TV. - Page 17 Making the initial settings Audio settings AUDIO CHANNEL DIGITAL OUTPUT DOWN SAMPLING SOURCE DIRECT BASS ENHANCER Viewing restriction setting COMPRESSION RATING LEVEL PASSWORD REGISTRATION PLAYER MODE Special settings CAPTIONS WALL PAPER SCREEN SAVER DISPLAY AUTO POWER MODE SLIDE SHOW Description Set the audio output.
-
Page 18: Operations For Making The Initial Settings
Before starting playback, make the initial settings according to your usage conditions. Check that all the connections are proper. Turn on the TV’s power and switch its video input so that the DVD-3930CI’s image can be seen. < POWER > Press ON: The power indicator lights green. -
Page 19: Language Code List
Making the initial settings Language setting ( [F F G G ] to select “ ”. [D D H H ] to select the item to be set, then press [ENTER] DIALOG: Set the audio language to be output. SUBTITLE: Sets the language of the subtitles displayed on the TV screen. -
Page 20: Digital Interface Settings
ENGLISH Making the initial settings Digital interface settings ( [F F G G ] to select “ ”. Setting the HDMI RGB picture quality settings Use this procedure to set the digital RGB image range (data range) output from the HDMI terminal. [D D H H ] to select “HDMI RGB SETTING”, then [ENTER]... - Page 21 Making the initial settings The display differs depending on the connected speaker. • To return to the setting screen: Press [RETURN]. ¢ Channel level Set the volume of the different speakers so that the test tones output from them sound to have the same volume. [D D H H ] At the HDMI speaker setting screen, use [ENTER]...
-
Page 22: Setting The Hdmi Auto Format
The following digital audio signals can be transferred: Super Audio CD, DVD-Audio, DVD-Video, music CD and video CD signals • The DENON LINK setting with respect to the DENON LINK version of the connected AV amplifier is as shown below. AV amplifier’s DENON LINK version... -
Page 23: Video Setting
• The picture will not be displayed properly if a video format different from the connected TV’s type is set. ENGLISH Making the initial settings Setting the component video output Use this procedure to set the DVD-3930CI’s component video output format. [D D H H ] to select “COMPONENT VIDEO OUT”, [ENTER]... -
Page 24: Setting The Av Synchronized
ENGLISH Making the initial settings Setting the AV Synchronized Set the video output to synchronize the audio signal. [D D H H ] to select “AUDIO/VIDEO SYNC”, then [ENTER] press [D D H H ] to select the item to be set, then press [ENTER] PROGRESSIVE (Upon purchase): Synchronizes the sound with the progressive mode. -
Page 25: Setting The Horizontal Display Range
Making the initial settings Setting the horizontal display range Set the horizontal display range with respect to the interlaced output. [D D H H ] to select “PIXEL CROPPING”, then press [ENTER] [D D H H ] to select the item to be set, then press [ENTER] OFF (Upon purchase): Select this when a regular consumer TV is connected. -
Page 26: Setting The Digital Output
• When playing linear PCM or packed PCM DVDs with copyright protection, due to considerations for the copyright holder, digital output is not possible for sources of 48 kHz/16 bit or more. To play such sources, either set to “ON”, use DENON LINK or analog connections ( page 9, 10). -
Page 27: Setting The Bass Enhancer
Making the initial settings • When set to “50kHz” or “100kHz”, you can enjoy the DTS recommended full range all-channel sound. (Note however that the subwoofer volume increases by 5 dB, or by 15 dB for Super Audio CDs.) In addition, the 6-channel sources of DVD-Audio discs recorded in the all-channel full range frequency model can also be played. -
Page 28: Viewing Restriction Setting
ENGLISH Making the initial settings Viewing restriction setting ( [F F G G ] to select “ ”. Setting the viewing restriction level A password can be set to restrict (prohibit) the playing of adult DVDs so that children or others cannot view them. [D D H H ] to select “RATING LEVEL”, then press [ENTER]... -
Page 29: Setting The Displaying The Registration Code
Making the initial settings Setting the displaying the registration code Use this procedure to display the registration code for leasing or ® ® purchasing DivX VOD format video files using the DivX VOD (Video On Demand) service. [D D H H ] to select “REGISTRATION”. -
Page 30: Setting The Screensaver
ENGLISH Making the initial settings Setting the screensaver The screensaver functions protects the TV screen from imprinting. [D D H H ] to select “SCREEN SAVER”, then press [ENTER] [D D H H ] to select the item to be set, then press [ENTER] OFF (Upon purchase): When this is set, the screensaver function does not work. -
Page 31: Other Settings
• ON (Upon purchase), OFF: Select whether or not to output video signals. DISPLAY: • ON (Upon purchase), OFF: Select whether or not to light the DVD-3930CI’s display. [PURE DIRECT MEMORY] Press • The settings are stored at “MODE 1” or “MODE 2”. -
Page 32: Changing The Signal Format
ENGLISH Other settings <VIDEO MODE> HDMI SELECT] HDMI FORMAT] About the button names in this explanation < > : Buttons on the main unit : Buttons on the remote control unit Button name only : Buttons on the main unit and remote control unit NOTE: •... -
Page 33: Performing Keystone Correction
Other settings ¢ When the signal format is set to “PC RES.”: When operating from the remote control unit: [HDMI FORMAT] and select the resolution. When operating from the main unit : < VIDEO MODE > Turn to display “HDMI SELECT” on <... -
Page 34: Audio Synchronization Adjustment Procedure
ENGLISH Other settings <VIDEO MODE> [ D H F G ] ENTER PICTURE ADJUST] About the button names in this explanation < > : Buttons on the main unit : Buttons on the remote control unit Button name only : Buttons on the main unit and remote control unit Audio synchronization adjustment procedure Use this procedure to set so that the video signal output method’s... - Page 35 Other settings ¢ Picture quality adjustment setting memory list Item Description STANDARD Upon purchase (initial value) MEMORY1 MEMORY2 Picture quality settings can be stored MEMORY3 at “Adjust 1” to “Adjust 4”. MEMORY4 MEMORY5 ¢ List of picture quality adjustment modes Item Adjusts the difference between the bright and dark parts of CONTRAST...
-
Page 36: Gamma Correction
Reference: Horizontal axis: Brightness level of pictures recorded on disc Vertical axis: Brightness level of pictures upon output from the DVD-3930CI When a bright point on the disc side is adjusted to the “dark” side, pictures whose bright sections are normally hard to see become easier to see. -
Page 37: Basic Operation
Basic Operation <ON/STANDBY> <POWER> POWER OFF About the button names in this explanation < > : Buttons on the main unit : Buttons on the remote control unit Button name only : Buttons on the main unit and remote control unit Turning the power on <... -
Page 38: To Pause Playback
ENGLISH Basic Operation <STILL/PAUSE> [NUMBER] (0~9, +10) AUDIO ANGLE SUBTITLE TOP MENU [ D H F G ] MENU ENTER About the button names in this explanation < > : Buttons on the main unit : Buttons on the remote control unit Button name only : Buttons on the main unit and remote control unit To pause playback... -
Page 39: Using The Top Menu And Dvd Menu
Basic Operation Using the top menu and DVD menu For DVDs containing multiple titles, the desired title can be selected and played from the top menu. Some DVDs also have special menus called “DVD menu”. [TOP MENU] [MENU] Press during playback. [D D H H F F G G ] [NUMBER] 0 ~ 9, +10... -
Page 40: Switching Between Groups And Tracks
ENGLISH Basic Operation SUPER AUDIO CD SETUP SUPER AUDIO [NUMBER] (0~9, +10) CLEAR SEARCH MODE] [ D H F G ] RETURN ENTER PAGE + PAGE – About the button names in this explanation < > : Buttons on the main unit : Buttons on the remote control unit Button name only : Buttons on the main unit and remote control unit... -
Page 41: Setting The Super Audio Cd Playback Area/Layer
CD-R/CD-RW disc, they can be played on the DVD-3930CI. ¢ Listening to CD-ROM, CD-R or CD-RW discs containing WMA files The DVD-3930CI can play music files stored on CD-ROM/CD–R/CD–RW ® discs in WMA (Windows Media Audio) format. - Page 42 • The DVD-3930CI is compatible with WMA files with sampling frequencies (fs) of 32, 44.1 or 48 kHz. • The DVD-3930CI is compatible with MP3 files with bit rates of 32 to 320 kbps, WMA files with bit rates of 64 to 160 kbps.
-
Page 43: About Discs Containing Divx ® Format Files
Remaining time per track (SINGLE ELAPSED) (SINGLE REMAIN) • The DVD-3930CI can play [discs containing] up to 255 folders and 1000 files. • Note that depending on the software used for burning and other conditions, some files may not play or display correctly. -
Page 44: Playing Picture Cds And Fujicolor Cds
Pictures cannot be zoomed in the continuous playback (slideshow) mode. is pressed. • The DVD-3930CI is compatible with picture data recorded in JPEG format, but it is not guaranteed that all picture data in JPEG format can be played. • When burning JPEG files onto CD-R/CD-RW discs, do so with the writing software set to “ISO9660 level 1”. -
Page 45: Repeat And Random Play Of Mp3, Wma, Jpeg And Divx ® Files
Basic Operation Repeat and random play of MP3, WMA, JPEG and DivX ® files FILE REPEAT: The selected file is played repeatedly. FOLDER REPEAT: Playback starts from the selected file, and all the files in that folder are played repeatedly. ALL REPEAT: Playback starts from the selected file, and all the files on the disc are played repeatedly. -
Page 46: Frame-By-Frame Playback (For Dvd-Video Discs And Video Cds Only)
ENGLISH Convenient operations PROGRAM/ [NUMBER] (0~9, +10) CLEAR CALL [ D H G ] ENTER [REPEAT] [RANDOM] About the button names in this explanation < > : Buttons on the main unit : Buttons on the remote control unit Button name only : Buttons on the main unit and remote control unit Frame-by-frame playback (for DVD-Video discs and Video CDs only) -
Page 47: Repeating A Section Between Two Specific Points (A-B Repeat Playback)
• The repeat play and A-B repeat functions may not work for discs on which the elapsed playing time is not indicated on the DVD-3930CI’s display during playback. • During A-B repeat playback, the subtitles just before or after the A- B section may not be displayed. -
Page 48: Operating Using The On-Screen Display
It may not be possible to display the disc information either for discs on which the elapsed playing time is not indicated on the DVD-3930CI’s display during playback. [D D H H F F G G ] to select the item you want to change. -
Page 49: Marking Scenes You Want To See Again Later
Convenient operations ¢ Specifying the elapsed time [NUMBER] 0 ~ 9, +10 ) to input the time, then press [ENTER] • Playback starts from the specified point. For some discs it is not possible to specify the time. For DVD-Video discs: Example: To specify 1h32m47s Press [0] [1] [3] [2] [4] [7] [ENTER]. -
Page 50: Zoomed Play
• The picture will not be displayed properly if a video format different from the connected TV’s type is set. Adjusting the brightness of the display Use this procedure to adjust the brightness of the DVD-3930CI’s display. The brightness can be switched in 3 steps. The display can also be turned off. -
Page 51: Others
Others About the DENON LINK function DENON LINK is a balanced transfer type digital link using high speed transfer elements. Connecting the DENON LINK terminal to a DENON AV amplifier equipped with a special terminal using a special cable enables high speed, high quality transfer of digital audio signals with little loss of signal quality, resulting in high quality sound production. -
Page 52: Troubleshooting
• Set the proper inputs (TV, stereo, etc.). • Check the “DIGITAL OUTPUT” and “COMPRESSION” settings. • Digital signals are not output for Super Audio CDs. Use analog or DENON LINK 3rd connections. • No audio signals are output from the HDMI terminal if “VIDEO OUT” or “DIGITAL OUTPUT”... -
Page 53: Specifications
CD (2) S/N (3) Harmonic distortion (4) Dynamic range Digital audio output: Output terminal : Optical, 1 set / Coaxial, 1 set / DENON LINK, 1 set ¢ General Power supply: AC 120 V, 60 Hz Power consumption: 70 W (In the standby mode : Approx. 1W) Maximum external dimensions: 434 (W) x 139 (H) x 407 (D) mm (17-3/32”... - Page 56 TOKYO, JAPAN www.denon.com Denon Brand Company, D&M Holdings Inc. Printed in China 00D 511 4467 000...
Need help?
Do you have a question about the DVD-3930CI and is the answer not in the manual?
Questions and answers