
Related Manuals for XTZ 99.36 MKII White


Summarization of Contents
About XTZ
Philosophy
Our reference and starting point is to create a natural sound, taking into account that acoustics always is a matter of taste.
XTZ Goal
Our main goal is to provide the best value for money. Our concept: Cut down middlemen, focus on product quality, manufacture cost-effectively, and provide technical solutions.
Contact
Contact information including website and email address for XTZ.
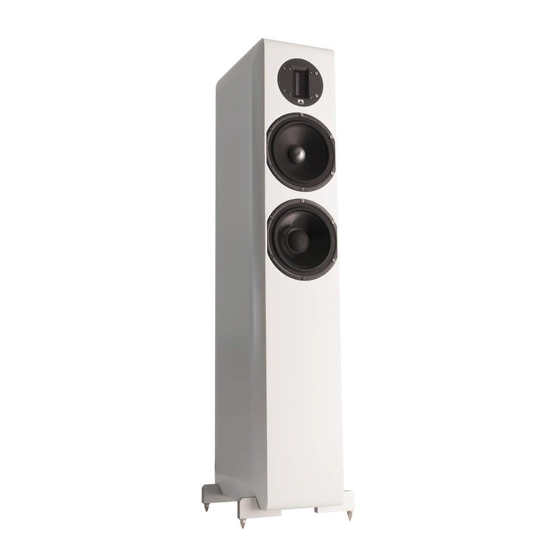
Technical presentation
Cabinet design
The box design with a narrow baffle and curved side provides acoustic advantages. Made from sturdy MDF board and strengthened with bars for stability.
Tweeter driver
Selected a ribbon tweeter with superior transient response and flat frequency response. Features a super light sandwich construction and neodymium magnets.
Woofer/midrange driver
6.5" magnesium driver from Seas Excel series. Features a light yet stiff magnesium cone and rubber surround to prevent edge resonances.
Woofer driver
6.5" SEAS coated paper driver. Features an extremely light and stiff cone, and a moulded 'high flow' driver basket for acoustic transparency.
Crossover / Binding post
Uses a -12/18 dB crossover with fast transient response. Connectors are gold-plated and bi-wiring type, offering multiple coupling modes.
Preparations
Unpackning
Carefully unpack the speaker and save the box for future transport. Contact the retailer immediately if any damage occurs.
Accessories
Lists included accessories: Bass reflex plugs (6 pcs), User manual, and Loops for level adjustment (6pcs).
Practice of sound / Installation and placement tips
In which room do you achieve the best sound?
No matter how good the equipment, the listening environment is crucial. Basic rules for proper loudspeaker installation exist.
Reflections
Carpets, curtains and soft furniture absorb sound. Empty areas reflect sound, potentially causing blurry dialogue and distorted perspective.
Amplification of bass frequencies
Placing speakers near walls amplifies bass. Keep speakers at least 30 cm from walls for clearer sound reproduction.
Furniture
Be aware that furniture may vibrate and cause noise at high volume levels.
Room dimension
Avoid quadratic rooms or rooms where length is twice the width, as these can create unwanted resonance.
Placement of the subwoofer
Subwoofer placement critically affects frequency response. Experimentation is key. Minimize phase errors by placing it near the front system.
Cables
Keep cables short, ensure clean connections, and separate signal cables from power/loudspeaker cables.
Front speakers
Place front speakers symmetrically. Distance should be ~80% of listener distance, with a recommended 45° angle between them.
Why use two Subwoofer
Benefits include higher maximum sound pressure, reduced room dips/standing waves, and better frequency response.
Finally
Good sound is subjective; experiment to find your preference. Wishing you the best of luck!
Mounting and Connecting tips
Mounting alternatives
Speakers are normally placed standing by a wall. Wall placement influences bass level and characteristics; try different distances.
Connect using the correct phase
Always connect using correct phase (+ to +, - to -). Incorrect phasing affects sound, especially in lower frequencies.
Overload
Risk of overloading drivers/amplifiers at high load. Avoid extremely loud volumes or excessive bass/treble adjustments.
The initial playing time
Drivers require 50 to 100 hours of playing time to reach optimal sound. The speaker can be used normally during this period.
Sound settings
Room Tuning - Mechanical adjustment of the boundary frequency
Use bass plugs in bass reflex gates to adjust lower boundary frequency. Setting depends on room size, shape, and personal taste.
Deep bass
Achieved with one bass plug in the lower gate for deepest bass, suitable for smaller rooms. Bass level set at mode 2 (+3dB).
"Quick" bass
Achieved without bass plugs for 'quick' bass, suitable for large rooms. Lower frequencies are often amplified by the room.
Neutral bass
Achieved with two plugs in two gates for a flat frequency response. Bass level set at mode 1 (odB).
Basic setting for neutral bass reproduction
No single setting suits all rooms. An average room (20m²) suggests two bass plugs, one midrange plug, and bass/treble at mode 1 (odB).
Level adjustment in the treble range
Treble level adjustable in four modes using a loop connector, ranging from -4dB to +3dB for a flat frequency response.
Level adjustment in the bass range
Bass level adjustable in four modes using a loop connector, offering neutral (odB) or increased by 3dB.
Binding post / Biwiring
Default setting uses all terminals with loops. Other modes allow feeding only the tweeter, midrange, or woofer.
Technical specifications
Construction type
2 1/2-way system with separate boxes. Bass reflex cabinet can be set as closed box with eight bass modes (Room Tuning). Treble/bass levels are adjustable.
Dimensions
244 x 910 x 352 mm (W x H x D).
Weight
19.5 kg/pcs.
Impedance
4-8 ohm.
Binding post
Gold plated bi-wiring / Banana plug / Pole screw.
Efficiency
88dB.
Power
550 W Short term IEC 268-5, 200 W Long term IEC 268-5.
Tweeter driver
Ribbon tweeter, SACD/DVD-Audio-ready, Sandwich ribbon cone, neodymium magnets, ceramic carbon steel chassis.
Woofer/midrange driver
6.5" SEAS Excel, Magnesium driver, moulded 'high flow' basket, powerful magnet. Weight 1900 gram.
Woofer
6.5" SEAS, coated paper driver, moulded high flow basket, powerful magnet. Weight 1900 gram.
Connections and settings
Gold plated biwiring. Bass reflex can be set to closed box. Bass/treble adjustable in 4 modes. Bass can be set to 8 modes.
Service & support
"Do-It-Yourself"- service
Allows unmounting and sending defective parts for exchange. Contact XTZ before dismounting if uncertain. Save original packaging.
If something is broken
Warranty applies for manufacturing defects. Warranty does not apply if user causes additional damage during dismounting.
Where to send the product for a warranty repair
Refer to retailer for service. Contact support@xtz.se for questions. Pack product carefully, enclose receipt and defect description.
Support
Contact free support for installation advice or problems. Email support@xtz.se with phone number for verbal help.
Need help?
Do you have a question about the 99.36 MKII White and is the answer not in the manual?
Questions and answers