Table of Contents
Advertisement
This new drill has been engineered and manufactured to our Ryobi's high standard for dependability, ease of operation,
and operator safety. When properly cared for, the drill will give you years of rugged, trouble-free performance.
WARNING:
To reduce the risk of injury, the user must read and understand the operator's manual before using this product.
Thank you for buying a Ryobi product.
SAVE THIS MANUAL FOR FUTURE REFERENCE
OPERATOR'S MANUAL
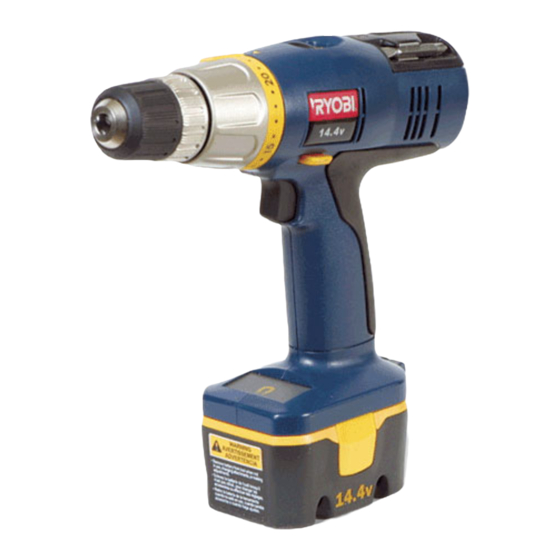
CORDLESS DRILL-DRIVER
MODEL NOS. SA1202 / SA14402 / SA1802
Advertisement
Table of Contents

Related Manuals for Ryobi SA14402


Summary of Contents for Ryobi SA14402
- Page 1 This new drill has been engineered and manufactured to our Ryobi’s high standard for dependability, ease of operation, and operator safety. When properly cared for, the drill will give you years of rugged, trouble-free performance. WARNING: To reduce the risk of injury, the user must read and understand the operator’s manual before using this product.
-
Page 2: Table Of Contents
Parts Ordering / Service ... 20 The Cordless Drill-Driver has many features for making the use of this product more pleasant and enjoyable. Safety, performance, and dependability have been given top priority in the design of this product making it easy to maintain and operate. -
Page 3: General Safety Rules
Use battery operated tool only with specifically designated battery pack. Use of any other batteries may create a risk of fire. Use battery only with charger listed. MODEL BATTERY PACK SA1202 130147008 SA14402 130224010/1314702 SA1802 130224007/1323303 1322401/130256001 Do not abuse the cord. -
Page 4: General Safety Rules
SERVICE Tool service must be performed only by qualified repair personnel. Service or maintenance performed by unqualified personnel may result in a risk of injury. Hold tool by insulated gripping surfaces when performing an operation where the cutting tool may contact hidden wiring. -
Page 5: Important Safety Instructions For Charger
IMPORTANT SAFETY INSTRUCTIONS FOR CHARGER WARNING: Read and understand all instructions. Failure to follow all instructions listed below, may result in elec- tric shock, fire and/or serious personal injury. Never use a battery that has been dropped or received a sharp blow. A damaged battery is subject to explosion. -
Page 6: Symbols
Important: Some of the following symbols may be used on your tool. Please study them and learn their meaning. Proper interpretation of these symbols will allow you to operate the tool better and safer. SYMBOL NAME Volts Amperes Hertz Minutes Alternating Current Direct Current No Load Speed... -
Page 7: Specifications
Charger Battery Pack (2) Operator’s Manual Case You may use the two speed drill for the purposes listed below: Drilling in wood Drilling in ceramics, plastics, fiberglass, and laminates Drilling in both hard and soft metals Using driving accessories, such as driving screws with screwdriver bits... -
Page 8: Features
Your drill has a two-speed gear train designed for drilling or driving at LO (1) or HI (2) speeds. A slide switch is located on top of your drill to select either LO (1) or HI (2) speed. FORWARD/REVERSE SELECTOR... - Page 9 FEATURES LEVEL TORQUE TWO SPEED ADJUSTMENT GEAR TRAIN (HI-LO) RING STORAGE AREA KEYLESS CHUCK DIRECTION OF ROTATION SELECTOR SWITCH TRIGGER MAG TRAY ™ (SCREW HOLDER) TOP VIEW OF LEVEL FOR END VIEW OF LEVEL FOR HORIZONTAL DRILLING VERTICAL DRILLING BATTERY PACK Fig.
-
Page 10: Adjustments
Your drill has a two-speed gear train designed for drilling or driving at LO (1) or HI (2) speeds. A slide switch is located on top of your drill to select either LO (1) or HI (2) speed. When using drill in the LO (1) speed range, speed will decrease and unit will have more power and torque. -
Page 11: Installing Bits
Insert your drill bit into the chuck the full length of the jaws. See Figure 4. Tighten the chuck jaws on the drill bit. To tighten, grasp and hold the collar of the chuck with one hand, while rotating the chuck body with your other hand. - Page 12 • 21 - 24 ( ) ...For heavy drilling. BIT STORAGE See Figure 7. When not in use, bits provided with your drill can be placed in the storage area located on the top of your drill. ADJUSTMENTS TO DECREASE...
-
Page 13: Operation
WARNING: Do not allow familiarity with the drill-driver to make you careless. Remember that a careless fraction of a second can result in a serious personal injury. LED FUNCTION OF CHARGER See Figure 8. LED WILL BE LIGHTED TO INDICATE STATUS OF... -
Page 14: Switch Lock
If the charger/charging assembly does not charge your battery pack under normal circumstances, return both the battery pack and charger/charging assembly to your nearest Ryobi Authorized Service Center for electrical check. For more information on the battery recycling call 1-800-8 BATTERY. - Page 15 If you are not prepared, this loss of control can result in possible serious injury. When drilling metals, use a light oil on the drill bit to keep it from overheating. The oil will prolong the life of the bit and increase the drilling action.
- Page 16 See Figures 12 and 13. A convenient new feature provided with your drill is a level. It is recessed in the motor housing on top of your drill. It can be used to keep drill bit level during drilling operations.
-
Page 17: Chuck Removal
WARNING: When servicing use only identical Ryobi replacement parts. Use of any other parts may create a hazard or cause product damage. Do not abuse power tools. Abusive practices can damage tool as well as workpiece. WARNING: Do not at any time let brake fluids, gasoline, petro- leum-based products, penetrating oils, etc. -
Page 18: Maintenance
Open the chuck jaws and remove the hex key. Remove the chuck screw by turning it in a clockwise direction. See Figure 16. NOTE: The screw has left hand threads. Insert the hex key in the chuck and tighten chuck jaws securely. - Page 19 NOTES Page 19...
-
Page 20: Parts Ordering / Service
Ryobi Authorized Service Center. Be sure to provide all pertinent facts when you call or visit. Please call 1-800-525-2579 for your nearest Ryobi Authorized Service Center. You can also check our web site at www.ryobitools.com for a complete list of Authorized Service Centers.
Need help?
Do you have a question about the SA14402 and is the answer not in the manual?
Questions and answers