La Crosse Technology 308-1425B Manual
- Instruction manual (15 pages) ,
- Faqs (13 pages) ,
- Quick setup manual (9 pages)
Advertisement
- 1 INITIAL SETUP
- 2 LCD FEATURES
- 3 BUTTONS
- 4 SET TIME, DATE, ETC.
- 5 BACKLIGHT (HI/LO/OFF)
- 6 MOON PHASE
- 7 ANIMATED COLOR FORECAST ICONS
- 8 FORECAST TENDENCY INDICATORS
- 9 24 HOUR PRESSURE HISTORY GRAPH
- 10 TEMPERATURE ALERTS
- 11 ARM/DISARM TEMPERATURE ALERTS
- 12 TEMPERATURE ALERT SOUNDS
- 13 SEARCH FOR OUTDOOR SENSOR
- 14 MAX/MIN TEMPERATURES
- 15 HEAT INDEX/DEW POINT
- 16 TEMPERATURE TREND ICONS
- 17 MANUAL WWVB RADIO-CONTROLLED TIME SEARCH
- 18 TIME ALARM
- 19 DEACTIVATE TIME ALARM
- 20 SNOOZE
- 21 POSITION THE FORECAST STATION
- 22 POSITION OUTDOOR SENSOR
- 23 SPECIFICATIONS
- 24 LOW BATTERY ICON
- 25 CARE AND MAINTENANCE
- 26 Documents / Resources
INITIAL SETUP
- Insert 2 new AA batteries (not included) into the TX141TH-Bv2 sensor. Observe the correct polarity.
![]()

- Insert the 5.0 volt AC adapter (included) into the forecast station.
- (Optional) Insert 3 AAA batteries (not included) into the forecast station.
- After 5 minutes, place the sensor outside in a shaded location. Maximum transmission range is 300 ft. (91 meters).


Note: If the outdoor temperature area shows dashes after 3 minutes, hold the HEAT/DEW button on the weather station to search for the sensor.
Press the TX button on the sensor to send a signal.
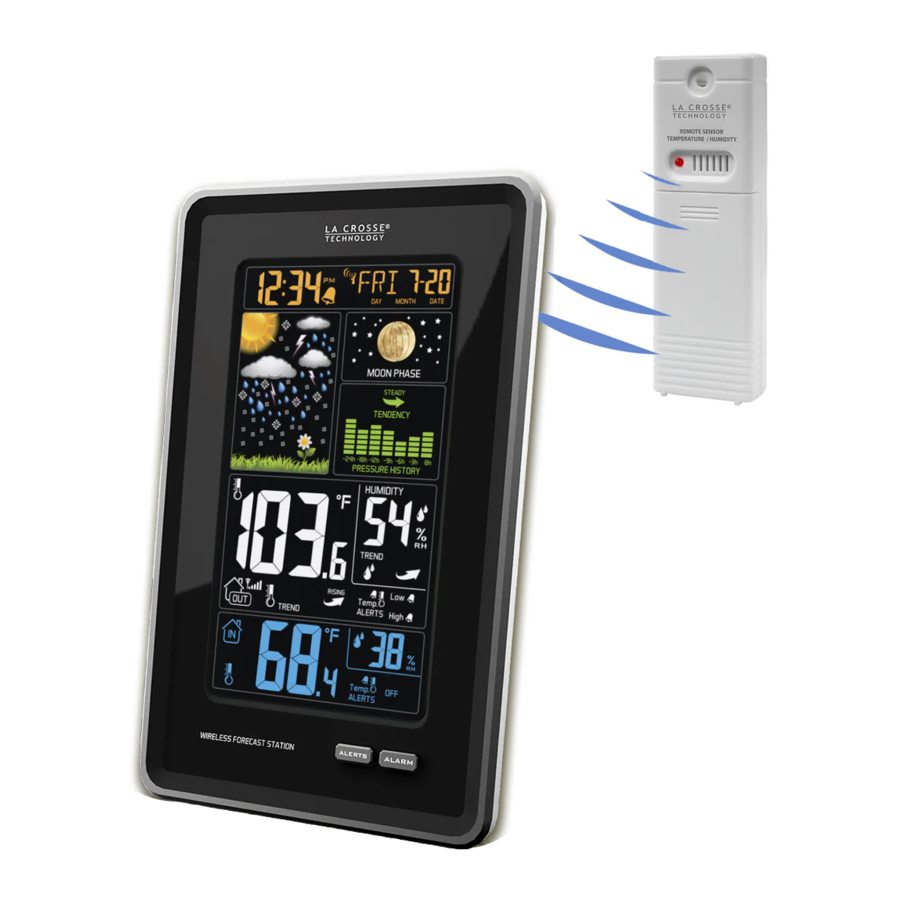
LCD FEATURES

BUTTONS
▼(Down) Button
Setting-
- Press to decrease values during setting.
- Hold 2 seconds to quickly adjust values.
Default Time Display-
- Press to display minimum temperature/humidity.
- Hold 2 seconds to clear minimum temperature/humidity memory.
Temperature Alert-
- Press to disarm alerts
TIME SET Button
Default Time Display-
- Press to start or stop a WWVB time signal search
- Hold for 3 seconds to set time/calendar, etc.
SNOOZE/LIGHT (HI-LOW-OFF) Button
Default Time Display-
- Press to change the LCD backlight brightness. HI/LOW/OFF
- Press to activate backlight for 10 seconds (without adaptor).
Time Alarm-
- Press to activate the snooze function when alarming
HEAT/DEW/SENSOR SEARCH button
Default Time Display-
- Press once to view Heat Index.
- Press twice to view Dew Point.
- Hold to search for Outdoor sensor.
▲(UP) Button
Setting-
- Press to increase the values during setting.
- Hold 2 seconds to quickly adjust values.
Default Time Display-
- Press to view maximum temperature/humidity.
- Hold 2 seconds to clear maximum temperature/humidity memory.
Temperature Alert-
- Press to arm alerts
ALERT Button
Default Time Display-
- Press to toggle between Outdoor High Alert, Outdoor Low Alert, Indoor High Alert and Indoor Low Alert.
- Hold to enter Alert setting
ALARM Button
Default Time Display-
- Press once to show alarm time
- Hold for 2 seconds enter alarm setting mode
Alarm Mode-
- Press to activate or deactivate time alarm.
SET TIME, DATE, ETC.
- Hold the TIME SET button to enter time set mode.
- Press the ▲ or ▼ button to adjust values.
- Press the TIME SET button to confirm adjustments and move to the next item.
Settings order:
- WWVB Reception
- Time Zone
![]()
- DST Indicator,
- 12/24 Hour Time Format
- Hour
- Minutes,
- Year
- Month
- Date
- Fahrenheit/Celsius


Press the TIME SET button to exit or wait 20 seconds.
BACKLIGHT (HI/LO/OFF)
When using A/C power (for constant light):
- Press the HI/LOW/OFF button to adjust the backlight.
When using battery power only:
- Press the HI/LOW/OFF button for 10 second backlight.
MOON PHASE
The Moon phase is based on the lunar calendar.

ANIMATED COLOR FORECAST ICONS
Animated forecast icons use changing atmospheric pressure to predict weather conditions for the next 12-hours with 70-75% accuracy.
INTELLIGENT WEATHER FORECAST
This station learns; please allow 7-10 days for barometric calibration. This will ensure an accurate personal forecast for your location.

- The forecast station samples the barometric pressure every twelve minutes.
- These samples are averaged hourly and daily then stored in nonvolatile memory.
- The three hour pressure icon change is based off of the last four average hourly readings.
The icons forecast the weather in terms of getting better or worse and not necessarily sunny or rainy as each icon indicates.
FORECAST TENDENCY INDICATORS
Working with the forecast icons, the tendency indicators let you know if the weather is improving, steady or worsening.

24 HOUR PRESSURE HISTORY GRAPH

- The bar chart indicates the air pressure history trend over the last 24 hours.
- The columns represent the pressure change ("InHg" or "hPa") readings at specific times.
- The "0" is equal to the current pressure and each bar represents how past pressure was compared to the current pressure.
- Read the graph from left to right. If the bars are rising, it means that the weather is getting better due to the increase of air pressure.
- If the bars go down, it means the air pressure has dropped and the weather is expected to get worse from the present time.
TEMPERATURE ALERTS
The forecast station offers individual, programmable high and low temperature alerts.
Hold the ALERT button for five seconds, until the forecast station beeps, to select and set temperature alert values. Each alert value will flash separately during alert set mode.
- OUTDOOR HIGH alert will flash. Press the ▼ or ▲ buttons to set the alert value, and press the ALERT button to confirm. Then press the ALERT button again switch to OUTDOOR LOW setting.
- OUTDOOR LOW alert will flash. Press the ▼ or ▲ buttons to set the alert value, and press the ALERT button to confirm. Then press the ALERT button again switch to INDOOR HIGH setting.
- INDOOR HIGH alert will flash. Press the ▼ or ▲ buttons to set the alert value, and press the ALERT button to confirm. Then press the ALERT button again switch to INDOOR LOW setting.
- INDOOR LOW alert will flash. Press the ▼ or ▲ buttons to choose the value, and press the ALERT button to confirm and exit.
Note: After selecting temperature alert values use the next step to turn individual alerts ON or OFF.
ARM/DISARM TEMPERATURE ALERTS
- In normal time mode, press and release the ALERT button to toggle between:
![]()
- Outdoor HI
- Outdoor Lo
- Indoor HI
- Indoor LO
- Press the ▲ button to arm the selected alert.
- The alert bell appears when each alarm is activated.
- Press the ▼ button to disarm the selected alert.
- OFF will show in the Alerts area if no alert is active.

TEMPERATURE ALERT SOUNDS
- When temperature alert sounds, the corresponding alert bell will flash.
- The alert beeps once every minute, until the temperature is out of alert range.
- Press any button to stop alert. The alert bell will still show.
- Disarm Alert: In normal mode, hold and release the ALERT button to select the alert to disarm. With HI or LO alert selected, press the ▼ button disarm alert.
SEARCH FOR OUTDOOR SENSOR
- Hold the HEAT/DEW button to search for the outdoor sensor.
- The strength signal icon will animate until the sensor signal is received or for 3 minutes if no signal available.
![]()

MAX/MIN TEMPERATURES
The Forecast station provides the daily minimum and maximum temperatures each day starting at midnight (12:00 AM). The Forecast station automatically resets the min/max temperatures at midnight (12:00 AM).
View MIN data: Press and release the ▼ button to view the minimum Indoor and Outdoor Temperatures.
Reset MIN data: Hold the ▼ button for five seconds and the Indoor and Outdoor Minimum Temperatures will be reset.
View MAX data: Press and release the ▲button to view the maximum Indoor and Outdoor Temperatures.
Reset MAX data: Hold the ▲ button for five seconds and the Indoor and all Outdoor Maximum Temperatures will be reset.
Note: The temperature areas will show dashes briefly then return to current temperatures.
HEAT INDEX/DEW POINT
The HEAT/DEW button toggles between Heat Index, Dew Point, and Mold Risk. Each feature will display for 10 seconds then return to default display if the button is not pressed again.
View Heat Index: From a normal display, press the HEAT/DEW button once and Heat Index will show in place of the outdoor temperature.
Note: Heat index will be the same number as the temperature until the outdoor temperature is above 80°F (26.7°C).
View Dew Point Temperature: From a normal display, press the HEAT/DEW button twice and Dew Point will show place of the outdoor temperature.
Note: Dew Point is lower than the actual temperature.
TEMPERATURE TREND ICONS
The temperature (2°F/1°C) and humidity (3% RH) trend indicators update every 30 minutes or less.
|  |
|  |
|  |
MANUAL WWVB RADIO-CONTROLLED TIME SEARCH
- Hold the TIME SET button to start or stop a WWVB signal search.
- WWVB Icon will flash
![]()

For information about WWVB visit: www.nist.gov/pml/div688/grp40/wwvb.cfm
TIME ALARM
Hold the ALARM button for 5 seconds to enter the alarm time set mode.
- The alarm hour digit will flash in the time display.
- Press and release the ▼ or ▲ buttons to select the hour.
- Press and release the ALARM button to set the minutes. The minute digits will flash.
- Press and release the ▼ or ▲ buttons to select the minutes.
- Confirm with the ALARM button and exit.
- The bell icon will show indicating the alarm is active.
- The bell icon will flash when the alarm is sounding.
DEACTIVATE TIME ALARM
- Press and release the ALARM button once to show alarm time.
- Press and release the ALARM button to deactivate the Alarm.
- The bell icon will disappear indicating the alarm is no longer active.
![]()

SNOOZE
- When the alarm sounds, press the SNOOZE/LIGHT button to trigger snooze alarm for 10 minutes. The snooze icon Zz will flash by the weekday when the snooze feature is active.
- To stop alarm for one day, press ALARM button, while in snooze mode. The bell icon will remain solid.
Note: When the alarm sounds, it continues for 2 minutes and then shuts off completely.
POSITION THE FORECAST STATION
The forecast station has a wide base to sit on a desk or table.
- For best WWVB reception orientate the forecast station with the front of the back facing Ft. Collins, Colorado.
- Choose a location 6 feet or more from electronics such as cordless phones, gaming systems, televisions, microwaves, routers etc.
- Place within range of the outdoor sensor.
- The maximum transmitting range in open air is 300 feet (91 meters). Obstacles such as walls, windows, stucco, concrete and large metal objects can reduce the range.
POSITION OUTDOOR SENSOR
- Mount the outdoor sensor on a north-facing wall or in any well shaded area. Under an eave or deck rail is preferred.
- The maximum transmitting range to the forecast station is over 300 feet (91 meters) in open air, not including walls.
SPECIFICATIONS
| Indoor: | |
| Temperature Range: | +32°F to +122°F (0°C to 50°C) |
| Humidity Range: | 10%-99% (RH) |
| Interval: | About every 30 seconds |
| Outdoor: | |
| Temperature Range: | -40°F to 140°F (-40°C to 60°C) |
| Alkaline Batteries: | -20°F to 140°F (-28.8°C to 60°C) |
| Lithium Batteries: | -40°F to 140°F (-40°C to 60°C) |
| Note: Temperatures below - 20°F (-28.8°C) require Lithium batteries in the outdoor sensor. | |
| Humidity Range: | 10%-99% (RH) |
| Distance: | Over 300 ft. (91 meters) RF 433MHz (open air) |
| Interval: | About every 50 seconds |
| Power: | |
| Primary AC Power: | AC6#: GPU280500150WA00 5.0 Volt 150mA adapter included |
| Optional: | 3-AA, IEC, LR6 batteries (not included) |
| TX141TH-Bv2 Sensor: | 2-AA, IEC, LR6 batteries (not included) |
| Battery Life: | Battery life is over 24 months when using reputable batteries. |
| Dimensions: | |
| Forecast Station: | 6.16" W x 9.65" H x 0.925" D (156.5 x 245.1 x 23.5 mm) |
| TX141TH-Bv2 Sensor: | 5.11" H x 1.57" W x 0.82" D (129.8 x 40 x 20.8 mm) |
LOW BATTERY ICON
- When displayed in Outdoor Temperature section, replace batteries in the outdoor sensor.
- When displayed in Indoor Temperature section, replace batteries in the forecast station.
![]()

CARE AND MAINTENANCE
- Do not mix old and new batteries.
- Do not mix Alkaline, Standard, Lithium, or Rechargeable Batteries.
- Always purchase the correct size and grade of battery suitable for the intended use.
- Replace all batteries of a set at the same time.
- Clean the battery contacts and also those of the device prior to battery installation.
- Ensure the batteries are installed correctly with regard to polarity (+and -).
- Remove batteries from equipment when it is not to be used for an extended period.
- Promptly remove expired batteries.
www.lacrossetechnology.com/support
Documents / Resources
References
Download manual
Here you can download full pdf version of manual, it may contain additional safety instructions, warranty information, FCC rules, etc.
Advertisement


Need help?
Do you have a question about the 308-1425B and is the answer not in the manual?
Questions and answers