Table of Contents
Advertisement
Quick Links
USER MANUAL
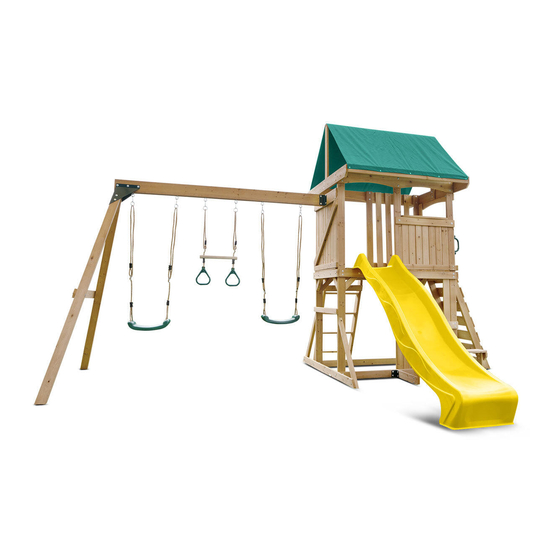
Carindale
Play Centre
WARNING: The disassembled product may contain small parts
which pose a choking hazard to children under 3.
IMPORTANT:
This product may contain sharp points and small parts prior to assembly. The owner's manual contains
safety, assembly, use and maintenance instructions. This product must be assembled by an adult who
has read and understood these instructions. Keep the packaging away from children and dispose of all
packaging before use.
For the installer and your children's safety, it is important to fully read and understand the instructions
and safety hazards before commencing the assembly of the product.
NOTE:
This manual should not be used to guide your purchasing decision. Your product, and the contents
inside its carton, may vary from what is listed in this manual. This manual may also be subject to
updates or changes. Updated manuals are available through our website at www.lifespankids.com.au.
Find the Digital
Manual Online
Advertisement
Table of Contents

Related Manuals for LifeSpan Kids Carindale Play Centre


Summary of Contents for LifeSpan Kids Carindale Play Centre
- Page 1 USER MANUAL Carindale Play Centre Find the Digital Manual Online WARNING: The disassembled product may contain small parts which pose a choking hazard to children under 3. IMPORTANT: This product may contain sharp points and small parts prior to assembly. The owner’s manual contains safety, assembly, use and maintenance instructions.
-
Page 2: Table Of Contents
TABLE OF CONTENTS I. GENERAL SAFETY INSTRUCTIONS 1.1 Danger for Children 1.2 Risk of Injuries 1.3 Product Damage 1.4 Assembly Advice II. SAFETY INSTRUCTIONS III. EXPLODED DIAGRAM IV. ASSEMBLY INSTRUCTIONS V. MAINTENANCE VI. FREQUENTLY ASKED QUESTIONS VII. WOOD ADVICE VIII. WARRANTY... -
Page 3: General Safety Instructions
I. GENERAL SAFETY INSTRUCTIONS NOTE: This product is intended for outdoor domestic use only. 1.1 DANGER FOR CHILDREN WARNING: No eating while using the product at the same time. • Children do not recognize potential dangers from this product. The unassembled product must be stored out of reach of children and pets. -
Page 4: Assembly Advice
1.3 PRODUCT DAMAGE • Do not make alterations to the product. Only use original spare parts. Qualified technicians should only carry out repairs – improper repairs can lead to danger for the user. Use this product only as described in this manual. 1.4 ASSEMBLY ADVICE •... -
Page 5: Safety Instructions
II. SAFETY INSTRUCTIONS A maximum of 68 kgs. per child is recommended for play activities designed for individual use. A maximum of 54 kgs. per child is recommended for play activities designed for multiple child use. A maximum of 4 children is recommended for this swing set •... - Page 6 Consumer Information Sheet for Playground Surfacing Materials The US Consumer Product Safety Commission (CPSC) estimates that about 100 000 playground equipment-related injuries resulting from falls to the ground surface are treated annually in US hospital emergency rooms. Injuries involving this hazard pattern tend to be among the most serious of all playground injuries, and have the potential to be fatal, particularly when the injury is to the head.
-
Page 7: Exploded Diagram
III. EXPLODED DIAGRAM EXPLODED DIAGRAM... -
Page 8: Assembly Instructions
IV. ASSEMBLY INSTRUCTIONS B O A R D L I S T B1 = 1 2420x134x50mm B2 = 2 2159x76x50mm C1 = 1 2260x86x35mm C2 = 1 2260x86x35mm C3 = 1 2260x86x35mm C4 = 1 2260x86x35mm C5 = 1 2260x86x35mm C6 = 1 F8 = 1 1172x86x35mm... - Page 9 H4 = 4 F15 = 1 1000x86x16mm 1470x86x24mm F16 = 2 H5 = 7 800x60x24mm 880x86x16mm F17 = 2 H6 = 1 778x60x24mm 880x125x16mm F18 = 2 H7 = 2 172x86x24mm 730x110x16mm F19 = 2 H8 = 14 300x86x24mm 848x86x16mm F2 = 1 1774x86x24mm F20 = 1...
- Page 10 P A R T S L I S T W8/15 W10/18 W12/28 Washer x 12 Washer x 96 Washer x 6 BM615 BM818 N815 B-NUT x 12 B-NUT x 15 NUT x 106 A-NUT8 x 6 SW16 M625 Screw x 10 Bolt x 12 SW25 M821...
- Page 11 (2) L651003 (1) L651022 (1) L651023 (1) L651024 (6) 650007 Star Bit (S) Star Bit (L) (4) 158003 Allen Wrench (S) (1) L650050 Allen Wrench (L) (6) 158004 (2) 139002 (1) 158031 2080mm*1476mm Instructions (7) 139070 (1) 158090 (1) L651015 (1) L650001 ASSEMBLY INSTRUCTIONS...
- Page 12 STEP 1 N815 W10/18 M855 M855 N815 W10/18 ASSEMBLY INSTRUCTIONS...
- Page 13 STEP 2 W10/18 N815 M855 M855 N815 W10/18 ASSEMBLY INSTRUCTIONS...
- Page 14 STEP 3 Note the orientation of the pilot holes N815 W10/18 M8107 M8107 N815 W10/18 ASSEMBLY INSTRUCTIONS...
- Page 15 STEP 4 Note the orientation of the pilot holes N815 W10/18 M8107 M8107 N815 W10/18 ASSEMBLY INSTRUCTIONS...
- Page 16 STEP 5 N815 W10/18 M865 M865 N815 W10/18 ASSEMBLY INSTRUCTIONS...
- Page 17 STEP 6 SW50 FA28 SW50 ASSEMBLY INSTRUCTIONS...
- Page 18 STEP 7 W10/18 M855 N815 M6SW55 M6SW55 N815 M855 W10/18 ASSEMBLY INSTRUCTIONS...
- Page 19 STEP 8 SW60 SW60 ASSEMBLY INSTRUCTIONS...
- Page 20 STEP 9 M6SW55 N815 M855 W10/18 M6SW55 N815 M855 W10/18 ASSEMBLY INSTRUCTIONS...
- Page 21 STEP 10 SW35 SW35 SW35 ASSEMBLY INSTRUCTIONS...
- Page 22 STEP 11 BM615 158004 x 6 W8/15 M625 W8/15 M625 BM615 ASSEMBLY INSTRUCTIONS...
- Page 23 STEP 12 spacing 56mm SW35 SW35 SW35 ASSEMBLY INSTRUCTIONS...
- Page 24 STEP 13 SW50 SW50 ASSEMBLY INSTRUCTIONS...
- Page 25 STEP 14 SW50 SW50 ASSEMBLY INSTRUCTIONS...
- Page 26 STEP 15 SW50 SW50 ASSEMBLY INSTRUCTIONS...
- Page 27 STEP 16 N815 W10/18 M855 M855 N815 W10/18 ASSEMBLY INSTRUCTIONS...
- Page 28 STEP 17 SW35 SW35 SW35 ASSEMBLY INSTRUCTIONS...
- Page 29 STEP 18 SW35 SW35 SW35 ASSEMBLY INSTRUCTIONS...
- Page 30 STEP 19 SW35 SW35 SW35 SW35 SW35 ASSEMBLY INSTRUCTIONS...
- Page 31 STEP 20 N815 W10/18 M855 M855 N815 W10/18 ASSEMBLY INSTRUCTIONS...
- Page 32 STEP 21 N815 N815 W10/18 W10/18 M855 M855 M8107 M8107 SW50 W10/18 W10/18 N815 N815 SW50 W10/18 M855 N815 M8107 ASSEMBLY INSTRUCTIONS...
- Page 33 STEP 22 SW35 SW35 SW35 SW35 SW35 ASSEMBLY INSTRUCTIONS...
- Page 34 STEP 23 L651015 BM818 BM818 M821 M821 M821 BM818 ASSEMBLY INSTRUCTIONS...
- Page 35 STEP 24 N815 W10/18 M845 N815 M845 W10/18 M845 N815 W10/18 ASSEMBLY INSTRUCTIONS...
- Page 36 STEP 25 SW25 SW50 SW50 SW25 SW50 ASSEMBLY INSTRUCTIONS...
- Page 37 STEP 26 SW50 SW50 SW50 SW50 ASSEMBLY INSTRUCTIONS...
- Page 38 STEP 27 N815 W12/28 SWING HANGER-650007 W12/28 N815 Insert the N815 Insert the swing hanger into the beam by hammer into the beam and fix them with nuts N815 as tightly as possible Fix the AN8 as tightly as possible W12/28 N815 ASSEMBLY INSTRUCTIONS...
- Page 39 STEP 28 L651022 M845 M845 L651023 M6SW35 BM818 BM818 M6SW35 M845 BM818 M6SW35 ASSEMBLY INSTRUCTIONS...
- Page 40 STEP 29 N815 M896 W10/18 M896 W10/18 N815 ASSEMBLY INSTRUCTIONS...
- Page 41 STEP 30 BM818 L651024 L651003 M869 BM818 BM818 M845 M845 M869 BM818 ASSEMBLY INSTRUCTIONS...
- Page 42 STEP 31 N815 N815 M821 Hang the swing M821 L650050 139002 139002 M821 N815 ASSEMBLY INSTRUCTIONS...
- Page 43 STEP 32 SW35 SW35 SW35 ASSEMBLY INSTRUCTIONS...
- Page 44 STEP 33 SW50 SW50 ASSEMBLY INSTRUCTIONS...
- Page 45 STEP 34 SW50 SW50 ASSEMBLY INSTRUCTIONS...
- Page 46 STEP 35 W10/18 SW50 N815 M845 M845 W10/18 SW50 N815 ASSEMBLY INSTRUCTIONS...
- Page 47 STEP 36 158031 SW16 SW16 SW16 ASSEMBLY INSTRUCTIONS...
- Page 48 STEP 37 M6SW35 158003 M6SW35 M6SW35 ASSEMBLY INSTRUCTIONS...
- Page 49 STEP 38 Put the slide braces T1 under the floor boards and fix the slide with floor and slide braces together L650001 SW50 ASSEMBLY INSTRUCTIONS...
- Page 50 STEP 39 M6SW35 139070 x 7 M6SW35 ASSEMBLY INSTRUCTIONS...
-
Page 51: Maintenance
V. MAINTENANCE WARNING: Please keep for future reference. We recommend regular maintenance to be conducted at the beginning of each season as well as at regular intervals during the usage session for your play equipment to ensure all main parts/fixings are tightly secured, well-oiled and intact to avoid failure, injury or hazards. -
Page 52: Frequently Asked Questions
9. The end beam is not straight up and down. Why not? This is normal. Lifespan Kids designs playsets this way to ensure the strongest structure possible. The slight angle adds strength and reduces rocking and twisting. -
Page 53: Wood Advice
VII. WOOD ADVICE Our products are manufactured from premium timber. Great care is taking in selecting, machining, and treating the timber before it is sold to you. 1. Inspect wood parts monthly. The grain of the wood sometimes will lift in dry periods causing splinters to appear. - Page 54 WHEN SHOULD WOOD CRACKS BE A CONCERN? Most of the wood splits will never become large enough to affect the reliability and strength of our products, however, there can be rare cases where splits can occur. This happens when a crack develops past the halfway point from the timber, splitting it into two separate pieces.
-
Page 55: Warranty
If you have purchased this product from the Official Lifespan Kids website, please visit www.lifespankids.com.au/warranty-form For support outside of warranty, if you wish to purchase replacement parts or request a repair or service, please visit www.lifespankids.com.au/warranty-form and fill in our Repair/Service Request Form or... - Page 56 www.l i f e s p an k i d s . co m . a u...
Need help?
Do you have a question about the Carindale Play Centre and is the answer not in the manual?
Questions and answers