Table of Contents
Advertisement
Quick Links
Advertisement
Table of Contents
Troubleshooting

Related Manuals for Wacom DTI-520UB


Summary of Contents for Wacom DTI-520UB
-
Page 2: So That The Dti-520Ub May Be Used Safely
The following symbols appear throughout this user guide in order to ensure safe use of the DTI- 520UB (hereafter referred to as “DTI-520UB,” “the product” or “this product”). Please read these items carefully and always heed the Warning and Caution items when using your DTI-520UB. - Page 3 Caution ■ Do not use organic solvents to clean ■ Do not place heavy objects on this product. the product. When cleaning the product, never use Do not put excessive weight, or place such organic solvents as alcohol. Such heavy objects on the product. These solvents may cause discoloration and actions may cause product failure.
- Page 4 Caution ■ ■ Do not connect or disconnect any Do not place the product in either very cable while the product or your hot or very cold places. computer is on. Do not place the product in very hot (35 degrees centigrade or more) or very cold Do not connect or disconnect any (5 degrees centigrade or less) locations.
- Page 5 Wacom within 30 days of purchase. Regarding Trademarks ● Wacom are registered trademarks of WACOM Company, Limited.
-
Page 6: Table Of Contents
Table of Contents So that the DTI-520UB may be Used Safely......1 Table of Contents .................5 Component Functions ..............6 Opening the Stand ..................7 Using the Penholder ..................7 Installing DTI-520UB on a Mount Arm ............8 Accessory Check .................9 Connecting DTI-520UB ............10... -
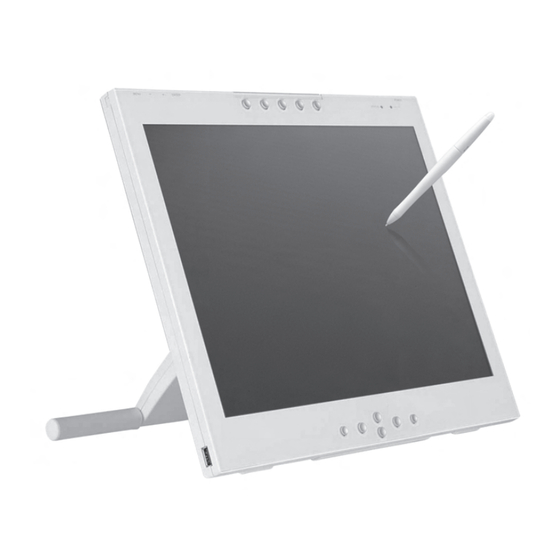
Page 7: Component Functions
When the pen switch is on, this will become blue. Power LED Lights blue when power has been supplied the DTI-520UB and the computer and video signals is present. Glows orange when no video signal is detected by the DTI-520UB. For Application Software buttons... -
Page 8: Opening The Stand
Opening the Stand Pull up on the stand adjustment lever. Let the stand down. Using the Penholder Pull the penholder towards you as shown in the illustration below. Caution Always close the stand and, as shown in the above illustration, lay the tablet on its side before pulling the penholder out. -
Page 9: Installing Dti-520Ub On A Mount Arm
Installing DTI-520UB on a Mount Arm This product conforms to the Video Electronics Standard Association’s (VESA) Flat Panel Monitor Physical Mounting Interface Standard (FPMPMI). This product can be removed from the stand and mounted on such apparatuses as a VESA- standard mount arm. -
Page 10: Accessory Check
Accessory Check ● Pen ● Power Adapter ● User Guide (This booklet) ● Power Cable User Guide ● Serial Cable ● Application Install Guide Application Install Guide ● Tablet Driver CD - ROM / ● USB Cable Application CD - ROM Important :Do no throw the box away;... -
Page 11: Connecting Dti-520Ub
W hile looking at the LCD screen, configure the color resolution and size settings. Caution: - Do not modify the refresh rate. Setting the rate to a value that exceeds the DTI-520UB refresh rate may result in loss of picture. -
Page 13: Installing Dti-520Ub Driver
Installing DTI-520UB Driver Windows Setup Before installation, connect the DTI-520UB USB cable to your computer and turn the unit on. Installing the Tablet Driver Insert the tablet driver CD into the CD-ROM drive. The install menu should automatically display. If the menu does not display, double-click on the INSTALL icon (located on the CD). -
Page 14: Macintosh Setup
Hint: *After installing OS X, input your password. C lick on Install Wacom Tablet and installation will begin. Thereafter, follow the screen instructions and continue the installation process. If during processing, the identity confirmation dialog box displays, input your password *. -
Page 15: The Dti-520Ub Display
Either an image input from the RGB – RGB cable (see P. 11) or an image input from the composite video cable will be displayed on the DTI-520UB. Either of these images can be replaced by using the following method: ●... -
Page 16: Protrusion Of The Picture From The Lcd Panel And The Blurring Of Characters
Protrusion of the Picture from the LCD Panel and the Blurring of Characters... Caution: This setting is effective when the product and computer are connected by a RGB cable. Depending on the type of computer and graphics board, the Auto-Adjust function is sometimes not able to operate at full power, resulting in the picture blurring and protruding from the LCD panel. -
Page 17: Button Functions
Button Functions : : Menu button − buttons buttons ENTER Button Opens or closes the OSD Activates or deactivates the selected OSD You can select an option that can be Menu. menu otion. Also switches the image input activated.After activatng a selected option, press the + button to increase from the RGB –... - Page 18 Types of OSD Menus Some menu screen displays may vary depending on whether a RGB cable or a video cable is connected. The following screens explained in Common Screens below are the same ones regardless of the connection method. ● Common Screens Language Contrast Select to choose a...
- Page 19 Signal Source Select D-SUB and the image input from the RGB – RGB cable displays. Select VIDEO and the image input from the composite video cable displays. ● Screens that Display with a RGB Cable Connection Horizontal Center(VGA only) Phase (VGA only) Select to move the Select to reduce or screen image left or...
-
Page 20: Pen
The Parts of the Pen and Their Functions Eraser It works like the eraser on a pencil. Pen Tip • You can change the position of the screen pointer by moving the tip of the pen. • By varying the amount of pressure applied, the boldness of lines and the size of points can be adjusted. -
Page 21: How To Use The Tablet Button
Double-clicking Tap in the same place twice quickly with the tip of the pen to double-click. Dragging Select an icon or folder and then, while keeping the pen tip pushed down, move the pen to move the object. Using the Eraser By setting the eraser function and then tracing over the display, pictures and handwritten characters disappear as if erased by a standard eraser. -
Page 22: Using The Control Panel
*When connecting and using multiple tablets, see page 23. Displaying the Control Panel Opening the Control Panel in Windows Click on the Windows Start button, go to All Programs (P) or Programs (P), open Wacom Tablet and select Wacom Tablet Properties. Opening the Control Panel in Macintosh Open System Settings and then Wacom Tablet. -
Page 23: Synchronizing The Positions Of The Pen Tip And Pointer
Synchronizing the Positions of the Pen Tip and Pointer Make the necessary adjustments so that when the pen nib is brought near the LCD screen, the pointer displays properly in the area where the pen nib is placed (parallactic adjusting). * When using an analog RGB input type of LCD pen tablet, please refer to “Protrusion of the Screen from the LCD Panel and the Blurring of Characters”... -
Page 24: Setup Procedures For When Multiple Interactive Pen Tablets Are Connected
Setup Procedures for when Multiple Interactive Pen Tablets are Connected When multiple interactive pen tablets are connected and are to be used, it is necessary to set up the pen and calibrate for each interactive pen tablet individually. Please follow the procedures below to carry this out. -
Page 25: Supplementary Information
Supplementary Information Removing Stains If the product casing or pen becomes soiled, wipe off with a clean, soft cloth. If this fails to remove the stains, soak a clean, soft cloth with a water-diluted detergent mixture, wring thoroughly and wipe off. If the protective covering for the LCD display becomes soiled, wipe with a dry, soft cloth. -
Page 26: Troubleshooting
Troubleshooting Display Troubleshooting If One of These Messages Should Appear... Message What to Do Reference Prior to connecting the product, if you have a monitor that you have been using, connect it and then adjust the horizontal frequency to 30–80 kHz and the vertical frequency to 50 –75 Hz. -
Page 27: The Pen And Side Switch Do Not Operate Correctly (For Both Windows And Macintosh)
Condition What to Do Reference The picture is distorted • Adjust the pitch and phase. P.16-18 • Verify that your computer display adapter is compatible The picture appears wavey with the product. The picture flickers • Verify that the graphics mode and frequency for the P.28 input signal are compatible with the product. -
Page 28: General Troubleshooting
The newest tablet driver can be downloaded the tablet cannot be used. from the Wacom homepage The tablet, which is connected to a Some USB hubs cannot recognize tablets. Connect the USB hub, doesn’t respond. -
Page 29: Specification
Specification General Specifications Physical dimensions(W D H):344 × 300 × 49 mm (excluding stand) Weight: 4.4kg (including stand) Main unit input voltage: DC12V Power consumption: 23 W or less (DC12 V) Usage temperature and humidity ranges: 5–35 degrees C, 20–80%RH (conditions where condensation does not form) Storage temperature and humidity ranges: -10–60 degrees C, 20–90%RH (conditions where condensation does not form) (at 60... -
Page 30: Warranty
(ii) any loss or damage to the product resulting from such transportation. Wacom shall have no responsibility to repair or replace the product if the failure of the product has resulted from accident, abuse, misuse, negligence, or unauthorized modification or repair, or if it has been handled or stored other than in accordance with Wacom’s storage instructions. -
Page 31: Obtaining Technical Support
If an authorized Wacom repair center is not available in your local country you will be responsible for all transportation costs including duties and taxes to and from the Wacom repair center. In all other respects the terms of the warranty as set forth above apply to such sales.
Need help?
Do you have a question about the DTI-520UB and is the answer not in the manual?
Questions and answers