
Related Manuals for HIKVISION ISD-SMG11 L Series


Summary of Contents for HIKVISION ISD-SMG11 L Series
- Page 1 ISD-SMG11XXL Walk Through Metal Detector Installation and Adjustment International Product Marketing Department International Product and Solution Center...
-
Page 2: Table Of Contents
Part.01 Introduction Part.02 Installation Part.03 CONTENTS Configuration Part.04 Adjustment Part.05 Troubleshooting... -
Page 3: Introduction
Introduction Appearance Specification Major highlight... - Page 4 Introduction- Principle Electromagnetic induction The production of electromotive force otherwise known as voltage across an electrical conductor where the magnetic field changes 1.When the metal object generates an induced current in the magnetic field, a reverse magnetic field will be generated at the same time.
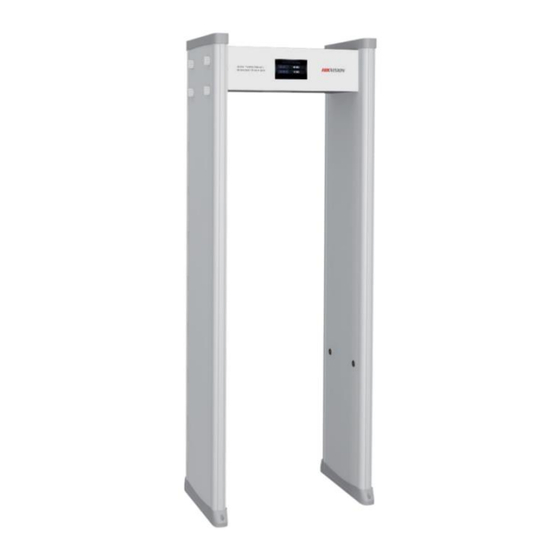
- Page 5 Introduction- Appearance main case Top Cover Light Housing remote control power cable Door panel power switch LED Light Bar side power in plug panel Infrared sensor network interface Foot Protective Cover ISD-SMG11XXL 2 relay alarm outputs...
- Page 6 Introduction- Specification Metal detection The smallest detected Coin-sized metals Multi-Area alarm ISD-SMG1118L 18 zones ; ISD-SMG1112L 12 zones Modularized component Easy transmission and installation Alarm output 2 Relay alarm outputs Network interface RJ45 Power supply 100 VAC to 240 VAC, 50/60HZ Power <...
- Page 7 Introduction- Major highlight ISD-SMG1118L • ISD-SMG1112L Ultra-high detection sensitivity:Coin-sized metal can be detected • Multi-location detection: To accurately determine the metal positions of the human body Pass and Warn (enter ,out ,stay , alarm) • People counting: • Sensitivity adjustment:0-999 •...
-
Page 8: Installation
Installation... - Page 9 Installation – Pre-exploration preparation confirm Installation with Tools position customer Space Paper& Pen Time Avoid wind Tape measure Location Ground solid flat PC &Cellphone Device type No big metal …...
- Page 10 Installation – Exploration Installation place requirements Survey items Requirement The ground should be flat, with strong support, to prevent vibration, especially when there are vibration metal Ground structures under the ground Environment Do not install in a high temperature and humid environment 110V-220V,50~60HZ,single phase with 3 wire,stable ground wire,Neutral wire is forbidden instead of ground Power supply wire...
- Page 11 Installation – Bad case ① Front and rear dislocation, and ② WTMD and scanner ⑤ Carpet ground not stable horizontal distance ≥50cm and easy shake distance≥50cm ④ WTMD and metal frame ③ WTMD and metal handrail ⑥ Strong wind area distance≥50cm distance ≥50cm...
- Page 12 Installation – Steps After the equipment arrives at the receiving place, check the equipment list with the acceptance personnel and other parties to confirm the quantity and parts of equipment. door package cable WTMD panel check connect lifting install...
- Page 13 Installation – Panel and Main control box 1. Check the package and open the 2. Take all parts out 3. Left side panel→left side of main box Right side panel→right side of main box 4. Connect the side panel and main 5.
- Page 14 Installation – Cable connection and Power on 7. Left side cable connection 8. Right side cable connection Left: Ground wire, Signal wire Right: Ground wire, Network wire, Power cable, Signal wire Power on and Device reset 9. push up the device...
- Page 15 Installation – Checklist Confirmation Confirmation item Note statue confirm the screws for combine main case and door panel tightly Confirm the cable from main board to 2 side panel stable Confirm whether the power cable which inside the main case is stable Confirm whether the ground wire is stable Confirm the IP address especially connect to internet Confirm the frequency different if there are more than 1 WTMD...
-
Page 16: Configuration
Configuration... - Page 17 Configuration – Main page Real-time metal detection strength Data and Time , Network Panel connection status, Infrared sensor status, IP, Version, SN...
-
Page 18: Activate Remote Control
Configuration– Activate Remote control Match remote control with device Press the home button 3 times quickly until home the top and bottom line turn red. Then we button can use the remote control do the settings... -
Page 19: Input Password
Configuration – Input password Default password: 000000 Menu button Menu page... - Page 20 Configuration – Metal Detect 1. Scenes:Different scenes have different zone sensitivity values. (quickly set) 2. Frequency (default 8) 1)When installing multiple security gates, the frequency should not be repeated 2)when there are some other frequency device disturb , also need try and set other frequency 3.
- Page 21 Configuration – Alarm Casting Metal Turn on : when there is metal item around the device ,the light and sound alarm will work.( check environment disturb) Turn off: when someone pass through device, the detector will detect the metal. If nobody /nothing pass through don’t detect Ps: Turn off .
- Page 22 Configuration – Linkage Linkage(alarm output) linkage setting for link with other device , such as turnstiles ,auto gate...
- Page 23 Configuration – System Password: set new password Clear 1) not clear , the people and alarm counting not 2) auto clear , the people and alarm counting return to 0 when reboot machine Restore: Return to factory fault settings and the counting back to 0...
- Page 24 Configuration – check IP address change IP : SADP Function: HCP/ Webpage setup...
- Page 25 Configuration – Test 1. casting metal turn on real-time metal induction value 2. casting metal turn off the metal induction value of pass through gate last time the zone history largest metal induction value during this test time alarm threshold value we already set in MetalDet green number:totally (all zone)metal...
-
Page 26: Activate Device
Configuration– Activate Device Device IP activation and IP configuration Use SADP tool or webpage activate device (we can check IP in net setting or LCD main view ) The password is what you set when you activate device and used for web login And it is difference with the password we saw in LCD screen(remote control) - Page 27 Configuration – Webpage Login Functional configuration...
- Page 28 Configuration – Parameter 1. Alarm Threshold: metal alarm threshold,there is light and sound alarm when detected metal induction value larger then Alarm threshold 2. Alarm Switch: enabled, turn on alarm function disabled,even the detected metal induction value larger then alarm threshold there isn’t any light or sound alarm 3.
- Page 29 Configuration – Parameter 8. Hydrodynamic Zone: different type different , 1,6,12,18 9. Alarm Tone: 1-10 10.Alarm Volume: silence, low, medium, high 11.Alarm Length: alarm duration(0.5-4) 12. Pass Direction:Default:OUT---Pass through from screen side to the other side Reverse 13. Break Alarm:Turn on: If there is alarm after the last person pass through and the alarm hasn’t been reset(reset in 7.Casting Metal Mode 1s) , it will still alarm when the next person follow pass through...
-
Page 30: Configuration - Parameter
Configuration – Parameter 16.Alarm Output : the relay continue time, action direction and linkage direction 17.NTP server: network time protocol, 18.Set Time: set time manually 19.Time Zone 20.Daylight time 21.Timed Clear: you can set a time for auto clear the people and alarm counting everyday 22.Reboot Clear: the people and alarm counting return to 0 when reboot machine Debug:when click,device go to test interface... -
Page 31: Adjustment
Adjustment... - Page 32 – Adjustment Set Alarm threshold 1. ‘Turn on’ Casting Metal 2. Go to the Test page , keep 1m away from device , waiting 5-10 minutes , and see the real time metal induction value of the surrounding environment Normally the metal induction real time value will be smaller than if the surrounding environment no disturb...
- Page 33 – Adjustment Set Alarm threshold 4. If there is still obvious disturb 3. Remove the obvious induction value, you can try to disturb items or device change the frequency, find a best position frequency value (normally default value 8, and metal most sensitivity value 11 ) If the metal induction value very large and always in the same zone, check...
- Page 34 – Adjustment Set Alarm threshold 5. After select the most suitable frequency value and interference cannot be completely removed , pass through the device with items need to be tested. if the tested metal items’ induction value larger than the surrounding environment induction value, which means we can adjust the alarm threshold value to meet that item detection requirement .
- Page 35 Turn On ‘Casting Metal’ after Adjustment installation, then enter the ‘test’ interface whether the environment value smaller then 20 whether installation environment adjust it according to Flow Chart meet requirements environment requirement change frequency value set suitable alarm threshold turn off ‘casting metal’ test value according to ‘test metal metal value value’...
- Page 36 Scene – Zone alarm Test 1. Always same zone induction value very large 1)Focus on the interference sources near that zone. 2)If there is no interference sources, add that zone alarm threshold , then test until you find the alarm threshold value without alarms 2.
- Page 37 Scene – Side-by-Side Metal Detector 1. Power on single metal detector,check the iron disturb and adjust metal detector good one by one 2. Power on all WTMD 3. In Alarm setting, change frequency to different numbers and test without any metal. For example, two WTMD we can set 2, 7or 8, 10, or 11, 15 or any other different numbers and test it without metal.
-
Page 38: Troubleshooting
Troubleshooting... - Page 39 Troubleshooting Issue Handling Process process issue follow issue ideal confirm close Issue confirm : 1.Describe the problem objectively and specifically. It will be better take a video about the issue. (error code、issue description) 2. name plate ( device type、version、settings) 3. what do you already do and the result Process ideal:...
- Page 40 Troubleshooting Frequently Asked Question 1. How to disable the Metal Detection Function? Go to ‘alarm’ page---Alarm Switch----Turn off ’,so the device will not alarm even someone take metal pass through 2. How to clear Person-Count to Zero? Method 1: Go to ‘system’ page---Clear---Auto clear Method 2: Log in web.
- Page 41 Troubleshooting Issue Solve 1. If one side panel error, swap left and right side signal cable , see if the error jump to another side . still same panel error , the error from panel. jump to another panel error, the error signal cable from signal cable or the main board.
- Page 42 THANKS 2023 International Product and Solution Center...
Need help?
Do you have a question about the ISD-SMG11 L Series and is the answer not in the manual?
Questions and answers