Bresser Biolux NV, 5116200 Manual
- Operating instructions manual (74 pages) ,
- Instruction manual (30 pages) ,
- Instruction manual (24 pages)
Advertisement
- 1 General Information
-
2
Operating instructions
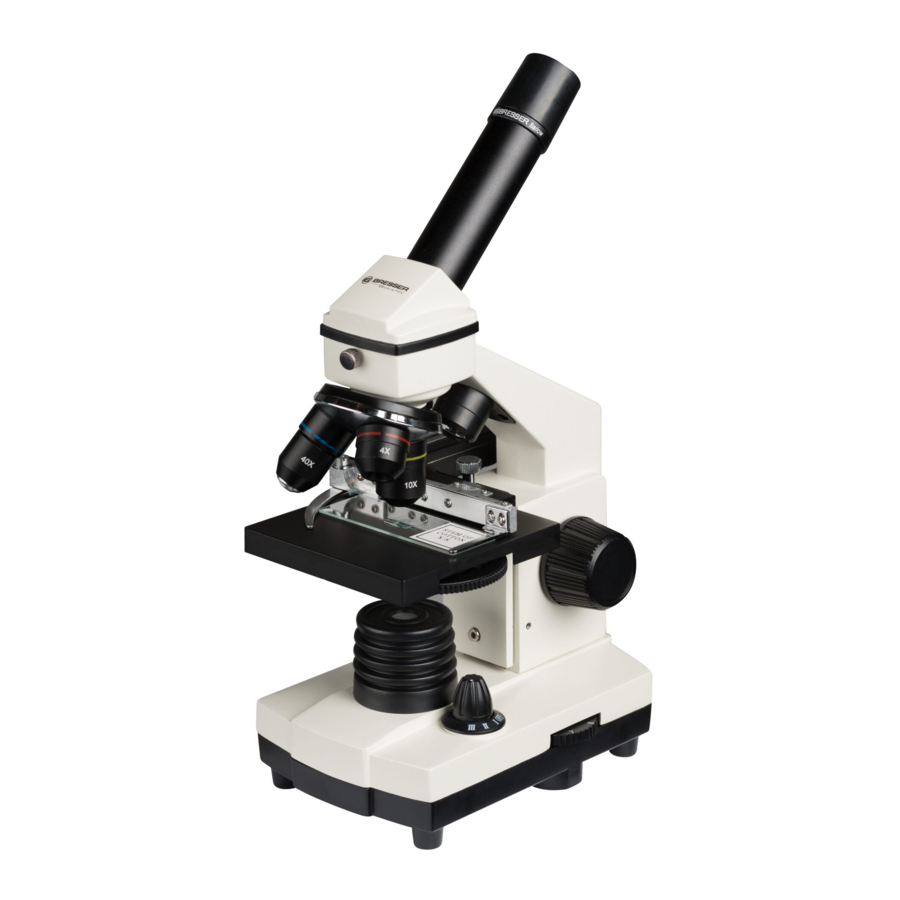
- 2.1 Parts overview
- 2.2 General/Location
- 2.3 Electric LED lighting with dimmer
- 2.4 Colour filter disc
- 2.5 Attach stage
- 2.6 Microscope setup
- 2.7 Observation
- 2.8 Viewed Object – condition and preparation
- 2.9 Experiments
- 2.10 MicrOcular setup
- 2.11 Installation and usage of the software
- 2.12 Using the MicrOcular
- 3 Care and maintenance
- 4 Troubleshooting
- 5 Specifications
- 6 General Warning
- 7 Documents / Resources
General Information
About this Instruction Manual
Please read the safety instructions in this manual carefully. To avoid damage to the unit and the risk of injury, only use this product as described in the manual.
Keep the instruction manual handy so that you can easily look up information on all the functions.

You will find this symbol in front of every section of text which deals with the risk of severe injury or even death in the event of improper use.

You will find this symbol before every section of text that deals with the risk of minor to severe injuries resulting from improper use.
NOTE!
You will find this symbol in front of every section of text which deals with the risk of damage to property or the environment.
Intended Use
This product is intended only for private use. It was developed for the magnified display of things in nature.
Operating instructions
Parts overview

- 5x WF Eypiece
- 16x WF Eyepiece
- Barlow lens
- MicrOcular (PC-Ocular)
- Eyepiece holder
- Microscope head
- Objective-revolver
- Microscope stage
- Focus wheel
- LED lighting (transmitted light)
- Microscope housing
- Microscope base
- Software
- Battery compartment (3x AA)
- 5 Slides, 10 Covering glasses and 5 preparations in a plastic box
- Dimmer
- Colour filter disc
- LED lighting (direct light)
- Direct light/transmitted light switch
- Microscope tools:
- Pipette;
- Tweezers
- Prawn breeding plant
- MicroCut
- Specimens:
- yeast;
- Gum media (specimen inclusion medium);
- sea salt;
- Prawn eggs
- Carrying case
- Locking screw
- Mechanical plate
General/Location
First you must make sure that your microscope is on a stable and solid surface.
Electric LED lighting with dimmer
Check before use whether the light switch (Fig. 1,21) is set to "off".
The microscope has two lighting units. Lighting can be of three types. Set the switch (Fig 1, 21) to „II" to light the specimen from above (reflected light) or „I" to light it from below (direct light). Use setting „III" to have the specimen simultaneously subjected to direct and transmitted light. The transmitted light unit (Fig 1, 10) is used for transparent specimens (those on glass slides). To view solid non-transparent specimens use the direct light unit (Fig 1, 20). Use of both forms of lighting simultaneously is only recommended for semi-transparent specimens. This operating mode is not recommended for direct light specimens on slides as it may cause reflection on the slide.
Use the switch (Fig 1, 21) to select the desired lighting mode and set the dimmer to the desired brightness (Fig. 1, 18).
As your device has continuously controllable lighting (dimmer) optimal illumination of the object to be viewed is guaranteed.
Colour filter disc
The colour filter under the microscope table (Fig. 1, 19) aids in viewing very bright and transparent objects. Just select the right colour for the specimen in question. The components of colourless/transparent objects (e.g. starch particles, single-cell -specimens) can thus be better recognised.
Attach stage
A stage is included along with your microscope (located in the case, under the CD). To install this on the microscope, proceed as follows:
- Place the stage (Fig. 4, 28) on the microscope stage (Fig. 4, 8) in such a way that the attachment screws (Fig. 4, D) are positioned over the middle threaded hole (Fig. 4, E).

- Tighten the attachment screws securely.

Microscope setup
The microscope's eyepiece (Fig 1, 6) will now be prepared for the first observation.
First, loosen the screw (Fig. 1, X27) and rotate the eyepiece into a convenient position.
Begin every observation with the lowest magnification. Place the microscope's table (Fig. 1, 8) with the focus knob (Fig 1, 9) into the lowest position and rotate the objective revolver (Fig. 1, 7) until it locks on the lowest magnification (4x).
NOTE:
First, drive the Microscope's table (Fig. 1, 8) in its lowest position before changing the objective in order to prevent damages.
Insert the 5x eyepiece (Fig. 3, 1) in the Barlow lens (Fig. 3, 3).
Take care, that the Barlow lens is inserted completely in the monocular head (Fig. 3, 5).

Observation
After you have set up the microscope with the corresponding illumination, the following principles are important:
Begin each observation with a simple observation at lowest magnification, so that the centre and position of the object to be viewed is in focus.
The higher the magnification the more light is required for good picture quality.
Place a permanent slide culture (Fig. 5, 15) directly under the microscope lens on the plate (Fig. 5, 8) and clamp it on the cross-table (Fig. 5, 28). To do so push the lever (Fig. 5, C) aside. The specimen to be examined must be directly over the lighting. If not turn the two knurled screws (Fig. 5, A+B) on the mechanical plate.

TIP:
On the mechanical plate (Fig 5, 28) there are two knurled screws (Figs 5, A+B). They are used to precisely position the specimen laterally (Fig 5, A) and vertically (Fig 5, B).
Look through the eyepiece (Fig. 1, 1/2) and turn carefully the focusing wheel (Fig. 1, 9)) until you can see a sharp picture.
Now you can get a higher magnification, while you pull out slowly the Barlow lens (Fig. 6, 3) of the monoculare barrel (Fig. 6, 5). With nearly entirely pulled out Barlow lens the magnification is raised to 2x.

For still higher magnification you can put the 16x eyepiece (Fig. 2, 2) into the objective revolver (Fig. 1, 7) and set on higher position (10x/40x).
TIP:
Depending on the preparation higher magnifications do not always lead to better pictures.
With changing magnification (eyepiece or objective lens changes, pulling out of the Barlow lens) the sharpness of the image must be newly defined by turning the focusing wheel (Fig. 1, 9).
Viewed Object – condition and preparation
Condition
With the Barlow lens nearly fully extended magnification can be doubled. Both transparent and non-transparent specimens can be examined with this microscope, which is a direct as well as transmitted light model. If opaque specimens are examined - such as small animals, plant parts, tissue, stone and so on - the light is reflected from the specimen through the lens and eyepiece, where it is magnified, to the eye (reflected light principle, switch position I). If opaque specimens are examined the light from below goes through the specimen, lens and eyepiece to the eye and is magnified en route (direct light principle, switch position II). Many small organisms of the water, plant parts and finest animal components have now from nature these transparent characteristic, other ones must be accordingly prepared. Is it that we make it by means of a pre-treatment or penetration with suitable materials (media) transparent or thus that we cut finest wafers off of them (hand cut, MicroCut) and these then examine. With these methods will us the following part make familiar.
Creation of thin preparation cuts
Specimens should be sliced as thin as possible, as stated before. A little wax or paraffin is needed to achieve the best results. A candle can be used for the purpose. The wax is put in a bowl and heated over a flame. The specimen is then dipped several times in the liquid wax. The wax is finally allowed to harden. Use a MicroCut (Fig 2, 24) or knife/scalpel (carefully) to make very thin slices of the object in its wax casing.
Be extremely careful when using the knives/scalpels or the MicroCut. There is an increased risk of injury due to the sharp edges!
These slices are then laid on a glass slide and covered with another.
Creation of an own preparation
Put the object which shall be observed on a glass slide and give with a pipette (Fig. 8, 22a) a drop of distilled water on the object (Fig. 8).
Set a cover glass (in each well sorted hobby shop available) perpendicularly at the edge of the water drop, so that the water runs along the cover glass edge (Fig. 8). Lower now the cover glass slowly over the water drop.

TIP:
The gum medium supplied (Fig 2, 25b) is used to make permanent slide cultures. Add it instead of distilled water. The gum medium hardens so that the specimen is permanently affixed to its slide.
Experiments
If you made yourself familiar with the microscope already, you can accomplish the following experiments and observe the results under your microscope.
Newspaper print
Objects:
- small piece of paper from a newspaper with parts of a picture and some letters
- similar piece of paper from an illustrated magazine
Use your microscope at the lowest magnification and use the preparation of the daily paper. The letters seen are broken out, because the newspaper is printed on raw, inferior paper. Letters of the magazines appear smoother and more complete. The picture of the daily paper consists of many small points, which appear somewhat dirty. The pixels (raster points) of the magazine appear sharply.
Textile fibres
Objects and accessories:
- Threads of different textiles: Cotton, line, wool, silk, Celanese, nylon etc..
- Two needles
Each thread is put on a glass slide and frayed with the help of the two needles. The threads are dampened and covered with a cover glass. The microscope is adjusted to a low magnification. Cotton staples are of vegetable origin and look under the microscope like a flat, turned volume. The fibres are thicker and rounder at the edges than in the centre. Cotton staples consist primary of long, collapsed tubes. Linen fibres are also vegetable origin; they are round and run in straight lines direction. The fibres shine like silk and exhibit countless swelling at the fibre pipe. Silk is animal origin and consists of solid fibres of smaller diameter contrary to the hollow vegetable fibres. Each fibre is smooth and even moderate and has the appearance of a small glass rod. Wool fibres are also animal origin; the surface consists of overlapping cases, which appear broken and wavy. If it is possible, compare wool fibres of different weaving mills. Consider thereby the different appearance of the fibres. Experts can determine from it the country of origin of wool. Celanese is like already the name says, artificially manufactured by a long chemical process. All fibres show hard, dark lines on the smooth, shining surface. The fibres ripple themselves/crinkle after drying in the same condition. Observe the thing in common and differences.
Salt water prawns
Accessories:
- Prawn eggs (Fig 2, 25d)
- Sea salt (Fig 2, 25c)
- Prawn breeding plant (Fig 2, 23)
- Yeast (Fig 2, 25a)
Eggs and prawns are not fit for human consumption.
- The lifecycle of the saltwater prawn
The saltwater prawn or artimia salina to scientists has an unusual and interesting lifecycle. The female's eggs are hatched without any male shrimp having to fertilise them. The resultant baby prawns are all female. Under unusual circumstances such as when a swamp is drained the eggs may produce male prawns. These males fertilise the female's eggs, resulting in a specific type of eggs. These are called winter eggs and have a thick shell as protection. They're pretty rugged and can survive the swamp or lake drying out causing the death of the entire prawn population for up to a decade in a form of hibernation. The eggs hatch once the right ambient conditions again obtain. The eggs supplied (Fig 2, 25d) are of this type. - Hatching of the salt water prawn
To hatch the prawn it is essential to first have a saline solution suited to the prawn's needs. Fill half a litre of rain- or fresh-water in a container. Let it stand for about thirty hours. As water evaporates over time it's a good idea to have a second container of such water left standing for thirty-six hours. Once it's stood for this length of time pour half of the sea salt supplied into one of the containers (Fig 2, 25c) and stir until it has dissolved. Then pour some of it into the prawn breeding plant (Fig 2, 23). Add a few eggs and close the lid. Put it somewhere with plenty of light but not in the direct sun. The temperature should be approximately 25°C. The prawns will hatch in two or three days at this temperature. Should any water evaporate during this time replace it from the second container. - The saltwater prawn under the microscope
What comes out of the egg is known as a nauplius larva. Use the pipette (Fig 2, 22a) to put some of them on a slide for examination. They will move in the solution using their hair like limbs. Remove a few daily from the container for examination under the microscope. If you do so and save the pictures made with the MicrOcular you will then have a seamless record of the prawn's lifecycle. You can remove the upper lid of the prawn bleeding plant and put the whole thing under the microscope. The larvae will mature in six to ten weeks depending on ambient temperature. You will soon have bred an entire generation of saltwater prawns that constantly reproduce. - Feeding your saltwater prawns
To keep them alive saltwater prawns must be fed occasionally. This must be done carefully as overfeeding causes the water to stagnate and poison the prawns. Feeding is best down with dry powdered yeast (Fig 2, 25a). Give them a little every other day. If the water darkens this signifies it is stagnating. If so remove the prawns and put them in a fresh saline solution.
MicrOcular setup
NOTE:
The MicrOcular only works without the Barlow lens supplied. Magnification setting is changed by using the MicrO- cular and must be reset by focussing anew.
Remove the Barlow lens (Fig 6, 3) and eyepiece currently in use from the eyepiece holder (Fig 6, 5) and replace them with the MicrOcular (PC-Ocular) (Fig 7, 4) as in illustration 7 in the holders (Fig 7, 5)

NOTE:
Please do not yet connect MicrOcular and PC. Please go through the items below in sequence.
Installation and usage of the software
Installing the software
You find the capturing software for Win 7/8.1/10 on the CD. Double click on the exe file and follow the instructions in the installation manager. It is not necessary to install a specific driver. The camera will be recognized automatically from suitable Windows operating systems.
Capturing images
Connect the camera with your PC. Start the software „CamLabLite" and activate the MikrOkularHD in the camera list of the software. Switch on the microscope and place a sample with good contrast on the microscope stage. Look through the eyepiece and use the lowest magnification to focus on the sample. Now insert the camera as described above. Normally only slight re-focussing is needed to see a sharp image of your sample in the software preview. The software preview will always show the full frame of view. Please note: The camera will show a smaller field of view as can be seen in the eyepiece, which is normal. Maybe choose a different magnification on the microscope to adjust the field of view of the camera.
You can save images and video by clicking on the button „Snap" (single image) or „record" (Video) respectively. The folder to save files and the language settings of the software can be adjusted. Click the button to enter the options menu. Choose the resolution of the camera from the „Live" dropdown menu. The resolution of the capture will be adjusted accordingly. The brightness of the image will be adjusted automatically. For best results adjust the microscope illumination to maximum brightness. To adjust the exposure time individually, remove the tick mark from „Auto Exposure" and choose a different exposure time from "Exposure target".
For a good result you can adjust further values from the menu „Color Adjustment". Depending on the exact model of your camera, certain menu points in the software might be inactive if not supported by the camera hardware.
TIP:
To use the MikrOkular longterm we recommend it always be connected to the same USB port.
Using the MicrOcular
Preparation
- Slide a specimen under your microscope and focus on it.
- Remove the eyepiece and Barlow lens from the eyepiece support and the dust cap from your MikrOkular and install same in the eyepiece supports instead of the Barlow lens.
- Start your PC if you haven't yet and connect your MikrOkular to the USB port of your computer.
Care and maintenance
Separate the device from the power supply before cleaning (remove batteries)!
Only use a dry cloth to clean the exterior of the device.
NOTE:
Do not use any cleaning fluid to avoid damaging the electronics.
Clean the lenses (eyepiece and/or lens) with a soft and lint-free cloth only (e.g. microfibre).
NOTE:
Do not apply excess pressure to the cloth so as to avoid scratching the lenses.
To remove more stubborn dirt, moisten the cleaning cloth with an eyeglass-cleaning solution and wipe the lenses gently.
Protect the device from dust and moisture! After use - in particular in situations of high humidity - let the device acclimatize for a short period of time, so that the residual moisture can dissipate.
Troubleshooting
| Error | Solution |
| No picture visible | Switch light on put condenser lens in place adjust focus |
Specifications
System requirements (PC Ocular)
PC with dual core processor (2.8 GHz minimum) or higher; Operating system Windows 7/8/10; 4 GB RAM minimum; 2 GB free HDD space minimum; free USB 2.0 port; CD/DVD drive.
Magnification table
| Eyep. | Object. | Magn. | with Barlow l. |
| 5x | 4x | 20x | 40x |
| 5x | 10x | 50x | 100x |
| 5x | 40x | 200x | 400x |
| 16x | 4x | 64x | 128x |
| 16x | 10x | 160x | 320x |
| 16x | 40x | 640x | 1280x |
General Warning
Tools with sharp edges and points are often used when working with this device. For this reason, store this device and all accessories and tools in a location that is out of the reach of children. There is a RISK OF INJURY!

This device contains electronic components which operate via a power source (batteries). Do not leave children unattended when using the device. Only use the device as described in the manual, otherwise you run the RISK of an ELECTRIC SHOCK.
Do not expose the device to high temperatures. Use only the recommended batteries. Do not short-circuit the device or batteries, or throw them into a fire. Excessive heat or improper handling could trigger a short-circuit, a fire or an explosion.
Keep batteries out of the reach of children! Make sure you insert the batteries correctly. Empty or damaged batteries could cause burns if they come into contact with the skin. If necessary, wear adequate gloves for protection.
Use only the recommended batteries. Always replace weak or empty batteries with a new, complete set of batteries at full capacity. Do not use batteries from different brands or with different capacities. The batteries should be removed from the unit if it has not been used for a long time.
The manufacturer is not liable for damage related to improperly installed batteries.
Children should only use the device under adult supervision. Keep packaging material (plastic bags, rubber bands, etc.) out of the reach of children! There is a RISK OF CHOKING!
Children must not have access to the included chemicals and liquids. Do not drink the chemicals. Wash hands thoroughly with running water after use. In the event of contact with the eyes or mouth, rinse thoroughly with water. In the event of pain, contact a doctor immediately and take the substances with you.
NOTE!
Do not disassemble the device. In the event of a defect, please contact your dealer. He will contact the Service Centre and can send the device in to be repaired, if necessary.
Documents / ResourcesDownload manual
Here you can download full pdf version of manual, it may contain additional safety instructions, warranty information, FCC rules, etc.
Advertisement


Need help?
Do you have a question about the Biolux NV and is the answer not in the manual?
Questions and answers