
Related Manuals for Bresser Biorit TP


Summary of Contents for Bresser Biorit TP
- Page 1 Mikroskop · Microscope · Microscopio Biorit TP Art. No. 5101100 Bedienungsanleitung Instruction Manual 12-08-2016...
- Page 2 Inhaltsverzeichnis Deutsch ......................... English........................
-
Page 3: Impressum
„Garantie“ und „Service“ in dieser Dokumentation. Wir bitten um Verständnis, dass direkt an die Her- steller-Anschrift gerichtete Anfragen oder Einsendungen nicht bearbeitet werden können. Irrtümer und technische Änderungen vorbehalten. © 2016 Bresser GmbH Alle Rechte vorbehalten. Die Reproduktion dieser Dokumentation – auch auszugsweise – in irgendeiner Form (z.B. Fotokopie, Druck, etc.) sowie die Verwendung und Verbreitung mittels elektronischer Systeme (z.B. -
Page 4: Table Of Contents
Inhaltsverzeichnis Inhaltsverzeichnis 1 Impressum .............................. 3 2 Eigenschaften .............................. 5 3 Zu dieser Anleitung ............................ 5 4 Verwendungszweck ............................ 5 5 Allgemeine Sicherheitshinweise........................ 5 6 Produktabbildungen............................ 7 7 Lieferumfang.............................. 7 8 Teileübersicht .............................. 8 9 Standortwahl.............................. 8 10 USB-Stromadapter montieren ........................ 8 11 Stromversorgung herstellen ......................... 9 12 Alternative Stromversorgung........................ 9 13 Gerät ein-/ausschalten ........................... 9 14 Beleuchtung einstellen .......................... 10 15 Objektträger einsetzen.......................... 10 16 Beobachtung.............................. 11... -
Page 5: Eigenschaften
Eigenschaften | 2 2 Eigenschaften – Biologisches Mikroskop für die Durchlichtmikroskopie – Alternative netzunabhängige Stromversorgung durch integrierten Akku – Kreuztisch mit Nonius-Einteilung sowie Quer- und Längsverstellung – LED-Beleuchtung mit stufenloser Helligkeitsregelung – Objektive und Okular auswechselbar – Kondensor mit Filterhalterung –... - Page 6 5 | Eigenschaften – Beschädigtes Gerät oder ein Gerät mit beschädigten stromführenden Teilen niemals in Betrieb nehmen! Beschädigte Teile müssen umgehend von einem autorisierten Service-Betrieb ausge- tauscht werden. – Betreiben Sie das Gerät nur in vollkommen trockener Umgebung und berühren Sie das Gerät nicht mit nassen oder feuchten Körperteilen.
-
Page 7: Produktabbildungen
Eigenschaften | 6 – Bauen Sie das Gerät nicht auseinander! Wenden Sie sich im Falle eines Defekts an Ihren Fach- händler. Er nimmt mit dem Service-Center Kontakt auf und kann das Gerät ggf. zwecks Reparatur einschicken. – Setzen Sie das Gerät keinen hohen Temperaturen aus und schützen Sie es vor Wasser und hoher Luftfeuchtigkeit. -
Page 8: Teileübersicht
8 | Eigenschaften 8 Teileübersicht Okular Okularstutzen Mikroskopkopf Objektivrevolver Objektiv (4x, 10x oder 40x) Objektklemmung Kondensor-Höhenverstellung Kondensor Filterhalter Beleuchtung Stellhebel für Irisblende Drehknopf für Helligkeitsregelung Feinfokussierung Grobfokussierung Kreuztisch-Querverstellung (X-Achse) Kreuztisch-Längsverstellung (Y-Achse) Ein/Aus-Schalter DC-Anschlussbuchse Universal USB-Netzadapter USB-Stromkabel mit Hohlstecker Netzadapteraufsatz (EU) Netzadapteraufsatz (UK) 9 Standortwahl Vor dem Aufbau und der Inbetriebnahme einen geeigneten Standort wählen. -
Page 9: Stromversorgung Herstellen
Eigenschaften | 11 1 USB-Stromadapter 2 Adapteraufsatz (EU) 3 Adapteraufsatz (UK) 4 USB-Stromkabel mit Hohlstecker 1. Passenden Adapteraufsatz mit den Kerben auf die Zapfen des USB-Stromadapters setzen. 2. Adapteraufsatz in Richtung LOCK drehen bis dieser einrastet. 3. USB-Stecker des Stromkabels in die USB-Anschlussbuchse des Stromadapters stecken. 4. -
Page 10: Beleuchtung Einstellen
14 | Eigenschaften 14 Beleuchtung einstellen Abb. 5: Durchlicht-Beleuchtung mit Dimmer 1 Dimmerregler 2 Beleuchtungseinheit Dieses Gerät verfügt über eine Beleuchtungseinheit mit fest eingebauter LED-Lichtquelle. HINWEIS Das Gerät nicht über einen längeren Zeitraum bei maximaler Helligkeit betreiben! Dies führt zur Verringerung der LED-Lebensdauer. Zur Regelung der Beleuchtung folgendermaßen vorgehen: 1. -
Page 11: Beobachtung
Eigenschaften | 16 16 Beobachtung HINWEIS Verwendung von Okularen und Objektiven Durch die Verwendung eines bestimmten Okulars und Objektivs wird eine individuelle Vergrößerung des Beobachtungsobjektes erreicht. Die Vergrößerung ist auf dem Okular und Objektiv jeweils als größte Ziffer aufgedruckt (z.B. 10x = zehnfache Vergrößerung, 4 = vierfache Vergrößerung). 1. -
Page 12: Verwendung Der Irisblende
18 | Eigenschaften 18 Verwendung der Irisblende HINWEIS Die Irisblende dient der Erhöhung der Tiefenschärfe. Eine geöffnete Blende lässt bei geringer Tiefenschärfe viel Licht hindurch. Eine teilweise geschlosse- ne Blende erhöht die Tiefenschärfe, jedoch ist es hierzu erforderlich, die Helligkeit der Beleuchtung zu erhöhen. -
Page 13: Technische Daten
Die vollständigen Garantiebedingungen sowie Informationen zu Garantiezeitverlängerung und Ser- viceleistungen können Sie unter www.bresser.de/garantiebedingungen einsehen. 23 EG-Konformitätserklärung Eine „Konformitätserklärung“ in Übereinstimmung mit den anwendbaren Richtlinien und ent- sprechenden Normen ist von der Bresser GmbH erstellt worden. Diese kann auf Anfrage je- derzeit eingesehen werden. IM_5101100_de_en_BRESSER_v0816 13 / 25... - Page 14 1 | Imprint 1 Imprint Bresser GmbH Gutenbergstraße 2 46414 Rhede Deutschland http://www.bresser.de For information regarding liability claims or service requests, please refer to chapters "Warranty" and "Service" in this documentation. We ask for your understanding, that any requests or submissions that have been addressed to the manufacturer's address can not be processed.
- Page 15 1 Imprint ................................ 14 2 Features................................. 16 3 About this Instruction Manual........................ 16 4 Intended Use .............................. 16 5 General safety instructions ......................... 16 6 Product images............................. 18 7 Scope of delivery............................ 18 8 Parts overview .............................. 18 9 Site location .............................. 19 10 Installing the USB power adapter ....................... 19 11 Setting up power supply.......................... 20 12 Optional power supply.......................... 20 13 Turning on/off the device.......................... 20...
-
Page 16: Features
2 | Features 2 Features Biological microscope for transmitted light microscopy Optional off-grid energy supply with integrated battery Cross table with Nonius scale and with lateral and longitudinal adjustment LED illumination with stepless brightness adjustment Objectives and eyepieces exchangeable Condensor with filter holder Universal USB power adapter with two adapter attachments 3 About this Instruction Manual NOTICE... - Page 17 Features | 5 – Only use the device in complete dry environment and do not touch it with wet or moist parts of your body. DANGER Danger of choking! In case of any improper use of this device, there is a risk of choking, especially for children. Therefore please read the safety instructions below.
-
Page 18: Product Images
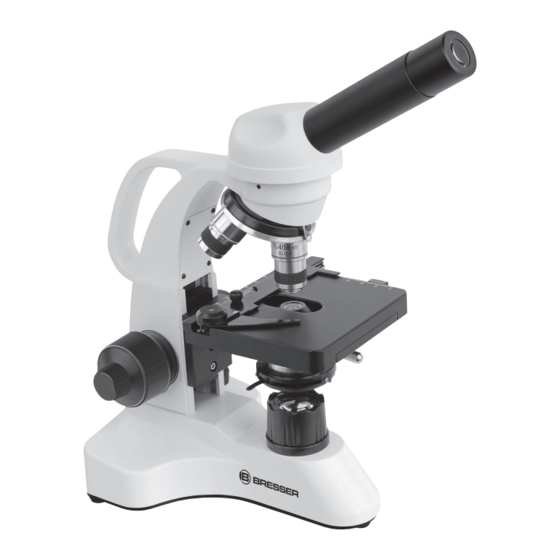
6 | Features – Protect the device from severe shocks! – For this device only use accessories and spare parts that comply with the technical information. 6 Product images Illustration 1: Product images 7 Scope of delivery Microscope (A); 10x WF Eyepiece (B); 3 Objectives (pre-assembled) (C); Condenser (pre-assembled) (D);... -
Page 19: Site Location
Features | 9 Objective (4x, 10x or 40x) Specimen clamp Condenser height adjustment Condenser Filter holder Illumination Adjusting lever for iris diaphragm Rotary knob for brightness adjustment Fine focusing Coarse focusing Cross table lateral adjustment (X-axis) Cross table longitudial adjustment (Y-axis) On/Off switch DC power port Universal USB power adapter... -
Page 20: Setting Up Power Supply
11 | Features 3. Put the USB plug of the power cable into the USB port of the power adapter. 4. To remove the adapter attachment, push the PUSH button and turn the attachment in OPEN direc- tion. NOTICE Using the USB power cable with a computer Alternatively the device can be powered by a computer via the included USB power cable: Put the USB plug into a free USB port of the computer. -
Page 21: Adjusting The Lighting
Features | 14 14 Adjusting the lighting Illustration 4: Transmitted light unit with dimmer 1 Dimmer control 2 Lighting unit This device provides an illumination with a permanently installed LED light source. NOTICE Do not operation the device on highest brightness over a longer time! This will reduce the lifetime of the LED. -
Page 22: Observation
16 | Features 16 Observation NOTICE Using eyepieces and objectives When using a specific eyepiece or objective, you will get the individual magnification of an object be- ing observed. The magnification is imprinted on the eyepiece and objective with a large number (e.g. 10x for 10-fold magnification, 4 for 4-fold magnification). -
Page 23: Using The Iris Diaphragm
Features | 18 18 Using the iris diaphragm NOTICE The iris diaphragm is used to increase the depth of focus. With an open aperture more light is getting through but the depth of focus is less. With an partially closed aperture the depth of focus is higher but it is neccessary to increase the brightness of the illu- mination then. -
Page 24: Technical Data
You can consult the full guarantee terms as well as information on extending the guarantee period and details of our services at www.bresser.de/warranty_terms. 23 EC Declaration of Conformity Bresser GmbH has issued a "Declaration of Conformity" in accordance with applicable guidelines and corresponding standards. 24 / 25... - Page 28 Teléfono*: +34 91 67972 69 Telephone*: +44 1342 837 098 BRESSER Iberia SLU BRESSER UK Ltd c/Valdemorillo,1 Nave B Unit 1 starborough Farm, Starborough Road, Nr Marsh Green, P.I. Ventorro del cano 28925 Alcorcón Madrid Edenbridge, Kent TN8 5RB España...
Need help?
Do you have a question about the Biorit TP and is the answer not in the manual?
Questions and answers