EINHELL TC-VC 1820 SA Manual
- Original operating instructions (17 pages) ,
- Original operating instructions (131 pages) ,
- Original operating instructions (41 pages)
Advertisement
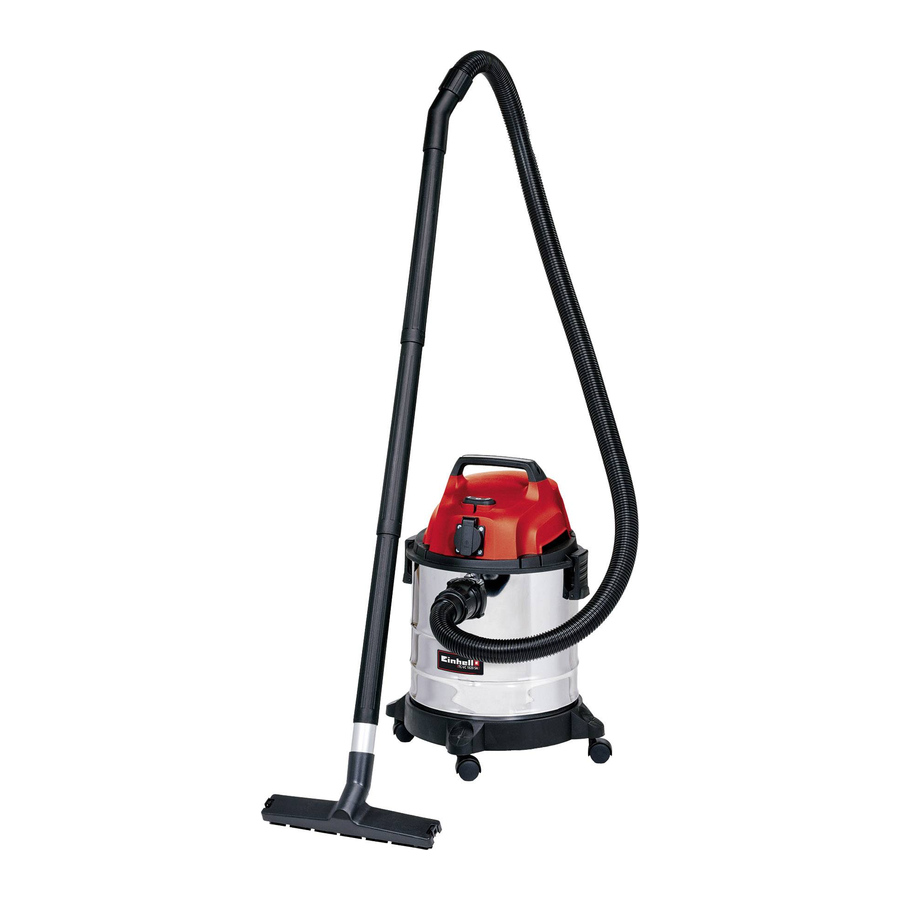
Layout and items supplied
Layout

- Handle
- ON/OFF/Automatic switch
- Appliance head
- Filter basket
- Safety fl oat valve
- Locking hook
- Container
- Suction hose connector
- Blow connector
- Flexible hose
- 3-part suction tube
- Combination nozzle
- Castors
- Dirt bag
- Foamed plastic filter
- Crevice nozzle
- Adapter
- Additional filter
- Hook for cable store
- Automatic socket-outlet for electric tools
- Electric tool adapter
Items supplied
Please check that the article is complete as specifi ed in the scope of delivery. If parts are missing, please contact our service center or the nearest branch of the DIY store where you made your purchase at the latest within 5 work days after purchasing the article and upon presentation of a valid bill of purchase. Also, refer to the warranty table in the warranty provisions at the end of the operating instructions.
- Open the packaging and take out the equipment with care.
- Remove the packaging material and any packaging and/or transportation braces (if available).
- Check to see if all items are supplied.
- Inspect the equipment and accessories for transport damage.
- If possible, please keep the packaging until the end of the guarantee period.

The equipment and packaging material are not toys. Do not let children play with plastic bags, foils or small parts. There is a danger of swallowing or suff ocating!
- Flexible suction hose
- 3-piece suction tube
- Dual purpose nozzle
- 4x wheels
- Dirt bag
- Foam filter
- Crevice nozzle
- Adapter
- Additional filter
- Electric tool adapter
- Original operating instructions
Proper use
The wet and dry vacuum cleaner is designed for wet and dry vacuuming using the appropriate filter. The appliance is not suitable for the vacuuming of combustible, explosive or harmful substances.
The equipment is to be used only for its prescribed purpose. Any other use is deemed to be a case of misuse. The user / operator and not the manufacturer will be liable for any damage or injuries of any kind caused as a result of this.
Please note that our equipment has not been designed for use in commercial, trade or industrial applications. Our warranty will be voided if the equipment is used in commercial, trade or industrial businesses or for equivalent purposes.
Technical data
Mains voltage: 220-240 V ~ 50/60 Hz
Power consumption: 1250 W
Max. power consumption of the automatic socket-outlet: 1740 W
Max. total power consumption: 2990 W
Tank volume: 18 l
Weight: approx. 4.7 kg
Wet vacuuming - max. water temperature 40°C
Before starting the equipment

Before you connect the equipment to the mains supply make sure that the data on the rating plate are identical to the mains data.
The equipment may be connected only to a shock-proof socket-outlet.
Appliance assembly
Fitting the appliance head (Fig. 4)
The appliance head (3) is fastened to the container (7) by the locking hook (6). To remove the appliance head (3), open the locking hook (6) and remove the appliance head (3). When fitting the appliance head (3), make sure that the locking hook (6) locks into place correctly.

Fitting the castors (Fig. 5)
Fit the castors (13) in accordance with Fig. 5.

Fitting the handle (Fig. 8)
Use a screwdriver to fit the handle (1).

Fitting the filter
Notice!
Never use the wet and dry vacuum cleaner without a filter!
Always ensure that the filters are perfectly secure!
Fitting the foam filter (Fig. 6)
For wet-vacuuming, slip the supplied foamed plastic filter (15) over the filter basket.

Fitting the additional filter (Fig. 7)
For dry vacuum cleaning always use the supplied additional filter (18). Mount the additional filter, so that no air is sucked through the filter cage (4) without being filtered.

Assembling the dirt bag (Fig. 9)
For vacuuming fi ne, dry dirt it is recommended that you fit the dirt bag (14). Slip the dirt bag (14) over the vacuuming hole. The dirt bag (14) is suitable for dry-vacuuming only. The dirt bag makes it easier to dispose of the sucked-in dust.

Fitting the suction hose
(Fig. 3, 10, 11)
Connect the suction hose (10) to the corresponding connector on the wet and dry vacuum cleaner, depending on the application required.


Vacuuming
Connect the suction hose (10) to the suction hose connector (8)
Blowing
Connect the suction hose (10) to the blow connector (9)
One or more of the elements which make up the 3-part suction tube (11) can be attached to the suction hose (10) to extend it. The adapter (17) must be inserted between the suction tube (10) and the combination nozzle (12) or crevice nozzle (17).
Suction nozzles
(Fig. 2)
Combination nozzle
The dual-purpose nozzle (12) is for vacuuming solids and liquids over medium to large areas.
Crevice nozzle
The crevice nozzle (16) is designed for vacuuming solids and liquids in corners, edges and other areas that are difficult to access.
Operation
On/Off switch
(Fig. 1)
Switch position 0: Off
Switch position I: Normal mode
Switch position AUTO: Automatic mode
Dry vacuuming
Use the dirt bag (14) and the additional filter (18) for dry vacuuming (see point Fitting the filter). Always ensure that the filters are perfectly secure.
Wet vacuuming
For wet-vacuuming, use the foam filter (15)
Check that the filter is securely fitted at all times.
When wet vacuuming, the fl oating safety switch (fig. 3/5) closes when the maximum tank level is reached. In doing so, the suction noise of the equipment will change and become louder. You must then switch off the equipment and empty the tank.
The wet and dry vacuum cleaner is not suitable for the vacuuming of combustible liquids. For wet vacuuming, use only the supplied foam filter.
Automatic mode
(Fig. 1)
Connect the power cable on your electric tool to the automatic socket-outlet (20) and connect the suction hose (10) to the extractor connector on your electric tool. Check that the connections are secure and air-tight.
You can use the supplied electric tool adaptor (21) to connect the suction hose (10) to the electric tool. To do so, fit it between the suction hose and the extractor port on the electric tool.
Set the switch (2) on the wet and dry vacuum cleaner to position AUTO (automatic mode). The moment you switch on the electric tool, the wet and dry vacuum cleaner switches on as well. When you switch off the electric tool, the wet and dry vacuum cleaner switches off as well after a pre-set delay.
Blowing
Connect the suction hose (10) to the blow connector (9) on the wet and dry vacuum cleaner.
Cleaning, maintenance and ordering of spare parts
Always pull out the mains power plug before starting any cleaning work.
Cleaning
- Keep all safety devices, air vents and the motor housing free of dirt and dust as far as possible.
- We recommend that you clean the equipment immediately after you use it.
Cleaning the appliance head (3)
Clean the appliance regularly with a damp cloth and some soft soap. Do not use cleaning agents or solvents; these may be aggressive to the plastic parts in the appliance.
Cleaning the container (7)
The container can be cleaned with a damp cloth and some soft soap or under running water, depending on the amount of dirt.
Cleaning the foam filter (15)
Clean the foam filter (15) with a little soft soap under running water and allow it to air-dry.
Servicing
At regular intervals and before each use, check that the filters in the wet and dry vacuum cleaner are securely fitted.
Ordering spare parts
Please provide the following information on all orders for spare parts:
- Model/type of the equipment
- Article number of the equipment
- ID number of the equipment
- Part number of the required spare part For our latest prices and information please go towww.isc-gmbh.info
Replacing the power cable
If the power cable for this equipment is damaged, it must be replaced by the manufacturer or its after-sales service or similarly trained personnel to avoid danger.
Storage
Store the equipment and accessories in a dark and dry place at above freezing temperature. The ideal storage temperature is between 5 and 30°C. Store the electric tool in its original packaging.
Service information
We have competent service partners in all countries named on the guarantee certifi cate whose contact details can also be found on the guarantee certifi cate. These partners will help you with all service requests such as repairs, spare and wearing part orders or the purchase of consumables.
Please note that the following parts of this product are subject to normal or natural wear and that the following parts are therefore also required for use as consumables.
| Category | Example |
| Wear parts* | Combination nozzle, crevice nozzle, upholstery nozzle, electric tool adapter, etc. |
| Consumables* | Pleated filter, foam filter, dirt bag, additional filter, etc. |
| Missing parts |
* Not necessarily included in the scope of delivery!
In the eff ect of defects or faults, please register the problem on the internet at www.isc-gmbh.info. Please ensure that you provide a precise description of the problem and answer the following questions in all cases:
- Did the equipment work at all or was it defective from the beginning?
- Did you notice anything (symptom or defect) prior to the failure?
- What malfunction does the equipment have in your opinion (main symptom)?
Safety regulations

Read the operating instructions to reduce the risk of injury
When using the equipment, a few safety precautions must be observed to avoid injuries and damage. Please read the complete operating instructions and safety regulations with due care. Keep this manual in a safe place, so that the information is available at all times. If you give the equipment to any other person, hand over these operating instructions and safety regulations as well. We cannot accept any liability for damage or accidents which arise due to a failure to follow these instructions and the safety instructions.
Read all safety regulations and instructions. Any errors made in following the safety regulations and instructions may result in an electric shock, fi re and/or serious injury.
Keep all safety regulations and instructions in a safe place for future use.
![]()
read the operating instructions before assembling and using the appliance for the first time.- Check that the mains voltage is the same as the mains voltage specified on the rating plate.
- Pull out the power plug in the following circumstances: whenever the appliance is not in use, before opening the appliance and before all cleaning and maintenance work.
- Never clean the appliance with solvents.
- Never pull the plug out of the socket by pulling the cable.
- Never leave the appliance unattended when operational.
- Keep away from children.
- Take care to ensure that the power cable does not get damaged by being run over, crushed, pulled or suchlike.
- Do not use the machine if the power cable is in a less than perfect condition.
- If the power cable has to be replaced, the replacement must comply with the design specifications of the manufacturer.
- Power cable: H 05 VV - F 1 x 1.5 mm2
- Never vacuum the following: burning matches, smoldering ash and cigarette butts, combustible, caustic, inflammable or explosive substances, vapor or liquids.
- This appliance is not suitable for vacuuming dust which can be harmful to health.
- Store the appliance in a dry indoor location.
- Never use the appliance if it is damaged.
- Only allow the appliance to be serviced by an authorized after sales service outlet.
- Only use the appliance to carry out work for which has been designed.
- Take extra care when cleaning steps.
- Use only genuine accessories and spare parts.

This equipment is not designed to be used by people (including children) with limited physical, sensory or mental capacities or those with no experience and/or knowledge unless they are supervised by a person who is responsible for their safety or they have received instructions from such a person in how to use the equipment safely. Children must always be supervised in order to ensure that they do not play with the equipment.
Documents / Resources
References
Download manual
Here you can download full pdf version of manual, it may contain additional safety instructions, warranty information, FCC rules, etc.
Advertisement


Need help?
Do you have a question about the TC-VC 1820 SA and is the answer not in the manual?
Questions and answers