
Related Manuals for XDrum DD-250P


Summary of Contents for XDrum DD-250P
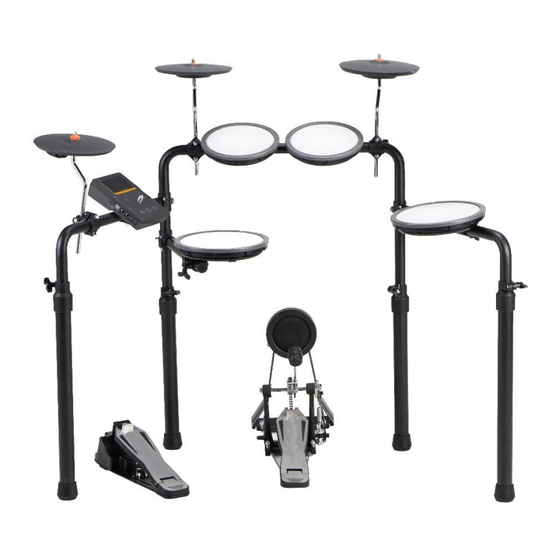
- Page 1 XDrum DD-250P Mesh E-Drum Kit Item no.: 00100192 Operating instructions Revision: 07/2024...
-
Page 2: Table Of Contents
XDrum DD-250P These operating instructions are protected by copyright. Reproduction of these operating instructions, even in part, is only permitted with the permission of Musikhaus Kirstein GmbH. The same applies to the reproduction or copying of images, even in modified form. -
Page 3: Intended Use
XDrum DD-250P Thank you for purchasing this product. To ensure that you are completely satisfied with this product, please read and understand this instruction manual carefully before using our product. Keep these operating instructions in a safe place. The operating instructions must be passed on to all subsequent users. - Page 4 XDrum DD-250P • Do not allow any liquids or moisture to penetrate the housing. • Disconnect the appliance from the power supply when not in use. • Disconnect the appliance from the mains during a thunderstorm. • The device does not contain any user-serviceable parts. Always consult appropriately trained specialist personnel.
-
Page 5: Included Components
XDrum DD-250P Included components Before assembling the e-drum for the first time, please check that you have received all the necessary components. You can find a list of the included components here: 1. Drum module A. Power supply unit 2. 7" Drum pad B. -
Page 6: Assembly
XDrum DD-250P Assembly 1. Assembly of the rack system Insert the rack (7) into the rack feet (8) and secure it by tightening the wing screws on the rack feet (8). This also allows you to set the desired height of the e-drum. Now you can loosen the wing screws of the individual rack rods to turn the rack rods to the desired position. - Page 7 XDrum DD-250P 3. Attaching the module Place the drum module (1) on the upper left rack bar and secure the drum module with the module holder (G) and the screws for the module (H). The screws can be tightened with the tuning key (E).
- Page 8 XDrum DD-250P 5. Attaching the HiHat and cymbal pads Put a washer (C) onto the HiHat arm (10). Now place an 8" cymbal pad (3) on this arm and then put another washer (C) on the cymbal pad from above.
-
Page 9: Specifications
XDrum DD-250P 6. Cabling of the individual components The multicore cable is labeled at the individual ends with the corresponding names of the components to be connected. Use the following diagram to help you connect the module to the various components. -
Page 10: Operating Elements Module
XDrum DD-250P Operating elements module 1. Display: For displaying various information. 2. Drums indicator (Drums): Indicates that you are in Drums mode. 3. Tempo indicator (Tempo): Indicates that you are in tempo mode. 4. Rhythm indicator (Rhythm): Indicates that you are in rhythm mode. -
Page 11: Module Connections
XDrum DD-250P Module connections 1. Mains connection (DC 5V): Connect the supplied type C power supply unit (DC 5V, 1A) here to supply the e-drum with power. 2. USB socket (USB): Connect the module to your computer via USB cable (USB-A - USB-B) to send and receive Midi data and to receive USB audio data. -
Page 12: Drum Kit Settings
XDrum DD-250P 3. Now switch on the external amplifier, active speaker, system, etc. 4. Now you can carefully adjust the volume upwards. You can check the volume during this process by hitting the drum pads. *After switching on, the module is in drums mode by default and the drums indicator lights Switching off the module 1. -
Page 13: Metronome Settings
XDrum DD-250P Metronome settings Changing the metronome tempo 1. Press the selection button (Select) to select the tempo mode of the metronome. The tempo indicator should light up. 2. The display shows the tempo in the form of a number. -
Page 14: Play To A Song
XDrum DD-250P Play to a song 1. Use the Select button to switch to Song mode. 2. Use the [+] or [-] buttons to select the desired song. The display will show the current song number (10 songs in total). -
Page 15: Energy-Saving Mode
XDrum DD-250P Energy-saving mode If this function is activated, the device switches off automatically if no signal is received from one of the input sockets or pads for a certain period of time. 1. With the module switched off, press and hold the metronome button (Metro/Play) and then press the On/Off button (Power) to switch the device on. -
Page 16: Index - List Of Drum Kits And Songs
XDrum DD-250P Index - List of drum kits and songs Index - List of sounds XDrum DD-250P 2024-07-17... -
Page 17: Midi Notes Of The Pads
Midi note 0x33 Simplified EU Declaration of Conformity Hereby, Musikhaus Kirstein GmbH declares that the radio equipment type (XDrum DD-250P Mesh E-Drum Kit) is in compliance with Directive 2014/53/EU. The full text of the EU Declaration of Conformity is available at the following internet address: http://www.kirstein.de/docs/Konformitaetserklaerung/CE_Konformitaetserklaerung_...
Need help?
Do you have a question about the DD-250P and is the answer not in the manual?
Questions and answers