Table of Contents
Advertisement
Advertisement
Table of Contents

Subscribe to Our Youtube Channel
Related Manuals for XDrum DD 650


Summary of Contents for XDrum DD 650
- Page 1 DD 650 Digital Drum Users Manual Art. Nr 00056971 Version 09/2018...
- Page 2 CAUTION CAUTION Any changes or modi cations in construction of this device which are not expressly approved by the party responsible for compliance could void the user’s authority to operate the equipment. WARNING When using electrical products, basic safety precautions should always be followed, including the following: These limits are designed to provide reasonable protection against harmful interference in a resi- dential installation.
- Page 3 TAKING CARE OF YOUR DRUM DO NOT ATTEMPT TO OPEN THE UNIT OR MAKE ANY CHANGE IN THE CIRCUITS OR PARTS OF THE UNIT. SERVICE AND MODIFICATION direct sunlight (near a window), This product should be serviced by qualified high temperatures (near a heat source, ...
-
Page 4: Table Of Contents
CONTENTS TABLE INSTALLATION ....................SOUND MODULE ..................... Control Panel ..................... Connectors ......................PLAYIN PAD ....................11 BEFORE START PERFORMANCE ..............BASIC OPERATION ..................Select Kit ......................Edit a Kit ......................13 Play a Drum Pattern (Demo song) ..............1 3 Record a Drum Track .................. -
Page 5: Installation
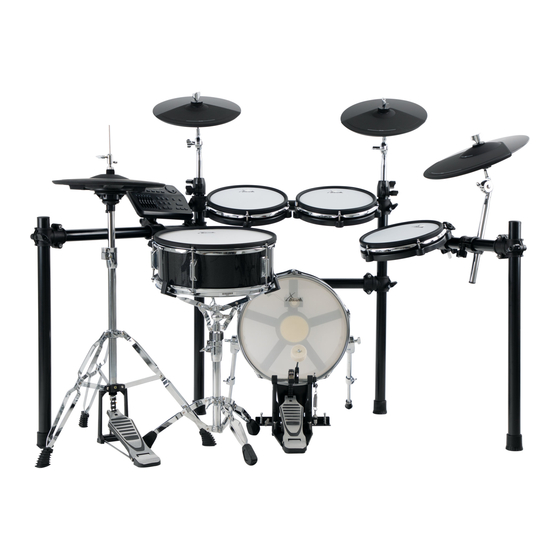
INSTALLATION CRASH1 CRASH2 HI-HAT TOM1 TOM2 RIDE SOUND MODULE SNARE KICK TOM3 KICK PEDAL... - Page 6 INSTALLATION ① ② ③ ④ ⑤ All components in the box are shown here. Extra components after installation are for replacements.
- Page 7 INSTALLATION ② ② ⑤ ⑤ ③ ④ ④ ④ ① ① 1. Insert Cross Bar①② into Post⑤, adjust their position and make ①② in parallel. 2. Insert Side Cross Bar③④ into Post⑤ and mount Connector⑨ on both ends. 3. Insert Side Post⑥ into connector⑨. 4.
- Page 8 ② ② ⑤ ⑤ ④ ③ ④ ④ ① ①...
- Page 9 INSTALLATION D R U M I N S T A L L A T I O N - 1 ⑤ HiHat Installation 1. Open HiHat Stand Legs① to suitable position and make it standfirm. ④ 2. Insert Thin Rod② into screw thread on the Bottom Stand according to dashed line here, and rotate it clockwise to fasten it.
- Page 10 INSTALLATION D R U M I N S T A L L A T I O N - 2 Cymbal Installation 1. Remove the Wing Nut, Washer and Felt ① from the top of the rod. ① 2. Put Cymbal Pad② into the Rod③, then place back parts removed in the step 1.
-
Page 11: Sound Module
SOUND MODULE Control Panel 1. MASTER VOL.: Adjust the output level of LINE OUT. Rotate it clockwise to increase volume. 2. HEADPHONE VOL.: Adjust the output level of HEADPHONE , rotate it clockwise to increase volume. 3. PAGE DOWN: Switch to next option in current menu. Can be used when you see on screen. - Page 12 SOUND MODULE 10. KIT: Press this button to engage kit mode. You can use -/+ button(15/16) or scroll wheel(7) to select a kit in this mode. 11. PATTERN: Press this button to engage pattern mode, where you can play demo patterns, exercise with patterns or do some drum recording.
- Page 13 SOUND MODULE 17. DRUM: Press this button to mute the drum track of a demo pattern. 18. ACCOMP: Press this button to mute accompaniment tracks of a demo pattern. 19.TEMPO: Tap this button at a desired rate to get a new tempo for demo pattern and metronome after you have tapped it four times.
-
Page 14: Connectors
SOUND MODULE Connectors DC 12V 23. HEADPHONE: Connect your headphone here. 1/8”TRS output. 24. LINE OUT L/MONO: Left channel of main output. Connect this output to any amplifier using 1/4” TS cable. For mono output, please connect this socket only. 25. -
Page 15: Playin Pad
PLAYING PAD PLAYING PADS Playing Snare Drum All pads have striking force sensitivity feature. Strike the central position (head) of the pad to Strike the pad harder to make higher volume make head sound, strike the rim of the pad to and strike the pad softer to make lower make rim sound. -
Page 16: Before Start Performance
BEFORE START PERFORMANCE - Make sure the drum kit is stable and all the parts are well locked. - Connect all the cables to the drum module according to their tags. - Connect the multi-trigger connector to its socket at the bottom of the sound module and lock it. SETUP - Power the sound module up. -
Page 17: Basic Operation
BASIC OPERATION Tempo Time signature TO SELECT A KIT 120 4/4 - Press kit on the control panel and use the scroll wheel or - Rock /+ button to select a kit. Kit name Kit No. Select or Change Part to edit SNARE-Rim VOICE TYPESNARE... -
Page 18: Record A Drum Track
BASIC OPERATION - Press METRO button, use -/+ button or scroll wheel to activate metronome. Use PAGE DOWN/UP to adjust met- ronome volume, tempo, time signature and sound. - Tap tempo button at a desired rate to get a new tempo. You can also change the tempo by scroll wheel or -/+ button after you press tempo button. -
Page 19: Setup
SETUP Press on the SETUP button to advance to system settings. SETUP Use PAGE DOWN/UP to select an item to set. BACK VOLUME If the item with blinking parameter, use -/+ button or scroll Change parameter directly wheel to change it directly. If the item has [ENTER] mark SETUP after, press the ENTER button to enter the sub-menu for MIDI SET[ENTER]... -
Page 20: Midi Set
SETUP ADVANCED SETTINGS Includes all the physical settings for pads/triggers. SETUP - Sensitivity: The higher the value is, the easier it will be to ADVANCE [ENTER] trigger. But if this value is too high, will cause some crosstalk problems. - Headroom: Set the velocity dynamic range. This value is the velocity needed to get max volume, so the lower the value is, the easier to get louder sounds. -
Page 21: Cross Talk
SETUP - Rim Velocity: Rim velocity correction option will appear TOM1-Rim when you strike on the rim or edge parts. The higher the Velocity value is, the louder it will become. Cymbal edges are also included in this setting. - Pedal Vel.: Decides the velocity triggered by hi-hat pedal. Pedal The higher the value is, the louder Pedal Chick and Pedal Pedal... -
Page 22: Drum Kit Edit
DRUM KIT EDIT Part to edit First, select a kit for editing. Press on the EDIT button to enter drum kit edit menu. There are 6 items available for kit SNARE-Rim VOICE TYPESNARE editing. The chapter <BASIC OPERATION> instructs how to en- Item name Editable parametr ter the Edit mode, select part and item in details;... - Page 23 See to the picture below for trigger names:...
-
Page 24: Appendix
APPENDIX KIT LIST Studio Latin DirtySouth Standard Brush Nebula Sunray Drumstep Jazz Fiesta Jungle Metal Mario Utopia Rock Impulse BlueBay Loop In kit 14 Loop, each tom contains a different loop. If you strike on it, a loop will be played. -
Page 25: Voice List
APPENDIX APPENDIX VOICE LIST (1) KICK Rock Techno 03 Session Kiss Jazz Techno 04 Vintage DDDclean Indie 01 Trance 01 Jungle 01 MorMOOG Indie 02 Trance 02 Jungle 02 Morschlag2 Metal Trance 03 Fiesta Morschlag3 Funk 01 Trance 04 Birch 01 Morschlag1 Funk 02 Trance 05... - Page 26 APPENDIX VOICE LIST (2) Funk Rimshot Trap 08 BrushV Morball2 Funk X-Stick Trap 09 BrushVSWIRL Morballcl 8Bit 01 Trap 10 BrushV RS 8Bit 02 Trap 11 BrushV SS Soli8084 House 01 JAZZV Soli9095 House 02 Rimshot JAZZV RS SoliFR2L House 03 X-Stick JAZZV SS Soli808...
- Page 27 APPENDIX VOICE LIST (3) Pop3 Rimshot Conga2 16XNMas 80er2 Pop4 Conga3 Rim10XNMas 80er3 Pop4 Rimshot Conga4 Rim12XNMas 80er4 Conga5 Brush1 Rim14XNMas NOV_808TOM1 Conga6 Brush2 Rim16XNMas NOV_808TOM2 Timbale1 Brush3 10BigReverb NOV_808TOM3 Timbale2 Brush4 12BigReverb NOV_808TOM4 8Bit1 Latin1 14BigReverb SDS7_4TO1 8Bit2 Latin2 16BigReverb SDS7_4TO2 8Bit3...
- Page 28 APPENDIX VOICE LIST (4) CRASH Rock1 8Bit2 SplashA12 Crash18 Rock1 Edge House 01 SplashA12E Crash18 E Rock2 House 02 SplashB12 CrashB16 E Rock2 Edge House 03 SplashB12E CrashB16 E RockChina House 04 Splash8 CrashB16 RockSplash Trance1 Splash8E Crash18 Jazz1 Trance2 China12Mal Crash18 B Jazz1...
- Page 29 APPENDIX VOICE LIST (5) 909HHCL2 Funk Closed Trap Open Fiesta Half-Open Funk Pedal Chick Trap Closed Fiesta Pedal Splash CR78_HHO Funk Open Open CCMHH O CR78_HHC Funk Closed Closed CCMHH C NOV_HHOP Funk Pedal Chick Pedal Chick CCMHH P NOV_1HHC 8Bit Open Half-Open...
-
Page 30: Specifications
SPECIFICATIONS 3 X 10" Mesh Tom (with rim),14" Acoustic Mesh Snare (layered rims), 2 X Configuration 12" Crash Cymbal(with edge & choke), 14" Ride Cymbal(with edge, bell & choke), 13" Hi-Hat with Stand, 14" Acoustic Mesh Kick Voice 720+ High Quality Sounds 20 Preset Kits and 20 User Kits Drum Kit 55 Songs,Drum On/Off,Accomp On/Off...
Need help?
Do you have a question about the DD 650 and is the answer not in the manual?
Questions and answers