Bosch Professional D-tect 120 Manual
- Original instructions manual (226 pages) ,
- Instructions manual (11 pages) ,
- Original instructions manual (231 pages)
Advertisement
Product Description and Specifications
Please observe the illustrations at the beginning of this operating manual.
Intended Use
The measuring tool is intended for the detection of objects in walls, ceilings and floors. Depending on the material and condition of the base material, it is possible to detect metal objects, timber joists, water-filled plastic pipes, conductors and cables.
The measuring tool complies with the limits of the standards specified in the declaration of conformity.
On this basis, clarification is required as to whether the measuring tool can be used in places such as hospitals, nuclear power plants and in the vicinity of airports and mobile phone base stations.
The measuring tool is suitable for indoor use.
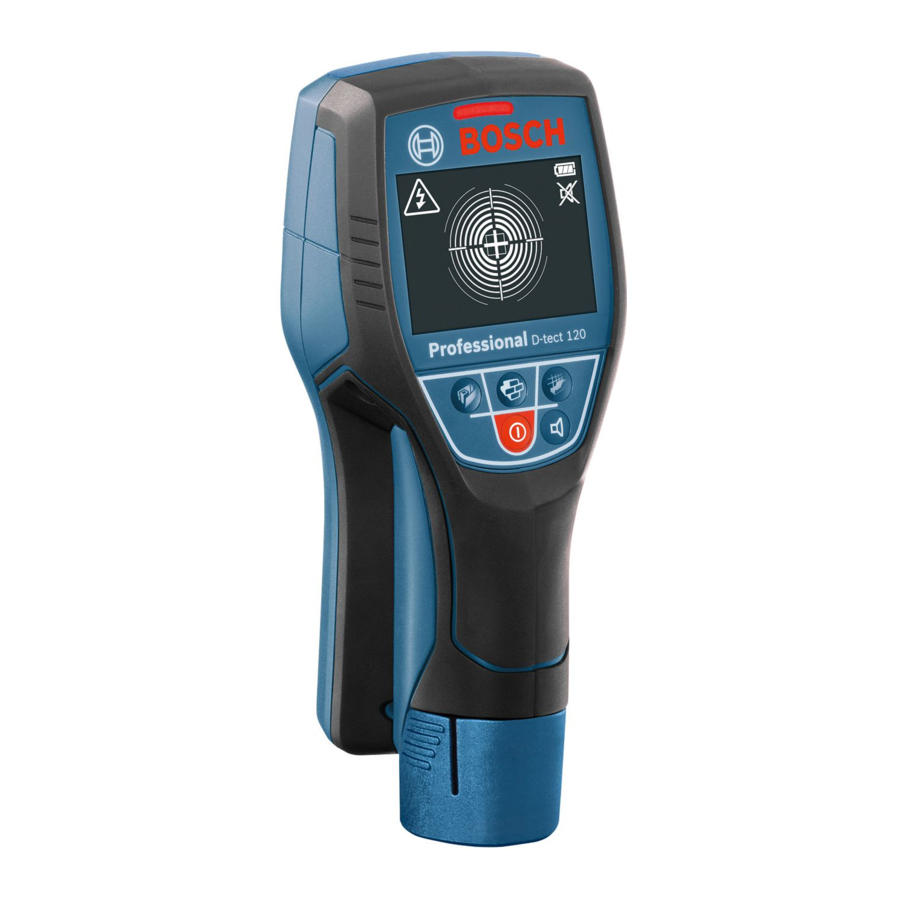
Product features


- Top marking aid
- Left-hand and right-hand marking aids
- Concrete operating mode button
- Audio signal button
- Gripping surface
- Rechargeable battery/battery adapter release buttona)
- Battery packa)
- On/off button
- Universal operating mode button
- Drywall operating mode button
- Display
- Indicator light
- Serial number
- Sensor area
- Battery adapter capa)
- Battery adapter receptaclea)
- Battery bay
- Non-rechargeable batteriesa)
a) Accessories shown or described are not included with the product as standard. You can find the complete selection of accessories in our accessories range.
Display elements

(see figure A)
- Indicator for live wires
- Procedure indicator
- Object centre indicator (centre cross)
- Orientation arrows to determine the object's centre
- Measuring indicator
- Service indicator
- Battery pack temperature monitoring indicator
- Interference from radio waves indicator
- Audio signal indicator
- State of charge of rechargeable batteries/non-rechargeable batteries
Technical data
| Universal detector | D-tect 120 |
| Article number | 3 601 K81 3.. |
| Max. detection depthA) | |
| 120 mm |
| 120 mm |
| 60 mm |
| 60 mm |
| 60 mm |
| 38 mm |
| Accuracy of object centre measurementA) | ±10 mm |
| Minimum distance between two neighbouring objectsA) | 50 mm |
| Operating frequency range | 2400–2483.5 MHz |
| Max. transmission power | 0.1 mW |
| Max. altitude | 2000 m |
| Relative air humidity max. | |
| 90% (non-condensing) |
| 50 % |
| Pollution degree according to IEC 61010-1 | 2B) |
| Measuring tool power supply | |
| 10.8 V, 12 V |
| 4 × 1.5 V LR6 (AA) (with battery adapter) |
| Approx. operating time | |
| 5 h |
| 5 h |
| Weight according to EPTA-Procedure 01:2014 | |
| 0.50−0.61 kg |
| 0.46 kg |
| Recommended ambient temperature during charging | 0°C to +35°C |
| Permitted ambient temperature during operation | –10°C to +40°C |
| Permitted ambient temperature during storage | –20°C to +70°C |
| Recommended rechargeable batteries | GBA 10,8V... GBA 12V... |
| Recommended chargers | GAL 12... GAX 18... |
A) Depends on operating mode, material and size of the objects, as well as material and condition of the base material
B) Only non-conductive deposits occur, whereby occasional temporary conductivity caused by condensation is expected.
C) Depends on battery in use
The serial number (13) on the type plate is used to clearly identify your measuring tool.
- The accuracy and detection depth of the measuring result may be negatively affected if the condition of the substrate is unfavorable.
Operation
- Protect the measuring tool from moisture and direct sunlight.
- Do not expose the measuring tool to any extreme temperatures or variations in temperature. In case of large variations in temperature, leave the measuring tool to adjust to the ambient temperature before switching it on. The accuracy of the measuring tool and the functionality of the display may be compromised if exposed to extreme temperatures or variations in temperature.
- Avoid hard knocks to the measuring tool or dropping it. After severe external influences and in the event of abnormalities in the functionality, you should have the measuring tool checked by an authorised Bosch aftersales service agent.
- Certain ambient conditions fundamentally impair the measuring results. These include, e.g. the proximity of devices that generate strong electric, magnetic or electromagnetic fields, moisture, metal building materials, foil-laminated insulation materials or conductive wallpaper or tiles. Therefore, also refer to other information sources (e.g. construction plans) before drilling, sawing or routing into walls, ceilings or floors.
- Hold the measuring tool by the intended gripping surface (5) only, so as not to influence the measurement.
- Do not attach any stickers or labels to the sensor area (14) on the rear of the measuring tool. Metal labels in particular will affect measuring results.

Do not wear gloves when taking measurements and make sure that you are properly earthed. If you are not properly earthed, the material identification of "live" wires may be impaired.

When taking measurements, avoid devices that emit strong electric, magnetic or electromagnetic fields. If possible, deactivate all tools whose radiation could interfere with the measurement and switch off the corresponding functions or tools.
Tool Power Supply
The measuring tool can be operated either with conventional non-rechargeable batteries or with a Bosch lithium-ion battery.
Operation with rechargeable battery pack

(see figure B)
- Use only the chargers listed in the technical data. Only these chargers are matched to the lithium-ion battery of your measuring tool.
Note: The use of batteries unsuitable for your measuring tool can lead to malfunctions or damage to the measuring tool.
Note: The battery is supplied partially charged. To ensure full battery capacity, fully charge the battery in the charger before using your tool for the first time.
The lithium-ion battery can be charged at any time without reducing its service life. Interrupting the charging process does not damage the battery.
The lithium-ion battery is protected against deep discharge by the "Electronic Cell Protection (ECP)". A protective circuit switches the measuring tool off when the battery is drained. To insert the charged battery pack (7), slide it into the battery bay (17) until you feel it engage.
To remove the battery pack (7), press the release buttons (6) and pull the battery pack out of the battery bay (17). Do not use force to do this.
Operation with non-rechargeable batteries
(see figure C)
It is recommended that you use alkaline manganese batteries to operate the measuring tool.
The batteries are inserted into the battery adapter.

- The battery adapter is intended only for use in designated Bosch measuring tools and must not be used with power tools.
To insert the batteries, slide the receptacle (16) of the battery adapter into the battery bay (17). Place the batteries in the receptacle as shown in the picture on the cap (15). Slide the cap over the receptacle until you feel it click into place.

To remove the batteries (18), press the release buttons (6) of the cap (15) and pull off the cap. Make sure that the batteries do not fall out by holding the measuring tool with the battery bay (17) facing upwards. Remove the batteries. To remove the receptacle (16) from inside the battery bay, reach into the receptacle and pull it out of the measuring tool, applying light pressure to the side wall as you do so.
Always replace all the batteries at the same time. Only use batteries from the same manufacturer and which have the same capacity.
- Take the batteries out of the measuring tool when you are not using it for a prolonged period of time. The batteries can corrode and self-discharge during prolonged storage in the measuring tool.
Starting Operation
Switching on/off
- Before switching on the measuring tool, ensure that the sensor area (14) is dry. If necessary, use a cloth to dry the measuring tool.
- If the measuring tool has been exposed to a significant change in temperature, leave it to adjust to the ambient temperature before switching it on.
To switch on the measuring tool, press the on/off button (8).
To switch off the measuring tool, press the on/off button (8) again.
If no button on the measuring tool is pressed for approx. 5 minutes, the measuring tool will automatically switch itself off to preserve battery life.
Check the measuring tool before each use. Safe operation cannot be guaranteed in the following circumstances:
- The measuring tool has visible damage or there are loose components inside the measuring tool.
- The measuring indicator (e) constantly deflects, even when holding the measuring tool in the air.
- The measuring indicator (e) does not deflect at all, even when holding a finger in the sensor area.
- None of the operating mode buttons light up.
Switching audio signal on/off
The audio signal can be switched on/off with the audio signal button (4). When the audio signal is switched off, the audio signal indicator (i) appears on the display.
Operating Modes
Once it has been switched on, the measuring tool defaults to the universal operating mode.
To change the operating mode, press the button for the required operating mode (button for universal operating mode (9), button for concrete operating mode (3) or button for drywall operating mode (10)). The selected operating mode is indicated by the illuminated button.
By selecting the operating mode, you can adjust the measuring tool to different wall materials and, if required, prevent the detection of unwanted objects.
If the wall material is not known, you should begin with the universal operating mode.
Universal operating mode
The universal operating mode is suitable for most applications in masonry. Metal objects, water-filled plastic pipes, electrical lines and cables can be detected. Hollow spaces in brickwork or empty plastic pipes with a diameter of less than 2 cm remain potentially undetectable. The maximum measuring depth is 6 cm.

Concrete operating mode
The concrete operating mode is particularly suitable for applications in reinforced concrete. Rebar, metal pipes, water-filled plastic pipes, electrical lines and cables can be detected. The maximum measuring depth is 12 cm.

Drywall operating mode
The drywall operating mode is suitable for detecting timber joists, metal supports, electrical lines and cables in drywalls (wood, plasterboard, etc.). Water-filled plastic pipes can also be detected. Empty plastic pipes normally can-not be detected. The maximum measuring depth is 6 cm.

How it works
(see figure D)
The measuring tool checks the base material of the sensor area (14) in the measurement direction A up to the maximum detection depth. Objects that are different from the material of the wall are detected.
Always move the measuring tool over the base material applying light pressure, without lifting it off or changing the pressure.
The measuring tool can be moved in any direction B.

Measuring process
Position the measuring tool on/against the surface being inspected.
If there is an object below the measuring tool when it is set down, the indicator light (12) lights up red if there is sufficient signal strength, the measuring indicator (e) deflects and an audio signal sounds.
If no object is detected when the measuring tool is set down, the proceed indicator (b) is displayed and the indicator light (12) lights up yellow. Move the measuring tool over the surface without lifting it off, until the proceed indicator disappears.
If no object is detected below the measuring tool, the indicator light (12) lights up green.
When the measuring tool approaches an object, the deflection in the measuring indicator (e) increases, the indicator light (12) lights up red and an audio signal sounds. When it moves away from the object, the deflection in the measuring indicator decreases.
For small or deep-lying objects, the indicator light (12) can light up yellow without the audio signal sounding.
Wider objects in the base material can be identified by a continuous high deflection of the measuring indicator (e). The indicator light (12) lights up red.
- Before drilling, sawing or routing into walls, refer to other sources of information to ensure that you eliminate hazards. As the measuring results can be influenced through ambient conditions or the condition of the wall, there may be a hazard even though the measuring indicator (e) does not indicate an object in the sensor range and the indicator light (12) lights up green.
Determining an object's centre
If an object is detected, the signal light (12) will light up red. With sufficient signal strength, the orientation arrows (d) are displayed to determine the object's centre.
To locate the object's centre, move the measuring tool in the direction of the orientation arrow (d) displayed.
Over the centre of an object, the measuring indicator (e) will exhibit maximum deflection, and with sufficient signal strength, the centre cross (c) will appear. The orientation arrow (d) will also disappear.
For a more accurate location of the object's centre, pay attention to the square; if there is sufficient signal strength, this will be shown in the immediate vicinity of the object's centre in addition to the centre cross (c).
If the orientation arrows (d) are not displayed, an object may nevertheless be located in the immediate vicinity.
- Always check all the signals of the measuring tool (indicator light, measuring indicator and orientation arrows for locating the object's centre).
Indicator for live wires
The scan for live wires takes place automatically for each measurement (regardless of the operating mode).
When a live wire is detected, the indicator for live wires (a) appears in the display, the indicator light (12) flashes red and the audio signal sounds at a faster rate.
Notes:
- In certain conditions (such as behind metal surfaces or behind surfaces with high water content), live wires cannot always be detected. The signal strength of a live wire depends on the position of the cable. Therefore, take further measurements in close proximity or use other information sources to check if a live wire is present.
- Static electricity can cause wires to be detected inaccurately (e.g. over a large area) or prevent them from being detected at all. To improve the detection, place your free hand flat on the wall next to the measuring tool, in order to remove the static electricity.
- Live wires can be detected more easily when power consumers (e.g. lamps, appliances) are connected to the wire being sought and switched on. Switch off electricity consumers before drilling, sawing or milling into the wall.
Marking objects
If required, detected objects can be marked. Perform a measurement as usual.
Once you have found the boundaries or the centre of an object, mark the sought location at the top marking aid (1) and the side marking aid (2). Connect the points with a vertical and horizontal line. The boundary or the centre of the object is located where the lines intersect.
Errors causes and corrective measures
| Error | Cause | Corrective measures | |
The unit cannot be switched on | Battery pack or batteries empty | Charge the battery pack or change the batteries. | |
The unit is switched on but not responding | Remove the battery pack or batteries and put them back in again. | ||
 | Battery pack temperature monitoring indicator (g) is shown on the display | Battery pack is outside the operating temperature range or has been subjected to large fluctuations in temperature | Wait until the battery pack is within the permitted temperature range again or change the battery pack. |
| Note: When lifting the measuring tool off the wall, the (g) indicator may appear briefly, even when the temperature is normal. | |||
 | Interference from radio waves indicator shown in display | Interference from radio waves (e.g. from Wi-Fi, UMTS, radar, transmitter masts or microwaves) | If possible, deactivate all tools whose radiation could interfere with the measurement and switch off the corresponding functions or tools. |
 | Service indicator shown on display | The measuring tool has developed a fault and is no longer functional. | Send the measuring tool to an authorised Bosch after-sales service centre. |
Safety Instructions
All instructions must be read and observed. The safeguards integrated into the measuring tool may be compromised if the measuring tool is not used in accordance with these instructions. STORE THESE INSTRUCTIONS IN A SAFE PLACE.
- Have the measuring tool serviced only by a qualified specialist using only original replacement parts. This will ensure that the safety of the measuring tool is maintained.
- Do not use the measuring tool in explosive atmospheres which contain flammable liquids, gases or dust. Sparks may be produced inside the measuring tool, which can ignite dust or fumes.
- Do not open the battery. There is a risk of short-circuiting.
- In case of damage and improper use of the battery, vapours may be emitted. The battery can set alight or explode. Ensure the area is well ventilated and seek medical attention should you experience any adverse effects. The vapours may irritate the respiratory system.
![]()
If used incorrectly or if the battery is damaged, flammable liquid may be ejected from the battery. Contact with this liquid should be avoided. If contact accidentally occurs, rinse off with water. If the liquid comes into contact with your eyes, seek additional medical attention. Liquid ejected from the battery may cause irritation or burns.![]()
The battery can be damaged by pointed objects such as nails or screwdrivers or by force applied externally. An internal short circuit may occur, causing the battery to burn, smoke, explode or overheat.![]()
When the battery is not in use, keep it away from paper clips, coins, keys, nails, screws or other small metal objects that could make a connection from one terminal to another. A short circuit between the battery terminals may cause burns or a fire.- Only use the battery with products from the manufacturer. This is the only way in which you can protect the battery against dangerous overload.
![burn hazard]() Only charge the batteries using chargers recommended by the manufacturer. A charger that is suitable for one type of battery may pose a fire risk when used with a different battery.
Only charge the batteries using chargers recommended by the manufacturer. A charger that is suitable for one type of battery may pose a fire risk when used with a different battery.

 Only charge the batteries using chargers recommended by the manufacturer. A charger that is suitable for one type of battery may pose a fire risk when used with a different battery.
![]()
Protect the battery against heat, e.g. against continuous intense sunlight, fire, dirt, water and moisture. There is a risk of explosion and short-circuiting.
- The measuring tool may not be 100% accurate for technological reasons. To eliminate hazards, familiarise yourself with further sources of information, such as building plans and photographs taken during construction, etc. before carrying out any drilling, sawing or routing work on walls, ceilings or floors. The accuracy of the measuring tool may be affected by environmental influences, such the level of humidity or there being other electronic devices nearby. The structure and condition of the walls (e.g. damp, building materials containing metal, electrically conductive wallpaper, insulating materials, tiles) and the number, type, size and position of the objects may distort the measuring results.
- Make sure that you are properly earthed when taking measurements. If you are not properly earthed (e.g. by wearing insulating footwear or by standing on a ladder), it will not be possible to locate live cables.
- If there are gas pipes in the building, check to ensure that none of them have been damaged after completing any work on walls, ceilings or floors.
- Live wires can be detected more easily when power consumers (e.g. lamps, appliances) are connected to the wire being sought and switched on. Switch off power consumers and make sure that live cables are de-energised before drilling, sawing or milling into walls, ceilings or floors. After performing any kind of work, check to ensure that objects placed on the base material are not live.
- When attaching objects to dry walls, and in particular when attaching them to the substructure, check to ensure that both the wall and the fastening materials have a sufficient load-bearing capacity.
Maintenance and Service
Maintenance and Cleaning
- Check the measuring tool before each use. If the measuring tool is visibly damaged or parts have become loose inside the measuring tool, safe function can no longer be ensured.
Always keep the measuring tool clean and dry to ensure optimum, safe operation.
Never immerse the measuring tool in water or other liquids.
Wipe off any dirt using a dry, soft cloth. Do not use any detergents or solvents.
After-Sales Service and Application Service
Our after-sales service responds to your questions concerning maintenance and repair of your product as well as spare parts. You can find explosion drawings and information on spare parts at: www.bosch-pt.com
The Bosch product use advice team will be happy to help you with any questions about our products and their accessories.
In all correspondence and spare parts orders, please always include the 10‑digit article number given on the nameplate of the product.
Malaysia
Robert Bosch Sdn. Bhd.(220975-V) PT/SMY
No. 8A, Jalan 13/6
46200 Petaling Jaya
Selangor
Tel.: (03) 79663194
Toll-Free: 1800 880188
Fax: (03) 79583838
E-Mail: kiathoe.chong@my.bosch.com
www.bosch-pt.com.my
Great Britain
Robert Bosch Ltd. (B.S.C.)
P.O. Box 98
Broadwater Park
North Orbital Road
Denham Uxbridge
UB 9 5HJ
At www.bosch-pt.co.uk you can order spare parts or arrange the collection of a product in need of servicing or repair.
Tel. Service: (0344) 7360109
E-Mail: boschservicecentre@bosch.com
You can find further service addresses at:
www.bosch-pt.com/serviceaddresses
Transport
The recommended lithium-ion batteries are subject to legislation on the transport of dangerous goods. The user can transport the batteries by road without further requirements.
When shipping by third parties (e.g.: by air transport or forwarding agency), special requirements on packaging and labelling must be observed. For preparation of the item being shipped, consulting an expert for hazardous material is required.
Documents / Resources
References
![www.bosch-pt.com]() Home | Bosch Power Tools
Home | Bosch Power ToolsBosch Power Tools | Bosch Professional
![www.bosch-pt.co.uk]() Home | Bosch Power Tools
Home | Bosch Power ToolsService worldwide
Download manual
Here you can download full pdf version of manual, it may contain additional safety instructions, warranty information, FCC rules, etc.
Advertisement


Need help?
Do you have a question about the Professional D-tect 120 and is the answer not in the manual?
Questions and answers