Abask Q40S Manual
- User manual (56 pages) ,
- User manual (76 pages) ,
- User manual (80 pages)
Advertisement
Introduction
Thank you for purchasing our Dash Cam. we are certain that our product will provide you with trouble free operation while providing you with safety features that will enhance your driving experience. As with most aftermarket safety enhancements, our products are designed to assist and aid the driver, not replace the manual functions of the person operating the vehicle. Please read these instructions carefully before installing your product.
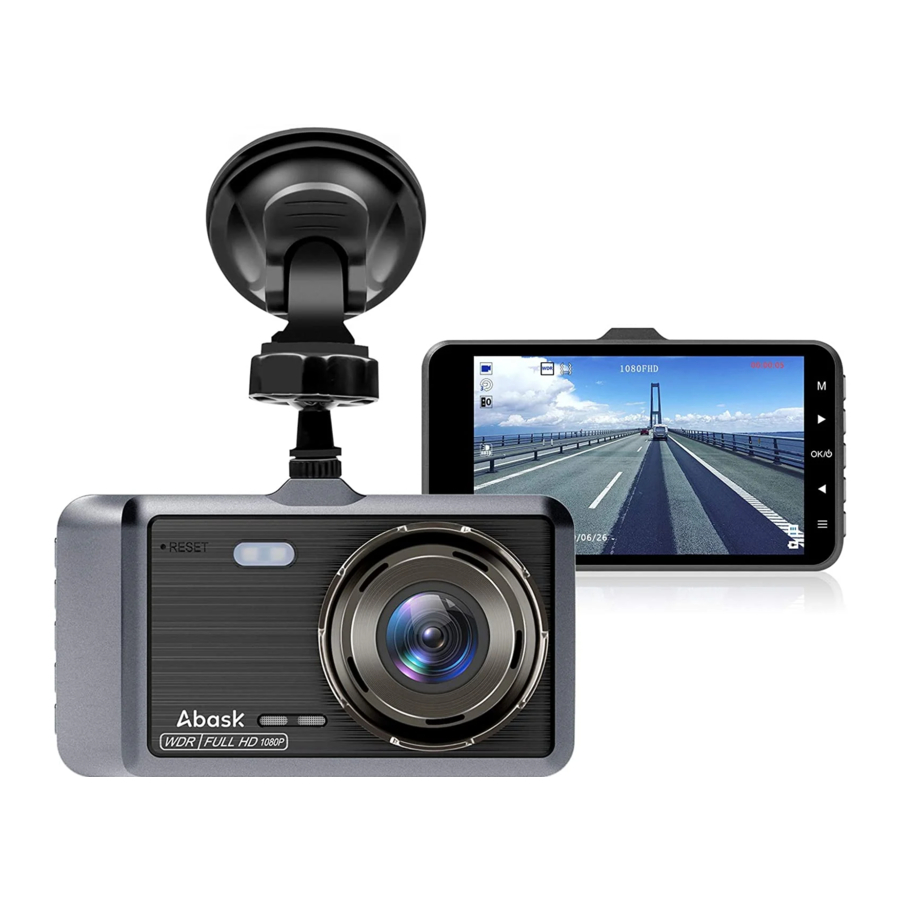
Package Contents
1x Dash Cam
1x Suction Cup Mount
1x Car Charger with 3.5M USB Cable
1x 32GB SD card (already inserted in the camera)
1x USB Cable (0.6m)
1x User Manual
1x Rear Camera with 6M Extension Cable (Q40 not included, Q40S included)
Button Function

- 4"IPS Screen
- Mode Button【M】
- Status light
- UP Button 【▶ 】
- OK Button
- Down Button【◀ 】
- Menu Button 【☰】
- Rear camera port
- USB port
- Patch light
- Suction cup
Mounting port - TF card slot
- Reset hole
- Speaker
- Camera lens
Mode Button【M】
- Back function: return to the previous page.
- Switching function: switch the Video/ Photo / playback mode; Enter/Exit the MENU.
- Lock function: press in video mode to lock/unlock the current file.
UP Button【▶ 】
- In MENU, press to scroll up.
- In Playback, select to previous file.
- Press to switch between front/rear camera in the video standby mode.
Ok Button 【OK/![]() 】
】
- Long press to turn on and turn off.
- Start/Stop recording.
- Starts playback while in Playback Mode.
- Selects option in MENU Mode.
- Select and play recorded files in Playback.
- During video recording, short press to turn on/off.
- Press to take a photo in Photo mode.
DOWN Button【◀ 】
- In MENU, press to scroll down.
- In Playback, select to next file.
- In Video recording Mode, press to turn on/off the recording function.
- In Video recording Mode or Standby mode, long press to turn on/off the Parking Monitor.
Menu Button 【☰】
- In Standby mode, Enter/Exit the Video Recording Menu /Setup Menu.
- Enter/Exit the MENU
- In Video/ Photo / playback mode, short press to access the menu settings for that particular mode.
Specifications
| Screen Display | 4"IPS Screen |
| Video Format | MOV |
| Video Resolution | 1296P/1080FHD/720P |
| Photo Resolution | VGA /1.3M /2M /3M /5M /8M/10M /12M |
| Picture Format | JPG |
| Memory Card | TF Card (Class10 or above, Up to 128GB) |
| Rear Camera | Supported |
| Language | English/Chinese/German/French/Spanish |
| Microphone & Speaker | Supported |
| USB Interface | USB 5pin |
| Power supply interface | DC 5V 1.5A |
| Frequency | 50HZ/60HZ |
| Battery | 200mAh 3.7V Polymer lithium battery |
| Operating current | 590mA |
| Storage Temperature | -30℃~70℃ |
| Operating Temperature | 0℃~50℃ |
Getting Started
Check the memory card
Please insert the SD card in the correct direction. The SD card will pop out after pressing it with a fingernail or sharp object. (SD card is already inserted in the SD card slot)
NOTE:
- Do not remove or insert the memory card while the Dash Cam is turned on as this may damage the memory card or corrupt the memory cards stored data.
- Please use a Class 10 or higher rated micro SD card with a maximum capacity of 32GB.
- Please format the Micro SD card before the initial use. -When removing the memory card, be careful as the card may eject quickly.
To remove the memory card
Ensure that the Dash Cam is powered off, then push the memory card until a click is heard and then release the card to eject.
Installing the Dash Cam

- Insert the high-speed TF card (Class10 or above) into the card slot of the dash cam. (You need to format the TF card in the camera when you use it for the first time)
- Insert the mounting bracket into the socket on the top of the camera and rotate the bracket until it is tightened. Remove the protective sticker from the camera and the suction rack. Fix the camera on the original rear view mirror position of the car.
- Plug the car charger into the car cigarette lighter, and the other end into the USB port of the dash cam. (When wiring, the wiring extension for charging can be wired along the edge of the car windscreen.)
- When mounting the rear camera, the plug is first connected into the recorder connector. Then the cable is connected from the front to the back along the car ceiling. The rear camera is installed in the back of the car. The red wire is connected to the anode of the reversing light. (Note: Q40 does not include a rear camera)
- Adjust the lens position and make sure that the lens remains horizontal with the ground and horizontal angle of the camera and tighten the knob on the bracket in order to lock the camera in position.
- Start the engine and check that the camera starts automatically. When the car engine is switched off, the camera is switched off.
Rear camera
The Q40 doesn't include a rear camera
- Rear camera waterproof.
- You can install it on the rear vehicle's windscreen
![]() or near the license plate
or near the license plate ![]() .
.
 or near the license plate
  .
.Reverse Parking Assistance
The back up camera with guide lines assists you safe parking by connecting the positive terminal from the reverse lights.
NOTE:

- The screen is small for parking assistance.
- No need to connect the red wire of rear camera with the reverse lights if you don't want rear guidance when put the car in reverse gear, and the dash cam will still record both front and rear.
Powering the Dash Cam On /Off
Auto Power On/Off
When the Dash Cam is correctly installed and connected to your vehicle's 12v power supply, the Dash Cam will automatically power up and start recording when the vehicle accessories are activated.
Manual Power On/Off
- Manual Power On
Hold the Power button on the right side of the Dash Cam until the start up screen appears. - Manual Power Off
Make sure that recording has been stopped(no red dot flashing on the screen) and then press the Power d button on the right side of the Dash Cam. After powering down the device please wait for 10 seconds before turning the Dash Cam back on.
Reset the Device
If the Dash Cam does not function normally, try restarting the Dash Cam. To restart the Dash Cam, with a flattened paper clip press the small button in the back side of the Dash Cam.
View the recorded videos
Playing back video on Dash Cam
- Press the [OK] button to stop recording (no red dot flashing on the screen ).
- Press the [M] button twice to enter the playback mode.
Playing back video on a PC
- Connect the Dash Cam to the computer using the USB cable (included).
- Select "Store" on the Dash Cam.
- Open the folder "DCIM" in the storage disk on your computer to view your recorded video.
- To playback video files on your PC, it is recommended to connect the Micro SD card directly to your PC using either a USB Micro SD card reader(not included)or if your PC has a SD card slot, a Micro SD/SD Card converter (not included).
Initial Settings
Before using the Dash Cam we recommend Formatting the Inserted Micro SD Card and setting the correct Time and Date.
Formatting the Inserted Micro SD Card
Formatting the Micro SD card will delete all information on the inserted Micro SD Card and prepare the card for use with the Dash Cam.
- Press the【OK 】Button to stop the Dash Cam from recording. (no red dot flashing on the screen).
- Press the【☰】Button to enter the Video Menu.
- Press the【☰】Button again to enter the Settings Menu.
- Press the [UP] or [DOWN] button to select the Format setting option, select 【OK 】to confirm and press the 【OK 】Button.
NOTE:
- Menus cannot be accessed while the camera is recording. Please stop the recording before attempting to access the menu.
- Formatting your Micro SD Card will delete all files from the card. Once these files have been deleted you will not be able to recover them.
Set Date Time
Setting the Time and Date allows you to stamp your footage with the time as a reference.
- Press the【OK】Button to stop the Dash Cam from recording.(no red dot flashing on the screen)
- Press the【☰】Button to enter the Video Menu.
- Press the【☰】Button again to enter the Settings Menu.
- Press the [UP] or [DOWN] button to select the Date/Time setting option, select 【OK】 to confirm and press the 【OK 】 Button.
NOTE:
- Menus cannot be accessed while the camera is recording. Please stop the recording before attempting to access the menu.
- Once the time and date is set it can be stamped onto your footage using the Date Stamp setting. Please see section Date Stamp.
Operation Mode
The dash cam operates has 3 modes: Video Recording Mode /Photo Mode/Playback Mode. Select desired mode by pressing 【M】button.
Video Recording Mode
When the Dash Cam is connected to your vehicle's 12v power supply, the Dash Cam will automatically power up and begin recording when you start your vehicle. There is a flashing red dot in the upper left corner of the screen, which means the camera is recording video. Press 【OK】 to stop recording and then the camera goes to standby mode.
Locked Recording
Locked Recording saves the current video file and protects it from being overwritten. To manually start a Locked Recording follow the instructions below.
- During recording press the 【M】button.
- To unlock the footage, press the【M】button again.
Recording Screen

- Recording Indicator
- Loop recording
- Exposure
- Motion Detection
- Fill light
- Recording Audio/ Microphone
- Time/Date
- Battery
- SD card
- Parking Guard
- Recording time
- Resolution
- G-sensor
- WDR
- Locked Recording
- Recording status
Video Recording Menu
Resolution: Set the resolution of the recorded video, there are three options for you to choose: 1296P/1080 FHD/720P.
Dual Camera: Set whether the rear camera records at the same time. (The Q40 does not include a rear camera, if you need one, please purchase the rear camera separately)
Loop Recording:The camera will take short video increments (1,3, or 5 minutes) and when storage is full, it will delete the oldest recorded to make room for a new one. (1 minute setting by default).You can also disable this feature.
Interval Recording: The interval time of each recorded video. Default is off.(off / 100ms / 200ms / 500ms)
WDR:The WDR setting increases the dynamic range of the camera.select to optimize video quality with wider light range and image details.
Exposure:Exposure is used to manually control the light sensitivity settings. The default is 0.
Motion Detection:Motion Detection is used to pause recording when no motion is detected in front of the camera, and to start recording when motion is detected again. Default is off. Recording:The Recording Audio setting allows you to mute the microphone during recording, or set it to record. Default is on.
NOTE:
In the video recording status, press [◀ ] button to quickly turn on/off the recording audio.
Date Stamp:Date stamp will stamp the current date onto the footage for future reference. G-Sensor(Gravity Sensing)
The G-Sensor defines the required force needed to trigger emergency recording. Once Emergency recording is triggered the current recording will be saved and protected from being saved over by the normal loop recording. To set the required sensitivity please follow the instructions below.
- Press the【OK 】Button to stop the Dash Cam from recording.(no red dot lashing on the screen)
- Press the【☰】Button to enter the Video Menu.
- Press the【☰】Button again to enter the Settings Menu.
- Press the [UP] or [DOWN] button to select the Gravity Sensing setting option, select 【OK】 to confirm and press the【OK】 Button.
NOTE:
- Menus cannot be accessed while the camera is recording. Please stop the recording before attempting to access the menu.
- The default setting of G Sensor is off.
- If your memory card is filling up quickly you may need to lower the sensitivity of the G-Sensor (Gravity Sensor)to decrease the number of triggers caused by normal driving. It's better to set G-Sensor to "Medium" to avoid too many useless locked videos.
Parking Guard: It's used to protect your car after parking. With this function on, after you stop the car and camera turns off, it stays standby. when camera detects shock and collision, the camera will sense motion and automatically begin recording, then shut down automatically.
NOTE:
To set Park Monitor Mode, follow the instructions below.
- Ensure that the Dash Cam is not recording.
- Press the[M]Button to enter the Video Menu.
- Press the [UP] or [DOWN] button to select the Parking Mode setting option, select [OK] to confirm and press the [OK] Button.
- Please buy "Dash Cam Hardwire Kit", Specification: DC 5V / 2A. Then connect the Dash Cam to the ACC fuse box of the vehicle, to continuously power the Dash Cam.
Setting System Menu
Display Protection:Timing can automatically turn off the display screen, so that the product can work under extremely low power consumption. There are four modes of "Off/30 second/1 minute/2 minutes" in the "Screen Saver" of the system menu. Choose "1" Minutes" means that it will enter the power saving mode after 1 minute of power on, and turn off the display.
Option:Off/30 seconds/1minutes/2 minutes, Set the time it takes for screen saver to be activated. It can also be turned off.
Auto Power Off: Set the time for the Dash Cam to automatically shut down to save power. The Dash Cam will automatically shut down when it is in standby for the set time. (Off/1min/3min/5min)
Frequency: 50Hz/60Hz.
The Key beeps setting is used to turn Off or On the beep that indicates a key press.
Language:Set the language for the dash cam.
Date/Time: Set the time and date, then press the [OK] button to confirm/change, and press the [☰] button again to exit the time setting.
Fill light: Turn on the fill light on the back of the camera. The default is Auto. The fill light will automatically turn on to provide light source for the recording of the car recorder in the dark environment.(On / Off / Auto)
Format:Completely delete all files in the storage card.
Default Setting:Return menu setting Defaults.
Version: The firmware version of the car recorder.
Contact us:
US: supportus@abask.hk
EU / UK: supporteu@abask.hk
Photo Mode
Press the [OK] Button to stop the Dash Cam from recording.(no red dot flashing on the screen)then press the mode [M] button to enter the photo mode. In the photo mode, press the [OK] button to take pictures and save.
NOTE:
- Photo Mode cannot be accessed while the camera is recording. Please stop the recording before attempting to access the menu.
- Photo mode, only in the case of manual operation.
Playback mode
Press the [OK ]Button to stop the Dash Cam from recording.(no red dot flashing on the screen. In standby mode, press the mode [M] button twice to enter file playback mode, press the up and down button to select the file, press the [OK] key to play the file, press the [◀ ] and [▶ ] keys to fast forward/fast rewind playback.
Questions and Answers
Does the dash cam have a built-in battery? Can I record with the car's engine off?
The Dash Cam has a built-in 200 mAh rechargeable battery. But it is only used for emergency backup. The camera needs to be connected to the car power supply for continuous operation. If you need the camera for parking monitoring function after turning off the car engine. You need to connect it to the car fuse box. The cable compatible with the dash cam is: output voltage/current is DC 5V/1.5A.
Why is the memory card error displayed when a new card is inserted into the computer?
This machine detects that the new card has no system files, so it will prompt an error, please format the memory card with this machine.
Why the purchased memory card can't record, freeze, have no video files, and can't play?
The memory card is not formatted on the machine, or it is a low-speed card or a fake card, please replace it with a genuine Class 10 or higher high-speed memory card.
Why can't loop recording?
- The gravity sensing function will generate locked files. If there are too many locked files, it will stop recording and prompt that the card is full. Please delete unimportant files.
- There are many low-speed cards or black cards on the market that pretend to be high-speed cards. If you use such a card, you will also be prompted that the card is full. If there is a problem with the card, it will cause the machine to judge incorrectly.
How does the recorder work after it crashes?
If the dash cam crashes for some reason, please tap the reset button with a small hard object to restart the dash cam.
Can't see the video recorded by the rear camera?
Both cameras will start recording video at the same time. You can see the rear video in the upper right corner of the screen. If you can't see the video from the rear camera. Please try the following:

- Please set the default settings in the camera's menu.
- Press the [▶ ] key to switch the display mode of the front and rear cameras on the screen.
- Please try to unplug the rear camera cable connection, and then reinsert it.
- Please make sure the rear camera cable is properly connected to the camera.
- Make sure the dual lens feature is enabled in the camera.
Is the video recorded by the rear camera a mirror image?
The rear camera is a mirror display. Due to technical limitations, the same type of rear camera on the market now has the same problem. But we were still able to analyze the license plate number from the video.
When reversing, the camera does not automatically switch to the reversing view (there is no auxiliary line displayed).
To display the reversing assist line, you need to connect the red wire on the rear camera cable to the positive pole of the reversing light.
The rear camera cable is not long enough
Please purchase a compatible extension cable. The extension cable specification: Q40/Q40S: 5-pin, Q40SPro: 4-pin.
Radio is disturbed
- Please change the light source frequency in the camera menu to 50HZ/60HZ.
- Please check whether the cable is coiled. Electromagnetic fields are created when current flows through the coiled wire, which can interfere with the radio signal. please straighten the cable.
If you have any questions, please contact us via email or scan QR1.
E-mail: From US/CA: support@abask.hk
From EU/UK: supporteu@abask.hk
QR1

If you need a more detailed electronic version of the manual, please scan QR2.
QR2

Important Notice

- Ensure you are using your Dash Cam within your countries road laws. Please make sure you are familiar with your local road legislation before use.
- Avoid leaving your Dash Cam in direct sunlight for extended periods of time in unventilated space.
- Please set time and date before you use this dash cam to record.
- The notifications given by the Dash Cam are suggestions only, please drive to the actual conditions.
- The system is to be used only for non-commercial use, within the limits permitted by the relevant laws.
- Avoid using the Dash Cam in the vicinity of any devices that emit radio interference (eg. Microwave Ovens).
- It is considered normal operation for the Dash Cam to get warm during use.
- The difference between the Q40 and Q40S is that the Q40S includes a rear camera in its accessories, while the Q40 does not.
Battery Warning
- All dash cams on the market are powered by the car. After the dash cam is plugged in the car cigarette lighter socket, while starting the car, the car will supply power to the dash cam, the dash cam will turn on and record the video. However, once the car shuts down, the dash cam shuts down and also stops recording.
- The car camera has a built-in 200 mAh rechargeable battery. It only used for emergency backup. Always charge the Dash Cam using the provided charger. Improper charging of the Dash Cam may result in failure of the internal battery.
- Never dismantle the Dash Cam or expose the internal battery.
- Do not dispose of the Dash Cam in fire.
- Dispose of the Dash Cam observing local regulations being mindful of the internal battery.
- Do not attempt to replace or expose the internal battery.
Documents / ResourcesDownload manual
Here you can download full pdf version of manual, it may contain additional safety instructions, warranty information, FCC rules, etc.
Advertisement


Need help?
Do you have a question about the Q40S and is the answer not in the manual?
Questions and answers