Advertisement
Available languages
Available languages
Quick Links
Operator's Manual
3.0 Amp/5-in.
Diameter
Random Orbital Sander
Model No. 172.27675
CAUTION:
Read,
understand
and follow
all Safety
Rules and Operating
Instructions
in this manual before
using this product.
Sears, Roebuck and Co., Hoffman Estates, IL 60179 U.S.A.
Visit our Craftsman ®website: www.sears.com/craftsman
c(@o+
3025736
Certified
to CAN/CSA-
C22.2
No.745-1,745-2-4
Conforms to UL
STD 745-1,745-2-4
Double Insulated
• WARRANTY
• SAFETY
• UNPACKING
• DESCRIPTION
• ASSEMBLY
• OPERATION
• MAINTENANCE
Advertisement

Related Manuals for Craftsman 27675 - Professional 5 in. 3.0 Amp Random Orbit Sander


Summary of Contents for Craftsman 27675 - Professional 5 in. 3.0 Amp Random Orbit Sander
- Page 1 • SAFETY • UNPACKING all Safety Rules and Operating Instructions • DESCRIPTION in this manual before using this product. • ASSEMBLY Sears, Roebuck and Co., Hoffman Estates, IL 60179 U.S.A. • OPERATION Visit our Craftsman ®website: www.sears.com/craftsman • MAINTENANCE...
- Page 2 Back Cover ONE YEAR FULL WARRANTY ON CRAFTSMAN® PROFESSIONAL TOOL If this Craftsman Professional Tool fails due to a defect in material or workmanship within one year from the date of purchase, RETURN ITTO ANY SEARS STORE OR PARTS AND REPAIR CENTER OR OTHER CRAFTSMAN OUTLET IN THE...
- Page 3 ALWAYS wear safety goggles or safety glasses with side shield and a full-face shield when needed. We recommend a Wide Vision Safety Mask for use over eyeglasses or standard safety glasses with side shield, available at Sears Stores or other Craftsman Outlets. 27675 2/11/08...
- Page 4 /ik WARNING: BE SURE to read and understand all instructions in this manual before using this power tool. Failure to follow all instructions may result in electric shock, fire and / or serious personal injury. WORK AREA SAFETY 1. Keep your work area clean and well lit. Cluttered workbenches and dark areas invite accidents.
- Page 5 TOOL USE AND CARE SAFETY /_ WARNING: BE SURE to read and understand all instructions before operating this power tool. Failure to follow all instructions listed below may result in electric shock, fire and/or serious personal injury. 1. ALWAYS use clamps or other practical ways to secure and support the workpiece to a stable platform.
- Page 6 ELECTRICAL SAFETY /_ WARNING: Do not permit fingers to touch the terminals of plug when installing or removing the plug from the outlet. 2. Double insulation [] eliminates the need for the three-wire grounded power cord and grounded power supply system. Applicable only to Class II (double-insulated) tools. This tool is a double insulated tool.
- Page 7 SAFETY SYMBOLS FOR YOUR TOOL The label on your tool may include the following symbols. V............... Volts A ..............Amps Hz..............Hertz W ..............Watts rain ..............Minutes _., ..............Alternating current ..............Direct current no ..............No-load speed [] ..............Class II construction, Double Insulated RPM ............
- Page 8 z_ WARNING: Some dust created by using power tools contains chemicals known to the State of California to cause cancer and birth defects or other reproductive harm. Some examples of these chemicals are: • Lead from lead-based paints. • Crystalline silica from bricks and cement and other masonry products. •...
- Page 9 NOTE: Only thosedustmasks suitable forworking withleadpaintdustandfumes should beused. O rdinary p ainting masks donotoffer t hisprotection. Seeyourlocal h ardware dealer f ortheproper ( NIOSH approved) mask. NO EATING, DRINKING OR SMOKING should be done in the work area to prevent ingesting contaminated paint particles. 'Workers should wash and clean up BEFORE eating, drinking or smoking.
- Page 10 5. If any of the parts are damaged or missing (refer to PAFr]-s LIST below), return the sander to your nearest Sears store or Craftsman outlet to have the sander replaced. the missing parts are replaced. Failure to do so could result in possible serious...
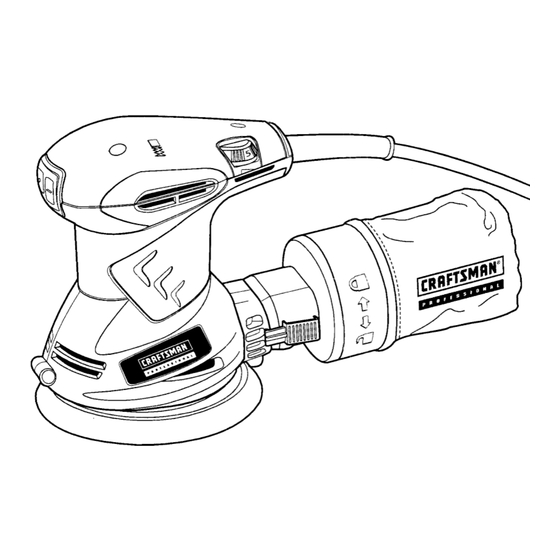
- Page 11 PARTS LIST (Fig. 1) 2. Dust Bag Assembly 1. Sander 3. Vac Adapter with dual dust ports 4. Two 5-in. Hook and Loop Sanding Dis('s with Pre-Punched Holes 5. Operator's Manual KNOW YOUR RANDOM ORBIT SANDER (Fig. 2) NOTE: Before attempting to use your sander, familiarize yourself with all of the operating features and safety requirements.
- Page 12 This Random Orbit Sander has the following features cont.: 6. On/Off rocker switch is conveniently located for easy control. Sealed to keep out dust for long life. loop 7. Hook and Loop Backing Pad for easy attachment of 17rook and type sanding discs with pre-punched holes.
- Page 13 Z_ WARNING: Your sander should NEVER be ('onnected to the power source when you are assembling parts, making adjustments, installing or removing sandpaper, cleaning or when it is not in use. Disconnecting the sander will prevent accidental starting, that could cause serious personal injury. INSTALLING THE SANDPAPER (See Figs.
- Page 14 TO REMOVE AND EMPTY DUST BAG (See Fig. 4 and 4a) 1, Unplug the sander. A WARNING: Failure to unplug the sander could result in accidental starting causing possible serious personal injury. 2. Locate (2) tab connectors on either side of vac adapter/dust bag assembly and squeeze. Pull assembly straight back and off of dust exhaust I_ole (',seeFig.
- Page 15 _, WARNING: Empty dust bag before storage 1toIhelp prevent possible fire hazard, especially when resin coating or linseed oil finishes have been sanded. NOTE: For more efficient operation, we recommend that you empty the dust bag when it is no more than half full. This will allow tlhe air to flow through the bag better.
- Page 16 ATTACHING VAC HOSE TO THE DUST COLLECTION SYSTEM cont. NOTE: A standard 1l/d-in, vac hose connection fits; inside the smaller diameter hole inside the dust exhaust, while a standard 21/2-in. vac hose connection fits inside the larger hole of the dust exhaust. /ik WARNING: When sander is not connected to vacuum, always install dust bag back on sander.
- Page 17 Fig. 7 VARIABLE SPEED SWITCH (seeFig.7) Thevariable speed dialallows matching t hecorrect speeds tosandpaper gritsandvarious surfaces a nd materials b eingsanded for either fast material removal or a fine smooth finish. Rotate the dial from 1 to 6, with 1 being the lowest speed and 6 the highest speed.
- Page 18 USING YOUR SANDER cont. Z_ CAUTION" To ensure proper brake operation afler extended use, periodically check its operation by removing the sanding disc and running the sander without load (off the workpiece).The backing pad should not tak:e Ilonger than 6 seconds to stop.
- Page 19 WARNING: Empty dust bag before storage to Ihelp prevent possible fire hazard, especially when resin coating or linseed oil finishes have been sanded. NOTE: Empty dust bag frequently when sanding so dust collection system works properly. ORBITAL MOTION (see Fig. 9) As shown in Figure 9, the orbit of the sander is 1/16-in.
- Page 20 LUBRICATION Your Craftsman @ProfessionaJ Orbital Sander has been properly lubricated and is ready to use. No further lubrication is needed under normal operating conditions. All bearings in the sander are lubricated for the life of the tool.
- Page 21 BRUSH REPLACEMENT (seeFig.11,11a,11band11c) 1. Unplug thesander. /_ WARNING: Failure to unplug the sander could result in accidental starting causing possible serious personal injury. 2. Remove (3) screws from top cover of sander and remove top cover (see Fig. 11). Fig. 11 3.
- Page 22 The use of attachments or accessories that are not Sears and other Craftsman®outlets offer a selection of Cr;aLftsman P rofessional Random Orbit Sander accessories designed for all your sanding applications.
- Page 23 5-in. Dia. Random Orbital Sander The model number will be found on the nameplate MODEL NUMBER 172.27675 of the Random Orbital Sander. Always mention the model number when requesting parts and service for your tool. 1_-_22(7) _24(6) _26_103 27(2)J ®...
- Page 24 5-in. Dia. Random Orbital Sander The model number will be found on the nameplate of the Random Orbital Sander. Always mention the MODEL NUMBER 172.27675 model number when requesting parts and service for your tool. Parts Item No. Part Description Qty.
- Page 25 ..Your Home _CIIIIIIIIIIIIIIIIIIIII !!!!i!!!iiiiiiiiiiiiiiiiiiiiiiiiiiiiiii ' ..!iiii!iiii!iii!_iliiiiiiiii_!i!i!_i_ For expert troubleshooting and home soilutions advice: _ililililililililiiii_iiiilililililili manage home _iiii!ii!!!iiiiiiiii!i!ili_i_ii ili!iiiiiiiiiii!iiiiiiiiiiiiiii_ _!i!_!i!i!i!i!i!i!i!i!i!i_i!i!i www.managemyhome.com iiiiii!ii!ii_i iiiiiiiii!_! i!iiiiiiiiiiiiiiiiiiiiiiiiiiiiiii i!iii!i!i!i;iii_ii!i!i!i_i!i!i!i For repair - in your home - of all major brand appliances, iiiiiiiiii_iiiiiiiiiiii_iiiiiii iiiiiiiiiii!!iiiii_iii_i_ii_i_i iiiiiiiiiiiiiiiiiiiiltlti_iiiiill i_i%iiiiiiiiiiiiiiiii_ lawn and garden...
- Page 26 Seguridad e Instrucciones de Operaci6n en este • DESEMPACADO Manual antes de usar este producto. • DESCRIPCION • ENSAMBLAJE • OPERACION Sears, Roebuck and Co., Hoffman Estates, IL 60179 EE.UU. • MANTENIMIENTO Visite nuestra pdgina Web Craftsman®: www.sears..comlcraftsman 27675 2111/08...
- Page 27 GARANT[A DE UN AI_O COMPLETO SOBRE PRODUCTOS PROFESIONAL CRAFTSMAN® Si esta herramienta profesional Craftsman falla debido a defectos en los materiales o mano de obra entre un afio desde la fecha de compra, REGRI_SELAA CULAQUIER TIENDA SEARS U OTRA PUNTA DE VENTA CRAFTSMAN EN LOS ESTADOS UNIDOS PARA Reparaci6n Gratis (O REEMPLAZO SI E'S IMPOSIBLE REPARARLA).
- Page 28 Recomendamos uso de una mdscara de seguridad de visi6n amplia para usar sobre los anteojos o anteojos de se_iuridad estdndar con protector lateral, disponibles en las tnendas Sears u otros puntos de venta Craftsman. 27675 2/11/08...
- Page 29 este manual antes de usar esta herramienta. No seguir todas las instrucciones /_ ADVERTENCIA: Asegdrase de leer y entender todas las instrucciones en podrfa resultar en descargas eldctricas, incendio y/o lesiones personales graves. SEGURIDAD DEL AREA DE TRABAJO 1. Mantenga su drea de trabajo limpia y bien iluminada. Los bancos de trabajo desorganizados y las ,_reas oscuras invitan a los accidentes.
- Page 30 SEGURIDAD EN EL USO Y CUIDADO DE LA HERRAMIENTA /K ADVERTENCIA: ASEGURASE de leer y entender todas las instrucciones en este manual antes de usar esta herramienta. No seguir todas las instrucciones podffa resultar en descargas eldctricas, incendio ylo lesiones personales graves. I.
- Page 31 SEGURIDAD ELI_CTRICA 2. Doble Aislamiento [] elimina la necesidad de un cord6n de alimentaci6n con conexi6n a tierra de tres alabres y un sistema de suministro de energfa con conexi6n a tierra. Aplica s61o para herramientas Clase II (con doble aislamiento). Esta herramienta tiene doble aislamiento.
- Page 32 SJMBOLOS DE SEGURIDAD PARASU HERRAMIENTA Laetiqueta en su herramienta puedaincluirlos simbolossiguientes. V ............... Voltios A ..............Amperios Hz ..............Hercios W ..............Vatios min ..............Minutes ..............Corriente altema ..............Corriente continua no ..............Velocidad libre de carga [] ..............Construccii6n Clase II, Doble aislamiento RPM ..............
- Page 33 _ADVERTENCIA: Algun polvo generado por el uso de herramientas el_ctricas contiene qufmicos conocido por el estado de California por causar cancer y defectos de nacimiento u otros defectos para la reproducci6n. Algunos ejemplos de estos qufmicos son: • El plomo de las pinturas a base de plomo. •...
- Page 34 NOTA: Deben usarse 5nicamente m,_scaras contra el polvo aptas para trabajar con polvo o vapores de pintura de plorno. Las m,_scaras comunes para pintar no ofrecen esta protecci6n. Consulte con su distribuidor local acerca de,la mascara adecuada (aprobada por NIOSH). •...
- Page 35 5. Si algunas de las partes esta daSada o no se encuentra (remftase a la Lista De Repuestos de abajo), regrese la lijadora al comercio Sears o al punto de venta de Craftsman mds cercano para que se la cambien. /_ ADVERTENCIA: Si falta alguna parte, NO utilice esta lijadora hasta que se reemplace la parte que falta.
- Page 36 PARTS LIST (Fig,, 1) 2. Montaje de Bolsa de Polvo 1. Lijadora 3. Conjunto de bolsa recolectora de polvo con todos puertos 4. Dos discos de papel de lija "gancho y vuelta" de 5 pulgadas ('on agujeros preperforados 5;. Manual del Usuario CONOZCA DU LIJADORA ORBITAL...
- Page 37 Esta Lijadora Orbital Aleatoria tiene las siguientes caracteristicas cont.: Interruptor de eje de balancin encendido-apagado ubicado convenientemente para facilitar el control. Sellado contra el polvo para prolongar su vida dtil. 7. Almohadilla con ganchos para facilitar el acoplamiento de discos de lija tipo "gancho y vuelta"...
- Page 38 ADVERTENCIA: Su lijadora NO debe estar enchufada en la fuente de alimentacibn cuando estd instalando repuestos, haciendo ajustes, instalando o reemplazando el papel de lijar, limpidndola o cuando no estd en uso. AI desenchufar su lijadora evitard la puesta en marcha accidental que podrfa provocar una lesion personal grave.
- Page 39 PARA QUITAR Y VACIAR LA BOLSA DEL POLVO (\ 1. Desenchufe su lijadora. /;k ADVERTENCIA: Si no su lijac desenchufa puesta en marcha accidental causando una lesid 2. Ubique las dos trabas a ambos lados del adaptadc entre sf. Jale el conjunto hacia atras y sdquelo del 3.
- Page 40 /_ ADVERTENCIA: Vacfa la bolsa guardapolvo antes de almacenamiento prevenir posibiidad de fuego, particularmente cuando has lijado capa de resina o acabado de aceite de linaza. NOTA: Para un funcionamiento mds eficiente, recomendamos que vacie la bolsa del polvo antes de que se Ilene rods de la mitad. Esto permitird una mejor circulacidn de aire a travds de la bolsa.
- Page 41 CONECTANDO LA MANGUERA DE LA ASPIRADORA AL SlSTEMA RECOLECTOR DE POLVO cont. NOTA: Una manguera est&ndar de I 1A"se acopla dentro del orificio m&s peque_o del adaptador doble, mientras que una manguera estdndar de 2 V2" se acopla dentro del orificio mds grande del adaptador doble. /_, ADVERTENCIA: Cuando la lijadora no est_i conectada a una aspiradora, siempre vuelva a instalar la bolsa para el polvo.
- Page 42 CONTROL VARIABLE DEVELOClDAD ( VerFig.7) funcibn de velocidad variable se deja ajustando los velocidades correctos con las lijas de papel de lijar y varios superficies y materiales que lijas para o material remocion rdpido, o acabado fino y liso. Rota el dial desde 1 hasta 6, con 1 la velocidad rods bajo y 6 la velocidad m,_salta.
- Page 43 USANDO S ULIJADORA c ont. /_ PRECAUCION: Para ensegurar operaci6n apropiadodel freno despu_s del uso extendido, revisa peri6dicamente la operaci6n por sacandoel disco de lijar y corriendo la lijadora sin carga (no en le pedazo de trabajo). La almohadilla no debe tomar rodsque 6 segundos parar.
- Page 44 ADVERTENCIA: No use joyas o ropa sueltas cuando trabaje con la lijadora. Elias pueden quedar atrapadas en las piezas m6viles causando lesiones graves. Mantenga la cabeza alejada de la lijadora y del drea que se estd Iijando. El cabello puede ser atraido hacia la lijadora causando lesiones graves. Z_ ADVERTENCIA: Vac{a Is bolsa guardapolvo antes de almacenamiento prevenir posibiidad de fuego, particularmente...
- Page 45 LUBRICACION La Lijadora Orbital Aleatoria Craftsman® se ha lubricado adecuadamente y estd lista para utilizar. No es necesaria mas lubricaci6n bajo condiciones de funcionamiento normales. Se lubricaron todos los cojinetes de la lijadora para toda la vida _til de la herramienta.
- Page 46 REEMPLAZO D EESCOBILLAS ( verFig.11,11a, 1 117 y 11c) 1. Desenchufe sulijadora. Z_ ADVERTENCIA: Si no desenchufa su lijadora, se puede producir a puesta en marcha accidental causando una lesion grave. 2. Saque los (3) tornillos de la cubierta superior de la lijadora y quite la cubierta superior (ver Fig 111).
- Page 47 Los discos de lija 'gancho y vuelta' de 5", 8 orificios vienen en graduaci6n muy fina, fina, mediana y gruesa. Visita su comercio Sears local u otro punto de venta Craftsman o compre en sears.corn/craftsman para todos los accesorios de su lijadora orbital aleatoria.
- Page 48 3.0 Amperios 5-pulg. Di_metro El n0mero de modelo ser,_encontrado en la placa de identificaci6n de la LijadoraOrbital Aleatoria. Lijadora Orbital Aleatoria Mencione siempre el nemero de modelo al solicitar MODELO No. 172.27673 piezas o serv=c_o para su herramienta. _---22(7) 27(2)J 30(2) 104 -- -36_...
- Page 49 3.0 Amperios 5-pulg. Didmetro Lijadora Orbital Aleatoria MODELO No. 172.27675 El nemero de modelo sera. encontrado en la placa de identificaciSn de la Lijadora Orbital Aleatoria. Mencione siempre el n_mero de modelo al solicitar piezas o servicio para su herramienta. NOmero N_merode Pa_e Cantidad...
- Page 50 3.0 Amperios 5-pulg. Didmetro Lijadora Orbital Aleatoria MODELO No. 172.27675 El n_mero de modelo serd encontrado en la placa de identificaciSn de la Lijadora Orbital Aleatoria. Mencione siempre el nemero de rnodelo al solicitar piezas o servicio para su herramienta. N_mero de Paffe Ndmero Cantidad...
- Page 51 iiiiiiiiiiiiii!iiiiiii!iiiiiiiiiiiiiiiiiiiiiiiiiiiiiiiiiiiiiiiiiii:i:::::::; ..Your Home For expert troubleshooting and home solutions advice: ii!ii!!iiiii!i_iiiiiiiii_ii_i_ manage home iiiiiiiiiiii_ilili_iiii_ ili!ii!ii!ii!!!iliiiiii_ www.managemyhome.com iiiiiiiiiiiiiiiiiiiiiiiiiiiiil For repair - in your home - of all major brand appliances, iiiiiiiiiiiiiiiiiiiiiiiiiiii lawn and garden equipment, or heating and cooling systems, iiiilililiiiiiilililililililili i_iiiiiiiiiiiiiiiiiiiiii no matter...
Need help?
Do you have a question about the 27675 - Professional 5 in. 3.0 Amp Random Orbit Sander and is the answer not in the manual?
Questions and answers