cecotec DRUMFIT ROWER 10000 NEPTUNO, 07224 Manual
- Instruction manual (20 pages) ,
- Instruction manual (53 pages)
Advertisement
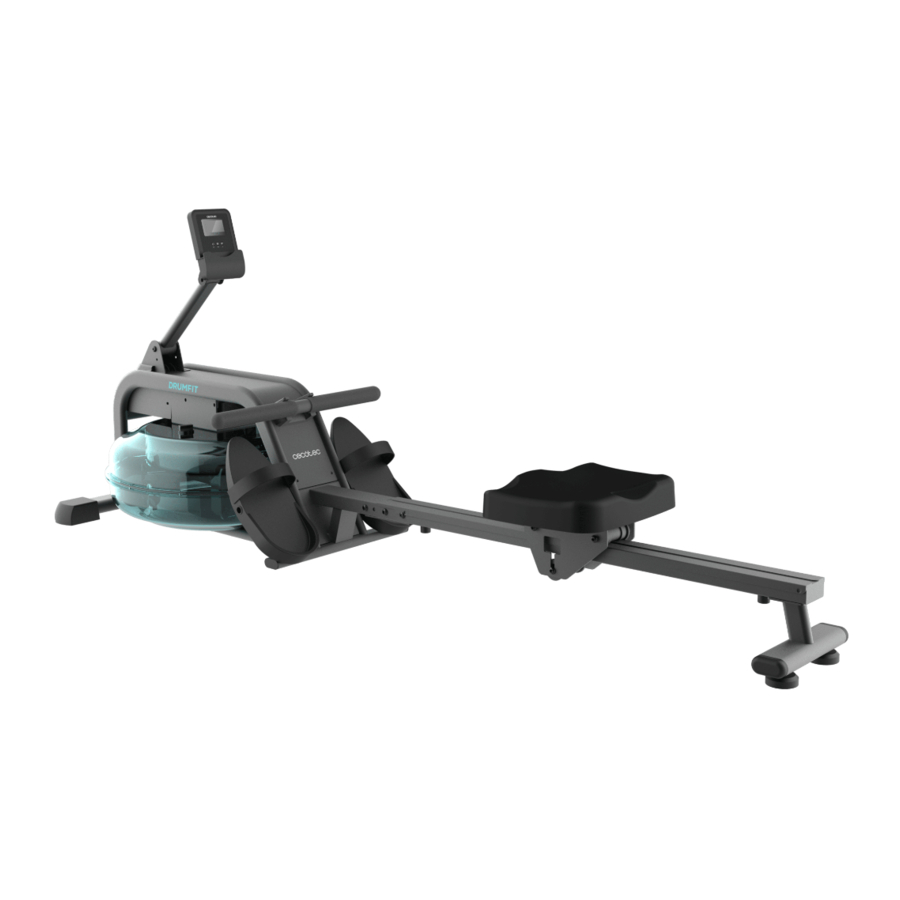
PARTS AND COMPONENTS
Img. 1

Img. 2

| No. | Description | Quantity |
| 1 | Console | 1 |
| 2 | Grip bar | 1 |
| 3 | Saddle | 1 |
| 4 | Sliding guide | 1 |
| 5 | Rear stabiliser | 1 |
| 6 | Footrest | 2 |
| 7 | Tank | 1 |
| 8 | Tank cap | 1 |
| 9 | Main frame | 1 |
| 10 | Bracket connector plate | 1 |
| 11 | Console bracket | 1 |
| 12/58 | Flat screw M8x15 | 4 |
| 13/60 | Sliding guide screw M8x15 | 4 |
| 14/96 | Screw M8x15 | 6 |
| 15/71 | Plain washer OD16xID8x1.5 | 10 |
| 16/65 | Sliding guide stop | 1 |
| 17/67 | Cross-head screw M5x15 | 1 |
| 18 | Console screws M5x12 | 2 |
NOTE:
the graphics in this manual are schematic representations and may not exactly match the device.
BEFORE USE
- This appliance is packaged in a way as to protect it during transport. Take the device out of its box and remove all packaging materials. You can keep the original box and other packaging elements in a safe place. This will help you prevent damage to the device when transporting it in the future. In case the original packaging is disposed of, make sure all packaging materials are recycled accordingly.
- Make sure all parts and components are included and in good conditions. If there is any piece missing or in bad conditions, contact the official Cecotec Technical Support Service immediately.
Box content
- Drumfit Rower 10000 Neptuno water rowing machine
- Assembly kit
- Instruction manual
- 2 AA console batteries
ASSEMBLY
- Img. 3

- Turn the sliding guide (4) and the saddle (3) upside down.
- Slide the saddle (3) onto the sliding guide (4). Place the rear stabiliser (5) on the sliding guide (4) using four washers (15) and four screws (14). Tighten the screws with the Allen key.
- Then, fit the sliding guide stop (16) using the crosshead screw (17) and tighten it.
- Img. 4

Connect the cables on the main frame (9) with the ones on the console bracket (11). Secure the bracket connector plate (10) to the main frame (9) with two washers (15) and two screws (12). Next, tighten them with the provided key. - Img. 5

First, place the sliding guide (4) on the main frame (9). Then, put four screws (13) and four washers (15) into the side holes. Finally, fit four flat screws (12) and secure them with the Allen key. - Connect the two data cables of the console with those of the console bracket as shown in the figure. Next, place the console (1) on the bracket (11) and use two screws (18) to fix it.
Img. 6


Adjusting the footrest
The pedal strap is adjustable and can be adapted to the size of the user's foot.
Filling and emptying the tank
- Remove the tank cap (8) from the top of the water tank (7).
- To fill in the tank with water, refer to Img. 7. Insert a funnel into the tank, then use a beaker or pump siphon and a bucket to fill the tank. Use the water level indicator on the side of the tank to measure the desired water level.

- To empty the tank, refer to Img. 8. Place a bucket next to the rowing machine and use the pumping siphon to pump the water from the tank into the bucket.

- Place the tank cap (8) on the top of the water tank (7). Wipe off any excess water that may have been left outside the tank.


ATTENTION:
- Fill the water tank with clean tap water. Add water purifying liquid (1 container included). Never use chlorine or bleach. This will damage the tank and void the warranty.
- Add purifying liquid every 6 months or as needed. If the water is still murky, replace the water in the tank.
- Do not drink the water from the tank. Discard the water after pumping it out of the tank.
Water level
- The water level indicators are located on the side of the tank. The maximum filling level is 6. Do not exceed this limit. Filling the tank above this limit will void the warranty.
- The resistance of the machine depends on the water level in the tank. Level 1 is the lowest resistance. Level 6 is the highest resistance.
CONSOLE OPERATION
The console allows the user to perform personalised training by tracking their progress. While you are training, you can view the duration of your workout, repetition count, calories burned, total repetition count since the first use of the machine, distance travelled during the workout, or all of the above at the same time. In that sense, you can see how your performance improves over time.
Automatic On/Off and Start/Stop
The console will automatically shut down after 4 minutes of inactivity. It will be activated again when the machine is in use or when any button is pressed.
Buttons. Img. 10

- MODE: it is used to select the function and to switch on the counter display.
- SET: it is used to set the time, repetitions and calories burned when not in SCAN mode.
- RESET: It is used to reset the time, repetitions or calories burned value to zero.
Functions:
- SCAN: press the MODE button until the SCAN function appears. The display will show all functions one by one in the following order: TIME, DISTANCE, CALORIES, COUNT and TOTAL COUNT. Each function will appear on the display for 6 seconds.
- TIME: displays total workout time (0:00-99:59).
- COUNT: displays the number of strokes performed during training (0-9999).
- TOTAL COUNT: displays the total number of strokes since the first use of the machine (0-9999).
- CAL: displays the total number of calories burned during training (0.0-9999).
- DISTANCE: displays the cumulative distance travelled during training.
- RPM: displays strokes per minute while training.
- Operating temperature: 0-40 ºC
- Storage temperature: -10-60 ºC
CLEANING AND MAINTENANCE
- Lubricate moving parts regularly. Lubricate the sliding guide once every year, at least, with a lubricant spray.
- Always check and tighten all parts of the product before using the equipment.
- Remove accumulated dust and dirt with a dry or slightly damp cloth.
- Use a mild cleaning agent to clean the equipment and avoid chemical solvents.
- Do not expose the machine to direct sunlight.
To move the rowing machine, raise the rear stabiliser (5) until the transport wheels of the front stabiliser touch the ground. When the wheels are on the ground, you can easily transport the machine to the desired location. Img. 9
When not in use, store the rowing machine vertically so that it takes up less space. If the rowing machine is not going to be used for more than 1 month, empty the water from the tank.

INFORMATION ON EXERCISING
A proper workout should consist of the following phases:
- Warm-up: consists of a session of stretching and low-intensity exercise lasting 5 to 10 minutes. A proper warm-up increases your body temperature, heart rate, and circulation in preparation for exercise. Img. 11

- Training: consists of 20 to 30 minutes of exercise.
(Note: during the first few weeks of exercise do not keep your heart rate high for more than 20 minutes). Img. 12

- Cool-down: consists of 5 to 10 minutes of stretching exercises. This will increase the flexibility of your muscles and will help prevent injuries. Img. 11


Workout routine
To maintain or improve your physical condition, exercise three times per week, with at least one day of rest between workouts. After a few months of regular exercise, you may exercise up to five times a week, if desired. Keep in mind that the key to success is making exercise a regular and enjoyable part of your everyday life.
TROUBLESHOOTING
| PROBLEM | CAUSE | SOLUTION |
The base is unstable |
|
|
Loud noise from moving parts | Parts are not tightened correctly. | Tighten them. |
The display is not working properly |
|
|
If none of these situations match your problem, do not attempt to disassemble or repair the machine by yourself. Repairs carried out by unqualified persons may result in injury or serious malfunctions. Contact the official Cecotec Technical Support Service. The repair must be carried out by an authorised technician, and you must use only original spare parts.
Unauthorised self-maintenance or maintenance will affect the safe use of the product and the application of the warranty policy.
TECHNICAL SPECIFICATIONS
Product reference: 07224
Product: Drumfit Rower 10000 Neptuno
Maximum user weight: 135 kg HC Class
Technical specifications may change without prior notification to improve product quality. Made in China | Designed in Spain
COPYRIGHT
The intellectual property rights over the texts in this manual belong to CECOTEC INNOVACIONES, S.L. All rights reserved. The contents of this publication may not, in whole or in part, be reproduced, stored in a retrieval system, transmitted, or distributed by any means (electronic, mechanical, photocopying, recording or similar) without the prior authorization of CECOTEC INNOVACIONES, S.L.
SAFETY INSTRUCTIONS
Please, keep this instruction manual in a safe place for future reference or new users.
- Read these instructions carefully before assembling or using your rowing machine. These instructions contain important information that will help you get the best out of your equipment.
- The free space shall not be less than 0.6 m larger than the training area in the directions from which the equipment is accessed. The free space shall also include the area for emergency dismounting. For equipment located next to each other, the value of the free space may be shared.
- This machine can be used by children aged 14 years and above and persons with reduced physical, sensory, or mental capabilities or lack of experience and knowledge if they have been given supervision or instruction concerning the use of the machine in a safe way and understand the hazards involved. Children must not play with the machine. Cleaning and user maintenance should not be carried out by unsupervised children.
![]()
Incorrect or excessive training can lead to health injuries.![]()
If any of the adjustment devices are protruding, they may interfere with the user's movement.![]()
The equipment must be installed on a stable and level surface.- This device is designed for domestic use only and is not intended for bars, restaurants, farmhouses, hotels, motels, and offices.
- The product will only be safe if it is properly assembled, cared for and used correctly.
- It is your responsibility to make sure every user is informed about the warnings and precautions stated in this instruction manual.
- Before starting a training session, it is recommended that you consult your doctor if you have any adverse health or physical condition that may pose a risk to your safety or make it difficult to use the machine properly. Your doctor's advice is essential if you are taking medication that affects your heart rate, blood pressure, or cholesterol level.
- Be aware of your body signals. Incorrect or excessive exercise can deteriorate your health. Stop exercising if you experience any of the following symptoms: pain, tightness in your chest, irregular heartbeat, extreme shortness of breath, dizziness, or nausea. If you experience any of these conditions, you should consult your doctor before continuing with your training.
![]()
the safety level of the equipment can only be maintained if it is regularly checked for damage and wear.![]()
replace faulty components immediately and/or keep the equipment out of use until repaired.- Pay special attention to the components that are most susceptible to mechanical wear.
- Keep children and animals away from the assembling area, as small parts could cause risk of suffocation if swallowed.
- Keep children and pets away from the machine. Do not allow children to use and/or play with the machine. It is designed for adults only.
- Use the machine on a solid, flat, stable surface with a protective floor covering or carpet.
- Make sure the screws and nuts are securely tightened before using the machine.
- Use the machine as indicated in this instruction manual. If you find any defective parts when assembling or testing the machine, or if it emits an unusual noise during use, stop using it. Do not use the machine until the problem has been solved.
- Wear suitable clothing when using the machibe. Avoid wearing baggy clothing, as it may get caught in the equipment or hinder movement.

- If repairs are required, please consult your supplier for further information or contact Cecotec Customer Service.
- The air bike is not suitable for therapeutic use.
- Be careful when moving or lifting the machine to avoid injuring your back.
- Do not introduce any object and/or body part in the moving parts.
- The machine is designed for a maximum user weight of 135 kg.
- It is not recommended for outdoor use.
![]()
this training machine is not suitable for highprecision purposes. This equipment is HC class.
Instructions on batteries
- Do not burn or expose the batteries to high temperatures, as they may explode.
- Leaks from the batteries can occur under extreme conditions. Do not touch any liquid that leaks from the batteries. If the liquid gets into contact with skin, wash immediately with soap and water. If the liquid gets into the eyes, wash them immediately with clean water for a minimum of 10 minutes and seek medical attention. Wear gloves to handle the battery and dispose of it immediately in accordance with local regulations.
- Avoid contact between the batteries and small metal objects such as paper clips, coins, keys, nails, or screws.
- Do not tamper with the batteries in any way.
- The batteries must be removed for safe disposal of the machine.
- Keep the batteries out of the reach of children when there is a risk of ingestion.
- Battery ingestion can cause burns, soft-tissue perforation, and death. It can cause severe burns within two hours of the ingestion.
- In case of battery ingestion, please seek medical help immediately.
- The batteries' power supply terminals must not be shortcircuited.
- If the machine is to be stored for a long period of time, it is advisable to remove the batteries.
- The batteries must be inserted in the correct position. When replacing batteries, check the polarity.
Documents / ResourcesDownload manual
Here you can download full pdf version of manual, it may contain additional safety instructions, warranty information, FCC rules, etc.
Advertisement


Need help?
Do you have a question about the DRUMFIT ROWER 10000 NEPTUNO and is the answer not in the manual?
Questions and answers