Yamaha R-N800A, R-N800AB Manual
- User manual (150 pages) ,
- Quick manual (32 pages) ,
- Manual (6 pages)
Advertisement
Compatible input sources

The comprehensive connectors of the R-N800A include special phono input terminals, letting you easily connect a turntable and enjoy music from your vinyl record collection.

A stable transmission method through asynchronous transmission has been adopted. Moreover, an ultra-precision dedicated crystal clock has been installed to improve signal accuracy. It also supports DSD 11.2MHz native playback and PCM 384kHz playback, letting you enjoy exceptionally high-quality sound that takes full advantage of high-resolution audio sources.

DAB and DAB+ are Digital Audio Broadcasting formats that offer a large selection of radio stations with high sound quality. Other benefits include automatic tuning to available stations with a list to choose from, and display of information such as station name. You can preset 40 DAB / DAB+ stations.

*Availability of DAB / DAB+ tuner varies by region
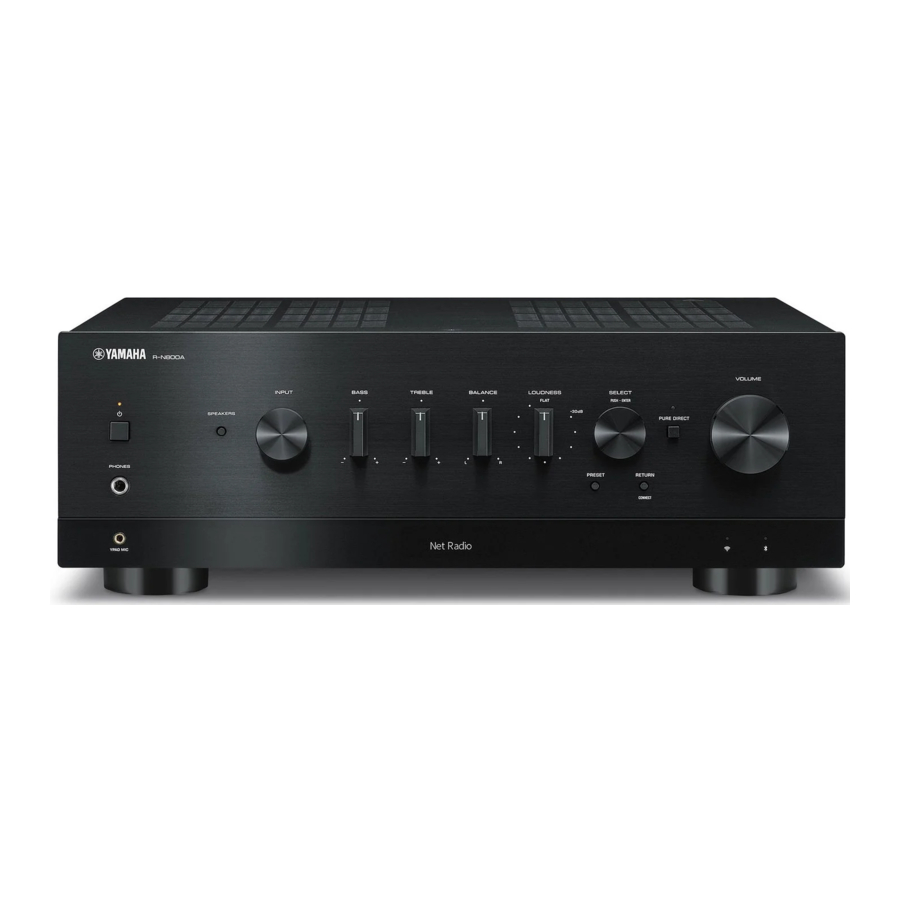
Front panel

The following are the names of parts on the front of the unit and an explanation of their functions.

![]() (Power) Switch
(Power) Switch
Turns the power of the product ON (![]() ) / OFF (
) / OFF (![]() ).
).
With the power ON, press the![]() (Power) key on the remote control to switch the power between ON and Standby. This product also goes into Standby in the following situations.
(Power) key on the remote control to switch the power between ON and Standby. This product also goes into Standby in the following situations.
 (Power) Switch
 ) / OFF (
 ).
).- When the Auto Power Standby function is active
 NOTE
NOTE
The remote control does not work if the power is OFF. This product cannot also be linked with a Bluetooth device, a network device, or MusicCast Controller App.
- Power Indicator
Lights up as follows to indicate the state of power.
Power ON: Indicator lights up.
Power in Standby: Indicator is faintly lit.
Power OFF: Indicator is off.
NOTE
When the indicator is flashing, it means the protective circuit has been activated and the power will not turn ON, in order to protect the product. Please contact an authorized Yamaha service center to have it repaired.
- SPEAKERS
Switches the speakers connected to the SPEAKERS L/R A and B jacks on the rear panel. - INPUT
Selects the input source. - BASS
Adjusts the volume of the low-frequency range. - TREBLE
Adjusts the volume of the high-frequency range. - BALANCE
Adjusts the left/right balance of the volume. - LOUDNESS
Adjusts to make it easier to hear bass and treble even at low volumes. If the YPAO Volume function is enabled, LOUDNESS adjustment cannot be used. - SELECT (PUSH-ENTER)
Used for things like operating the menus on the front display. Turn this to select an item, and press it to confirm the selection. - PURE DIRECT/Indicator
Switches the Pure Direct function ON/OFF. When this is ON, the indicator lights up, and the front display turns off. - VOLUME
Adjusts the volume. - PHONES jack
For plugging in headphones (compatible with standard stereo phone plugs).
NOTE
Audio cannot be output to speakers connected to this product when headphones are plugged in. Also, output from the PRE OUT jack turns OFF.
- YPAO MIC jack
For connecting the included YPAO microphone. - Remote control signal receiver
Receives the signal (infrared) from the remote control. - Front Display
Displays various information and menus. - PRESET
Used for recalling registered (preset) radio stations and registered songs/Internet radio stations. - RETURN/CONNECT
Used for things like operating the menus on the front display.
Also used when registering this product on the MusicCast Network. - Wireless LAN indicator
Lights up when this product is connected to a wireless network. - Bluetooth indicator
Lights up when a Bluetooth device is connected.
Rear panel

The following are the names of parts on the rear of the unit and an explanation of their functions.

- CD IN jacks
For connecting to the analog audio OUT of devices like CD players. - OPTICAL 1-2 IN jacks
For connecting to external devices with an optical digital output. - COAXIAL 1-2 IN jacks
For connecting to external devices with a coaxial digital output. - USB port
For connecting to computers. Compatible with USB type B connectors. - NETWORK jack
For connecting a network cable when connecting this product to a wired network. - Wireless antenna
For connecting this product to a wireless network (Wi-Fi). It is also used for Bluetooth connections. - SERVICE ports
These are service ports that are used when performing repairs, etc. Do not plug anything into them. - AC IN jack
For connecting the included power cord. - LINE 1-2 IN jacks
For connecting to external devices with analog audio OUT. - PHONO IN jacks
GND jack
For connecting to a turntable (record player). - PRE OUT jacks
Outputs the same audio signal that is output to the SPEAKERS L/R jacks. - ANTENNA jack
For connecting to a radio antenna. - TRIGGER OUT jack
For connecting to external devices that support the trigger function. - SUBWOOFER OUT jack
For connecting to a subwoofer with a built-in amplifier. - SPEAKERS L/R jacks
For connecting to speakers.
Documents / ResourcesDownload manual
Here you can download full pdf version of manual, it may contain additional safety instructions, warranty information, FCC rules, etc.
Advertisement


Need help?
Do you have a question about the R-N800A and is the answer not in the manual?
Questions and answers