Advertisement
ASSEMBLY

ALWAYS UNPLUG ROTARY TOOL BEFORE CHANGING ACCESSORIES, CHANGING COLLETS OR SERVICING YOUR ROTARY TOOL.
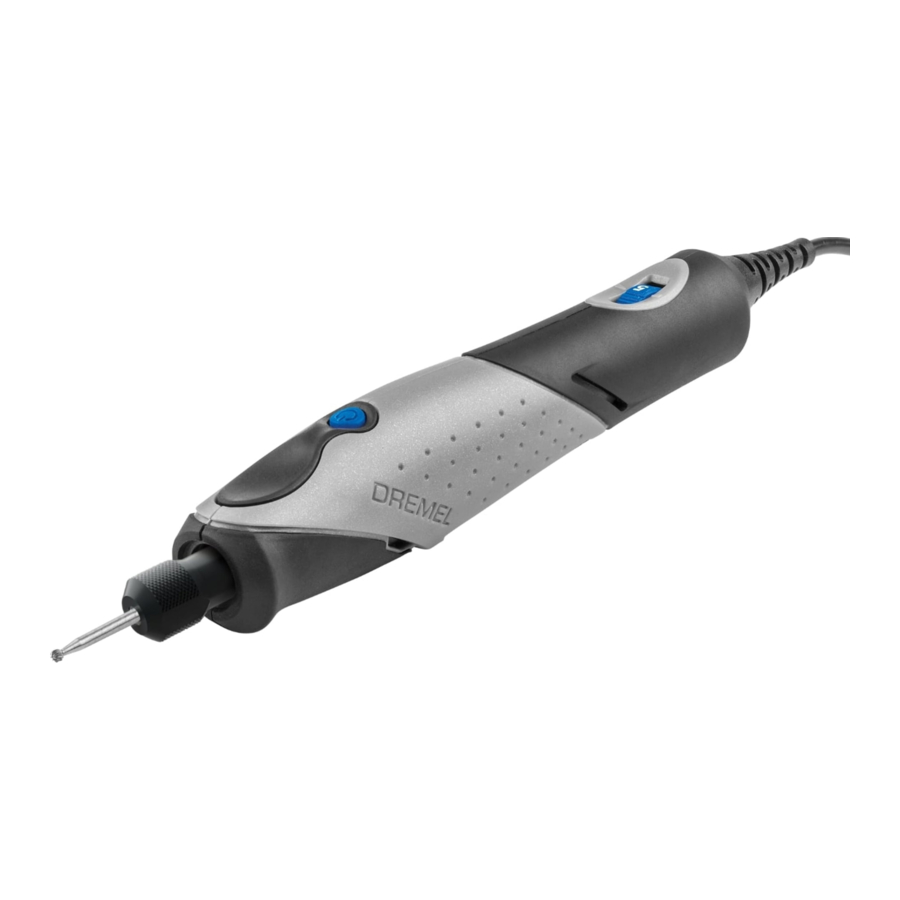
PICTURE 1

- On/Off button
- Variable Speed Dial
- Ventilation Openings
- Shaft Lock Button
- Dremel Chuck
- DC Jack
- DC Socket
- Power Adapter
DREMEL CHUCK
Dremel Chuck allows you to quickly and easily change accessories on Dremel Rotary Tools without changing collets. Accepts accessories with 1/32" - 1/8" shank. To loosen, first press shaft lock button and rotate the shaft by hand until the lock engages the shaft preventing further rotation.
DO NOT ENGAGE LOCK WHILE THE ROTARY TOOL IS RUNNING.
With the shaft lock engaged use the wrench to loosen the chuck and open the jaws. Remove the accessory from the chuck. If necessary, continue loosening the chuck so that the new accessory fits between the jaws. Insert the new accessory into the chuck far enough so that there is approximately 1/4" between the end of the chuck and the beginning of the working part of the accessory (drill bit flutes, sand paper, engraving end, etc.). With the shaft lock engaged, tighten the chuck using the wrench to secure the accessory.
HELPFUL TIPS WHEN USING THE DREMEL CHUCK
- The Dremel Chuck and the collet and collet nut system are interchangeable on this tool.While the chuck will provide you with the best experience for changing accessories, the collet and collet nut will provide a more precise accessory holding solution especially in more precise applications such as engraving in glass or etching in wood.
- The Dremel Chuck needs to be securely tightened in order to retain the accessory during use.If you find the accessory slipping in the chuck, use the included wrench to tighten the chuck around the bit. If further slippage persists, switch to using the collet and collet nut.
- The jaws of the chuck can become displaced if dropped, pried against, or filled with dust causing the accessory to no longer run true and concentric. This is often called run-out.
PICTURE 2

- Shaft Lock Button
- Dremel Chuck
To reset the jaws, apply the following procedure:
- Remove the accessory from the chuck.
- Clean the chuck if necessary using compressed air.
![]()
ALWAYS WEAR SAFETY GOGGLES WHEN CLEANING TOOLS WITH COMPRESSED AIR. - Press shaft lock button and tighten the chuck until the jaws extend past the outer surface of the chuck, approximately 3.2mm.
- Push the end of the chuck firmly against a hard flat surface to be sure the jaws are all seated axially.
- Continue to hand tighten the chuck until the jaws completely close.
- Loosen the chuck, and reinsert a straight accessory.
- Turn the tool by hand and observe if there is any run-out. If there is obvious run-out, repeat the procedure.
- With the shaft lock engaged, tighten the chuck using the wrench to secure the accessory.
- Turn the tool on to the lowest speed setting and observe for run-out. If there is obvious run-out, check that the accessory is straight before repeating the procedure.
DO NOT USE ROUTER BIT WITH THE DREMEL CHUCK. BIT MAY BECOME A PROJECTILE AND CAUSE SERIOUS INJURY.
BALANCING ACCESSORIES
For precision work, it is important that all accessories be in good balance (much the same as the tires on your automobile). To true up or balance an accessory, slightly loosen chuck or collet nut and give the accessory or collet a 1/4 turn. Re tighten the chuck or collet nut and run the Rotary Tool. You should be able to tell by the sound and feel if your accessory is running in balance. Continue adjusting in this fashion until best balance is achieved. To maintain balance on abrasive wheel points, before each use, with the wheel point secured in the collet, turn on the Rotary Tool and run the 415 Dressing Stone lightly against the revolving wheel point. This removes high spots and trues up the wheel point for good balance.
COLLETS
Four different size collets (see PICTURE 3), to accommodate different shank sizes, are available for your Rotary Tool. To install a different collet, remove the collet nut and remove the old collet. Insert the unslotted end of the collet in the hole in the end of the tool shaft. Replace collet nut on the shaft.
ALWAYS USE THE COLLET WHICH MATCHES THE SHANK SIZE OF THE ACCESSORY YOU PLAN TO USE. NEVER FORCE A LARGER DIAMETER SHANK INTO A COLLET.
PICTURE 3

- Collet Nut
- 480 3.2mm Collet
- Shaft
- Identification Rings
- 483 0.8mm Collet
- 482 1.6mm Collet
- 481 2.4mm Collet
Note: Most rotary tool kits do not include all four collet sizes.
COLLET IDENTIFICATION CHART
Collet sizes can be identified by the rings on the back end of collet.
0.8mm Collet has one (1) ring.
1.6mm Collet has two (2) rings.
2.4mm Collet has three (3) rings.
3.2mm Collet has no rings. (Included in most tool kits on the tool).
FIXING STUCK COLLETS
It is possible for a collet to get stuck within the collet nut especially if a collet nut is tightened onto the tool without a bit in place. If this happens, the collet can be removed from the collet nut by pushing the shank of an accessory into the hole in the collet nut. This should cause the collet to pop out of the collet nut.
COLLET NUT
To loosen, first press shaft lock button and rotate the shaft by hand until the lock engages the shaft preventing further rotation. Your Dremel 2050 is equipped with a quick shaft lock mechanism.
DO NOT ENGAGE LOCK WHILE THE ROTARY TOOL IS RUNNING.
With the shaft lock engaged use the collet wrench to loosen the collet nut if necessary. The collet nut must be loosely threaded on when inserting an accessory. Change accessories by inserting the new one into the collet as far as possible to minimize runout and unbalance.
With the shaft lock engaged, use collet wrench to securely tighten the collet nut (PICTURE 4). Avoid excessive tightening of the collet nut when there is no bit inserted.
PICTURE 4

- Collet Wrench
- Shaft Lock Button
- Collet Nut
- To Tighten
- To Loosen
USE
GETTING STARTED
The first step in using the multitool is to get the "feel" of it. Hold it in your hand and feel its weight and balance. Feel the taper of the housing. This taper permits the tool to be grasped much like a pen or pencil.
Always hold the tool away from your face. Accessories can be damaged during handling and can fly apart as they come up to speed.
When holding tool, do not cover the ventilation openings with your hand. Blocking the ventilation openings could cause the motor to overheat.

Practice on scrap material first to see how the tool's high-speed action performs. Keep in mind that your multitool will perform best by allowing the speed, along with the correct Dremel accessory and attachment, to do the work for you. Do not put pressure on the tool during use, if possible. Instead, lower the spinning accessory lightly to the work surface and allow it to touch the point at which you want to begin. Concentrate on guiding the tool over the work using very little pressure from your hand. Allow the accessory to do the work. Usually it is better to make a series of passes with the tool rather than to do the entire job with one pass. A gentle touch gives the best control and reduces the chance of error.
HOLDING THE TOOL
For best control in close work, grip the multitool like a pencil between your thumb and forefinger.
PICTURE 5

OPERATING SPEEDS
TURNING TOOL ON AND OFF
USE ONLY POWER ADAPTER 2610Z09729 (EU), 2610Z09734 (UK) AND 2610Z09742 (AUS) SUPPLIED WITH THE TOOL.
Insert DC jack of the rotary tool into DC socket of the power adapter PICTURE 1. Insert power adapter into power outlet.
The tool is turned "ON" by the on/off button
PICTURE 6-A
TO TURN THE TOOL "ON" press and release the on/off blue button.
TO TURN THE TOOL "OFF" press and release the on/off button.
Adjust the tool speed using the speed dial. See "Operating Speeds" Section.
PICTURE 6

- On/Off Button
- Variable Speed Dial
SPEED CONTROL BUTTONS
To select the right speed for each job, use a practice piece of material.
VARIABLE SPEED DIAL
Your tool is equipped with a variable speed dial. The speed may be adjusted during operation by presetting the dial on or between any one of the settings.
You can refer to the charts to determine the proper speed, based on the material being worked and the type of accessory being used. These charts enable you to select both the correct accessory and the optimum speed at a glance. The speed of Rotary Tool is controlled by setting this dial on the housing (PICTURE 6-B).
Settings for Approximate Revolutions
| Speed Setting | Speed Range |
| 1 | 5,000 to 7,000 RPM |
| 2 | 8,000 to 10,000 RPM |
| 3* | 11,000 to 14,000 RPM |
| 4 | 15,000 to 18,000 RPM |
| 5 | 19,000 to 22,000 RPM |
* 3 is the maximum speed setting for wire brushes.
Needs for Slower Speeds
Certain materials, however, (some plastics and precious metals, for example) require a relatively slow speed because at high speed the friction of the accessory generates heat and may cause damage to the material.
Slow speeds (15,000 RPM or less) usually are best for polishing operations employing the felt polishing accessories. They may also be best for working on delicate projects as "eggery" work, delicate wood carving and fragile model parts. (All brushing applications require lower speeds to avoid wire discharge from the holder.)
Higher speeds are better for carving and shaping wood. Hardwoods, metals and glass require high speed operation, and drilling should also be done at high speeds. The point to remember is this: Many applications and accessories in our line will provide the best performance at full speed, but for certain materials, applications, and accessories, you need slower speeds, which is the reason our variable speed models are available.
Ultimately, the best way to determine the correct speed for work on any material is to practice for a few minutes on a piece of scrap, even after referring to the chart. You can quickly learn that a slower or faster speed is more effective just by observing what happens as you make a pass or two at different speeds.
Some rules of thumb in regard to speed:
- Polishing, buffing and cleaning with any type of bristle brush must be done at speeds not greater than 15,000 RPM to prevent damage to the brush.
- Increasing the pressure on the tool is not the answer when it is not performing as you think it should. Perhaps you should be using a different accessory, and perhaps an adjustment in speed would solve the problem. Leaning on the tool does not help.
Let speed do the work!
STALL PROTECTION
This tool has a stall protection feature built into it to protect the motor in the event of a stall. If you stall the tool for too long, or bind the bit in a work piece, especially at high speeds, it will automatically turn itself off. Simply take the tool out of the material you were stalled in, turn it back on again to continue using it.
MAINTENANCE
Preventive maintenance performed by unauthorized personnel may result in misplacing of internal wiring and components which could cause serious hazard. We recommend that all tool service be performed by a Dremel Service Facility. To avoid injury from unexpected starting or electrical shock, always remove plug from wall outlet before performing service or cleaning.
CLEANING
TO AVOID ACCIDENTS, ALWAYS DISCONNECT THE TOOL AND/OR CHARGER FROM THE POWER SUPPLY BEFORE CLEANING.
The tool can be cleaned most effectively with compressed dry air. Always wear safety goggles when cleaning tools with compressed air.
Ventilation openings and switch levers must be kept clean and free of foreign matter. Do not attempt to clean the tool by inserting pointed objects through an opening.
CERTAIN CLEANING AGENTS AND SOLVENTS DAMAGE PLASTIC PARTS.
Some of these are: gasoline, carbon tetrachloride, chlorinated cleaning solvents, ammonia and household detergents that contain ammonia.
EXTENSION CORDS

IF AN EXTENSION CORD IS NECESSARY, A CORD WITH ADEQUATE SIZE CONDUCTORS THAT IS CAPABLE OF CARRYING THE CURRENT NECESSARY FOR YOUR TOOL MUST BE USED.
THIS WILL PREVENT EXCESSIVE VOLTAGE DROP, LOSS OF POWER OR OVERHEATING. GROUNDED TOOLS MUST USE 3-WIRE EXTENSION CORDS THAT HAVE 3-PRONG PLUGS AND RECEPTACLES.
NOTE: The smaller the gauge number, the higher the cord capacity.
RECOMMENDED SIZES OF EXTENSION CORDS 240 VOLT
ALTERNATING CURRENT TOOLS
| Max. Tool Ampere Rating | Cord Ampere Rating | Cord Sizes in mm2 | Cord Lenght in Meters |
| 10 | 10 | 1.0 | 10 |
| 20 | 15 | 1.5 | 32 |
CONTACT DREMEL
For more information on the Dremel product range, support and hotline, go to www.dremel.com.
NOISE AND VIBRATION
| Sound Pressure Level dB(A) | <70 |
| Sound Power Level dB(A) (uncertainty K = 3dB) | – |
| Vibration m/s2 (triax vector sum) | <2.5 |
| Uncertainty K m/s2 | 1.5 |
NOTE: The declared vibration total value has been measured in accordance with a standard test method and may be used for comparing one tool with another. It may also be used in a preliminary assessment of exposure.
THE VIBRATION EMISSION DURING ACTUAL USE OF THE POWER TOOL CAN DIFFER FROM THE DECLARED TOTAL VALUE DEPENDING ON THE WAYS IN WHICH YOU USE THE TOOL.
MAKE AN ESTIMATION OF THE EXPOSURE IN THE ACTUAL CONDITIONS OF USE AND IDENTIFY THE SAFETY MEASURES FOR PERSONAL PROTECTION ACCORDINGLY (TAKING ACCOUNT OF ALL PARTS OF THE OPERATING CYCLE SUCH AS THE TIMES WHEN THE TOOL IS SWITCHED OFF AND WHEN IT IS RUNNING IDLE IN ADDITION TO THE TRIGGER TIME).
USED SYMBOLS
 | READ THESE INSTRUCTIONS |
 | USE HEARING PROTECTION |
 | USE EYE PROTECTION |
 | USE A DUST MASK |
GENERAL POWER TOOL SAFETY WARNINGS
READ ALL SAFETY WARNINGS AND ALL INSTRUCTIONS.
Failure to follow the warnings and instructions may result in electric shock, fire and/or serious injury.
Save all warnings and instructions for future reference. The term "power tool" in the warnings refers to your mainsoperated (corded) power tool or battery-operated (cordless) power tool.
WORK AREA SAFETY
- Keep work area clean and well lit. Cluttered and dark areas invite accidents.
- Do not operate power tools in explosive atmospheres, such as in the presence of flammable liquids, gases or dust. Power tools create sparks which may ignite the dust or fumes.
- Keep children and bystanders away while operating a power tool. Distractions can cause you to lose control.
ELECTRICAL SAFETY
- Power tool plug must match the outlet. Never modify the plug in any way. Do not use any adapter plugs with earthed (grounded) power tools. Unmodified plugs and matching outlets will reduce risk of electric shock.
- Avoid body contact with earthed or grounded surfaces such as pipes, radiators, ranges and refrigerators. There is an increased risk of electric shock if your body is earthed or grounded.
- Do not expose power tools to rain or wet conditions. Water entering a power tool will increase the risk of electric shock.
- Do not abuse the cord. Never use the cord for carrying, pulling or unplugging the power tool. Keep cord away from heat, oil, sharp edges or moving parts. Damaged or entangled cords increase the risk of electric shock.
- When operating a power tool outdoors, use an extension cord suitable for outdoor use. Use of a cord suitable for outdoor use reduces the risk of electric shock.
- If operating a power tool in a damp location is unavoidable, use an earth leakage circuit breaker (ELCB) protected supply. Use of an earth leakage circuit breaker reduces the risk of electric shock.
PERSONAL SAFETY
- Stay alert, watch what you are doing and use common sense when operating a power tool. Do not use a power tool while you are tired or under the influence of drugs, alcohol or medication. A moment of inattention while operating power tools may result in serious personal injury.
- Use personal protective equipment. Always wear eye protection. Protective equipment such as dust mask, nonskid safety shoes, hard hat, or hearing protection used for appropriate conditions will reduce personal injuries.
- Prevent unintentional starting. Ensure the switch is in the off-position before connecting to power source and/ or battery pack, picking up or carrying the tool. Carrying power tools with your finger on the switch or energising power tools that have the switch on invites accidents.
- Remove any adjusting key or wrench before turning the power tool on. A wrench or a key left attached to a rotating part of the power tool may result in personal injury.
- Do not overreach. Keep proper footing and balance at all times. This enables better control of the power tool in unexpected situations.
- Dress properly. Do not wear loose clothing or jewellery. Keep your hair, clothing and gloves away from moving parts. Loose clothes, jewellery or long hair can be caught in moving parts.
- If devices are provided for the connection of dust extraction and collection facilities, ensure these are connected and properly used. Use of these devices can reduce dust related hazards.
POWER TOOL USE AND CARE
- Do not force the power tool. Use the correct power tool for your application. The correct power tool will do the job better and safer at the rate for which it was designed.
- Do not use the power tool if the switch does not turn it on and off. Any power tool that cannot be controlled with the switch is dangerous and must be repaired.
- Disconnect the plug from the power source and/or the battery pack from the power tool before making any adjustments, changing accessories, or storing power tools. Such preventive safety measures reduce the risk of starting the power tool accidentally.
- Store idle power tools out of the reach of children and do not allow persons unfamiliar with the power tool or these instructions to operate the power tool. Power tools are dangerous in the hands of untrained users.
- Maintain power tools. Check for misalignment or binding of moving parts, breakage of parts and any other condition that may affect the power tools operation. If damaged, have the power tool repaired before use. Many accidents are caused by poorly maintained power tools.
- Keep cutting tools sharp and clean. Properly maintained cutting tools with sharp cutting edges are less likely to bind and are easier to control.
- Use the power tool, accessories and tool bits etc., in accordance with these instructions, taking into account the working conditions and the work to be performed. Use of the power tool for operations different from those intended could result in a hazardous situation.
SERVICE
- Have your power tool serviced by a qualified repair person using only identical replacement parts. This will ensure that the safety of the power tool is maintained.
SAFETY INSTRUCTIONS FOR ALL OPERATIONS
SAFETY WARNINGS COMMON FOR GRINDING, SANDING, WIRE BRUSHING, POLISHING, CARVING OR ABRASIVE CUTTING-OFF OPERATIONS
- This power tool is intended to function as a grinder, sander, wire brush, polisher, carving or cut-off tool. Read all safety warnings, instructions, illustrations and specifications provided with this power tool. Failure to follow all instructions listed below may result in electric shock, fire and/or serious injury.
- Do not use accessories which are not specifically designed and recommended by the tool manufacturer. Just because the accessory can be attached to your power tool, it does not assure safe operation.
- The rated speed of the grinding accessories must be at least equal to the maximum speed marked on the power tool. Grinding accessories running faster than their rated speed can break and fly apart.
- The outside diameter and the thickness of your accessory must be within the capacity rating of your power tool. Incorrectly sized accessories cannot be adequately controlled.
- The arbour size of wheels, sanding drums or any other accessory must properly fit the spindle or collet of the power tool. Accessories that do not match the mounting hardware of the power tool will run out of balance, vibrate excessively and may cause loss of control.
- Mandrel mounted wheels, sanding drums, cutters or other accessories must be fully inserted into the collet or chuck. If the mandrel is insufficiently held and/or the overhang of the wheel is too long, the mounted wheel may become loose and be ejected at high velocity.
- Do not use a damaged accessory. Before each use inspect the accessory such as abrasive wheels for chips and cracks, sanding drum for cracks, tear or excess wear, wire brush for loose or cracked wires. If power tool or accessory is dropped, inspect for damage or install an undamaged accessory. After inspecting and installing an accessory, position yourself and bystanders away from the plane of the rotating accessory and run the power tool at maximum no-load speed for one minute. Damaged accessories will normally break apart during this test time.
- Wear personal protective equipment. Depending on application, use face shield, safety goggles or safety glasses. As appropriate, wear dust mask, hearing protectors, gloves and workshop apron capable of stopping small abrasive or workpiece fragments. The eye protection must be capable of stopping flying debris generated by various operations. The dust mask or respirator must be capable of filtrating particles generated by your operation. Prolonged exposure to high intensity noise may cause hearing loss.
- Keep bystanders a safe distance away from work area. Anyone entering the work area must wear personal protective equipment. Fragments of workpiece or of a broken accessory may fly away and cause injury beyond immediate area of operation.
- Hold power tool by insulated gripping surfaces only, when performing an operation where the cutting accessory may contact hidden wiring or its own cord. Cutting accessory contacting a "live" wire may make exposed metal parts of the power tool "live" and could give the operator an electric shock.
- Always hold the tool firmly in your hand(s) during the start-up. The reaction torque of the motor, as it accelerates to full speed, can cause the tool to twist.
- Use clamps to support workpiece whenever practical. Never hold a small workpiece in one hand and the tool in the other hand while in use. Clamping a small workpiece allows you to use your hand(s) to control the tool. Round material such as dowel rods, pipes or tubing have a tendency to roll while being cut, and may cause the bit to bind or jump toward you.
- Position the cord clear of the spinning accessory. If you lose control, the cord may be cut or snagged and your hand or arm may be pulled into the spinning accessory.
- Never lay the power tool down until the accessory has come to a complete stop. The spinning accessory may grab the surface and pull the power tool out of your control.
- After changing the bits or making any adjustments, make sure the collet nut, chuck or any other adjustment devices are securely tightened. Loose adjustment devices can unexpectedly shift, causing loss of control, loose rotating components will be violently thrown.
- Do not run the power tool while carrying it at your side. Accidental contact with the spinning accessory could snag your clothing, pulling the accessory into your body.
- Regularly clean the power tool's air vents. The motor's fan will draw the dust inside the housing and excessive accumulation of powdered metal may cause electrical hazards.
- Do not operate the power tool near flammable materials. Sparks could ignite these materials.
- Do not use accessories that require liquid coolants. Using water or other liquid coolants may result in electrocution or shock.
KICKBACK AND RELATED WARNINGS
Kickback is a sudden reaction to a pinched or snagged rotating wheel, sanding band, brush or any other accessory. Pinching or snagging causes rapid stalling of the rotating accessory which in turn causes the uncontrolled power tool to be forced in the direction opposite of the accessory's rotation.
For example, if an abrasive wheel is snagged or pinched by the workpiece, the edge of the wheel that is entering into the pinch point can dig into the surface of the material causing the wheel to climb out or kick out. The wheel may either jump toward or away from the operator, depending on direction of the wheel's movement at the point of pinching. Abrasive wheels may also break under these conditions.
Kickback is the result of power tool misuse and/or incorrect operating procedures or conditions and can be avoided by taking proper precautions as given below.
- Maintain a firm grip on the power tool and position your body and arm to allow you to resist kickback forces. The operator can control kickback forces, if proper precautions are taken.
- Use special care when working corners, sharp edges etc. Avoid bouncing and snagging the accessory. Corners, sharp edges or bouncing have a tendency to snag the rotating accessory and cause loss of control or kickback.
- Do not attach a toothed saw blade. Such blades create frequent kickback and loss of control.
- Always feed the bit into the material in the same direction as the cutting edge is exiting from the material (which is the same direction as the chips are thrown). Feeding the tool in the wrong direction causes the cutting edge of the bit to climb out of the work and pull the tool in the direction of this feed.
- When using rotary files, cut-off wheels, high-speed cutters or tungsten carbide cutters, always have the work securely clamped. These wheels will grab if they become slightly canted in the groove, and can kickback. When a cut-off wheel grabs, the wheel itself usually breaks. When a rotary file, high-speed cutter or tungsten carbide cutter grabs, it may jump from the groove and you could lose control of the tool.
SAFETY WARNINGS SPECIFIC FOR GRINDING AND ABRASIVE CUTTING-OFF OPERATIONS
- Use only wheel types that are recommended for your power tool and only for recommended applications. For example: do not grind with the side of a cut-off wheel. Abrasive cut-off wheels are intended for peripheral grinding, side forces applied to these wheels may cause them to shatter.
- For threaded abrasive cones and plugs use only undamaged wheel mandrels with an unrelieved shoulder flange that are of correct size and length. Proper mandrels will reduce the possibility of breakage.
- Do not "jam" a cut-off wheel or apply excessive pressure. Do not attempt to make an excessive depth of cut. Overstressing the wheel increases the loading and susceptibility to twisting or snagging of the wheel in the cut and the possibility of kickback or wheel breakage.
- Do not position your hand in line with and behind the rotating wheel. When the wheel, at the point of operation, is moving away from your hand, the possible kickback may propel the spinning wheel and the power tool directly at you.
- When wheel is pinched, snagged or when interrupting a cut for any reason, switch off the power tool and hold the power tool motionless until the wheel comes to a complete stop. Never attempt to remove the cut-off wheel from the cut while the wheel is in motion otherwise kickback may occur. Investigate and take corrective action to eliminate the cause of wheel pinching or snagging.
- Do not restart the cutting operation in the workpiece. Let the wheel reach full speed and carefully re-enter the cut. The wheel may bind, walk up or kickback if the power tool is restarted in the workpiece.
- Support panels or any oversized workpiece to minimize the risk of wheel pinching and kickback. Large workpieces tend to sag under their own weight. Supports must be placed under the workpiece near the line of cut and near the edge of the workpiece on both sides of the wheel.
- Use extra caution when making a "pocket cut" into existing walls or other blind areas. The protruding wheel may cut gas or water pipes, electrical wiring or objects that can cause kickback.
SAFETY WARNINGS SPECIFIC FOR WIRE BRUSHING OPERATIONS
- Be aware that wire bristles are thrown by the brush even during ordinary operation. Do not overstress the wires by applying excessive load to the brush. The wire bristles can easily penetrate light clothing and/or skin.
- Allow brushes to run at operating speed for at least one minute before using them. During this time no one is to stand in front or in line with the brush. Loose bristles or wires will be discharged during the run-in time.
- Direct the discharge of the spinning wire brush away from you. Small particles and tiny wire fragments may be discharged at high velocity during the use of these brushes and may become imbedded in your skin.
- Do not exceed 15,000 RPM when using wire brushes.
DO NOT WORK WITH MATERIALS CONTAINING ASBESTOS (ASBESTOS IS CONSIDERED CARCINOGENIC).
TAKE PROTECTIVE MEASURES WHEN DURING WORK DUST CAN DEVELOP THAT IS HARMFUL TO ONE'S HEALTH, COMBUSTIBLE OR EXPLOSIVE (SOME DUSTS ARE CONSIDERED CARCINOGENIC); WEAR A DUST MASK AND WORK WITH DUST/CHIP EXTRACTION WHEN CONNECTABLE.
SPECIFICATIONS
GENERAL SPECIFICATIONS
| Model no | 2050 |
| Voltage Rating | 1 00-240V~ 50-60Hz, 18Vdc, 0.5A |
| Max. Speed | 22,000/min |
| Chuck Capacity | 0.8mm - 3.2mm |
| Maximum diameter of Accessory | 38.1mm |
| Power supply | 2610Z09729 (EU) |
| 2610Z09734 (UK) | |
| 2610Z09742 (AU | NZ) | |
| 2610Z09748 (CN) | |
| 2610Z09753 (KO) |
EXTENSION CORDS
Use completely unrolled and safe extension cords with a capacity of 5A.

Documents / Resources
References
Download manual
Here you can download full pdf version of manual, it may contain additional safety instructions, warranty information, FCC rules, etc.
Advertisement


Need help?
Do you have a question about the STYLO+ and is the answer not in the manual?
Questions and answers