Advertisement
Quick Links
Technical Support and E-Warranty Certificate www.vevor.com/support
BIKE REPAIR STAND
MODEL:TQXL-11
We continue to be committed to provide you tools with competitive price.
"Save Half", "Half Price" or any other similar expressions used by us only represents an
estimate of savings you might benefit from buying certain tools with us compared to the major
top brands and does not necessarily mean to cover all categories of tools offered by us. You
are kindly reminded to verify carefully when you are placing an order with us if you are
actually saving half in comparison with the top major brands.
Advertisement

Related Manuals for VEVOR TQXL-11


Summary of Contents for VEVOR TQXL-11
- Page 1 Technical Support and E-Warranty Certificate www.vevor.com/support BIKE REPAIR STAND MODEL:TQXL-11 We continue to be committed to provide you tools with competitive price. "Save Half", "Half Price" or any other similar expressions used by us only represents an estimate of savings you might benefit from buying certain tools with us compared to the major top brands and does not necessarily mean to cover all categories of tools offered by us.
- Page 2 This is the original instruction, please read all manual instructions carefully before operating. VEVOR reserves a clear interpretation of our user manual. The appearance of the product shall be subject to the product you received. Please forgive us that we won't inform you again if...
-
Page 3: Safety Notices
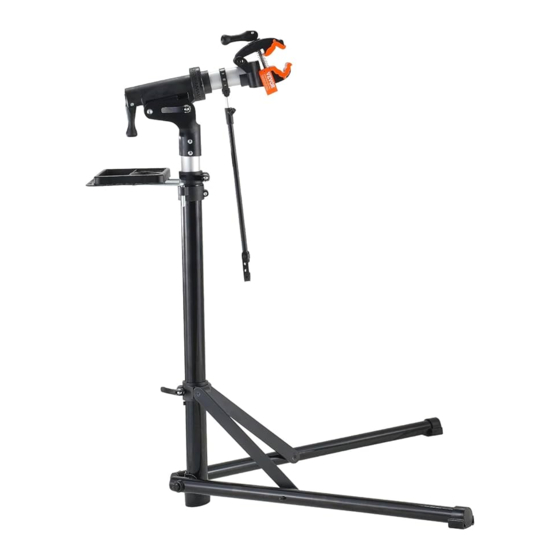
Safety Notices Risk of injury! • Thoroughly read the assembly and operating instructions prior to assembly and follow the individual steps as described in the assembly instructions. • WARNING! Do not exceed the maximum load capacity of 80 lbs / 36.3kg! Injuries or product damages may result. - Page 4 Maximum Load 66 lbs / 30 kg For Bicycle Frame Size 25-50 mm Stretching Range 40.1-62.9 inch / 1020-1600 mm Number of Legs 2 pcs Main Material Aluminum Fig. 1...
- Page 5 Description Qty. Main Supporting Stand The Clamp Tool Tray Bracket for Tool Tray Connecting Plate L-type Wrench Inner Hexagon Screw Telescopic Arm Lock Screw Bundling Belt Assembly Step 1: Fig. 2...
- Page 6 step1-1>>> Loosen the quick-release#3 on the ①main supporting stand, then unfold the supporting feet. step1-2>>>Tighten the quick-release#3 when the supporting feet have completely unfolded. step1-3>>>To adjust the height, loosen the quick-release#2 to extend the upper tube. Tighten the quick-release#2 when the tube has fully extended. Step 2:...
- Page 7 Step3-1>>>To assemble the ③tool tray, use a ⑤connecting plate to fix the ④ bracket underneath the tool tray, as shown in the figure above. Insert ⑦ three hexagon screws into the tray and use a ⑥smaller L-type wrench to tighten all the parts together. Step3-2>>>Mount the installed tool tray on the connector of the main stand.
- Page 8 Step4-1 >>>Before mounting the bike on the clamp, push the switch upwards and pull up the grab handle; the forepart of the clamp can rotate 360°. Choose your preferred angle and lock down the grab handle. Step4-2>>>Release the lever to expand the clamp jaw, then you can place your bike on the clamp.
- Page 9 Step 5: Step5-1>>>There are locking belts at both ends of the telescopic arm. To fix the front wheel of your bike, extend the telescopic arm to a suitable length. Step5-2>>>One end of the belt is tied to the repair stand frame, and the...
-
Page 10: Care, Storage
other end of the belt is fixed to the front wheel or handle of the bicycle. NOTE: You can adjust the right length according to your bike and lock the knob, then You must install the 10 into the 8 as show in the above Fig. Step5-3>>>Now your repair stand is ready to work. - Page 11 municipal government. Follow the current local disposal regulations that apply. Tool tray A magnet is located inside the large compartment of the tool tray for securing small parts. Address:Baoshanqu Shuangchenglu 803long 11hao 1602A-1609shi Shanghai Imported to AUS: SIHAO PTY LTD, 1 ROKEVA STREETEASTWOOD NSW 2122 Australia Imported to USA: Sanven Technology Ltd., Suite 250, 9166 Anaheim Place, Rancho Cucamonga, CA 91730...
- Page 12 Technical Support and E-Warranty Certificate www.vevor.com/support...
Need help?
Do you have a question about the TQXL-11 and is the answer not in the manual?
Questions and answers