
Related Manuals for EVGA 680i - nForce LT SLI Motherboard


Summary of Contents for EVGA 680i - nForce LT SLI Motherboard
- Page 1 User Guide EVGA nForce 680i LT SLI Motherboard With Intel Processor Installation and Configuration...
-
Page 2: Table Of Contents
Table of Contents Before You Begin… ..................vii Parts NOT in the Kit..................vii Intentions of the Kit..................viii Introduction to the EVGA nForce 680i LT SLI Motherboard .......1 Features ......................1 Ultimate Overclocking ..................1 High-speed Memory ..................1 Comprehensive Overclocking Tools..............1 NVIDIA nTune Utility ................2 NV BIOS....................2... - Page 3 Introduction Equipment ......................7 EVGA nForce 680i LT SLI Motherboard ..............8 Hardware Installation .................11 Safety Instructions ..................11 Preparing the Motherboard................12 Installing the CPU ..................12 Installing the CPU Fan................13 Installing Memory DIMMs ................13 Installing the Motherboard ................14 Installing the I/O Shield ................
- Page 4 PCI Express x1 Slot ................25 PCI Express x16 Slots ................25 Jumper Settings .................... 26 Clear CMOS Jumper: CLR_CMOS ..............26 Configuring the BIOS ..................27 Enter BIOS Setup ..................28 Main Menu....................28 Standard CMOS Features Menu ..............31 Date and Time...................
- Page 5 Introduction Spread Spectrum ................... 43 FSB & Memory Config ................44 CPU Configuration..................48 System Voltages ..................49 NVMEM Memory Test ................. 51 PCI Clocks....................Load Timing/Voltage Set ................51 Save Timing/Voltage Set ................52 System BIOS Cacheable ................52 HPET Function...................
- Page 6 PnP/PCI Configuration Menu................59 Init Display First ..................60 Reset Configuration Data................60 Resources Controlled By ................60 IRQ Resources................... 61 PCI/VGA Palette Snoop................61 Maximum Payload Size ................61 System Monitor Menu ..................62 Dynamic Fan Control.................. 63 Installing Graphics Cards in an SLI Configuration........65 Building an SLI System ..................
-
Page 7: Before You Begin
Parts NOT in the Kit This kit contains all the hardware necessary to install and connect your new EVGA nForce® 680i LT SLI motherboard. However, it does not contain the following items that must be purchased separately to make the motherboard functional. -
Page 8: Intentions Of The Kit
Intentions of the Kit This kit provides you with the motherboard and all connecting cables necessary to install the motherboard into a PC cabinet. If you are building a PC, you will use most of the cables provided in the kit. If however, you are replacing a motherboard, you will not need many of the cables. -
Page 9: Introduction To The Evga Nforce 680I Lt Sli Motherboard
Introduction to the EVGA nForce 680i LT SLI Motherboard Thank you for buying the EVGA NFORCE 680i LT SLI Motherboard. This motherboard offers the tools and performance PC users’ demand. When combined with two SLI-Ready NVIDIA GeForce graphics cards, you get innovative NVIDIA SLI Technology for enhanced system performance. -
Page 10: Nvidia Ntune Utility
NVIDIA SLI Certified Components Look for other components including NVIDIA® GeForce® GPUs and system memory that have been certified by NVIDIA to deliver unmatched performance with the EVGA nForce 680i LT SLI motherboard. For more information on SLI Certified components, visit www.SLIZone.com\nForce... -
Page 11: Dualddr2 Memory Architecture
Introduction Dual DDR2 Memory Architecture A state-of-the-art Dual DDR2 memory controller allows high bandwidth and low latency data access to the CPU and GPU. Ensures data and information are relayed through the system as quickly as possible for incredible performance. NVIDIA MediaShield™... -
Page 12: Networking With Nvidia Nforce
Networking with NVIDIA nForce NVIDIA networking delivers the highest network throughput at the lowest CPU utilization. The manageable and stable NVIDIA networking solution results in better networking management and a lower total cost of ownership. Only NVIDIA integrates this level of networking features to allow you to take your online experience to the next level. -
Page 13: Motherboard Specifications
Introduction Motherboard Specifications Size ATX form factor of 12 inch x 9.6 inch Microprocessor support Intel Core 2 Extreme, Intel Core 2 Quad, Intel Core 2 Duo, Pentium EE, Pentium Operating systems: Supports Windows XP 32bit/64bit and Windows Vista 32bit/64bit Contains NVIDIA nForce 680i LT SLI MCP and SPP System Memory support Supports dual channel JEDEC DDR2-800 and SLI-Ready memory up to 800... - Page 14 Onboard 1394 Support hot plug Two 1394a ports (one rear panel port, one onboard header) with rate of transmission at 400 Mbps Onboard Audio Azalia High-Definition audio Supports 8-channel audio Supports S/PDIF output Supports Jack-Sensing function Dual PCI Express x16 Support Supports 4 GB/sec (8 GB/sec concurrent) bandwidth Low power consumption and power management features Green Function...
-
Page 15: Unpacking And Parts Descriptions
Unpacking and Parts Descriptions Unpacking The EVGA nForce 680i LT SLI motherboard comes with all the necessary cables for adding a motherboard to a new chassis. If you are replacing a motherboard, you may not need many of these cables. -
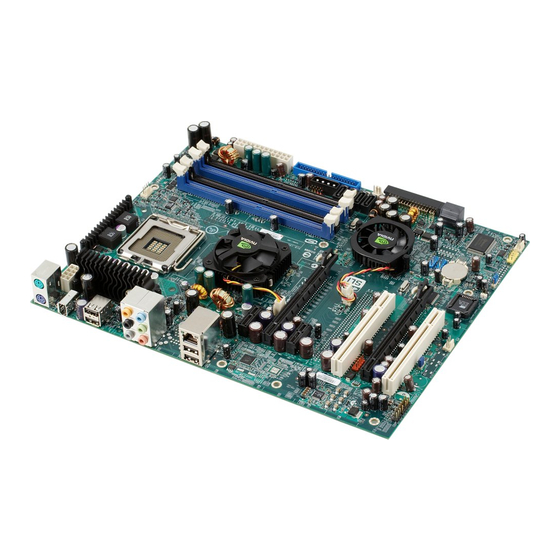
Page 16: Evga Nforce 680I Lt Sli Motherboard
EVGA nForce 680i LT SLI Motherboard The EVGA nForce 680i LT SLI motherboard with the NVIDIA nForce 680i LT SLI SPP and MCP processors is a PCI Express, SLI-ready motherboard. Figure 1 shows the motherboard and Figures 2 shows the back panel... - Page 17 14. Fan Headers 22. NVIDIA SPP fan connector 7. Front panel connector 15. Serial connector 23. Backpanel connectors (Figure 2) 8. AUX PEX Power connector 16. Clear CMOS 24. 8-pin ATX_12V power connector Figure 1. EVGA nForce 680i LT SLI Motherboard Layout...
- Page 18 1. PS/2 Mouse Port 2. PS/2 Keyboard Port 3. 1394a (Firewire) Port 4. USB 2.0 ports (two) 5. SPDIF output 6. Port 2-Channel 4-Channel 6-Channel/8-Channel Blue Line-In Line-In Line-In Green Line-Out Front Speaker Out Front Speaker Out Pink Mic In Mic In Mic In Orange...
-
Page 19: Hardware Installation
Hardware Installation This section will guide you through the installation of the motherboard. The topics covered in this section are: Preparing the motherboard Installing the CPU Installing the CPU fan Installing the memory Installing the motherboard Connecting cables and setting switches Safety Instructions To reduce the risk of fire, electric shock, and injury, always follow basic safety precautions. -
Page 20: Preparing The Motherboard
Preparing the Motherboard The motherboard shipped in the box does not contain a CPU or memory. You need to purchase a CPU, a CPU fan assembly, and memory to complete this installation. Installing the CPU Be very careful when handling the CPU. Make sure not to bend or break any pins on the back. -
Page 21: Installing The Cpu Fan
Hardware Installation Installing the CPU Fan There are many different fan types that can be used with this motherboard. Follow the instruction that came with you fan assembly. Be sure that the fan orientation is correct for your chassis type and your fan assembly. Installing Memory DIMMs Your new motherboard has four 1.8V 240-pin slots for DDR2 memory. -
Page 22: Installing The Motherboard
Installing the Motherboard The sequence of installing the motherboard into the chassis depends on the chassis you are using and if you are replacing an existing motherboard or working with an empty chassis. Determine if it would be easier to make all the connections prior to this step or to secure the motherboard and then make all the connections. -
Page 23: Connecting Cables And Setting Switches
Hardware Installation Connecting Cables and Setting Switches This section takes you through all the connections and switch settings necessary on the motherboard. This will include: Power Connections 24-pin ATX power ( PWR1 8-pin ATX 12V power ( PWR2 Auxiliary power for graphics ( PWR3 Internal Headers Front panel... -
Page 24: Power Connections
Power Connections This motherboard requires an ATX power supply. To support a PCI Express motherboard with the addition of dual graphics cards using NVIDIA SLI technology, you are going to need a minimum of a 500W power supply. Make sure you have enough power to cover all the expansion cards you will be installing. -
Page 25: 8-Pin Atx 12V Power (Pwr2)
Hardware Installation 8-pin ATX 12V Power ( PWR2 , the 8-pin ATX 12V power connection, is used to provide power to the PWR2 CPU. Align the pins to the connector and press firmly until seated. Backpanel connector edge. Connect a four-pin power plug to pins 1, 2, 5, and 6. -
Page 26: Connecting Ide Hard Disk Drives
Connecting IDE Hard Disk Drives The IDE connector supports Ultra ATA 133/100/66 IDE hard disk drives. 1. Connect the blue connector (the cable end with a single connector) to the motherboard. 2. Connect the black connector (the cable with the two closely spaced black and gray connectors) to the Ultra ATA master device. -
Page 27: Connecting Internal Headers
Hardware Installation Connecting Internal Headers Front Panel Header The front panel header on this motherboard is one connector used to connect the following four cables: PWRLED HD_LED Attach the front panel power LED cable to Connect RESET these two pins of the connector. The Power LED indicates the system’s status. -
Page 28: Ieee 1394A
Table 2. Front Panel Header Pins Signal In/Out Description HD_PWR Hard disk LED pull-up to +5V HD_LED HDA# Hard disk active LED HDR_BLNK_GRN Front panel green light PWRLED HDR_BLNK_YEL Front panel yellow light Ground RESET FP_RESET# Reset switch SWITCH_ON# Power switch PWRSW Ground No Connect... -
Page 29: Usb Headers
Hardware Installation USB Headers This motherboard contains four (4) USB 2.0 ports that are exposed on the rear panel of the chassis. The motherboard also contains two 10-pin internal header connectors onboard that can be used to connect an optional external bracket containing four (4) more USB 2.0 ports. -
Page 30: Audio
Audio The audio connector supports HD audio standard and provides two kinds of audio output choices: the Front Audio, the Rear Audio. The front Audio supports re-tasking function. Table 5. Front Audio Connector Connector Signal PORT1_L Front Audio Connector AUD_GND PORT1_R PRECENCE_J PORT2_R... -
Page 31: Fan Connections
Hardware Installation Fan Connections There are two fan connections, the system fan and the CPU fan. The fan speed can be detected and viewed in the section of the CMOS Setup. PC Health Status Both fans are automatically turned off after the system enters S3, S4 and S5 mode. -
Page 32: Com1
(FDD). Expansion Slots The EVGA nForce 680i LT SLI motherboard contains six expansion slots, four PCI Express slots and two PCI slots. For a full list of PCI Express x16 graphics card supported by this motherboard, go to www.nvidia.com/products 1 –... -
Page 33: Pci Slots
Hardware Installation PCI Slots The two PCI slots support many expansion cards such as a LAN card, USB card, SCSI card and other cards that comply with PCI specifications. When installing a card into the PCI slot, be sure that it is fully seated. Secure the card’s metal bracket to the chassis back panel with the screw used to hold the blank cover. -
Page 34: Jumper Settings
Jumper Settings The motherboard contains a 3-pin BIOS configuration jumper that enables all board configurations to be done in the BIOS Setup program. The silk screen on the motherboard shows a ∆ next to pin 1. Clear CMOS Jumper: CLR_CMOS The motherboard uses the CMOS RAM to store all the set parameters. -
Page 35: Configuring The Bios
Configuring the BIOS This section discusses how to change the system settings through the BIOS Setup menus. Detailed descriptions of the BIOS parameters are also provided. This section includes the following information: Enter BIOS Setup Main Menu Standard CMOS Features Advanced BIOS Features Advanced Chipset Features Integrated Peripherals... -
Page 36: Enter Bios Setup
Enter BIOS Setup The BIOS is the communication bridge between hardware and software. Correctly setting the BIOS parameters is critical to maintain optimal system performance. Use the following procedure to verify/change BIOS settings. 1. Power on the computer, 2. Press the key when the following message briefly displays at the bottom of the screen during the Power On Self Test (POST). - Page 37 Configuring the BIOS Phoenix – AwardBIOS CMOS Setup Utility Standard CMOS Features System Monitor Advanced BIOS Features Load Defaults Advanced Chipset Features Set Password Integrated Peripherals Save & Exit Setup Power Management Setup Exit Without Saving PnP/PCI Configurations Esc : Quit : Select Item F10 : Save &...
- Page 38 The following items on the CMOS Setup Utility main menu are commands rather than submenus: Load Defaults Load default system settings. Set Password Use this command to set, change, and disable the password used to access the BIOS menu. Save & Exit Setup Use this command to save settings to CMOS and exit setup.
-
Page 39: Standard Cmos Features Menu
Configuring the BIOS Standard CMOS Features Menu The Standard CMOS Features menu is used to configure the standard CMOS information, such as the date, time, HDD model, and so on. Use the Page Up keys to scroll through the options or press to display the Page Down Enter... -
Page 40: Date And Time
Date and Time Using the arrow keys, position the cursor over the month, day, and year. Use keys to scroll through dates and times. Note that Page Up Page Down the weekday (Sun through Sat) cannot be changed. This field changes to correspond to the date you enter. - Page 41 Configuring the BIOS Press to auto-detect IDE and SATA channels in the system. Once the Enter channel is detected, the values for Capacity, Cylinder, Heads, Precomp, Landing Zone, and Sector are automatically filled in. None There is no HDD installed or set. Auto The system can auto-detect the hard disk when booting up.
-
Page 42: Drive A
Drive A option allows you to select the kind of FDD to install. Drive A Options are: Press ENTER to display sub-menu Drive A [1.44, 3.5 in.] Halt On [All , But Keyboard] None Drive A 360K, 5.25 in. None .. -
Page 43: Memory
Configuring the BIOS The system boot does not stop for a diskette error but will stop for all other errors. All, But Disk/Key The system boot does not stop for a keyboard or disk error, but will stop for all other errors. Memory These settings are display-only values that are determined by the BIOS POST (Power-On Self Test). -
Page 44: Advanced Bios Features
Advanced BIOS Features Access the Advanced BIOS Features menu from the CMOS Utility Setup screen. Use the keys to scroll through the options or Page Up Page Down press to display the sub-menu. Use the arrow keys to position the Enter selector in the option you choose. -
Page 45: Removable Device Priority
Configuring the BIOS Removable Device Priority Use this option to select the priority for removable device startup. Press Enter to see the list of removable devices in your system. Use the arrow keys to go to the various devices. Then use the keys to move the device priority up –... -
Page 46: Quick Power On Self Test
Quick Power On Self Test Enabling this option allows the system to skip certain test while booting, which reduces the time needed to boot the system. Use the Page Up Page Down keys to toggle between Enable Disable First/Second/Third Boot Device Use this option to set the priority sequence of the devices booted at power on. -
Page 47: Security Option
Configuring the BIOS Security Option The Security Options allows you to require a password every time the system boots or only when you enter setup. Select to require a password to gain Setup access to the CMOS Setup screen. Select to require a password to System access the CMOS Setup screen and when the system boots. -
Page 48: Advanced Chipset Features
Advanced Chipset Features Select from the CMOS Setup Utility menu and Advanced Chipset Features press Enter to display the functions of the Advanced Chipset Functions menu. Phoenix – AwardBIOS CMOS Setup Utility Advanced Chipset Features System Clocks [Press Enter] Item Help FSB &... -
Page 49: System Clocks
Configuring the BIOS System Clocks Select from the Advanced Chipset Features menu and press System Clocks to display the System Clocks menu. From this menu, you are able to Enter specify frequency settings, HT multipliers, and Spread Spectrum settings. Note that in Figure 9, all of the options are listed. -
Page 50: Frequency Settings
Frequency Settings CPU Freq, MHz This value is set by the CPU Multiplier (value cannot be changed by the user). FSB Reference Clock. MHz This value is set by the system (value cannot be changed by the user). To change the SLI-Ready memory, FSB memory, and memory timing, go to the FSB &... -
Page 51: Ht Multiplier
Configuring the BIOS HT Multiplier nForce SPP > nForce MCP — — Use the keys to scroll through the HT multiplier Page Up Page Down options and set the link speed from the SPP chip to the MCP chip. Values are through [1 x] [5 x]. -
Page 52: Fsb & Memory Config
FSB & Memory Config Select from the Advanced Chipset Features menu and FSB & Memory Config press to display the FSB & Memory Config menu. This menu provides Enter the means to set SLI-Ready memory, FSB memory, and memory timing. Phoenix –... - Page 53 Configuring the BIOS When you select one of the options, the CPUOC x% FSB - Memory is set to and cannot be changed until Clock Mode Unlinked SLI- is set to Ready Memory Disable FSB and Memory Clock Mode Use the keys to scroll through the FSB and Page Up Page Down...
- Page 54 or type in a new value. Note that the reflects the actual Actual MEM (DDR) frequency that takes effect when the system reboots. Memory Timing Setting Press to display the Memory Timing Setting menu. Use this menu to Enter set optimal timings or to manually enter timings. Phoenix –...
- Page 55 Configuring the BIOS Expert Use the keys to select . When Expert Page Up Page Down Expert is selected, all timing categories are enabled for manual input. Note that you should set the value to Optimal to use the manufacturers’ recommended values.
-
Page 56: Cpu Configuration
CPU Configuration Select from the Advanced Chipset Features menu and CPU Configuration press to display the CPU Configuration menu. Enter Phoenix – AwardBIOS CMOS Setup Utility CPU Configuration Limit CPUID MaxVal [Disabled] Item Help x Intel SpeedStep Disabled CPU Thermal Control [Disabled] Main Level C1E Enhanced Halt State... -
Page 57: System Voltages
Configuring the BIOS TM1 & TM2 Enables support for both TM1 and TM2. C1E Enhanced Halt State Enabled, this function reduces the CPU power consumption when the CPU is idle. Idle occurs when the operating system issues a halt instruction. Execute Disable Bit When this function is disabled, it forces the XD feature flag to always return to zero (0). - Page 58 CPU Core Use the keys to scroll through the voltages or select Page Up Page Down to automatically set the voltage level for the CPU Core. [Auto] Memory This function defines the voltage level for the DRAM. Use the Page Up keys to select a voltage or select to automatically set the Page Down...
-
Page 59: Nvmem Memory Test
Configuring the BIOS NVMEM Memory Test This function defines whether you run the NVIDIA memory testing module during POST. The options are Fast, Medium, Slow, and Disable. Load Timing/Voltage Set This function loads the system voltages and timing settings that were defined in the System Voltages menu. -
Page 60: Save Timing/Voltage Set
Save Timing/Voltage Set This function saves the system voltages and timing settings that were defined in the System Voltages menu. There are four profile options that can be loaded. The default setting is for all settings. Press to see the options. Enter Auto Save timing/voltage set... -
Page 61: Integrated Peripherals Menu
Configuring the BIOS Integrated Peripherals Menu Select from the CMOS Setup Utility menu and Integrated Peripherals press to display the Integrated Peripherals menu. Enter Phoenix – AwardBIOS CMOS Setup Utility Integrated Peripherals IDE Function Setup [Press Enter] Item Help RAID Config [Press Enter] USB Config [Press Enter]... -
Page 62: Ide Function Setup
IDE Function Setup Press to display the IDE Function Setup menu. Enter OnChip IDE Channel0 [Enabled] Primary Master [Auto] Primary Slave [Auto] Primary Master UDMA [Auto] Primary Slave UDMA [Auto] IDE DMA transfer access [Enabled] Serial-ATA Controller [All Enabled] IDE Prefetch Mode [Enabled] OnChip IDE Channel0 Use this function to enable... -
Page 63: Raid Config
Configuring the BIOS RAID Config Press to display the RAID Config menu. Enter RAID Enable [Enabled] SATA 0 Primary RAID [Disabled] SATA 0 Secondary RAID [Disabled] SATA 1 Primary RAID [Disabled] SATA 1 Secondary RAID [Disabled] SATA 2 Primary RAID [Disabled] SATA 2 Secondary RAID... -
Page 64: Mac Config
MAC Config Press to display the MAC Config menu. Enter MAC0 LAN [Enabled] MAC1 LAN [Disabled] MACx LAN Use these functions to set the MAC0 and/or MAC1 LANs to Auto disable their functions. IEEE1394 controller This function on the Integrated Peripherals menu allows you to enable or disable the IEEE1394 (Firewire) interface. -
Page 65: Power Management Setup Menu
Configuring the BIOS Power Management Setup Menu Select from the CMOS Setup Utility menu and Power Management Setup press to display the Power Management Setup menu. Enter Phoenix – AwardBIOS CMOS Setup Utility Power Management Setup ACPI function [Enabled] Item Help APCI Suspend Type [S1&S3] Soft-Off by PBTN... -
Page 66: Soft-Off By Pbnt
Soft-Off by PBNT This function on the Power Management Setup menu allows you to set Soft- Off by PBNT to [Instant-Off] [Delay 4 Sec] WOL(PME#) From Soft-Off This function on the Power Management Setup menu allows you to enable or disable WOL(PMW#) from soft-off. -
Page 67: Pnp/Pci Configuration Menu
Configuring the BIOS Hot Key Power On When is selected, the function is enabled [Hot Key] Hot key Power On so that you must select a keyboard key as the hot key. To select a hot key use though Ctrl+F1 Ctrl+F12 POWER ON Function [Hot key]... -
Page 68: Init Display First
Init Display First This function on the PnP/PCI Configuration menu allows you to define if the initial display is in the PCI slot or in the PCI Express slot. Options are [PCI Slot] [PCIEx]. Reset Configuration Data This function on the PnP/PCI Configuration menu allows you to enable or disable the resetting of Extended System Configuration Data (ESCD) when you exit Setup. -
Page 69: Irq Resources
Configuring the BIOS IRQ Resources To enable this field for input, set Resources Controlled By . With this field enabled, press Enter to see options. [Manual] IRQ-5 assigned to [PCI Device] IRQ-9 assigned to [Reserved] IRQ-10 assigned to [PCI Device] IRQ-11 assigned to [PCI Device] IRQ-14 assigned to... -
Page 70: System Monitor Menu
System Monitor Menu Select from the CMOS Setup Utility menu and press Enter System Monitor display the System Monitor menu. Phoenix – AwardBIOS CMOS Setup Utility System Monitor Dynamic Fan Control [Press Enter] Item Help 47ºC/ 117ºF CPU Core 1.28V Main Level CPU FSB 1.19V... -
Page 71: Dynamic Fan Control
Configuring the BIOS Dynamic Fan Control Press to display the Dynamic Fan Control menu. Enter CPU Fan Speed Control [SmartFan] If temp > 70ºC, Set Fan Speed 100% If temp < 30ºC, Set Fan Speed Manual Fan Speed, % AUX Fan Speed Control, % [100] nForce Fan Speed Control, % [100]... -
Page 73: Installing Graphics Cards In An Sli Configuration
Installing Graphics Cards in an SLI Configuration NVIDIA SLI (Scalable Link Interface) is a revolutionary technology that allows two NVIDIA SLI graphics cards to work together to deliver incredible 3D graphics performance. Your new motherboard can support up to two PCI Express graphics cards linked using SLI. - Page 74 The NVIDIA SLI power supply recommendations are based on the following test configurations: Extreme SLI PC Configuration: Dual GeForce 8800 GTX or 8800 GTS Graphics cards Intel Core 2 Quad Extreme EVGA nForce 680 SLI 2GB system memory Two HDDs in Raid 0 configuration...
- Page 75 Installing Graphics Cards in an SLI Configuration Two optical drives PCI Sound Card LCD at 2560x1600 resolution Ultra High-End SLI PC Configuration: Dual GeForce 7900 GTX or Dual GeForce 7800 GTX 512MB AMD Athlon 64 FX-60 2.6 GHz or Intel Pentium EE 955 3.46 GHz NVIDIA nForce4 SLI X16 motherboard with 2GB system memory Two HDDs in Raid 0 configuration Two optical drives...
-
Page 76: Install Your Nvidia Sli-Ready Parts
This procedure assumes you have already installed the motherboard. The EVGA nForce 680i LT SLI motherboard has two PCI Express slots used for the SLI configuration. SLI graphics cards in these slots Figure 17. -
Page 77: Install Nvidia Sli Software
Installing Graphics Cards in an SLI Configuration Use the following procedure to build your NVIDIA SLI-Ready PC system: 1. Install two SLI-Ready graphic cards into the two black PCI Express x16 slots on the motherboard (see Figure 29). Be sure to seat the graphic cards into the connectors. -
Page 78: Enable Nvidia Sli
3. Install the NVIDIA SLI connector across the two outer graphics cards as shown below. Each SLI-Ready graphics card has an SLI finger on the upper side of the card. Install the SLI connector onto the two outer cards. Install NVIDIA SLI Software Upon power up, the operating system recognizes the new NVIDIA SLI-Ready components and displays the message. - Page 79 Installing Graphics Cards in an SLI Configuration After reboot of the system to the Windows desktop, you will see an SLI Capable System message. Click on this message to enable your NVIDIA SLI. Enable NVIDIA SLI At this point, you need to enable NVIDIA SLI. You can do this either by clicking on the SLI capable system balloon or by going to the NVIDIA...
- Page 80 Click and click Enable SLI technology (recommended) Apply. You now have an NVIDIA SLI-enabled PC! The system reboots to apply the setting and display the following message upon reboot: Congratulations on your new NVIDIA SLI-Ready PC system.
Need help?
Do you have a question about the 680i - nForce LT SLI Motherboard and is the answer not in the manual?
Questions and answers