Electrolux 800, E8EC1-8BP Manual
- Instruction book (355 pages) ,
- User manual (258 pages) ,
- Specifications (5 pages)
Advertisement
Introduction
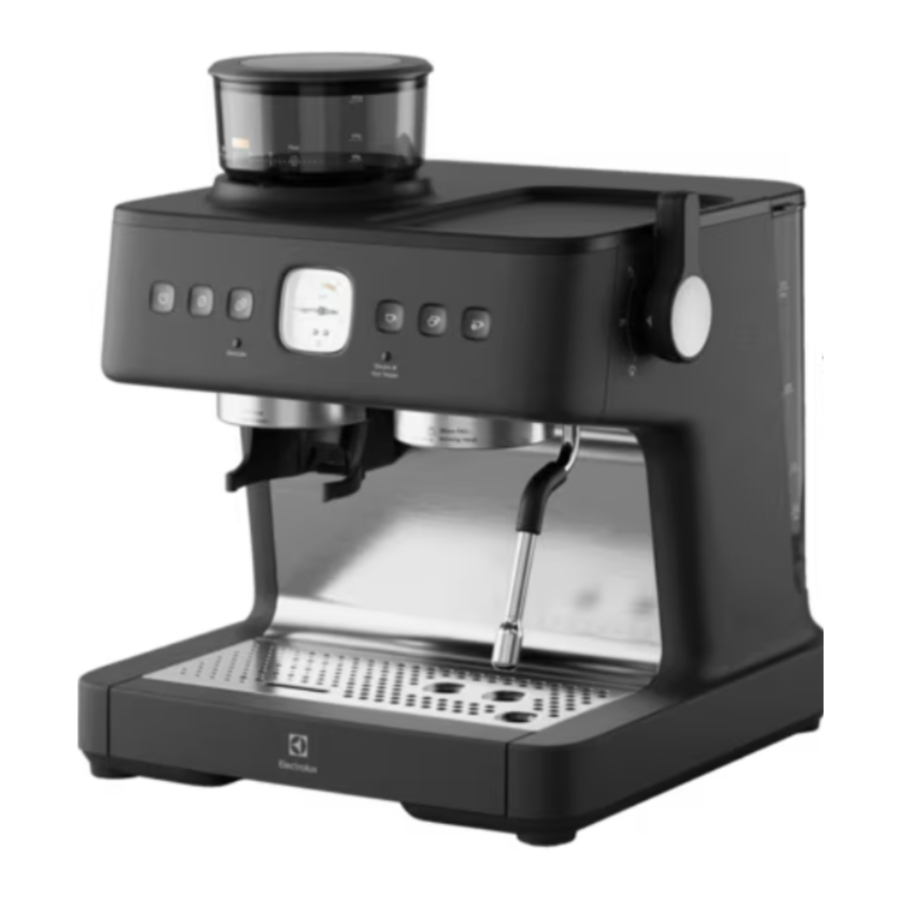
Product overview

- Removable bean hopper
- Removable top burr
- Static-free coffee grinder
- 58 mm PRO grinding cradle
- 58 mm PRO portafilter
- 58 mm PRO one cup filter basket
- 58 mm PRO two cup filter basket
- 58 mm PRO brewing head
- Pressure gauge
- Steam & hot water wand
- Steam & hot water dial
- Removable water tank
- Removable drip tray with grid
- Drip tray float/water level indicator
- Non-slip feet
- Tool kit
- Cleaning brush
- Cleaning pin
- Cup warmer
- Accessory tray
- 360 ml milk jug
- 58 mm PRO tamper
Placement and function overview

Control panel overview

- ON/OFF button
- One cup grind button
- Two cup grind button
- Descale light
- Pressure gauge
- One cup espresso button
- Two cup espresso button
- Manual cup espresso/program button
- Steam & hot water light
- Hot water
- OFF
- Steam
Pressure gauge and espresso extraction

Ideal espresso extraction
A good quality espresso flows steadily from the portafilter with a consistency similar to warm honey. The ideal brewing pressure is between 6 and 12 on the pressure gauge (B). The top layer, the crema, has a caramel color.
Under extraction
If the pressure is lower than 6 on the pressure gauge (A), the espresso flows too fast and becomes sour, acidic and watery. The reasons can be that the coffee grounds are too coarse, the amount of coffee grounds is not sufficient, the coffee beans are old or the coffee grounds are not pressed hard enough with the tamper.
Over extraction
If the pressure is higher than 12 on the pressure gauge (C), the espresso flows too slowly and becomes bitter. The reasons can be that the coffee grounds are too fine, the amount of coffee grounds is too much or the coffee grounds are pressed at too high force with the tamper.
If you use the correct settings and tamper force but the espresso quality remains poor, refer to "Troubleshooting".
Preparations before first use
Before you use the product to make espresso, it is necessary to clean and install all parts and do the brewing process one time with water only.
To prepare and install all parts
- Remove the product from the packaging and make sure that all packing material is removed.
- Put the product on a flat surface.
- Remove and discard the red plug at the base of the water tank.
![]()
- Clean the milk jug, tamper, filter baskets, portafilter, and water tank with warm water and a mild detergent:

- Clean the top burr and the bean hopper with the cleaning brush.
![]()
Do not clean the top burr or the bean hopper with water. - Hold the top burr at the handle and insert it in the grinder collar. Make sure that the top burr (A) aligns with the surface of the grinder collar (B).

- Turn the top burr clockwise to lock it, and lower the handle.
![]()
- Align the DOWN arrow on the bean hopper with the marking at the front edge of the coffee grinder.

- Press the bean hopper carefully down and turn it clockwise to the lock position.

- Make sure that the water tank is clean.
- Fill the water tank with cold pure water and install it.
![]()
- If it is necessary, put a water filter in the water tank.
- Insert the two cup filter basket in the portafilter.

- Align the portafilter with the UP arrow on the brewing head.

- Insert the portafilter flat against the brewing head.
- Turn the handle of the portafilter right to the center lock position.
Note: The first few times the portafilter is inserted, there can be some resistance when you turn the handle. - Make sure that the steam & hot water dial is in the OFF position.
![]()
- Connect the product to the power supply.
- Press the ON/OFF button.

- During the start-up, the buttons (A-C) illuminate and the steam & hot water light (G) flashes. Wait until all buttons (A-F) and the steam & hot water light (G) are on with a steady light.

- Press the two cup espresso button. Water runs from the brewing head, through the filter basket and portafilter.

- Wait until the water flow stops.
Note: The first time that water runs through the product, air that releases from the product can cause a loud noise. The noise stops after approximately 20 seconds and it is not an indication of an error. - Turn the steam wand until the nozzle is above the drip tray.

- Turn the steam & hot water dial to the hot water position. The steam & hot water light flashes and hot water comes out of the nozzle.
![]()
- Let the water run for 20 seconds.
- Turn the steam & hot water dial to OFF.
![]()
- Clean the portafilter and the filter basket in warm water and let them become dry before you make coffee.
- To switch off the product, press the ON/OFF button. All lights on the control panel go off.

Note: The product switches off automatically after 15 minutes of no operation.


To switch on the product
- Make sure that the steam & hot water dial is in the OFF position.
![]()
- Connect the product to the power supply.
- Press the ON/OFF button.

- During the start-up, the buttons (A-C) illuminate and the steam & hot water light (G) flashes. Wait until the buttons (D-F) illuminate and the steam & hot water light (G) is on with a steady light.

When all buttons (A-F) and the steam & hot water light (G) are on with a steady light, the product is prepared for operation.


Daily operation
To make an espresso coffee
- Fill the water tank with cold pure water. Make sure that the water level is not above the 3L mark. Install the water tank.

- Fill freshly roasted coffee beans in the bean hopper and install the lid. Turn the bean hopper clockwise until the marking at the front edge of the coffee grinder is between the 10 and 15 marking on the bean hopper.

![]()
Do not fill too much coffee beans. Coffee beans that stay in the bean hopper for a long time can become moist which affects the grinding and the taste.
Note: Between the 10 and 15 marking is the suggested starting point for espresso. If adjustments are necessary, refer to "To adjust the coffee grind". - Switch on the product.

- Make sure that the steam & hot water dial is in the OFF position.
- Press the ON/OFF button.
- To warm the coffee cup on the cup warmer, remove the tray and put the coffee cup on the cup warmer.

- To warm the cup with hot water, do these steps:

- Put the coffee cup below the steam wand.
- Turn the steam & hot water dial to the hot water position, fill the coffee cup by ¼ and turn the dial to OFF.
- Wait 30 seconds and then empty the coffee cup.
- Insert the one cup or two cup filter basket in the portafilter.

- Hold the portafilter below the brewing head and press the one cup espresso button. When the water flow stops, dry the filter basket with a cloth.

- Install the portafilter in the grinding cradle. Press the one cup or the two cup grind button. The pressed button flashes and the filter basket fill with coffee grounds. Lift the portafilter from the grinding cradle.
Note: To stop the grinding process before it stops automatically, press the grind button again.

- Hold the portafilter with the bottom against the accessory tray or put the rubber part at the edge of the portafilter against a benchtop edge. Press the coffee grounds with the tamper until the top edge (A) of the tamper aligns with the edge of the portafilter. Remove excess coffee grounds from the edge of the filter basket.

- Align the handle of the portafilter with the UP arrow on the brewing head. Press the portafilter up into the brewing head and turn the handle right to the center lock position.

- Put the coffee cup on the drip tray, below the portafilter. To make a one cup or two cup espresso, press the one cup or two cup espresso button. The pressed button flashes and the preset volume of coffee flows into the coffee cup.

Note: The default setting for a one cup espresso is 40 ml. The default setting for a two cup espresso is 80 ml. Refer to "To customize the espresso cup volumes" for information on how to change the default settings.
Note: The actual extraction volume depends on the type of coffee beans and the size of the coffee grounds. - To make an espresso with manually selected volume, press the manual cup espresso/program button. The button flashes and coffee flows into the coffee cup until you press the button again.

Note: If you do not press the button again, the process stops automatically when the volume is 250 ml. - Turn the handle of the portafilter to the left and then lower the portafilter.

- Remove the used coffee grounds from the filter basket.
![]()
- To switch off the product, press the ON/OFF button. All lights on the control panel go off.
![]()
Note: The product switches off automatically after 15 minutes of no operation. - Make sure that the steam & hot water dial is in the OFF position. Disconnect the power plug.

- Clean the filter basket and the portafilter. Refer to "Every time after use".


To froth milk
- Fill the milk jug with refrigerated full milk. Suggested amount of milk is 100 ml for cappuccino and 160 ml for latte.

- Prepare the steam wand.

- Switch on the product and move the steam wand until it is above the drip tray.
- Turn the steam & hot water dial to the steam position. The steam & hot water light flashes. Release steam for approximately 5 seconds until no water comes out of the steam wand nozzle.
- Turn the steam & hot water dial to OFF.
- Put the steam wand in the milk jug.
![]()
- Put the nozzle just below the surface of the milk. Hold the milk jug spout against the steam wand in a 12 o'clock position.
- Tilt the milk jug in a 9 o'clock direction until the nozzle is at a finger width (A) from the edge.
- Turn the steam & hot water dial to the steam position. The steam & hot water light flashes and the frothing starts.
![]()
- Make sure that the steam wand is in a position that makes the milk rotate in one direction from the top to the bottom.

- As the milk level rises, lower the milk jug to keep the steam nozzle just below the surface of the milk.

- When the amount of milk foam is sufficient, lower the steam nozzle half way to the bottom.

- When the bottom of the milk jug is too hot to touch, turn the steam & hot water dial to OFF.

- Remove the milk jug from the steam wand and clean the steam wand and nozzle immediately with a damp sponge or cloth.
![]()
Do not let your skin touch the steam wand or nozzle. There is a risk of burn injury.

- Move the steam wand until it is above the drip tray. Turn the steam & hot water dial to the hot water position and wait 2 seconds to remove milk that has gone into the steam wand. Turn the steam & hot water dial to OFF.


To make latte or cappuccino
- Tap the bottom of the milk jug against the benchtop to release larger air bubbles.
![]()
- Swirl the milk jug to mix the milk and make the texture silky.
![]()
- Pour the milk into the prepared espresso in one steady movement.
![]()


Coffee styles
Espresso
Espresso is a concentrated, fullbodied coffee with a stable layer of crema on top. Select one cup or two cup espresso.

Ristretto
A ristretto is a half one cup espresso with intense flavour and aftertaste and a thin crema on top.

Americano
A one cup or two cup espresso with hot water. Add the hot water first to keep the crema on top.

Con panna
A one cup or two cup espresso topped with lightly whipped cream. Add cinnamon powder or chocolate powder on top.

Macchiato
A one cup or two cup espresso topped with a small amount of cold or frothed milk and a small dollop of milk foam.

Flat white
A one cup or two cup espresso with 2/3 frothed milk and a thin layer of milk foam on top.

Latte
A one cup or two cup espresso with 3/4 frothed milk and a finger width layer of milk foam on top.

Cappuccino
A one cup or two cup espresso with 1/3 frothed milk and 1/3 milk foam on top. Add chocolate powder on top.

Mocha
A one cup or two cup espresso mixed with drinking chocolate and with 1/3 frothed milk and 1/3 milk foam on top.

Babyccino
No espresso, only frothed milk and milk foam on top. Add chocolate powder on top.

Pre-ground coffee
If you use pre-ground coffee, the coffee should be freshly ground and subjected to deep roasting. You may need to use French or espresso roasted coffee grounds for espresso coffee. Pre-ground coffee can only keep the aroma for 7-8 days unless it is stored in a sealed container in a cool place. Do not store coffee in the refrigerator or freezer. In general, it is not recommended to use pre-ground coffee. Freshly ground coffee keeps the aroma of the coffee better and gives a higher coffee quality.
Settings and adjustments
To adjust the coffee grind
When the coffee grind is adjusted correctly, the coffee grounds have the same granularity as salt. For freshly roasted coffee beans the recommended setting is 10-15 but the type and quality of coffee beans can make adjustments necessary.
Turn the bean hopper clockwise or counterclockwise to the wanted setting between 0-30. A lower number gives a finer grind. A higher number gives a coarser grind.

If the coffee grounds become too fine or too coarse, adjust again.
To customize the amount of coffee grounds
These are the default settings for coffee grounds:
- One cup espresso: approximately 13 g coffee grounds.
- Two cup espresso: approximately 19 g coffee grounds.
Note: The amount of coffee grounds depends on the type of coffee beans and the size of the coffee grounds.
- Install the portafilter with the one cup or two cup filter basket in the grinding cradle.
- Press and hold the one cup or two cup grind button. After 3 seconds, the light of the other grind button goes off and the grinding starts.

- When the amount of coffee grounds is satisfactory, release the grind button. There is a beep sound and the new amount of coffee grounds is saved.

To customize the espresso cup volumes
These are the default settings for espresso cups:
- One cup espresso: approximately 40 ml.
- Two cup espresso: approximately 80 ml.
These are the allowed volumes:
- One cup espresso: 20-125 ml.
- Two cup espresso: 20-200 ml.
Note: The extraction volume depends on the type of coffee beans and the size of the coffee grounds.
- Press and hold the one cup or two cup espresso button. After 3 seconds the light on the other espresso button goes off and the water flow starts.

- When the volume is satisfactory, release the espresso button. There is a beep sound and the new espresso cup volume is saved.

To customize the coffee extraction temperature
The default coffee extraction temperature is 92°C. The temperature can be adjusted between 90-96°C in 2°C increments.
- Switch on the product.
- Press and hold the manual cup espresso/program button until there is a beep sound. The light of the ON/OFF button goes off and the lights of the other buttons are on or flash.

- Set the wanted temperature by pressing the applicable button. The pressed button comes on with a flashing light.
![]()
- Press the one cup grind button (A) to set the temperature to 90°C.
- Press the two cup grind button (B) to set the temperature to 92°C.
- Press the one cup espresso button (C) to set the temperature to 94°C.
- Press the two cup espresso button (D) to set the temperature to 96°C.
Note: Higher temperatures increase bitterness and decrease acidity. Lower temperatures decrease bitterness and increase acidity.
- Press the manual cup espresso button. There is a beep and the product is set to standard operation mode.
![]()
Note: If you do not press a button, the product automatically goes back to standard operation mode after 10 seconds.


To restore to factory settings
- Press and hold the one cup and two cup grind button at the same time to enter factory default setting mode. All buttons start to flash.

- When there is a beep sound, release the grind buttons.
- To restore to the default setting for the one cup grind button (A) or the two cup grind button (B), do these steps:

- Press and hold the grind button (A) or (B) for 3 seconds until the lights of all buttons go off, except for the pressed grind button with a steady light after 3 quick blinks.
- When there is a beep sound, release the pressed button. All buttons start to flash.
- Press the ON/OFF button (C). The setting is reset to default and the product is set to standard operation mode.
- To restore to the default setting for the one cup espresso button (D) or the two cup espresso button (E), do these steps:
- Press and hold the espresso button (D) or (E) for 3 seconds until the light of all buttons go off, except for the pressed espresso button with a steady light after 3 quick blinks.
- When there is a beep sound, release the pressed button. All buttons start to flash.
- Press the ON/OFF button (C). The setting is reset to default and the product is set to standard operation mode.
- To restore all default settings, do these steps:
- Press and hold the ON/OFF button (C). The lights of all other buttons go off.
- When there is a beep sound, release the ON/OFF button. All settings are reset to default and the product is set to standard operation mode.


Note: If you do not press a button, the product automatically goes back to standard operation mode after 10 seconds.
Cleaning and care
Espresso machine
The espresso making process involves extracting oils out of coffee grounds. Deposits of coffee grounds and oils build up over time, affecting the coffee taste and operation of the espresso machine.
Running water through the brewing head and steam wand, before and after making each coffee, is the easiest way to keep your espresso machine clean.
Every time before use
- Run water through the brewing head. Refer to "To make an espresso coffee".
Every time after use
- After frothing milk, immediately purge the steam wand by turning the dial to hot water for 1-2 seconds and then clean it with a damp sponge or cloth. Refer to "To froth milk".
- Remove the filter basket from the portafilter with the end of the cleaning brush.
![]()
- Clean the filter basket, portafilter and milk jug with warm water.
![]()
Only the filter baskets and the milk jug are dishwasher safe. - Examine the drip tray float. If it is higher than the surface of the drip tray, it is necessary to empty the drip tray.

- Remove the drip tray.
- Empty the drip tray.
- Clean the drip tray and grid with warm water.
- Examine the water tank. Clean it with warm water if necessary.


Weekly
Purge and clean the brewing head
- Press the one cup espresso button and wait until the water flow stops.

- Remove coffee grounds from the inner surface and the silicone seal with the cleaning brush.
![]()
- Clean the shower head with a damp cloth.
![]()


Every 2-3 months
Use descaling solution to clean up the steam wand & filter baskets.
- Fill the milk jug with warm water and descaling solution.
![]()
- Put the filter baskets in the milk jug.

- Put the steam wand in the milk jug and put the milk jug on the drip tray.
- Wait 8 hours.
- Remove and empty the milk jug. Clean the milk jug until all remaining particles from the descaling solution are removed.
- Clean the steam wand with a wet sponge or cloth until all remaining particles from the descaling solution are removed.

- Turn the steam & hot water dial to the hot water position and let water run through the steam wand for 40 seconds.
![]()
- Turn the steam & hot water dial to OFF.
![]()
- Install the one cup filter basket into the portafilter and install the portafilter in the brewing head.

- Press the one cup espresso button to let water run through the filter basket.

- When the water flow stops, remove the portafilter and to the same procedure with the two cup filter basket.


When needed
- Switch off the product and disconnect the power supply.
- Let the product become cool before you clean it.
- Clean the outer surfaces with a damp cloth.
- Clean the water tank, the bean hopper, the drip tray and grid regularly.
![]()
Never use caustic or abrasive cleaners, and never immerse the product in liquid.
![]()
Only the filter baskets and the milk jug are dishwasher safe. - Insert the thicker cleaning pin through the hole in the steam wand nozzle.

- Turn the steam & hot water dial to the hot water position and let water run through the steam wand for 40 seconds.
![]()
- Turn the steam & hot water dial to OFF.
![]()
- If the blockage continues, remove the steam wand nozzle and clean it with descaling solution.


Coffee grinder
Conical burrs are used to grind coffee beans to a suitable grind size for espresso extraction.
Static-free system is equipped to prevent coffee grinds from ejecting outside of the filter basket during grinding.
Deposits of coffee grounds and oils build up over time, affecting the coffee taste and operation of the integrated grinder.
Weekly or at least once every two weeks
- Remove remaining coffee grounds from the grinding cradle and the grind outlet with the cleaning brush.
![]()
- Clean the grinding cradle and the grind outlet with a damp sponge or cloth and then with a dry cloth.

Every 1-2 months
If the grinder is used daily, the burrs need to be cleaned to ensure best performance of the integrated grinder. Regular cleaning helps the burrs achieve consistent grinding results, which is especially important when grinding coffee beans for espresso.

Never use caustic or abrasive cleaners, and never immerse the product in liquid.
- Make a note of the current grind setting. This is to make sure that you get the same setting after cleaning.
- Turn the bean hopper fully counterclockwise to unlock it.

- Remove the bean hopper and put remaining coffee beans in an airtight container.
![]()
- Clean the bean hopper with the cleaning brush.
- Remove remaining coffee beans from the top burr.

- Install the empty bean hopper and press the one cup or two cup grind button. If no coffee grounds come out, the top burr is empty.
Note: When the bean hopper is not installed, the one cup and two cup grind buttons flash and the grinder cannot start. - Switch off the product and disconnect the power supply.
- Remove the bean hopper.
- Lift the handle on the top burr.
- Turn the top burr counterclockwise and lift it out from the grinder collar.

![]()
Do not clean the top burr with water. - Clean the parts and surfaces in the grind chamber and the grind collar with the cleaning brush.
![]()
- Do not install the top burr, but install the empty bean hopper.

- Connect the power supply and switch on the product.
- Press the one cup or two cup grind button.

If coffee grounds appear in the grinder, remove them with the cleaning brush. Repeat until no coffee grounds come out when you press a grind button.
![]()
Do not pour water or any other liquid into the grind chamber. - Switch off the product and disconnect the power supply.
- Remove remaining coffee grounds from the grinding cradle and the grind outlet with the cleaning brush.
![]()
- Clean the grinding cradle and the grind outlet with a damp sponge or cloth and then with a dry cloth.
- Remove the bean hopper and install the top burr. Make sure that the top burr aligns with the surface of the grinder collar.
![]()
If the top burr is not installed correctly, the grinder produces coarse coffee grounds. - Install the bean hopper.
Note: When the bean hopper is not installed, the one cup and two cup grind buttons flash and the grinder cannot start. - Turn the bean hopper to the grind setting that you made a note of.
Note: After cleaning, the optimum grind setting may have changed. To find the optimum grind setting, refer to "To adjust the coffee grind".


Every 2-3 months
If the grinder is used daily, the bean hopper needs to be cleaned to ensure best performance.
Note: When the bean hopper is not installed, the one cup and two cup grind buttons flash and the grinder cannot start.
- Clean the inner surfaces of the grinder from below with the cleaning brush.
![]()
- Clean the burrs, grinder collar, grind chamber and grind outlet. Refer to "Every 1-2 months".

Descaling
After continued use, your espresso machine may develop a build-up of mineral deposits and therefore require occasional descaling.
We recommend descaling your espresso machine every 4-6 months, although this period will depend on the hardness of water and frequency of use.
Descaling reminder
When the product senses that the water consumption is at 15 liters, the descale light comes on. The descale light stays on until the descaling procedure is completed. You can stop the descaling reminder and restart the water consumption monitor by restoring all factory settings. Refer to "To restore to factory settings".
Note: If the descaling procedure is not fully completed or stopped at any of the steps, it is necessary to restart the procedure from the beginning.
To do a descaling procedure
- Prepare a descaling solution. Refer to "To prepare a descaling solution".
- Fill the water tank with the descaling solution and install the water tank.
- Put a 1 liter container below the brewing head.
![]()
- Put another 1 liter container below the steam wand.
- Switch on the product.
- Press and hold the one cup, two cup and the manual cup espresso buttons at the same time.

- Wait until the descale light flashes, the ON/OFF button and the steam & hot water light are on with a steady light and all other buttons are off. There is a beep sound and then the product is in descaling mode.
Note: If the descaling procedure is not started in 1 minute, the product goes back to standard operation mode.
Note: The descaling procedure can be cancelled at any time with the ON/OFF button. However, if the descaling procedure is not fully completed, the descale light will stay on. - Turn the steam & hot water dial to the steam position. The ON/OFF button and the steam & hot water light start to flash.
![]()
- Wait 2 minutes while the pump operates. Hot descaling solution flows from the brewing head and the steam wand, and the pump makes different noises.
Note: If the procedure is not continued within 5 minutes after the pump stops, the product goes back to standard operation mode, except that the steam & hot water light flashes because the dial is in steam position. - When the product beeps and the ON/OFF button is on with a steady light, turn the steam & hot water dial to OFF. The steam & hot water light comes on with a steady light.
![]()
- Remove the water tank and clean it fully in warm running water until all remaining descaling solution is removed.
- Fill the water tank with pure water.
- Empty and clean the 1 liter containers and put them back below the brewing head and the steam wand.
- Turn the steam & hot water dial to the hot water position. The ON/OFF button and the steam & hot water light start to flash.
![]()
- Wait 2 minutes while the pump operates. Hot water flows from the brewing head and the steam wand, and the pump makes different noises.
Note: If the procedure is not continued within 5 minutes after the pump stops, the product goes back to standard operation mode, except that the steam & hot water light flashes because the dial is in hot water position. - When the product beeps, the descale light goes off and the ON/OFF button is on with a steady light, turn the steam & hot water dial to OFF. The descaling procedure is completed and the product is set to standard operation mode.
![]()


To prepare a descaling solution
There are 3 different descaling solutions to select from:
- Coffee cleaning tablet dissolved in water.
- Coffee descaler.
- A mixture of white vinegar or citric acid and warm water.
- Prepare the descaling solution in a 1 liter container.
- For cleaning tablets, do these steps:
![]()
- Fill the container with 1 liter of warm water.
- Add 1 cleaning tablet and wait until it is fully dissolved (please follow the instructions of selected cleaning product).
- For coffee descaler, do these steps:

- Fill the container with 1 liter of warm water.
- Add coffee descaler and let the solution mix. (Please follow the instructions of selected cleaning product)
- For white vinegar or citric acid solution, do these steps.

- Fill the container with 500 ml of warm water and 500 ml of white vinegar or 1 liter of warm water and 50 g of citric acid.
- Let the solution mix.


Troubleshooting
| Problem | Cause | Solution |
| No lights on the control panel are on. | The power plug is not connected. | Connect the power plug to the power supply. |
| Continuous beep sounds come from the product. | The steam & hot water dial is not in the OFF position when you switch on the product. | Turn the steam & hot water dial to the OFF position. |
| The steam or hot water function is used for too long. | ||
| There is a ticking sound when the product starts and a hissing sound when the brewing process is finished. | The pressure control valve is in operation. | No action is necessary. |
| The one cup grind button and the two cup grind button flash quickly at the same time. If you press a grind button, there are 3 beep sounds. | The bean hopper is not installed. | Install the bean hopper. |
| The one cup grind button and the two cup grind button flash quickly one at a time. If you press a grind button, there are 3 beep sounds. | The grinder was used more than 3 minutes within the last 6 minutes. | Wait 6 minutes. |
| The one cup grind button and the two cup grind button flash quickly 3 times. If you press a grind button, there are 3 beep sounds. | There is blockage in the grinder. | Clean the grinder. Refer to "Every 2-3 months". If cleaning the grinder was not the solution to the problem, speak to an Electrolux service center. |
| The motor stopped because the current is unusually high. | ||
| The grinder operates but no coffee grounds come out. | There is blockage in the grinder or there are coffee grounds in the grinder instead of coffee beans. | Clean the grinder. Refer to "Every 2-3 months". |
| Coffee grounds eject from the filter basket during grinding. | There is blockage in the grinder. | Clean the grinder. Refer to "Every 2-3 months". |
| The amount of coffee grounds in the filter basket after grinding is incorrect. | There is blockage in the grinder. | Clean the grinder. Refer to "Every 2-3 months". |
| There are 5 beep sounds and all buttons flash. | The water tank is empty. | Fill the water tank and wait 1 minute. |
| Water cannot go through the filter basket because there are too much coffee grounds, the coffee grounds are too fine or the coffee grounds were pressed too hard with the tamper. | Use a smaller amount of coffee grounds. Adjust the grind setting to a coarser grind. Use lighter force when you press the coffee grounds with the tamper. | |
| No espresso comes out of the portafilter or the flow of espresso is not smooth. | There are too much coffee grounds, the coffee grounds are too fine or the coffee grounds were pressed too hard with the tamper. | Use a smaller amount of coffee grounds. Adjust the grind setting to a coarser grind. Use lighter force when you press the coffee grounds with the tamper. |
| The portafilter cannot be correctly installed in the brewing head. | There are too much coffee grounds. | Use a smaller amount of coffee grounds. |
| There is no crema on top of the espresso | The coffee beans are damp. | Use freshly roasted coffee beans. |
| The coffee grounds are too coarse. | Set a finer coffee grind. | |
| Steam does not come out when you turn the steam & hot water dial to the steam position. | The start-up of the product is not completed. | Wait until the steam & hot water light is on with a steady light. |
| There is blockage in the steam wand. | Clean the steam wand nozzle. | |
| The descale light is on. | The product senses that the water consumption is at 15 liters and it is necessary to do a descaling procedure. | Do a descaling procedure. Refer to "To do a descaling procedure". You can also stop the descaling reminder and restart the water consumption monitor by restoring all factory settings. Refer to "To restore to factory settings". |
| There is water on the benchtop surface where the product is installed. | The drip tray is full. | Empty the drip dray. |
| There is a leakage from the water tank. | Install the water tank correctly. If correct installation was not the solution to the problem, speak to an Electrolux service center. | |
| There is a leakage from the drip tray. | Install the drip tray correctly. If correct installation was not the solution to the problem, speak to an Electrolux service center. | |
| There is a water leakage at the edge of the portafilter. | There are coffee grounds on the edge of the portafilter when it is installed in the brewing head. | Remove all coffee grounds from the edge of the portafilter. |
| Watery espresso leaks from around the portafilter or the portafilter is loose. | The silicone seal in the brewing head is damaged. | Let an Electrolux service center replace the silicone seal in the brewing head. |
Storage

- Put the filter baskets, the cleaning brush and the cleaning pin in the tool kit behind the drip tray.
- Put the tray on top of the cup warmer.
- Put the tamper, the milk jug and the portafilter on the tray.
Do not keep the portafilter installed in the brewing head when you do not use the product. The silicone seal inside the brewing head can become damaged.
Accessories
www.shop.electrolux.com
EPD2
900 923 820/6
Premium Coffee Descale
![]()
*Accessories are subject to country availability.
Safety instructions
Read the following instructions carefully before using the appliance for the first time.
- This appliance can be used by children aged from 8 years and above and persons with reduced physical, sensory or mental capabilities or lack of experience and knowledge if they have been given supervision or instruction concerning use of the appliance in a safe way and understand the hazards involved.
- Children must not play with the appliance.
- Cleaning and user maintenance must not be done by children unless they are aged from 8 years and above and supervised.
- Keep the appliance and its supply cord out of reach of children aged less than 8 years.
- The appliance must only be connected to a power supply whose voltage and frequency comply with the specifications on the rating plate.
- Never use or pick up the appliance if
- the supply cord is damaged,
- the housing is damaged
- The appliance must only be connected to an earthed socket. If necessary, an extension cable suitable for 10 A can be used.
- If the appliance or the supply cord is damaged, it must be replaced by the manufacturer, its service agent or similarly qualified person, in order to avoid hazard.
- Always place the appliance on a flat, level surface.
- Always disconnect the appliance from the power supply if it is left unattended and before assembling, disassembling or cleaning.
- The temperature for operating or storing the appliance must be higher than 0°C.
- Do not operate the appliance at an environment with high temperature, strong magnetic field and moist air.
- The appliance and accessories become hot during operation. Use only designated handles and knobs. Allow to cool down before cleaning or storage.
- The supply cord must not come into contact with any hot parts of the appliance.
- Do not remove the water tank during the brewing process. If you want to add more water, press the ON/OFF button to switch off the appliance. All lights go off which means that the appliance is powered off.
- Do not remove the portafilter during the brewing process or when there is steam or hot water escaping from the portafilter as the appliance is pressurized.
![]()
There is a risk of scalding. ![]()
Avoid steam burn.- When the steam function is used, hot water can drip from the brewing head.
![]()
The water is hot, there is a risk of scalding. - When you turn the steam & hot water dial, a shot of hot water comes out. Be careful and open the steam valve slowly.
![]()
The water is hot, there is a risk of scalding. - Do not immerse the appliance in water or any other liquid.
- Do not exceed the maximum filling volume as indicated on the appliance.
- Fill the water tank only with cold fresh water, never with milk or other liquids.
- Do not use the appliance if the water tank is empty.
- Do not use the appliance without the drip tray or drip grid, unless a higher cup or mug is in use.
- Do not use or place the appliance on a hot surface or near a source of heat.
![]()
Avoid spillage on the connector.- This appliance is intended for domestic use only. The manufacturer cannot accept any liability for possible damage caused by improper or incorrect use.
![]()
Potential injury can be caused from misuse.![]()
Do not place the appliance in a cabinet when in use.- This appliance is not intended to be operated by means of an external timer or separate remote control system.
- This appliance is intended to be used in household and similar applications such as:
- staff kitchen areas in shops, offices and other working environments;
- farm houses;
- by clients in hotels, motels and other residential type environments;
- bed and breakfast type environments.

CUSTOMER CARE AND SERVICE
When contacting Service, ensure that you have the following data available:
- Model number
- PNC number
- Serial number
The information can be found on the rating plate.
www.electrolux.com
Visit our website to:
Get usage advice, brochures, trouble shooter, service information: www.electrolux.com
Register your product for better service: www.electrolux.com/productregistration
Buy accessories and consumables for your appliance: www.electrolux.com/shop
Documents / Resources
References
Download manual
Here you can download full pdf version of manual, it may contain additional safety instructions, warranty information, FCC rules, etc.
Advertisement


Need help?
Do you have a question about the 800 and is the answer not in the manual?
Questions and answers